Archive
Excel : Form to Save Data P-1
Learning : VBA Codes to Save Data
Subject: Create Form to collect Data
In a very fast and as simple as we can, we will design and write VBA codes to transform three fields of Data from an Excel sheet “Form” to another sheet “Data”.
To keep thing as simple as we can, we will not use any Validations on user inputs in this example.
First, we will re-name a sheet to “Form” and another one to “Data”. In sheet [Form] we will create a simple Form to collect Names, Company Name and Emails of our customers, also we add a button and call it Save. As in Image-1
Image-1 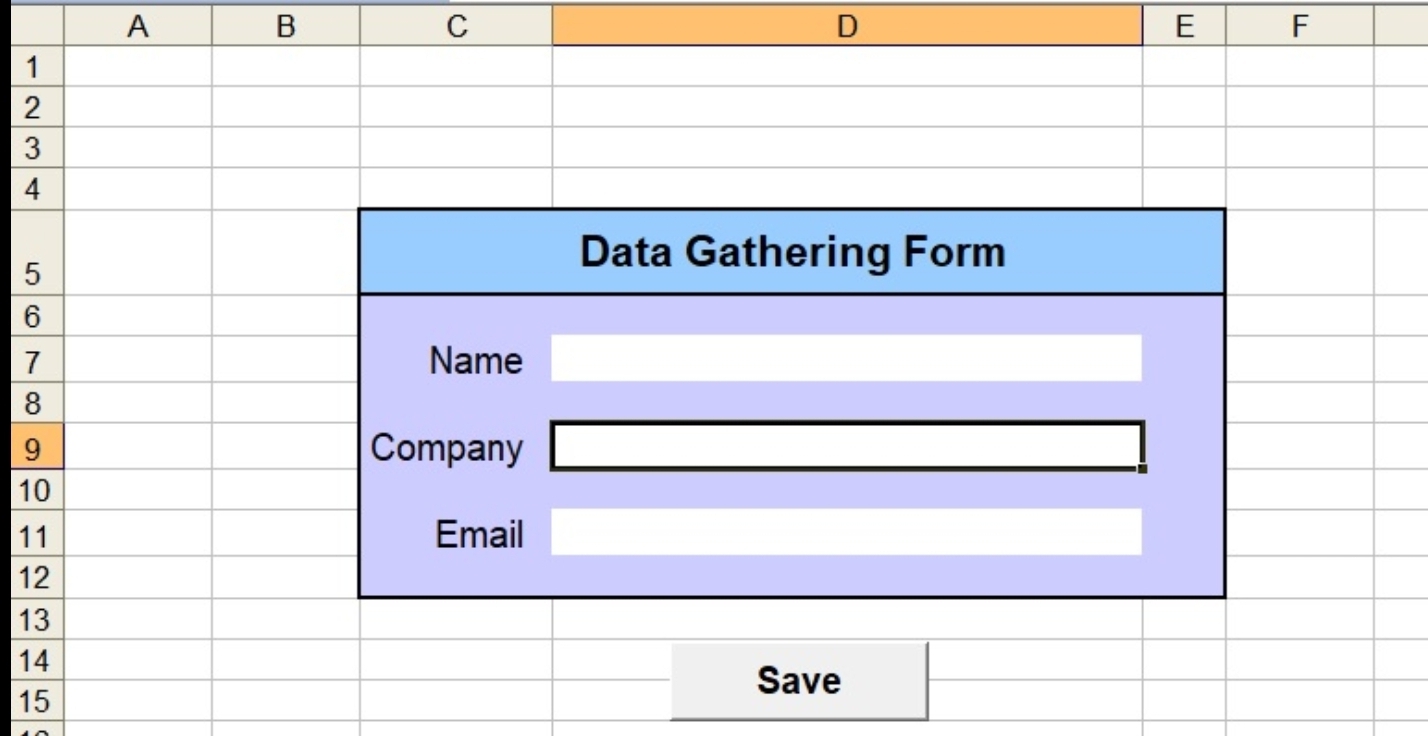 |
For companies Name, We will create a list then we will link it to Cell”D9″ so we can select a “Company Name” from a drop-down list. So to do this First in the Data sheet I will write a list of companies Name as (Comp Name 1,Comp Name 2,Comp Name 3, …. to Comp Name 10). I start my list from Cell “H8” [As in Image-2] you may start from any Cell you want.
Image-2 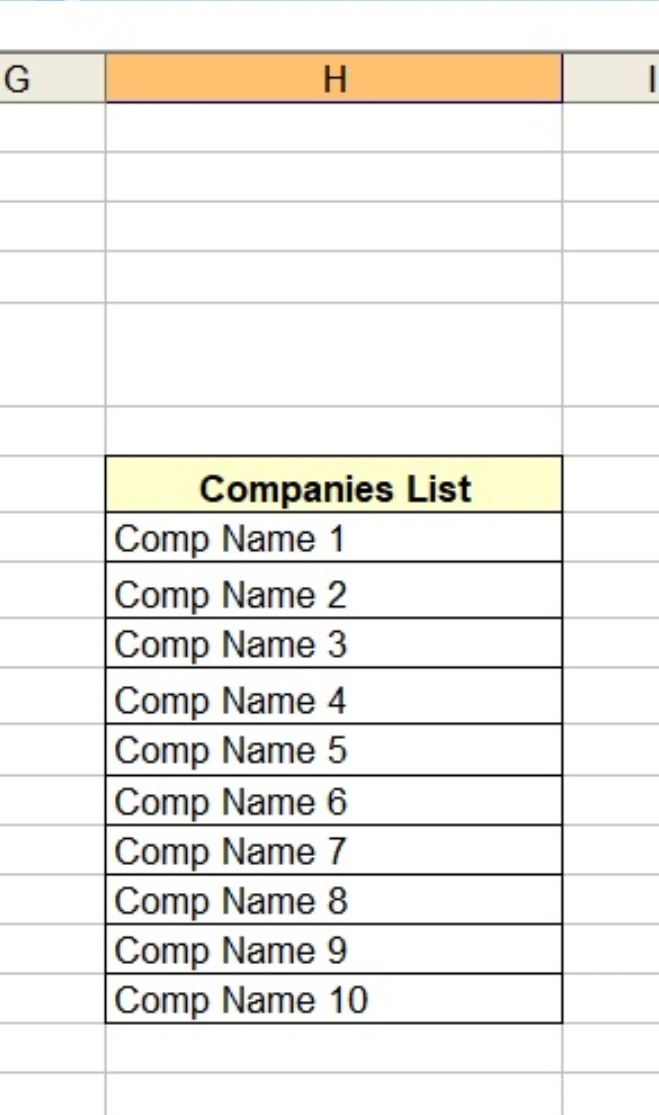 |
Now to link a Dropdown list of our companies Name to Cell “D9″ Do this:
1. Goto Cell”D9”.
2. From the menu we will select “Data” then “Data Validation” and select Data Validation. [Image-3]
Image-3 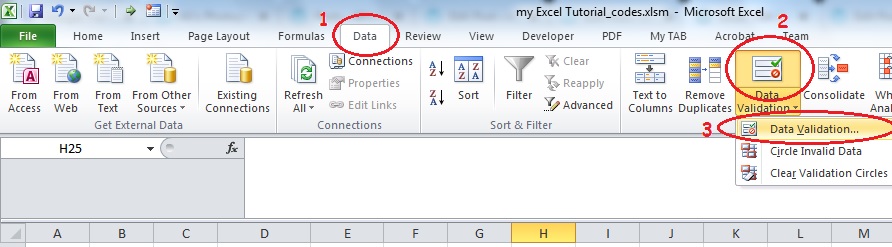 |
3. In the Allow [Select “List”], then in the Source we select the range of Companies we write [Range Cells H8:H17] or just write this: =$H$8:$H$17. Then click OK. See Image-4
Image-4 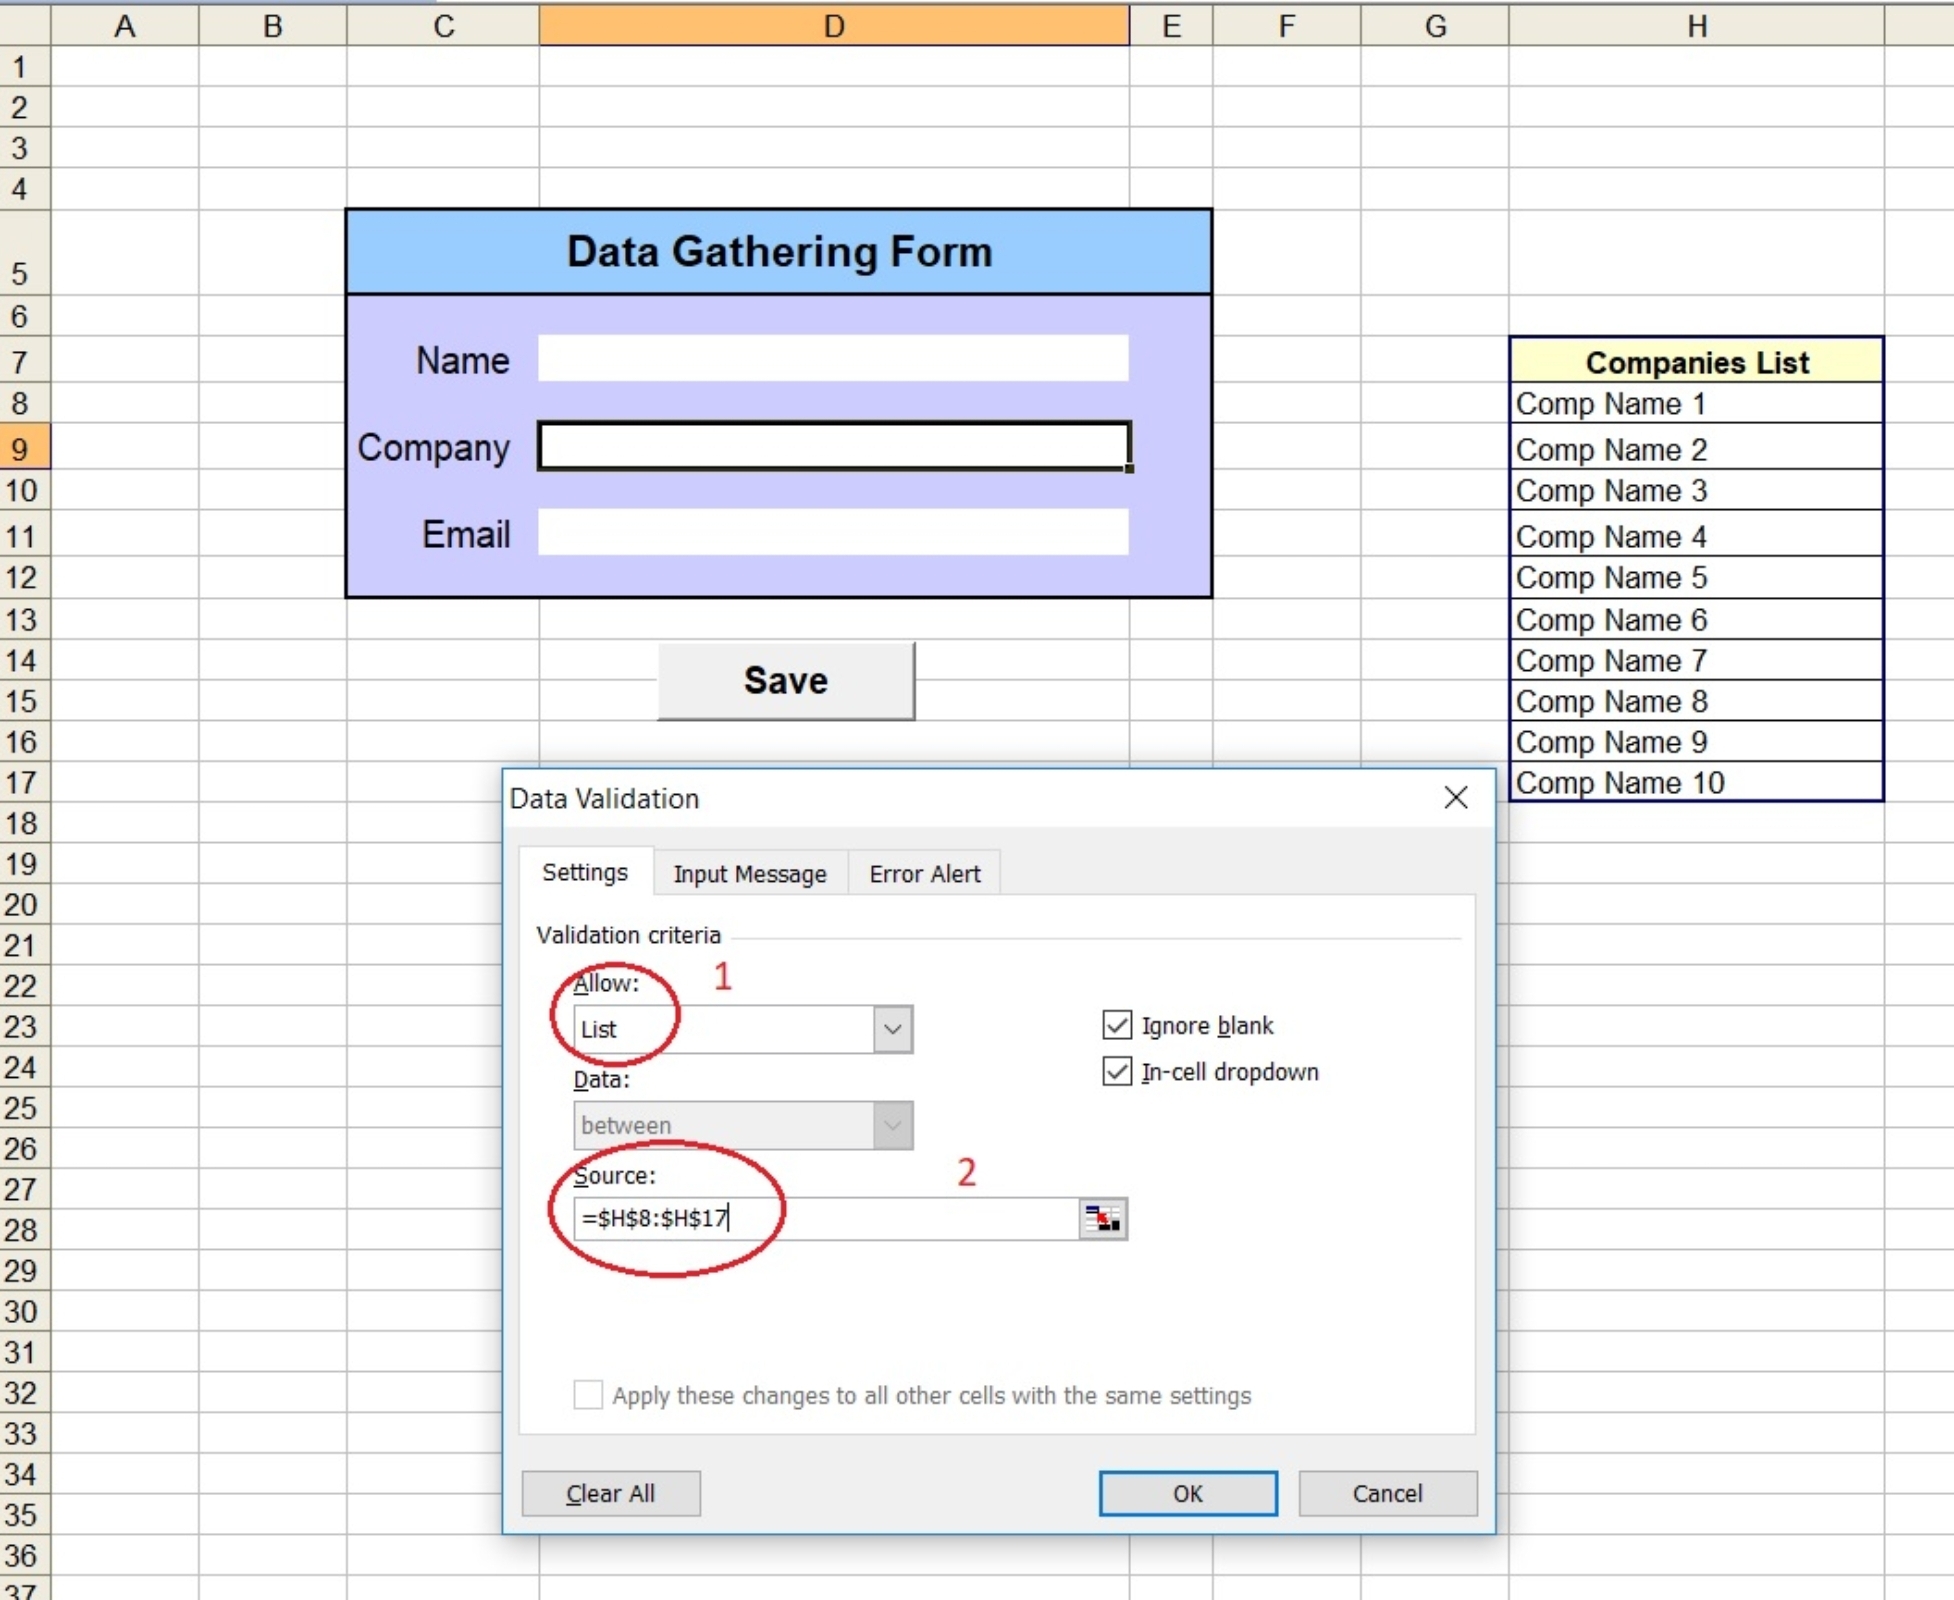 |
Now if we try to click on Cell “D9” we will have a list as in Image-5.
Image-5 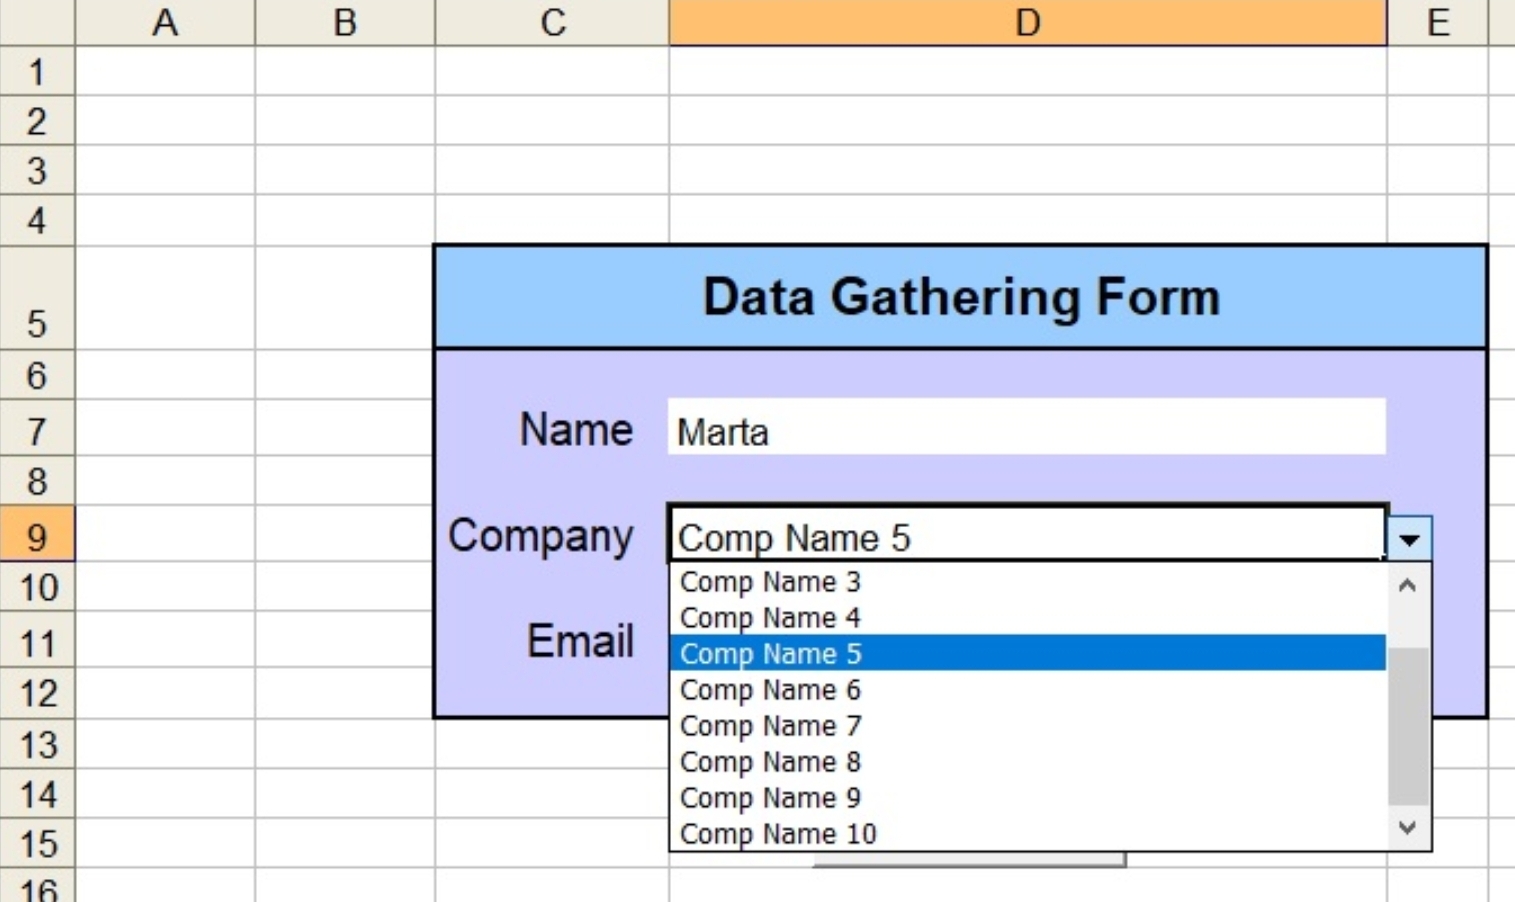 |
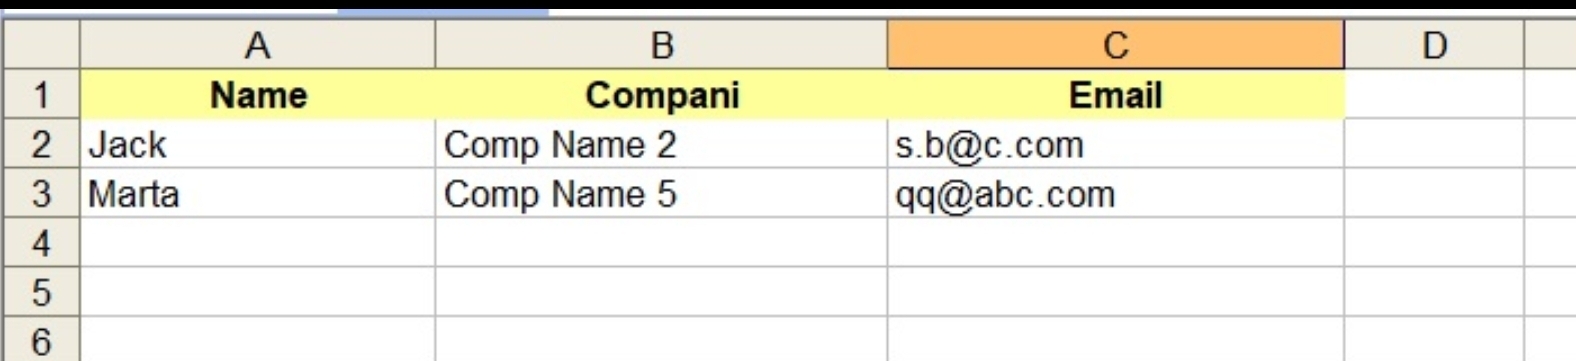
In the “Data” Sheet we will just create the Table Header as in Image-6, and will go-back to “Form” Sheet.
| Image-6 |
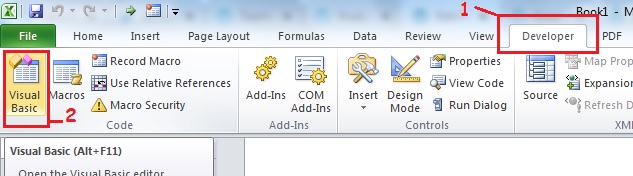
Now we will write the VBA codes and link it to to a “Save” Button we create. To open the Visual-Basic window we select “Developer” From the Top menu, then Press Visual Basic.
 |
Then we write this code and link it to the Save Button. ..
 # VBA Macro code to Save Data to Data sheet

Sub Save_data()
'
' Save_data Macro
' Macro recorded 2020-03-29 by HP
'

'
    ' Set Variables
    Name = Range("D7").Value
    comp_name = Range("D9").Value
    Email = Range("D11").Value


    ' Goto data sheet
    Sheets("Data").Select
    ' This line will get the Next empty Row in the Data sheet.
    emp_row = Range("A" & Rows.Count).End(xlUp).Offset(1).Row
    Range("A" & emp_row).Value = Name
    Range("B" & emp_row).Value = comp_name
    Range("C" & emp_row).Value = Email

    'Go to Form Sheet.
    Sheets("Form").Select

    ' Clear data cells.
    Range("D7").Value = ""
    Range("D9").Value = ""
    Range("D11").Value = ""

    Range("D7").Select

End Sub
Now if we enter some data [as we said: No Validation on the data] and press the Save button, the data will be coped to next empty row in the Data Sheet.
 |
Enhancement: In some cases as in our coming project, it’s better to create a sheet and call it “Setting”, then we can have our Lists (such as Company-Name), Colors, Filters all to be in the Setting sheet. [We will see this in the Next Project.]
 Follow me on Twitter..
By: Ali Radwani
Excel, VBA Codes and Formulas-4
Learn To : In Excel – Highlight the Row when clicked.
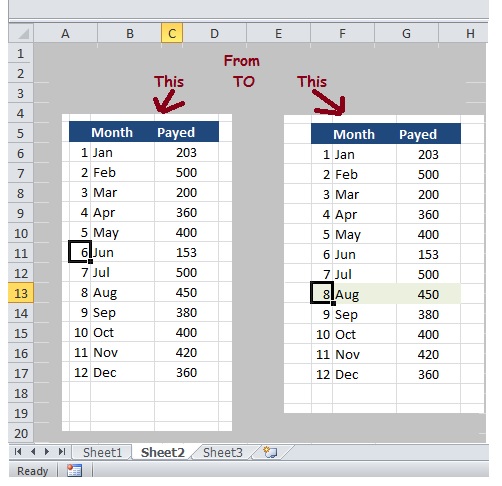
Assume we have a table, and all we want to do is that if the user click anywhere in the table that ROW will change it’s color.
 |
Steps
1. From the Top menu, Go to “Developer”, then Press Visual Basic.
| |
2. from the select the sheet name containing the table. ( We have it in Sheet 2 )
3. Then we select “SelectionChange” action from the
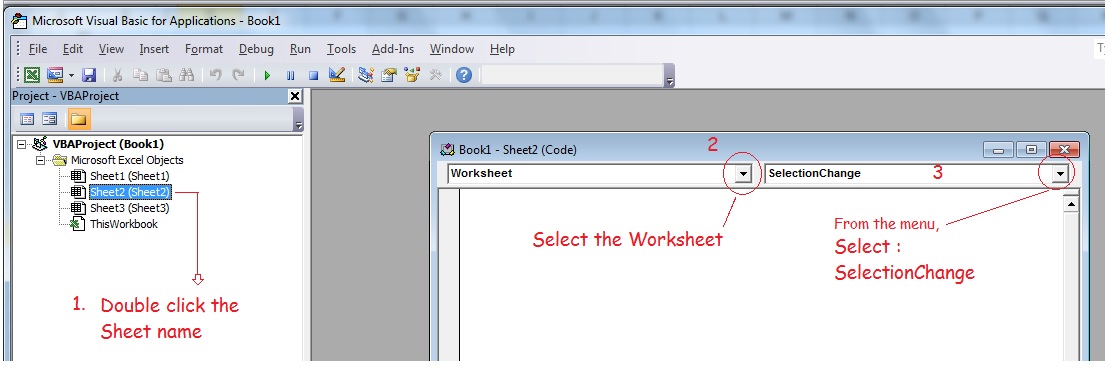 |
4. Write this code:
If Not Intersect(ActiveCell, Range(“C8:E9999”)) Is Nothing Then
Range(“A1”).Value = Target.Row
End If
5. You need to know your Table Range, in my example, the range is (“C8:E9999”). I add the “9999” so i will be sure the even if we add more data to out Table the code will handle it.
6. Now we need to add a rule in the “Manage Roles” in “Conditional Formatting” from the Excel Menu. Here is how to Open it.
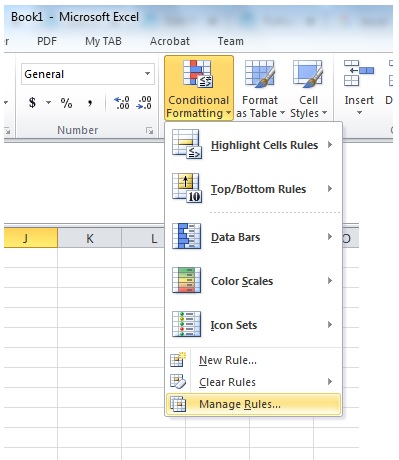 |
7. Select the “” then add new Rule, Follow the Image showing the steps to do that. Once we finish it should work fine.
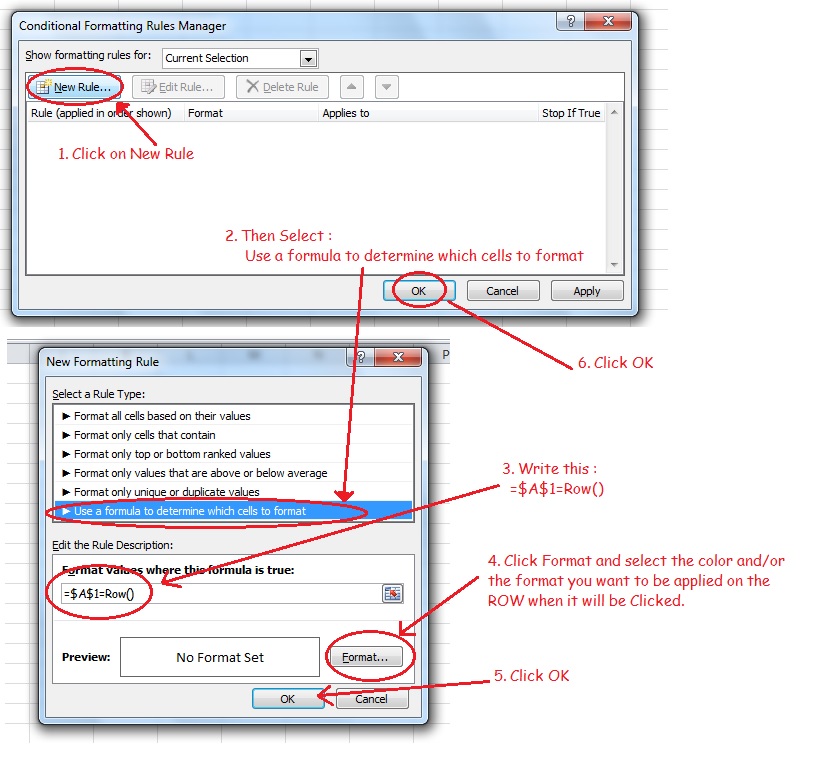 |
Now, when the user click any cell in the Table the Row will change it’s color (Format) as we set it.
🙂 Have Fun ..
By: Ali Radwani
Python and Excel P1
Learning : Python and Excel Part-1
Subject: Read Excel file
In the coming four or five Lessons we will work on reading and writing to Excel file using Python code.
First we need to import os and Pandas as in coming code block, I will use os later to fetch file information. Also we will set the file_name variable to our file assuming it is in the same .py directory and we will call [read] the file in to df [dataframe]. Here is the code
 # Import and call the File into DataFrame.

  import os, pandas as pd
  file_name = 'python_sheet_4.xlsx'
  df = pd.read_excel(file_name, sheet_name='Sheet1')
Now let’s talk about my excel file “python_sheet_4.xlsx” has two sheets named “sheet1 and sheet2” both contin same table sheet1 the table start from cell A1 and in sheet2 the table start from cell C7. So first we will work on sheet1 that’s way we call sheet1 in our df setting statement.
Now we have the df (dataframe), and if we run the this code:
 # To print out the data from df DataFrame.

print(df)
The Output.. |
Here is the original shot for our excel table
 |
Here is a list of commands that we can use..
| Command | Action |
| print(df) | Print all the data in the table |
| print(df.head()) | Print the first 5 record in the table |
| print(df.head(10)) | Print the first 10 records in the table, and print(df.head(x)) will will print the first x record. |
| print(df.columns) | Print out the table header as a list along with data type. |
| print(*df.columns,sep=’,’) | This command will printout only the table header separated by (,) |
| print(df.shape) | This will print the size of the table, in our case the out-put will be (17,3) so we have 17 records and 3 columns. |
| sheets_name = (pd.ExcelFile(file_name)).sheet_names | This command will return the Number and name of sheets in the file, then we can print it out like this: print(‘\n Number of Sheets in the file: ‘,len(sheets_name)) print(‘\n Sheets Name :’,*sheets_name,sep=’,’)
|
To make things in a professional way, we will write a function so we can use it with other applications, here is it..
The Code |
[Out-Put]: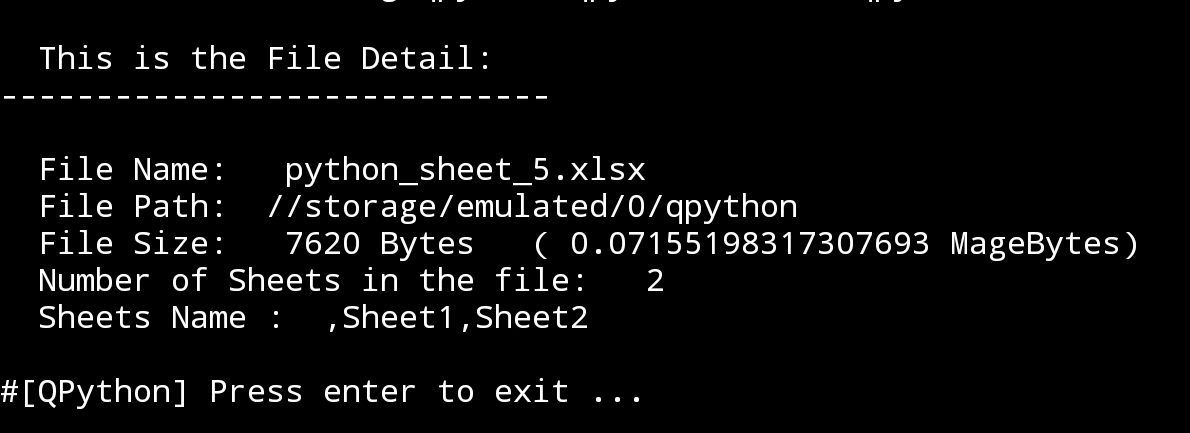 |
To Download my Python code (.py) files Click-Here
By: Ali Radwani
Excel, VBA Codes and Formulas-3
Learn To : In Excel – SUMIF and SUMIFS [ Part-2 SUMIFs ]
In SUMIFS we are talking about more than one conditions to apply on the same range or other range before we calculate the SUM of the target range.Case Assumption: As in Part-1, Assume we have a table, with 5 columns (as in image-1) columns titles are [Date, Item, Quantity, Price and Total] containing our Expendituer and we have another table call it Summaries, we want some totals to be in this table. We can see the main table [Expendituer] and the Summary table as in part-1 but here we will add a year column to the Item-Quantity box, so we want to have the Quantity of an Item in given year. Image-2.
Image-1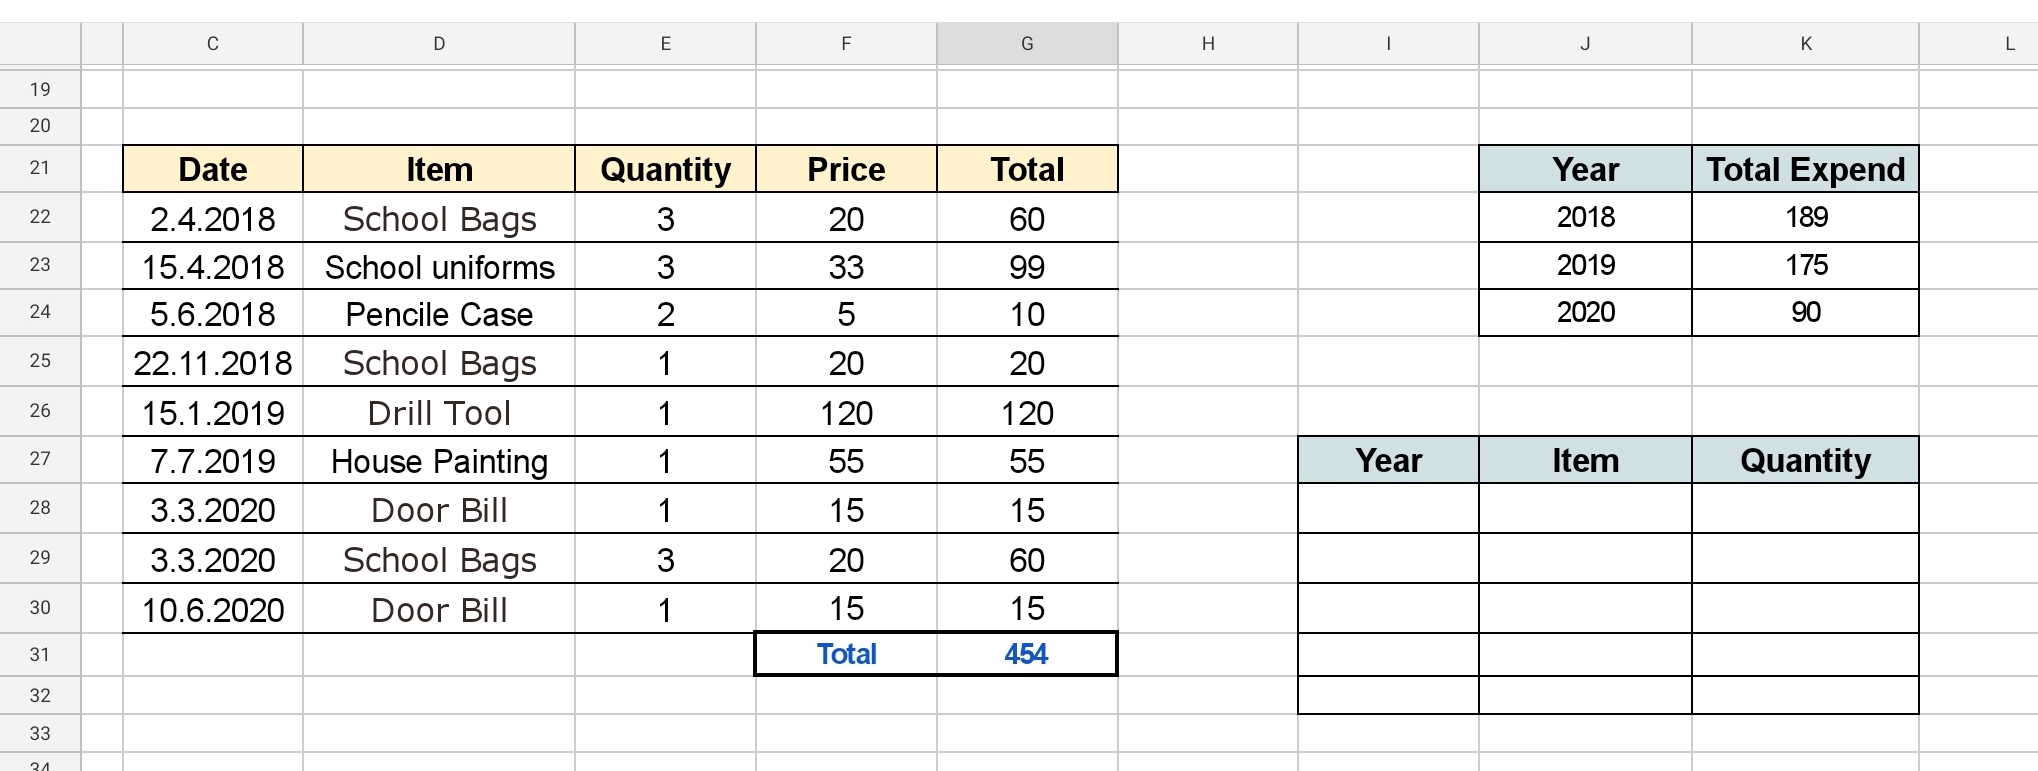 |
Image-2 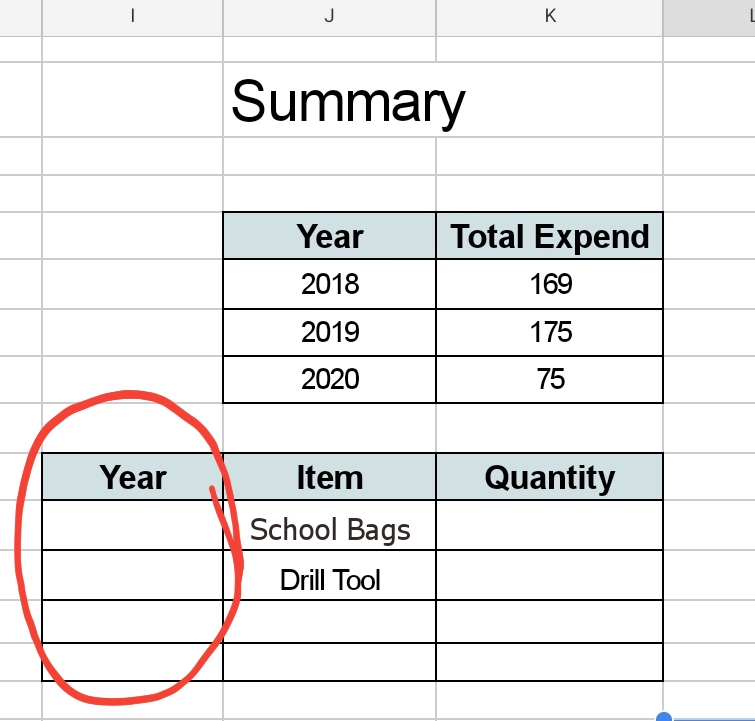
|
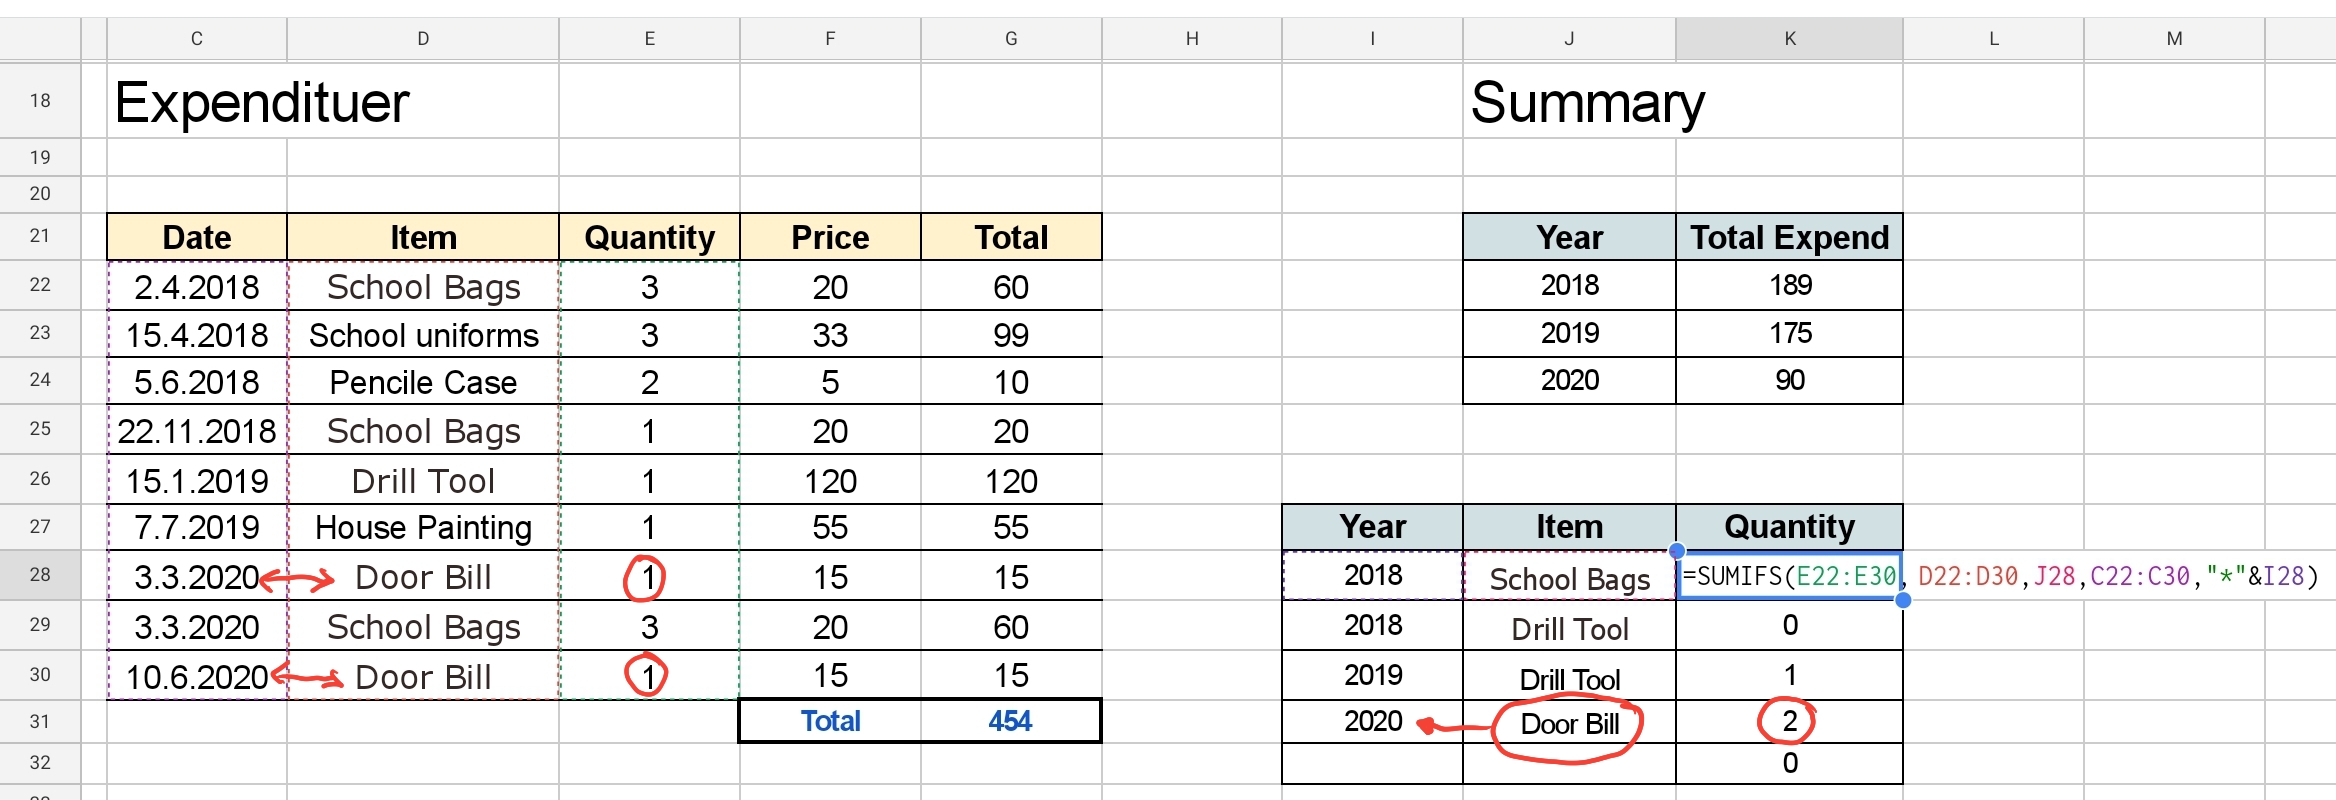
So if we write 2018 in Cell I27 we Must get the Quantity of School Bags we bought in 2018. To do this we will write this formula:
SUMIFS ()
=SUMIFS(E22:E30, D22:D30,J28,C22:C30,”*”&I28)
So in Cell K28 we will write =SUMIFS(E22:E30, D22:D30,J28,C22:C30,”*”&I28)
then we can copy the formula to other cells.
Now we have the formula in all the cells we want, we may need to do a little changes to cells number or columns that may been changed during the copy. And here is a screen shot of what we must have.
|
🙂 Have Fun ..
By: Ali Radwani
Excel, VBA Codes and Formulas-2
Learn To : In Excel – SUMIF and SUMIFS [ Part-1 SUMIF ]
Case Assumption: Assume we have a table, with 5 columns (as in image-1) columns titles are [Date, Item, Quantity, Price and Total] containing our Expendituer and we have another table call it Summaries, we want some totals to be in this table. In Image-1 we can see the main table [Expendituer] and the Summary table.
Image-1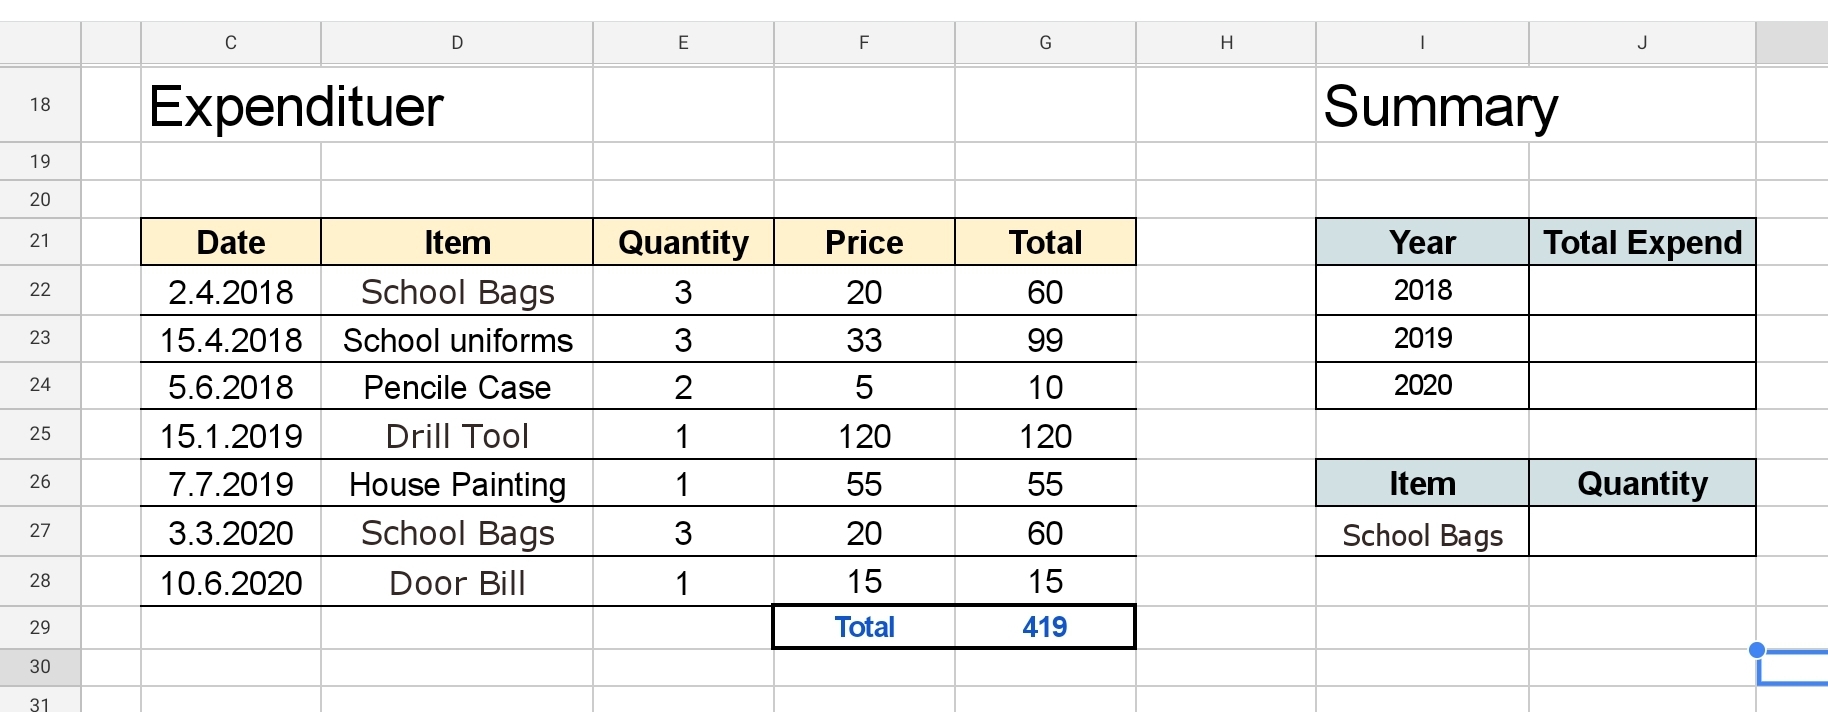 |
In the Above Expendituer Table we have some [Dummy] data, and in our Summary Table we want to calculate the SUM of each year so in the Cell J22 we shall write this formula: =SUMIF()
SUMIF will take 3 parameters First one is the range of applying the condition. Second one is the condition. Third one is the range to calculate to SUM form. So in our case [Image-1]
The range of applying the condition will be C22:C28
The condition is in Cell I22 [23,24,25 … for each row and year.]
The range to calculate to SUM form will be G22:G28
So in Cell J22 we will write =SUMIF(C22:C28,”*”&I22,G22:G28)
then we can copy the formula to other cells [I23 and I24]
So now we have the Sum in each Year. See Image-2
Image-2 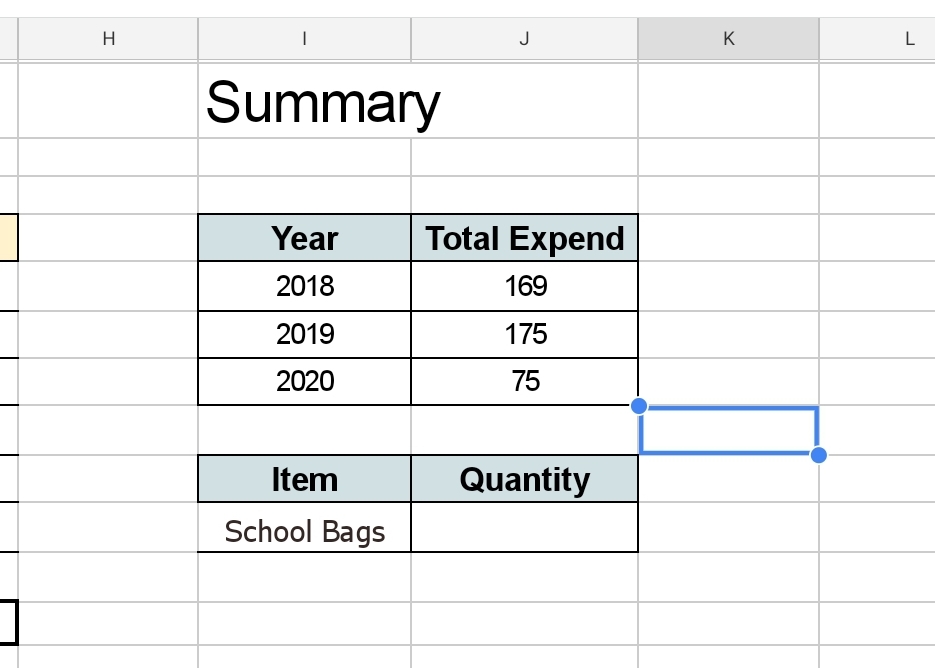 |
Now with same formula SUMIF, we can get the Quantity of each Item we purchase, and we will write the formula in Cell J27 [as in Image-1].
So in Cell J27 we will write =SUMIF(D22:D28,I27,E22:E28) as in Image-3 then we copy the formula to Cells [J28, J29, J30 .. and so]
Image-3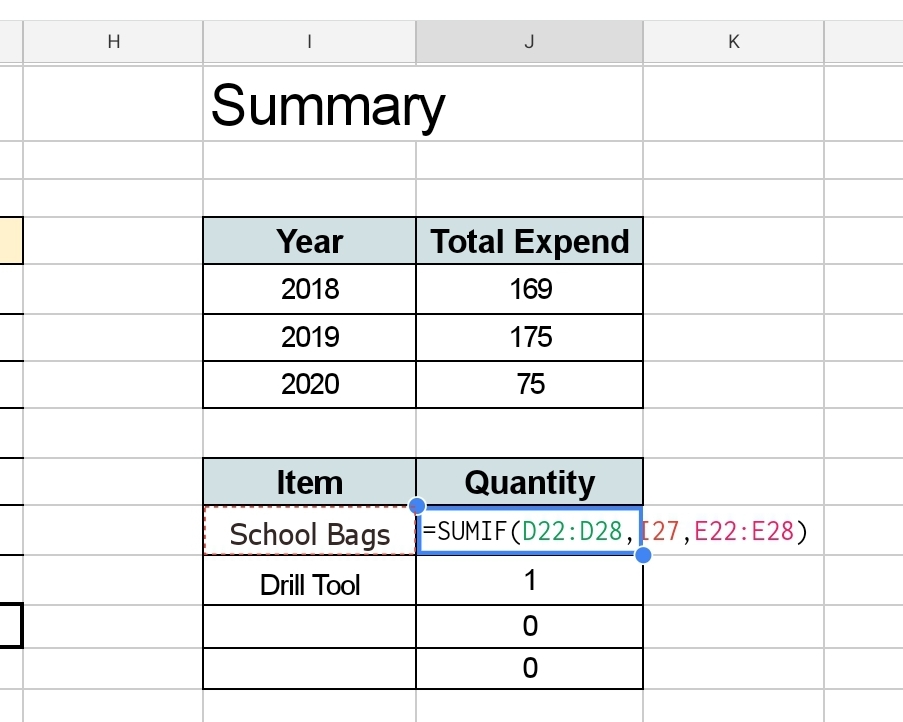 |
Now we have the sum of Quantity.
🙂 Have Fun ..
By: Ali Radwani
Excel, VBA Codes and Formulas-1
Learn To : In Excel – Drop Down List in a cell.
I start working on a project for a friend, he has some requests to be done on a MS-Excel, so I thought why not to write several posts about MS-Excel capabilities.
MS-Excel is a great application to be used, I will not write to praise the program, but will jump to coding. In Excel we can use dozens of built in ready to use tools and Formulas. Also MS-Excel has a very good, easy to use and learn programming language called VBA (Visual Basic for Application) which with simple code we can perform some tasks and create Menus, buttons and functions that runs in background.
Starting from this post we will use some built-in functions and VBA’s one that I am using in my Excel files.
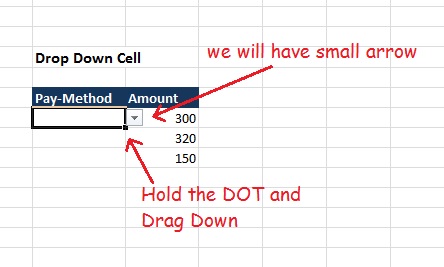
So let’s say we have a table that has a column called “Pay-Method”, the value we save in this column always is one of three: “Cash, Card, Cheque” we don’t want the user to type it every time, but to select it from a list.
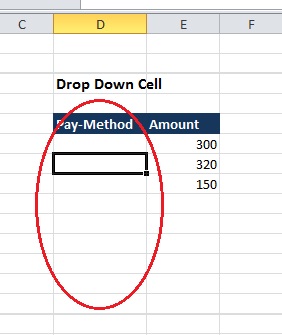 |
To do this we can use an static approach or a Dynamic approach.
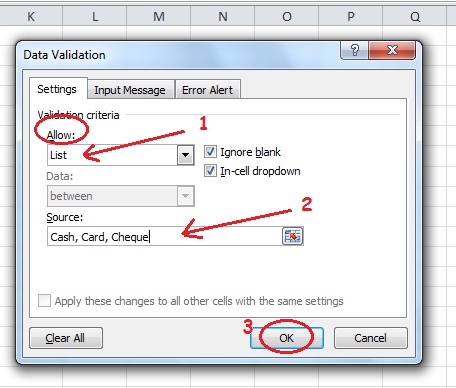
Static Approach: if we have a specific answers that can’t be more like (Yes,No) or as our example above (Cash, Card, Cheque) or similar cases then we can use an static approach. So First Select First cell in the Table, from the menu we will select “Data” then “Data Validation” and select Data Validation.
| |
Now,
- From the Allow box, we select List.
- Then in Source box, we need to type the items we want to appear in each cell as a drop-down list separated by a comma. Cash, Card, Cheque
- We need to check [Ignore Blank and In-cell Dropdown] Then Click OK.
 |
Now we will have a small arrow on the first cell in our Table, to copy the List to other Cells (Beneath) hold the small DOT and Drag it down.
 |
And Now we are DONE, we just create a Dropdown List in all “Pay-Method” Column in the table..
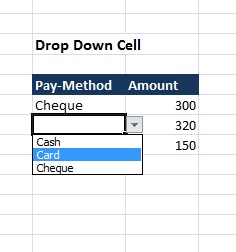 |
Dynamic Approach: If we have a list of items and this list is growing (We may add more items ti it), such as Fruit list in a grocery, then we will use the Dynamic drop-down list. In this case I prefer to use a new Excel Tab call it “Setting”, so we will create one. On that Tab create a Table call it “Fruit” and list all the fruits you want to be appear in the drop-down cell list (In this example I will list down F1, F2, F3, F4, F5), Select the table and from Menu select “Format as Table” and just chose any format you want. Here is a screen shot.
Here is a screen shot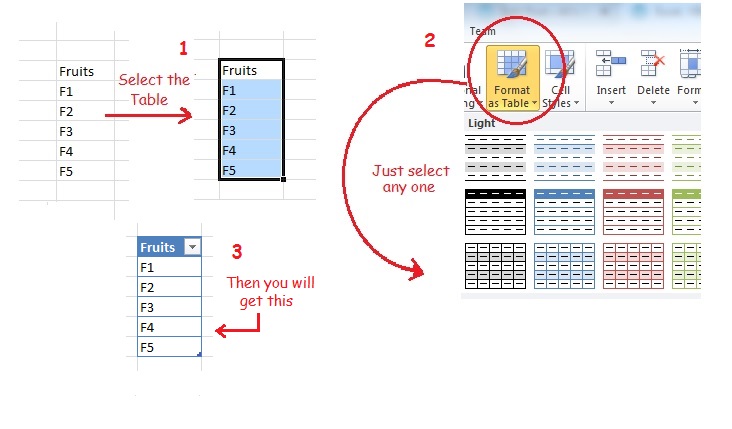 |
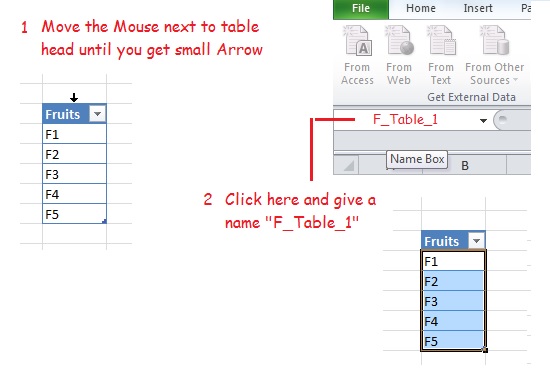
Move the Mouse next to table head until you get small Arrow, and give it a name. as in here..
 |
Now go-back to our main Table and using the same way we did in the Static Approach (from the menu we will select “Data” then “Data Validation” and select Data Validation.) AND
- From the Allow box, we select List.
- Then in Source box, we need to type the Name we select for our table “F-Table_1” for the fruit table
- We need to check [Ignore Blank and In-cell Dropdown] Then Click OK.
Done … Now if we add new Fruit to the list “F6” it will appear in our Drop-Down cell list.
🙂 Have Fun ..
By: Ali Radwani
Python: Cooking App P-8
Learning : Python, Data-Base, SQlite
Subject: Writing a Cooking Application
RECIPES MENU: Show Recipe During writing all functions of the application I notes that my “Show Recipe” need to be updated, so in this post we will do some changes on “def show_all_rec(opt)” function.
First, we will change the if opt ==”name” to list all the Recipes Name with ID’s and ask the user to Enter a Recipe ID to show its information.
Here is the code ..
 # Changes on show_all_rec(opt) - if opt =="name"

if opt =="name" :
        #First we will list down all Recipes Names.
        c.execute("select r_id,r_name from recipes where r_id > 0")
        for each_r_name in c.fetchall():
            print(' ID:',each_r_name[0], ' Name:',each_r_name[1])

        get_rec_id = input ('\n Enter the Recipe ID you want to read: ')
        # Get the Recipe information based on ID.
        c.execute("select * from recipes where r_id ={}".format(get_rec_id))
        for each_basic in c.fetchall():
            print('\n  ID: ',each_basic[0])
            print('  Name: ',each_basic[1])
            print('  Date: ',each_basic[2])
            print('  Type: ',each_basic[3])
            print('  Other: ',each_basic[4])

            print('\n  The Recipe Ingredients: ')
            # Get all Recipe Ingredients.
            get_sql = '''
                    select
                        i_name

                    from
                    ingredients_list

                    INNER JOIN rec_ingredient ON ingredients_list.i_l_id = rec_ingredient.i_l_id
                    where rec_ingredient.r_id = {}

                    '''
            c.execute(get_sql.format(each_basic[0]))

            st = 1
            for each in c.fetchall():
                print('  ',st,': ',each[0])
                st = st + 1

            print('\n\n  Cooking Steps: ')
            # Get the Cooking Steps.
            c.execute("select * from recipes_steps where recipes_steps.r_id = {}".format(each_basic[0]))
            st = 1
            for each in c.fetchall():
                print('\n    Step-',st,': ',each[2])
                st = st + 1

            print('\n ---------------------------------------------')
Here is the out-put screen :
First we have the Menus, we select 1,1,1 to get “Show Recipe By Name”  |
Here is the List of All Recipes and we will enter the ID of the one we want to see.  |
Here is the Recipes Information.  |
Notes That 1. We don’t have any Ingredient (we did not add any) so in coming post we will develop the Edit function to add some Ingredient and change/Update the Recipe Information. 2. We are not using any Validations, so if we enter any dummy data for Date the system will accept it. 3. We are not using any (avoiding Error code) such as Try…except.
To Download my Python code (.py) files Click-Here
By: Ali Radwani
Python: Cooking App P-7
Learning : Python, Data-Base, SQlite
Subject: Writing a Cooking Application
RECIPES MENU: Delete Recipe To Delete a recipe we need to point on it, we will do this by it’s ID. So we can show all recipes by names, then we select the one we want to delete and enter it’s ID, the system will ask to confirm this action by typing (y,Y) then it we will call the delete function. In Delete function “def del_recipe()” we need to delete all the data regarding this ID form three DB Tables, recipes, recipes_steps, rec_ingredient and photo. Although we did not use the photo table and and we just create it for future use, but er will write its code.
Future Plan: In coming weeks we will convert this application “Cooking Application” to GUI “Graphical User Interface” application using tkinter library (Tkinter: is a Python binding to the Tk GUI toolkit) .
Coding: So to Delete a recipe we will show all Recipes and there ID’s sorted by it’s Name and ask the user to enter the ID of the Recipe he/she want to delete.
 # Code to Delete a Recipe

def del_recipe():
    os.system("clear")
    print('\n ====== Delete a Recipe =====')

    # Start to list down all the Recipes Name.
    print("\n\n  List of ALL Recipes we have.")
    c.execute("select r_id,r_name from recipes where r_id > 0")
    for each_r_name in c.fetchall():
        print('   ID:',each_r_name[0], 'Name:',each_r_name[1])

    # Now we ask the user to Enter the Recipe ID.
    rec_del = input('\n\n   Enter an Recipe ID to be Deleted: ')

    # Now we ask the user to Confirm Deleting Recipe.
    sure_remove = input('\n The Recipe will be DELETE and can''t be Rolled-Back. Are you sure you want to Remove it [Y,N] ')

    if sure_remove in ['y','Y']:
        c.execute ("Delete  from recipes_steps where r_id = {}".format(rec_del))
        db_conn.commit()
        c.execute ("Delete  from recipes where r_id = {}".format(rec_del))
        db_conn.commit()
        c.execute ("Delete  from rec_ingredient where r_id = {}".format(rec_del))
        db_conn.commit()
        c.execute ("Delete  from photo where r_id = {}".format(rec_del))
        db_conn.commit()

    elif sure_remove in ['n','N']: # If the user decide not to delete and select N
        print('\n You select NOT to remove the Recipe.')
    else :# If the user enter anything else than Y or N
        print('\n You must select (Y or N).')

    input('\n   .. One Recipe Removed ..   Press any key .. ')
 |
To Download my Python code (.py) files Click-Here
By: Ali Radwani
Python: Cooking App P-6
Learning : Python, Data-Base, SQlite
Subject: Writing a Cooking Application
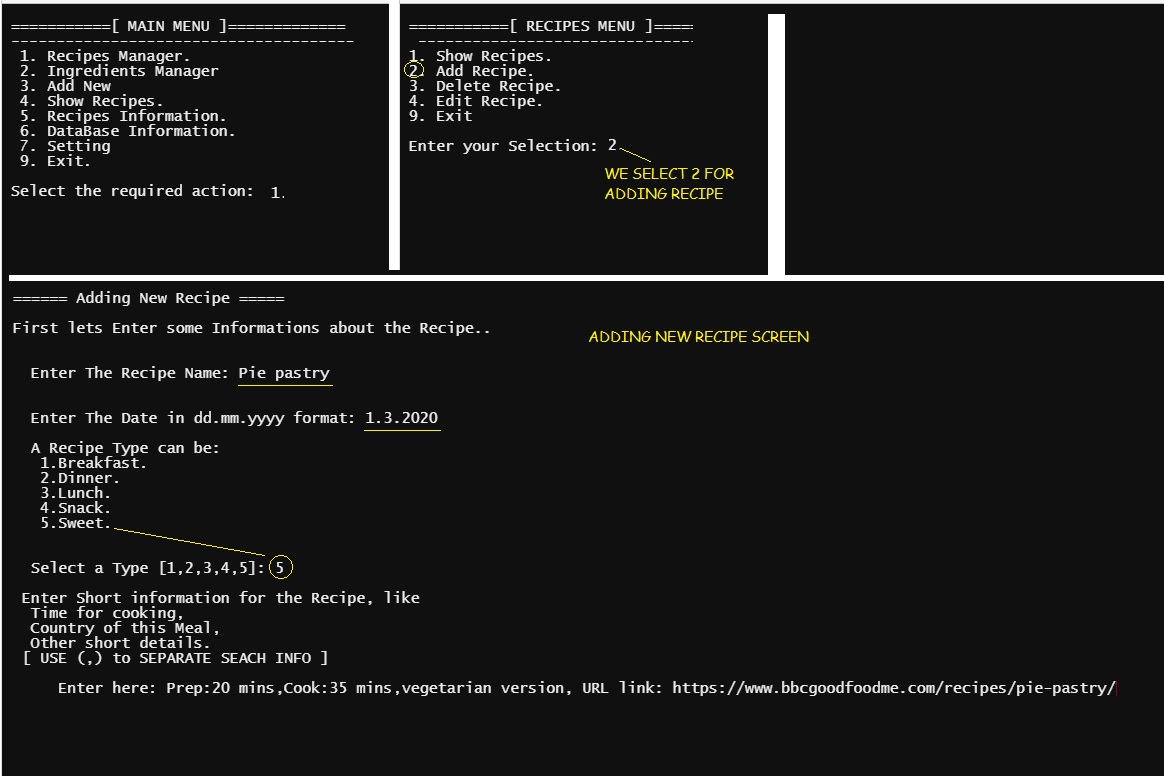
RECIPES MENU: Adding a Recipe.To Add a recipe we need to work on three tables, the user will not know that, the user dose’t care what happening in the application, he/she want the cooking information to be saved and retrieved whenever required.To do this we First will ask the user to Enter some basic information about the Recipe, such as Name, Date selecting it’s type like is it a Lunch or Dinner and other thing we will see it later while writing the code, then we need to enter the Ingredients of each Recipes, the Ingredients are store in another DB-Table based on our DB-design, so we will list down all the Ingredients and ask the user to select from the list by typing the ID’s of those they want, and if an ingredient does not exist in the list the user will write it.Finally we will ask the user to write the cooking steps.This is not easy way to do it using Terminal-screen or console (Command line application CLIs), we will convert this application to GUI (Graphical User Interface) later after we finish the application.
Now, let’s start with the basic information about the Recipes. In Basic Information we have:
Recipe Name: To give a Name to the Recipe.
Recipe Date: The user can Write a date.
Recipe Type: The user will select one of: [Breakfast, Dinner, Lunch, Snack, Sweet]
Recipe Details: Other Details such as the time needed for cooking, other notes.
Recipe Tags: Tags will not be available in this version, but we will work on it when we start doing the GUI version.
So let’s start writing the code..
 # Adding New Recipe

def add_recipe():

    os.system("clear")
    print('\n ====== Adding New Recipe =====')

    print('\n First let''s Enter some Information about the Recipe..')
    r_name = input('\n\n   Enter The Recipe Name: ').capitalize()
    r_date = input('\n\n   Enter The Date in dd.mm.yyyy format: ')

    # Now to select the Recipe Type.
    print('\n   A Recipe Type can be:\n    1.Breakfast.\n    2.Dinner.\n    3.Lunch.\n    4.Snack.\n    5.Sweet. ')
    r_type = False
    while r_type == False :
        rec_type = input('\n\n   Select a Type [1,2,3,4,5]: ')
        if rec_type =='1' :
            rec_type ='Breakfast'
            r_type = True
        elif rec_type =='2' :
            rec_type ='Dinner'
            r_type = True
        elif rec_type =='3' :
            rec_type ='Lunch'
            r_type = True
        elif rec_type =='4' :
            rec_type ='Snack'
            r_type = True
        elif rec_type =='5' :
            rec_type ='Sweet'
            r_type = True
        else :
            print('\n   You have to select from the List')

    r_details = input ('\n  Enter Short information for the Recipe, like \n   Time for cooking,\n   Country of this Meal,\n   Other short details.\n  [ USE (,) to SEPARATE EACH INFO ]\n\n      Enter here: ')

    c.execute ("INSERT INTO recipes (r_name, r_date, r_type, r_details ) VALUES(:r_name,:r_date,:r_type, :r_details)",{"r_name":r_name,"r_date":r_date,"r_type":rec_type, "r_details":r_details})
    db_conn.commit()
Now, we save the Basic Recipe Information and we have the Recipe ID (PK) and we will use it as a Foreign Key in Recipe-Ingredient and Recipe-Steps. With Recipe-Ingredient we will list down all the recipes and let the user to enter the Id’s of the one’s they will use with there recipe. If the needed Ingredient is not in the list, the user will insert it and it will be added to the Ingredient list. Here is the code for this section. .
 #This part of code continuing the above part.


    os.system("clear")
    # Select the Ingredient for the Recipe.
    print('\n Now, Select the Ingredients of your Recipe:')
    print("\n If the Ingredient is not in the List you will Add it shortly, FIRST select the exist ones\n write it''s ID Separated by ( , ) ")
    print('\n  List of Ingredients:')

    list_of_ing()

   ing_l = input('\n Enter the Ingredients ID Seperated by ( , ) ')

    if input ('\n Is there any more Ingredients you want to add? [Y,N]: ') in ['y','Y'] :

        new_ing = input('\n Enter the Ingredients Seperated by ( , ): ')
        new_ing = new_ing.split(",")

        # To get max ingredients ID.
        c.execute ("select max(i_l_id) from ingredients_list")
        max_ing_id = c.fetchall()[0][0]
        ing_l2 =[]

       # To add the new ingredients to the ingredients_list .
        for each in range(len(new_ing)) :
            c.execute ("INSERT INTO ingredients_list (i_name) VALUES(:i_name)",{"i_name":new_ing[each].capitalize() })#ing_name})
            db_conn.commit()
            ing_l2.append (str(max_ing_id+(each+1)))

        ing_l=ing_l.split(",")
        ing_l2=ing_l + ing_l2

        # To link the ingredients to the recipe.
        for each in range (len(ing_l2)):

            c.execute ("INSERT INTO rec_ingredient (i_l_id, r_id) VALUES(:i_l_id, :r_id)",{"i_l_id":ing_l2[each],"r_id":rec_max })
            db_conn.commit()
Now, we have the all Ingredients of the Recipe, also we have the ID or the Recipe, so we can link the Recipe information to the cooking Steeps. Here the user will write the cooking steps until the user press (Q,q) and Enter.
 #This part of code continuing the above part.

print('\n  Now we can Write the Cooking Steps, Press Enter After each Step. When you finish just enter (q). ')

    stop = False
    while stop == False :
        c_step = input('\n Enter a Cooking Step: [Press Enter After each Step. q to Finish] :\n   Write Here : ')
        if c_step not in ['q','Q'] :
            c.execute("INSERT Into recipes_steps (r_id , rec_steps) values (:r_id, :rec_steps)",{"r_id":rec_max,"rec_steps":c_step})
            db_conn.commit()
        else :
            stop = True


    input('\n   .. One Recipe Added ..   Press any key .. ')
Here are some screen shots of the code and running out-put.
 |

|
In Next Part: In the next coming part we will work on the Deleting Recipe.
To Download my Python code (.py) files Click-Here
By: Ali Radwani
Taking pictures is not my main daily practices, but when i start playing with my camera, i really enjoy my self.
Thanks for visiting my Space..


