Archive
Python and Lindenmayer System – P1
Learning : Lindenmayer System P1
Subject: Drawing with python using L-System
First What is Lindenmayer System or L-System? L-System is a system consists of an alphabet of symbols (A, B, C ..) that can be used to make strings, and a collection of rules that expand each symbol into larger string of symbols.
L-system structure: We can put it as Variables, Constants, Axiom, Rules
Variables (V): A, B, C …
constants : We define a symbols that present some movements, such as ‘+’ mean rotate right x degree, ‘F’ mean move forward and so on ..
Axiom : Axiom or Initiator is a string of symbols from Variable (V ) defining the initial state of the system.
Rules : Defining the way variables can be replaced with combinations of constants and other variables.
Sample:
Variables : A, B {we have two variables A and B}
Constants : none
Axiom : A {Start from A}
Rules : (A → AB), (B → A) {convert A to AB, and convert B to A}
So if we start running the Nx is the number the time we run the rules (Iteration).
N0 : A
N1 : AB
N2 : AB A
N3 : AB A AB
N4 : AB A AB AB A
N5 : AB A AB A AB A AB .. an so-on
So in this example after 5 Iteration we will have this pattern (AB A AB A AB A AB)
In this post we will write two functions, one to generate the pattern based on the Variables and Rules we have. Another function to draw the pattern using Python Turtle and based on the Constants we have within the patterns.
The constants that we may use and they are often used as standard are:
F means “Move forward and draw line”.
f means “Move forward Don’t draw line”.
+ means “turn left by ang_L°”.
− means “turn right ang_R°”.
[ means “save position and angle”.
] means “pop position and angle”.
X means “Do nothing”
and sometime you may add your own symbols and and rules.
First Function: Generate the Pattern will take the Axiom (Start symbol) and apply the rules that we have (as our AB sample above). The tricky point here is that the function is changing with each example, so nothing fixed here. In the coming code i am using only one variable F mean (move forward) and + – to left and right rotations. Other patterns may include more variables. once we finished the function will return the new string list.
Generate the Pattern
|
# Generate the patern def l_system(s) : new_s = [] for each in s : if each == ‘F’: new_s.append(‘F+F+FF-F’) else : new_s.append(each) return new_s |

|
The second function: Draw the Pattern will take the string we have and draw it based on the commands and rules we have such as if it read ‘F’ then it will move forward and draw line, and if it reads ‘-‘ then it “turn right ang_R°”.
here is the code ..
Draw the Pattern
def draw_l_system(x,y,s,b,ang_L,ang_R):
cp = [] # Current position
t.goto(x,y)
t.setheading(90)
t.pendown()
for each in s:
if each == ‘F’ :
t.forward(b)
if each == ‘f’ :
t.penup()
t.forward(b)
t.pendown()
elif each == ‘+’:
t.left(ang_L)
elif each == ‘-‘:
t.right(ang_R)
elif each == ‘[‘:
cp.append((t.heading(),t.pos()))
elif each == ‘]’:
heading, position = cp.pop()
t.penup()
t.goto(position)
t.setheading(heading)
t.pendown()
t.penup()
Now we will just see a one example of what we may get out from all this, and in the next post P2, we will do more sample of drawing using L-System.
In the image bellow, left side showing the Rules, angles and iterations and on the right side the output after drawing the patters.

|
To Download my Python code (.py) files Click-Here
Python: Date Validation Function
Learning : Date Validation Function
Subject: Dll’s and Function
In late of 90’s, I start writing DLL files, Dll file or Dynamic Link Library is a file that contain instructions or function that can be used and reused with/by other applications. So if we have a function that we keep using it in most of our programs then we write it in a dll file and re-call it any time we want to.
Writing a function that can be added to a Dll file and will be used by all the team is not a simple as it appeared to be, Dll files often contains more than one functions so we may find ten or twenty functions in there most are related so a DLL file need to be a very well documented and each function has it’s own comments, variables, version number and summary of its task and what it will return back.
In this post we will write Python code for a date validation function, the function will take one argument and will return values as :
1. Function will return False and error message if the passed argument is not a valid date.
2. Function will return True and the date if the date is valid.
Date Validation Function:
# Date validation function
# Variables: This function will take one argument as a user input date.
# Returns: This dunction will return Fals and error_message each itme the user enter a not valid date.
# The functin will return True and the date in case it was correnct.
# The function will returns value as a list.
def valid_date(my_date):
# get the separator
the_separator = []
for each in my_date :
if not each.isdigit():
the_separator.append(each)
# If the user inter other that two separators then the date is invalid.
if len (the_separator) != 2 or (the_separator[0] != the_separator[1]):
error_message = “Date is not valid.”
return False, error_message
d,m,y = (my_date.split(the_separator[0]))
if not d.isdigit() or (int(d) > 31 or int(d) < 1 ):
error_message = ‘Day must be number and between (1-31).’
return False, error_message
if not m.isdigit() or (int(m) > 12 or int(m) < 1 ) :
error_message= ‘Mounth must be number and between (1-12).’
return False, error_message
if not y.isdigit() or len(y) != 4 or int(y) < 1:
error_message = ‘Year must be a 4-digit positive number. ‘
return False, error_message
# convert the days and month to two digits numbers
if len(d) == 1: d =’0′ + d
if len(m) == 1: m =’0′ + m
my_date = d + ‘/’ + m + ‘/’ + y
return True, my_date
So now if we want to call the function and pass the user input to it then examine the returns, we may use the While loop as here..
vd=[False,0]
while vd[0] == False :
my_date = input(‘\n Enter the date as dd/mm/yyyy :’)
vd = valid_date(my_date)
if not vd[0] : print(‘ ‘,vd[1])
print(“\n we have a valid date, it is .. “, vd[1])
… Have fun …
To Download my Python code (.py) files Click-Here
 Follow me on Twitter..
Python: Drawing Shapes
Learning : Drawing Shapes
Subject: New shapes function
To Draw a Square shape, we need to know the width ( W ) of the square side, and then we draw a line and moving in 90 degree and drawing another line and so on until we finished the 4 side of the square. In the same principle if we want to draw a triangle (equilateral one), we need to know length of its sides and in mathematics we know that in equilateral triangles the angles (corners) are 120 degree, so we draw a line and move in 120 degree and drawing another two sides.
In coming code, we will write a general function in Python to pass the number on sides we want to draw (triangle =3, Square=4,Pentagon = 5, Hexagon =6 .. and so on), the width (size) of the shape and the position (x,y) of the first angle or point.
The Codes:
def d_shape(s_heads,w,x1,y1):
t.goto(x1,y1)
# To get t.right angle
rang = 360 / s_heads
t.pendown()
for x in range (s_heads +1) :
t.forward(w)
t.right(-rang)
t.penup()

|
Results after using the new function we can pass any number of sides and the function will draw the shape, here are a sample execution of it. .. .. Click to enlarge ..
|
|
|
Now if we call the function number of times equal to it’s heads what we will get ? let’s see . .. Click to enlarge ..
 |
|
| |
 |
And take a look when we set the numbers to 20. .. Click to enlarge ..

|
To Download my Python code (.py) files Click-Here
Python: Random Squares
Random Squares Art
Subject: Python, Graphics and simulation
In This project say we have a Square (10 x 10 cm) the square has four corners labeled as (a, b, c, d) as in figure i.

|
then we select a random corner (c or d) [assume it is c] then we select an angle (ang) of rotation between (10, 45), and we draw another square positioning (a) on the (c) and rotating it with (ang) anticlockwise as figure ii.

|
Now if we repeat this two steps .. S1. Selecting a random corner (c or d). S2. Selecting a random rotation angle between (10, 45). and draw the square. let’s see what we may have as a random art generator.
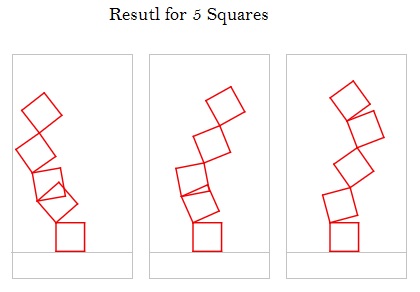 |

|
 |
Python Code for Random Squares Art
Codes to select corner (c or d)
def select_c_or_d():
if random.randrange(0,2) == 0 :
x = cdpos[0][0]
y = cdpos[0][1]
else:
x = cdpos[1][0]
y = cdpos[1][1]
t.setheading(0)
t.right(random.randrange(rotmin,rotmax)*f)
Codes to draw the Square (c or d)
def d_square(w,x1,y1):
t.goto(x1,y1)
t.pendown()
t.forward(w)
t.right(-90)
t.forward(w)
# save corner c position
cdpos.append([t.xcor(),t.ycor()])
t.right(-90)
t.forward(w)
# save corner d position
cdpos.append([t.xcor(),t.ycor()])
t.right(-90)
t.forward(w)
t.penup()
I notes that if we increase the number of Squares, we start to have some interesting results.
.. Have Fun ..
To Download my Python code (.py) files Click-Here
My Fitbit Data
Solving My Fitbit data Problem
Subject: VBA code to combine Fitbit excel files into one
I purchase a Fitbit Alta HR in 2017, and since then I wear it and never take it off unless for charging. Fitbit Alta HR is a very nice slim device, but unfortunately there was no way to upload my previous data from my old device to my Fitbit, this was not the only issue with Fitbit data, now; after three years still we can’t download Fitbit data in one file, if you want to do this (each time) you need to send a request to Fitbit team and they will prepare the file for you!! Instead, Fitbit site allow you to download your data as month by month, in my case I will have almost 32 files.
Solving the Problem: After downloading the excel files and look at them, I decide to write a code to help me combine all the current 32 files and any coming once into one data file. First I start thinking to use Python to do this task, but after second thought I will use the Excel file and VBA macro coding to do it.
Here in coming paragraph I will post about the general idea and some codes that i use.
General Idea: I will use same structure of Fitbit file and name it as “fitbit_All_data_ali”, in this file we will create new tab and name it Main. In the Main tab we will create several buttons using excel developer tools and will write the macro VBA code for each task we need to operate.
Tabs in our file: Main: Contain buttons and summary about my data.
Body, Food, Sleep, Activities and Food Log. Food Log tab will store the data such as calories, fibers, fat and so-on., all those tabs will be filled with a copied data from each Fitbit data file.
Here are some VBA codes that I use and what it’s purpose .
| Code: ‘ Get current path. the_path = Application.ActiveWorkbook.Path |
The path on the current excel file. |
| Code: the_All_Data_file = ThisWorkbook.Name |
Get current excel file name |
| Code: Workbooks.Open Filename:=thepath + my_source_Filename |
Open a file |
| Code: Windows(my_source_Filename).Activate Sheets(“Foods”).Select Range(“A2:B31”).Select Selection.Copy |
Goto fitbit file, goto food sheet, select the data copy it. |
| Code: Application.CutCopyMode = False Workbooks(my_source_Filename).Close SaveChanges:=False |
Close an open excel file. |
| Code: Range(“A3”).Select Selection.EntireRow.Insert , CopyOrigin:=xlFormatFromLeftOrAbove |
To insert a black Row |
| Code: sname = ActiveSheet.Name |
Get current sheet name |
| Code: Function go_next_sheet() As String ‘ This code will go to next sheet if there is one, if not will return ‘last’ On Error Resume Next If sht.Next.Visible xlSheetVisible Then Set sht = sht.Next sht.Next.Activate End Function |
if there is no more tabs or sheets, function will return “last” |
Final Results: After i run the code, I have an Excel file contain all my Fitbit data in one place. Mission Accomplished
To Download my Python code (.py) files Click-Here
Taking pictures is not my main daily practices, but when i start playing with my camera, i really enjoy my self.
Thanks for visiting my Space..


