Archive
M&M’s in Light-Box
In this article I am posting three images for a M&M’s mug to use a Kodakporta400 and ilford film simulation with Fujifilm X-T30ii camera in hand. Also I am posting the outer or say back-stage shot for my Light-Box with LED lighting the subject.

First lit’s see the colored shot using the kodakporta400 film Simulations.
Camera settings: ISO 2000, f 4.5, Focal-Point 34, Shutter speed 1/125s.
Here i use the ilford film Simulations. The setting was: ISO 6400 , f 14 , Focal-Point 34 , Shutter speed 1/125s.


This is the Light-Box studio I am using with an out-source LED lights.
In this shot I just change the light position.

For more film simulation Click-Here
By: Ali Radwani
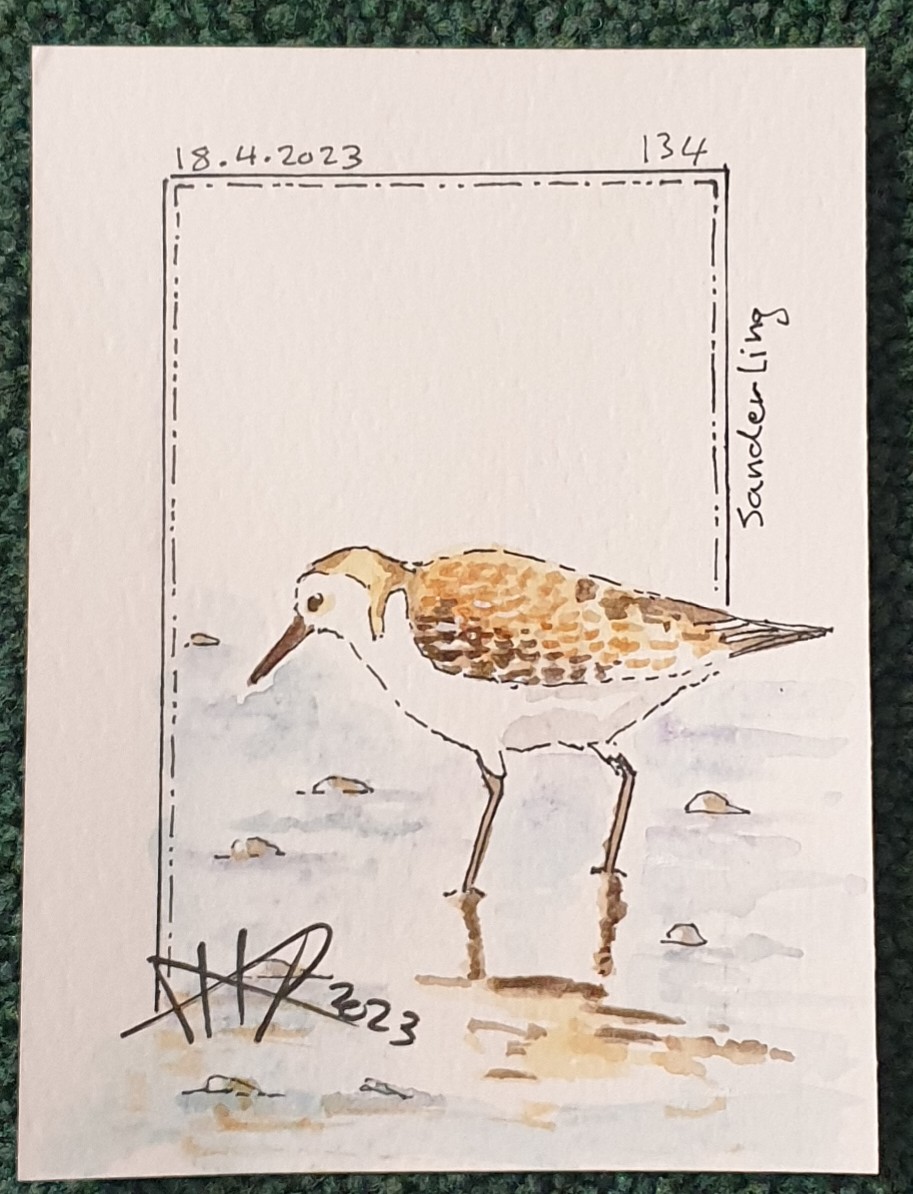
Daily Sketche: Sanderling
I almost have finished 134 water_colored sketches on a 4x3in cards since I start this Task [Drawing on a 4×3 Card] on September 2022, the sketch it self is about 3x2in.
Here I am posting Sanderling sketch.
|
..:: Have Fun with Sketching ::.. 🙂
By: Ali Radwani
Python: Grade_2 Math Questions V1
Learning : Python, Math
Subject: Math Questions for Grade-2 V.1
[NOTE: To keep the code as simple as we can, We WILL NOT ADD any user input Varevecations. Assuming that our user will Enter the right inputs.]
In the process of studing with/for my kids [specialy Math] i always need to give them some Questions in [+ -], I need to write the Questions on a paper then they solve it and i check the answers. So I thought if I create an app to solve this Problem.
Application to Do What?
- Select Two random numbers from a given range.
- Select a Math operator [+ -].
- Writing the Question on the Screen.
- Comparing the user input with the real answer.
- Writing a message on the screen acoording to the user answers.
Application Menu
x
y (+ -)
_______________
??
In this Version (V.1) of the application, there will be some limitations on the Questions Difficulties, Number ranges and type of Questions.
Start Coding
The Menu
As we can see above, we will have 7 keys for the Menu, Menu 9 is for Exit. Menu 3 will ask the user to Enter the Kid Name. Menu 2 will ask for the Number Ranges (From/To as 0 to 9 so all the questions will be in this rage). Menu 4, 5 and 6 each will be for type of questions. Menu 1 will ask the user about All the questions type. In all menus 1,4,5 and 6 if the user did’t enter a Name or a number ranges, the application will as for it before srating.
Here is the code for the Main Menu.
 # Code for Main Menu

 # ---------------- Main Menu -------------------------
def menu () :
    os.system('clear')
    print('\n\n\t This is a Math Revision Game.',version)
    print('\t --------------------------------------------')
    print(' '*34,'By:[AHRADWANI.COM]')

    print('\n\n\t')
    print('\t 1. Start Play the Game. [All Math Lessons]')
    print('\t 2. Re-set the Numbers Range.')
    print('\t 3. Register New Kid to Play.')
    print('\t \n ')
    print('\t 5. Questions Like:   x (+ -) y = ?? \n')
    print('\t 6. Questions Like:   x (+ -) ?? = y \n')
    print('\t 7. Questions Like:      x','\n\t\t\t\t y   (+ -)','\n\t\t\t     ___________')

    print('\t ')
    print('\t 9. Exit.')

    user_select = input ('\n\n\t Select from the Menu. > ')

    return user_select
Get the Numbers Range
In this Function the user will be asked to Enter the Number range as from and to, we will check if the user Enter a valid input, No space, No Alphabetics.
 #  Get the Numbers Range

 def get_numbers_range () :

     """
        Function to get the Number range from the user, we will check if the user Enter
        a valid input, No space, No Alphabetics.

        return:
            nfrom: is the lower number range.
            nto  : is the upper number range.
    """


    nfrom = check_user_input("\t Enter the Lower Range Number > ","\t ... You Need to Enter a Lower Range Number.") #(input('\n\t Enter the Lower Range > '))
    nto = check_user_input("\t Enter the Upper Range Number > ","\t ... You Need to Enter an Upper Range Number.")

    if (int(nfrom)) > (int(nto)) :
        nfrom, nto =  nto, nfrom

    return int(nfrom), int(nto)
Check user input
With each user input we will call this Function with two messages, statement message will be the one to gaid the user to What is need to Enter, error message will be display if the user input something wrong or not expected. Then the Function will return back the user input.
 # check_user_input

def check_user_input(statment_m,error_m):
     """
    Function to check on the user input if it is a valid or not.

    Arguments:
        statmen_m: will be the one to gaid the user to What is need to Enter
        error_m: will be display if the user input something wrong or not expected.

    Return:
        uinput

    """
    while True :
        print(statment_m,end="")
        uinput = input()
        if ((uinput) in [" ",""] or (not uinput.isnumeric()) or ((uinput) in schar) or ((str(uinput).isalpha()))):
            print(error_m)
        else:
            break
    return uinput
Get the Kid Name
A small and short Function to return the user/Kid Name.
 # Get the Kid Name

 def get_kid_name () :

    return input('\n\t Enter Your Name > ')
Setting and Variabls
This is the first upper part of the application, we just import the random and os also we set some variables.
 # Variables


import random, os, operator

score1 = 0
good = ['Correct','You are Right', 'Well Done..','Nice..','Excellent..','Amazing..','Good job',' YES .. Keep it up .. ','So Proud of You','Yes .. Another Point for You',]
bad = ['Wrong ..','Sorry .. No!','Try Your Best','No!','No..Think Harder','ooops .. No','Not this Time']
oper_dict = { '+': operator.add, '-': operator.sub,} # '*': operator.mul, }
schar = "@_!#$%^&*()?/\|}{~,.:'"

nfrom = 0
nto = 0
name = 0
version = 'V.10.2022.R1'
Math Question Type-1
This Function will ask the user 10 Questions of Math according to the Numbers Range were the question will looks like: X [+ -] Y = ??, then if the answer is right good message will display on the screen.
 #  Math Question Type-1 (X [+ -] Y = ??)

 def Math_G2_type_1():
   os.system('clear')
   score =0
   for q in range(0,10):
      n1 = random.randint(nfrom,nto)
      n2 = random.randint(nfrom,nto)
      op = random.choice(list(oper_dict.keys()))

      if op == '-' :
          if n1 ')
      print('   ', n1, op ,n2,end='')

      ans = check_user_input(" = ","  You Need to Enter an Answer .. ")

      if  int(ans) == oper_dict[op](n1,n2):
          print('   ',random.choice(good),'   .. ')
          score = score +1
      else:
          print('   ',random.choice(bad),'   .. ')

   return score
Math Question Type-2
This Function will ask the user 10 Questions of Math according to the Numbers Range were the question will looks like: X [+ -] ?? = Y, then if the answer is right good message will display on the screen.
 # Math Question Type-1 (X [+ -] ?? = Y)


def Math_G2_type_2():
    os.system('clear')
    print('\n\n\t ', name ,' Now try to solve these once\n ')
    score =0
    for q in range(0,10):
        n1 = random.randint(nfrom,nto)
        n2 = random.randint(nfrom,nto)
        op = random.choice(list(oper_dict.keys()))
        if op == '-' :
          if n1 < n2 :
              n1,n2 = n2,n1

        print('\t\t   ',n1)
        print('\t\t   ',n2,' ',op)
        print('\t\t __________')
        ans = int(input('\t\t    '))

        if ans in [" ",""]:
          print('   ',random.choice(bad),'  You Need to Enter an Answer .. ')
        else:
            if ans == oper_dict[op](n1,n2):
                print('   ',random.choice(good),'   .. \n\n')
                score = score +1
            else:
                print('   ',random.choice(bad),'   .. \n\n')

    return score
Math Question Type-3
This Function will ask the user 10 Questions of Math according to the Numbers Range were the question will looks like:
X
Y [+ -]
__________
??? then if the answer is right good message will display on the screen.
 #

 def Math_G2_type_3 ():
    os.system('clear')
    print('\n\n\t ', name ," let's try this.")
    print('\t Complete with correct number.\n')
    score = 0
    for q in range(0,10):
        n1 = random.randint(nfrom,nto)
        n2 = random.randint(nfrom,nto)
        op = random.choice(list(oper_dict.keys()))
        if op == '-' :
            if n1  n2 :
                n1,n2 = n2, n1

        print('\t ',n1,op, ' ______ = ', n2)
        ans = int(input('  Your Answer > ') )

        if ans in [" ",""]:
          print('   ',random.choice(bad),'  You Need to Enter an Answer .. ')
        else:
            if n2 == oper_dict[op](ans,n1):
                print('   ',random.choice(good),'   .. \n\n')
                score = score +1
            else:
                print('   ',random.choice(bad),'   .. \n\n')
    return score
Application Body
In the Application Body itself I use a while loop to call and detect the User input from the menu and using that input to call the corresponding Function. All the codes and functions also the application Body code is on the Source file and can be Downloaded.
I test the code and RUN the app several times, but errors can be found, so next version of this Application will solve any errors also will add more Math Questions Type.
..:: Have Fun with Coding ::.. 🙂
To Download my Python code (.py) files Click-Here
By: Ali Radwani
Daily Sketch: Colored Love Bird
On last September I start doing some small water_colored sketches on a 4x3in card, sketch size is almost 3x2in. Here I am posting yesterday Love-Bird sketch.

|
More of my Other Sketches Here..
..:: Have Fun with Sketching ::.. 🙂
By: Ali Radwani
Arduino: NOT-Gate Circuit
Learning : Electronic NOT-Gate Circuit
Subject: To Build a NOT-Gate Circuit using BC547 Transistor
[NOTE: We are working on Electronic Devices, Voltage, Resistors and other Electronic Parts that may Become HOT due to un-stable current or Wrong Wire Connections.. PLEASE BE CAUTIOUS AND TAKE SAFETY NEEDED PROCEDURES.]
In this Project we will use the BC547 Transistor to build a NOT-Gate circuit, so we will Not use the ADRUINO board.
What we Need
- 1 2Pin Push-Button.
- 1 LED
- 3 Resistors.
- 1 BC547 Transistor.
- 1 BreadBoard. [I am using a small 5x7cm]
- Some Jumper Wires.
Connections
- Connect the BC547 BasePin to a Resistor Pin1, Then the Pin2 of the Transistor to the Push-Button Pin1.
- Connect the Push-Button Pin2 to Another Transistor Pin1, Then the Pin2 of the Transistor to BC547 CollectorPin, AND to the Battery(+).
- Connect the third Transistor Pin1 to BC547 CollectorPin, and the Pin2 of the transistor to LED(+) Pin.
- Connect the BC547 EmitterPin to the LED(-) Pin by Jumper-wire.
- Connect the LED(-) Pin to the Battery(-).
Here is the Circuit on the Breadboard |
Run-Time
Since this is a NOT-Gare Circuit then once we connect the Power we can see the LED turns ON, Now if we Press the button and keep pressing, the circuit will be in connecting phase and the LED will tune Off.
Here is a GIF clip of Running Time. |
:: ARDUINO PROJECTS LIST ::
[ Click Here to See all ARDUINO Projects ]
By: Ali Radwani
Arduino: AND-Gate Circuit
Learning : Electronic AND-Gate Circuit
Subject: To Build an AND-Gate Circuit using BC547 Transistor
[NOTE: We are working on Electronic Devices, Voltage, Resistors and other Electronic Parts that may Become HOT due to un-stable current or Wrong Wire Connections.. PLEASE BE CAUTIOUS AND TAKE SAFETY NEEDED PROCEDURES.]
In this Project we will use the BC547 Transistor to build an AND-Gate Circuit on a breadboard, so we will Not use the ADRUINO board.
What we Need
- 2 2Pin Push-Button.
- 1 LED
- 3 Resistors.
- 2 BC547 Transistor.
- 1 BreadBoard. [I am using a small 5x7cm]
- Some Jumper Wires.
- 3V Battery
Connections
- Connect Both BC547 to the BreadBoard.
- Connect Emitter of the First (left) One to the Collector of the second One (Right one). [Use Jumper Wire]
- Connect TWO Push-Buttons to the BreadBoard.
- Connect between each BasePin of the BC547 and Pin1 of each Push-Button using a Resistor1&2 [Pin1 of PushButton1 to Pin1 of Resistor1, Pin2 on the Resistor1 to BasePin of BC547.]
- Connect Pin2 of Push-Button1 to the Pin2 of the Push-Button2.
- Connect the Push-Button2 Pin2 to a Resistor3 Pin1
- Connect the Resistor3 Pin2 to the LED(+)Pin.
- Connect the LED(-)Pin to the First BC547 CollectorPin
- Connect the Battery (+) to the Resistor3 pin2, and Connect the Battery (-) to the Emitter Pin of Second BC547.
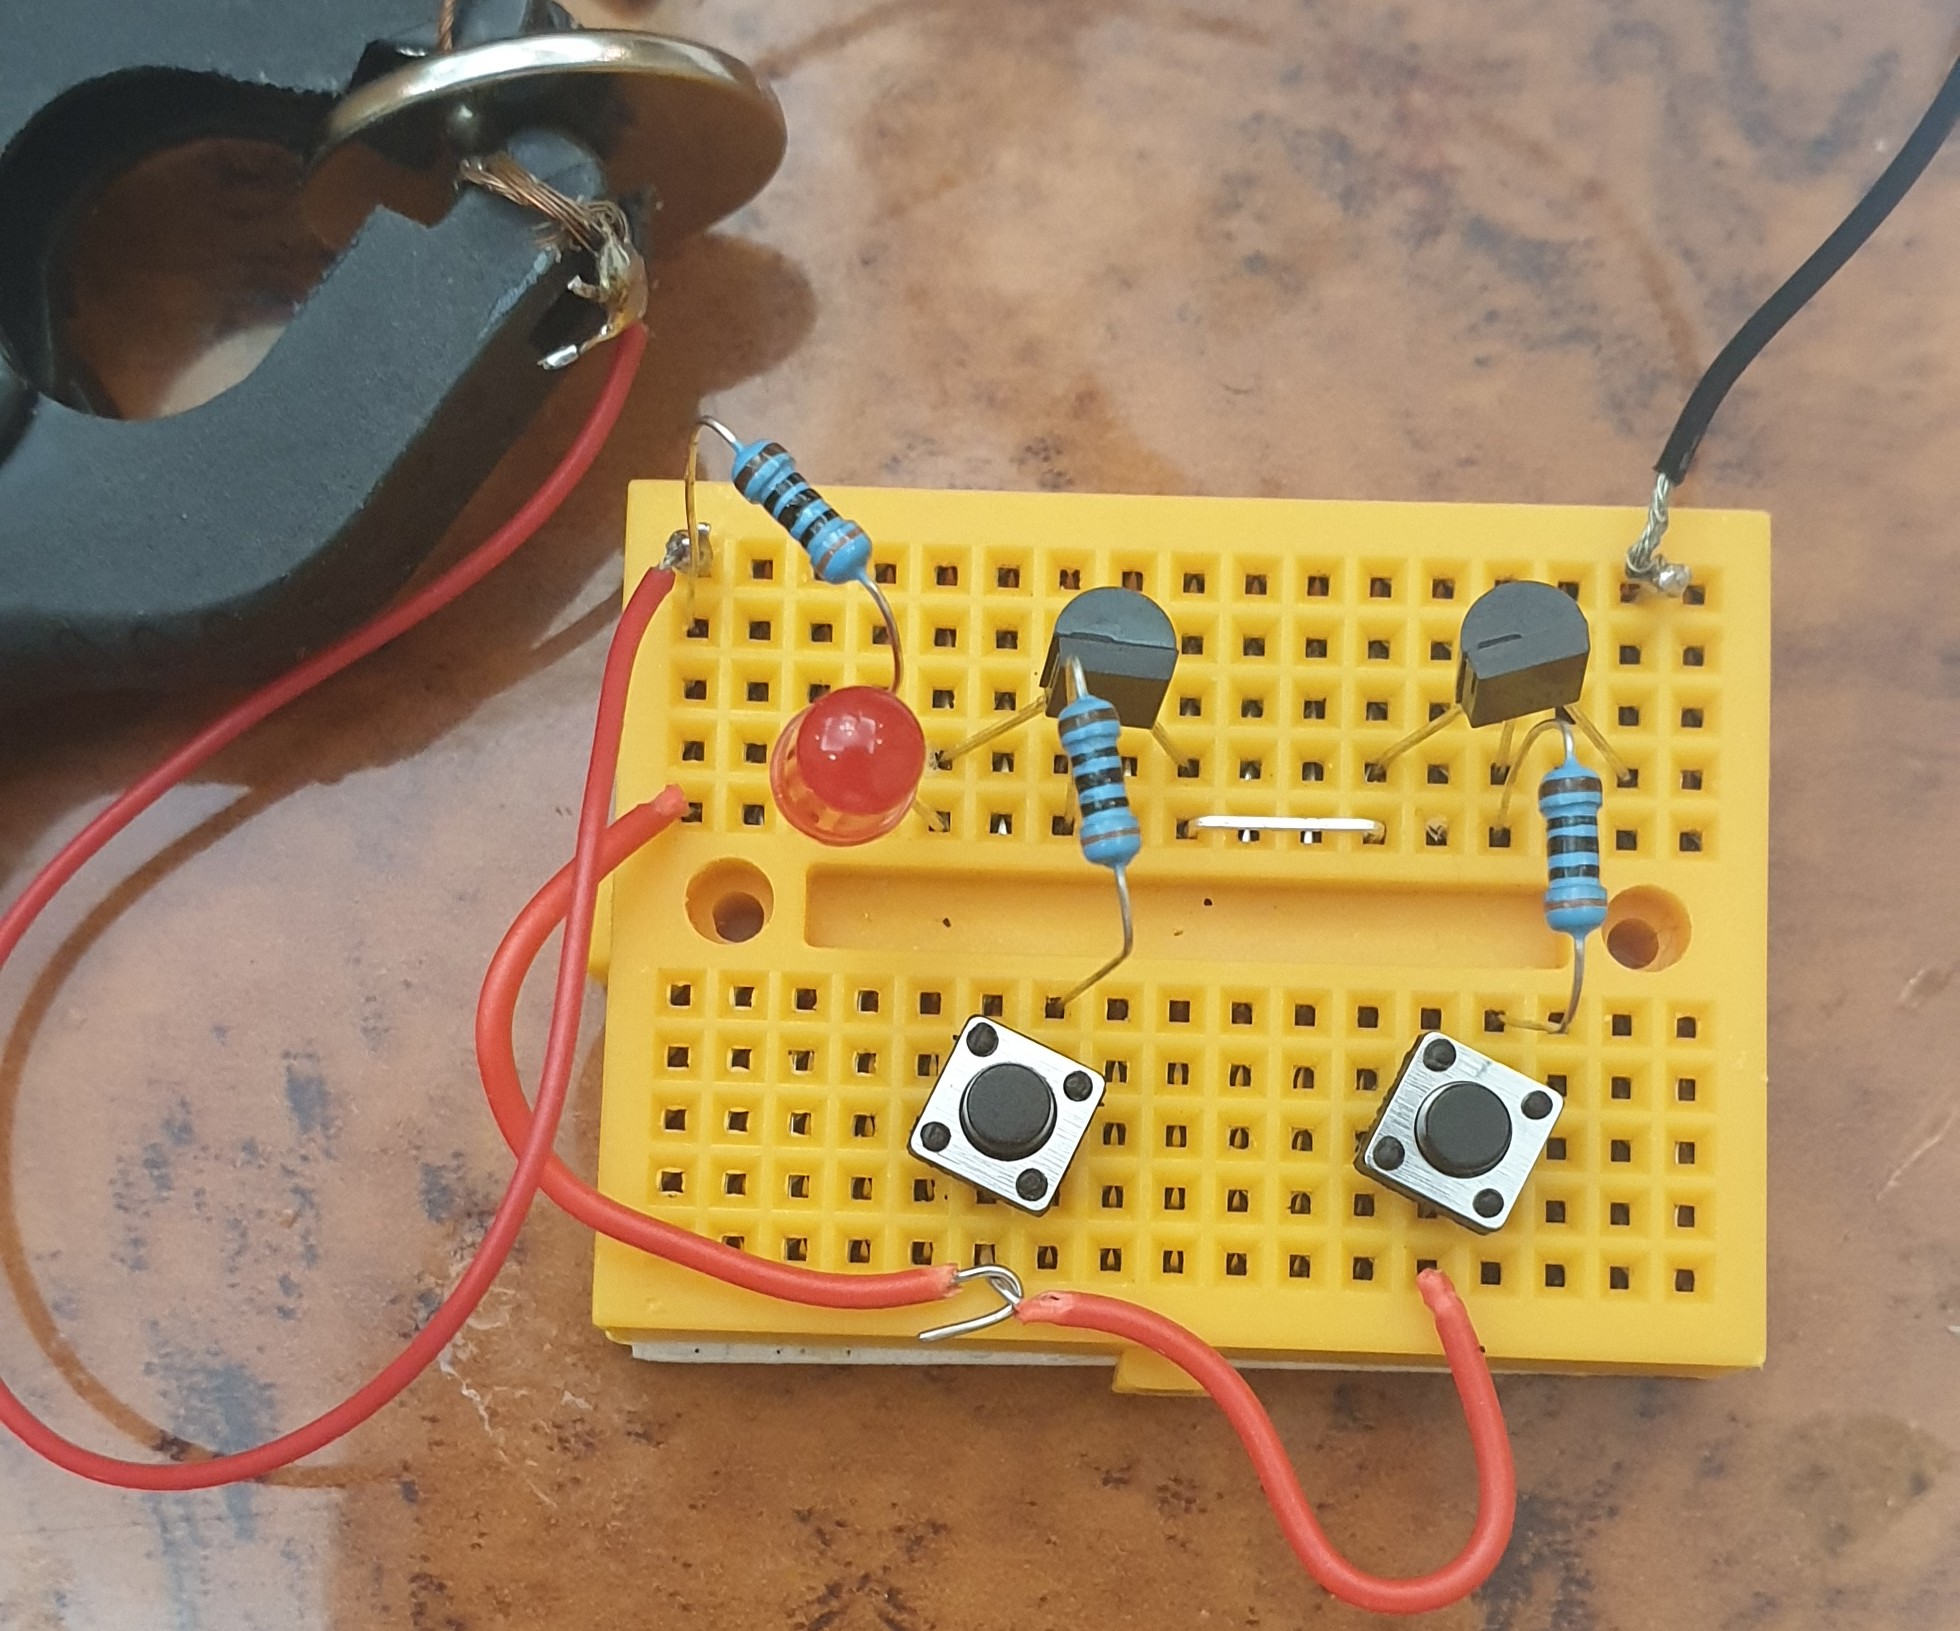 |
 |
Run-Time
The Logic of the AND-Gate is if the BOTH Button are Pressed in same time the circuit will close and the LED turn On.
Here is a GIF clip of Running Time. |
:: ARDUINO PROJECTS LIST ::
[ Click Here to See all ARDUINO Projects ]
By: Ali Radwani
LED Fade-Off from Prototype to Gadget
Learning about : Circutes, Capasitor, Push-Button
Subject: LED Fade-off apply it on a PCB Board.
[NOTE: We are working on Electronic Devices, Voltage, Resistors and other Electronic Parts that may Become HOT due to un-stable current or Wrong Wire Connections.. PLEASE BE CAUTIOUS AND TAKE SAFETY NEEDED PROCEDURES.]
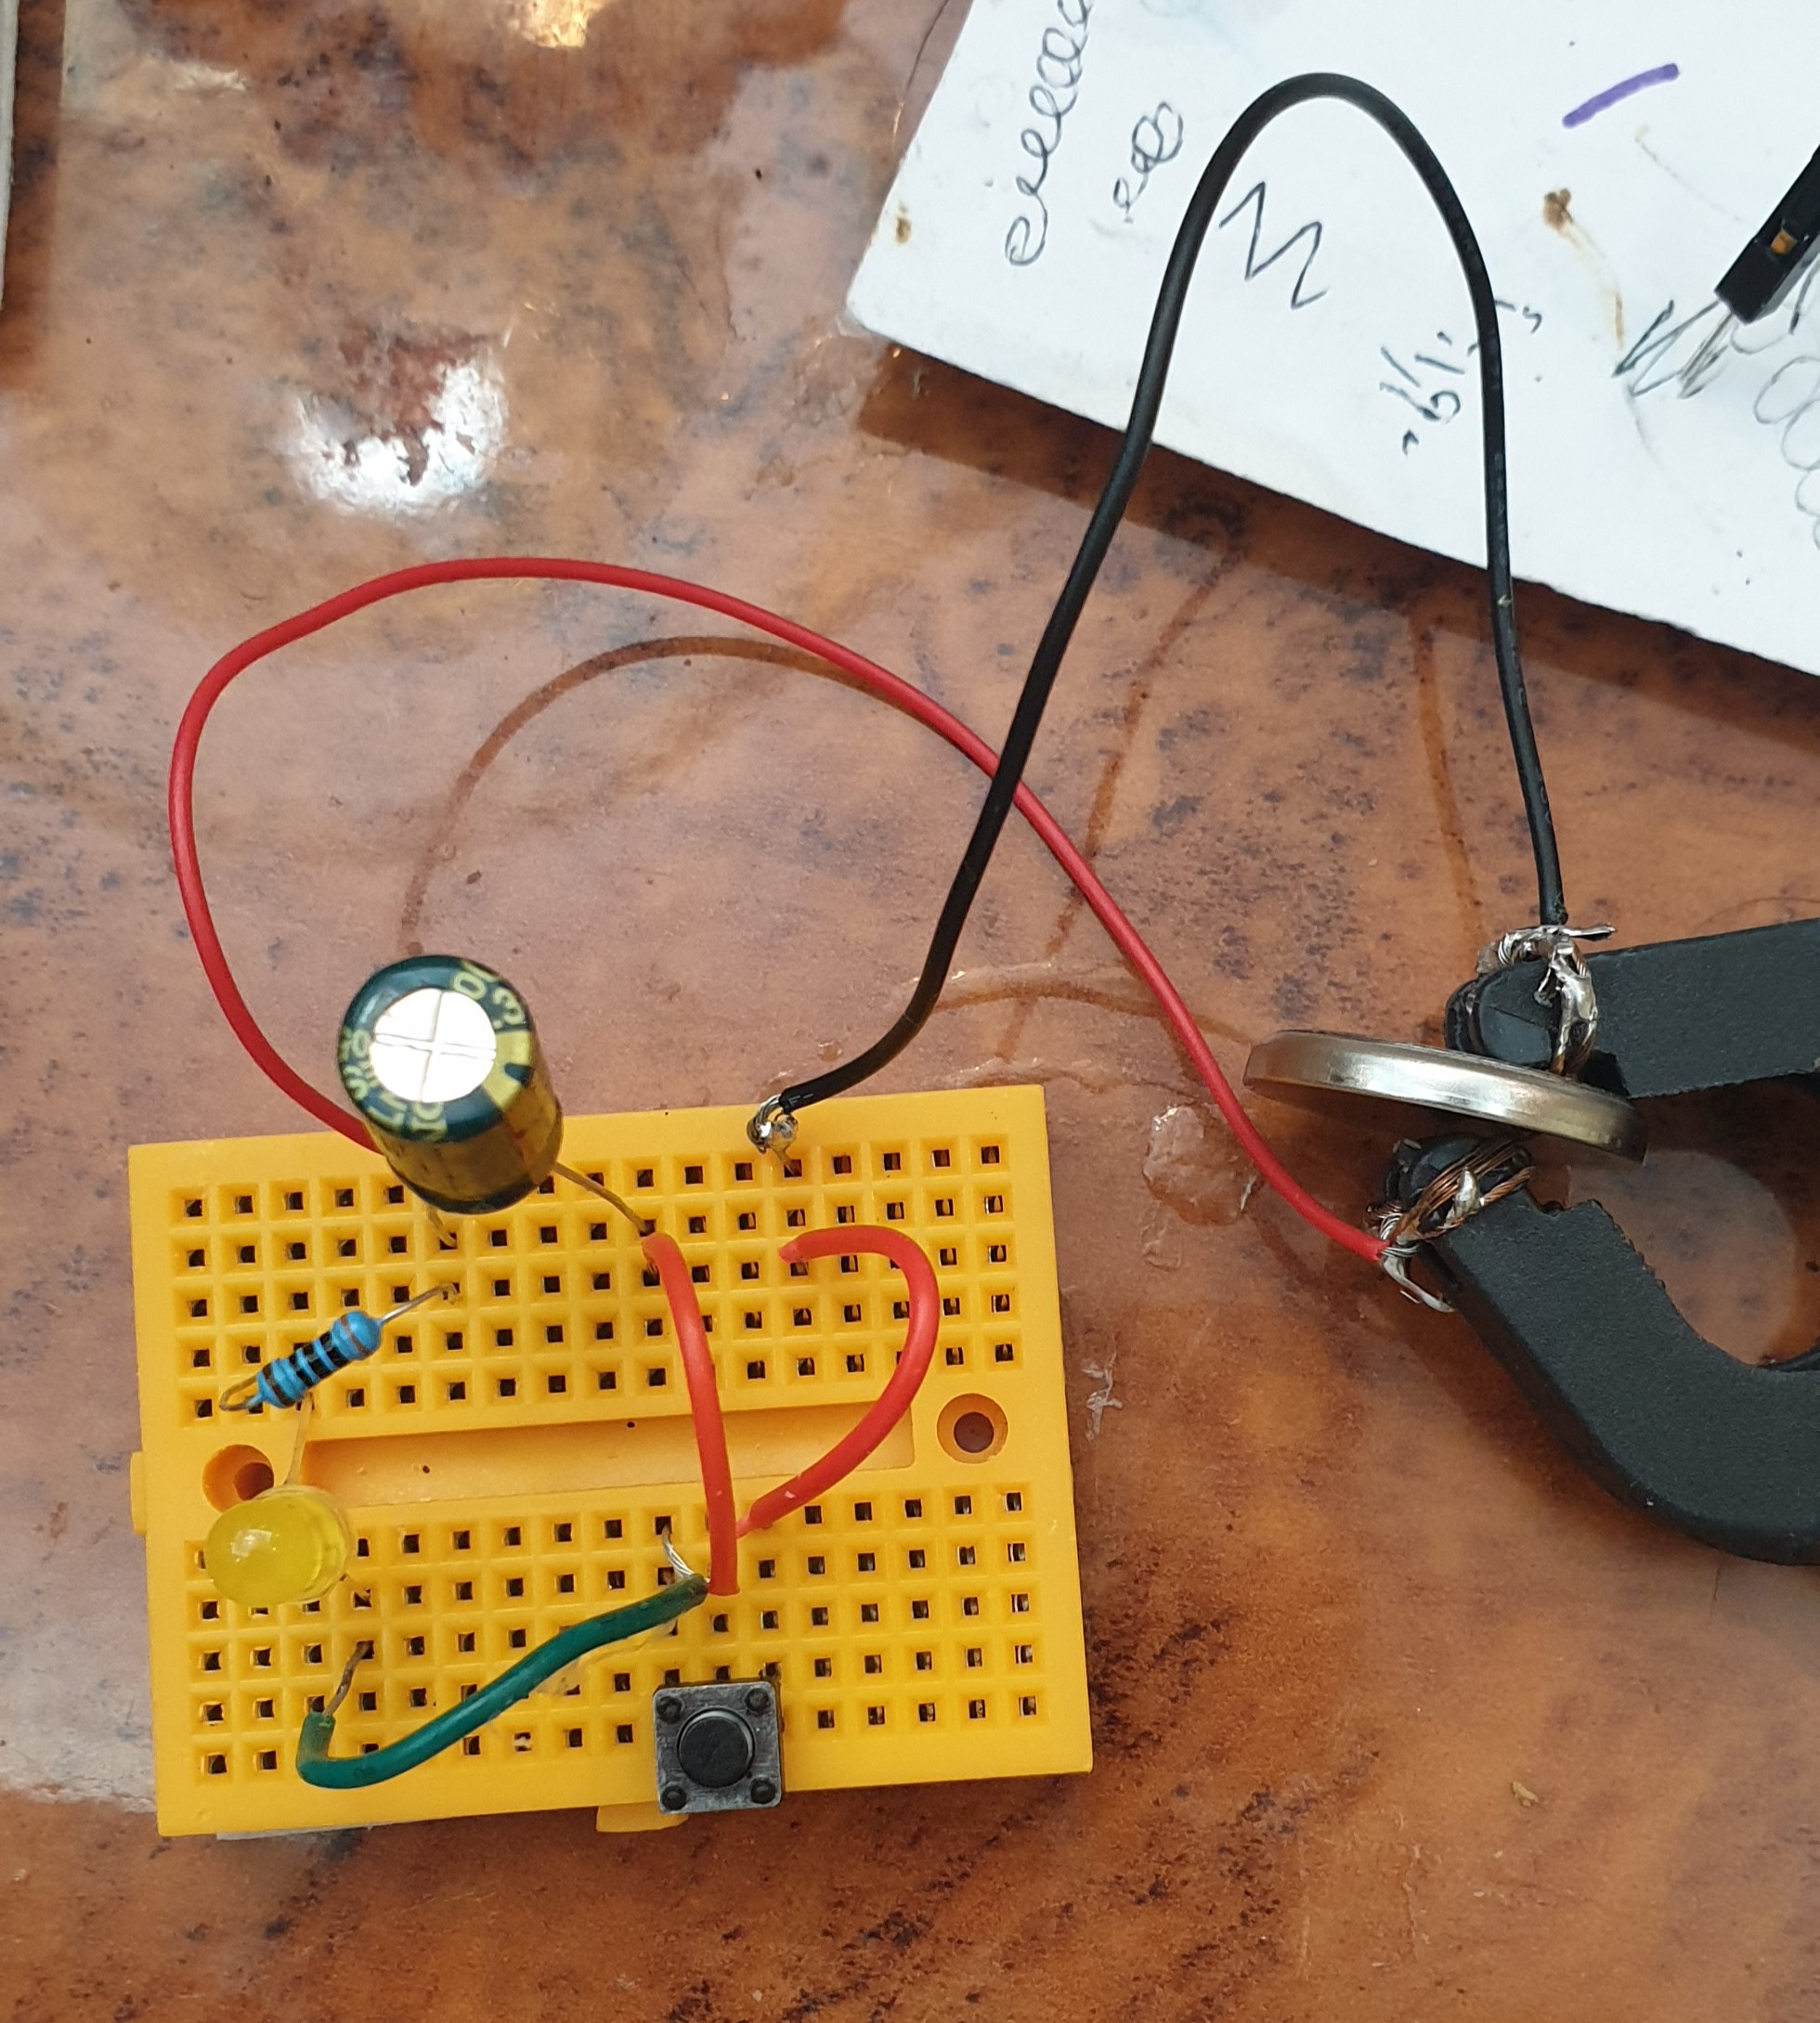
In one of my previous Post [Read Here] I did some connection on a breadboard using BC547 and a Capacitor to make an LED Fade-off in 60sec after pushing a button. In this post we will convert that circuit a simpler circuit doing the same thing from a breadboard to a PCB to be as a Gadget.
What we Need: Here is a list of what we will use:
- 1 LED (I will use a yellow one)
- 1 PCB Board 5x7cm.
- 1 1000uF 6.3v Capacitor.
- 1 Resistor 300 ohm.
- 1 2pin Push Button.
- 1 CR2032 Lithium Cell 3V Battery.
Connection: All the connections will be on a 5x7cm PCB Board, I use a thin steel wire to create a strap to hold the Battery, and:
- Connect the Negative (-) Battery to Pin1 of the Push Button.
- Pin2 of the Push Button will be connected to the Negative (-) pin of the Capacitor.
- Connect the 300ohm Resistor Between (+) Pin of the Capacitor and the (+) Pin of the LED.
- The Negative(-) Pin of the LED will be connected to the Pin2 of the Push Button.
Here is all connections on a small breadboard.
 |
Here I copy the circuit on a small 5x7cm PCB.
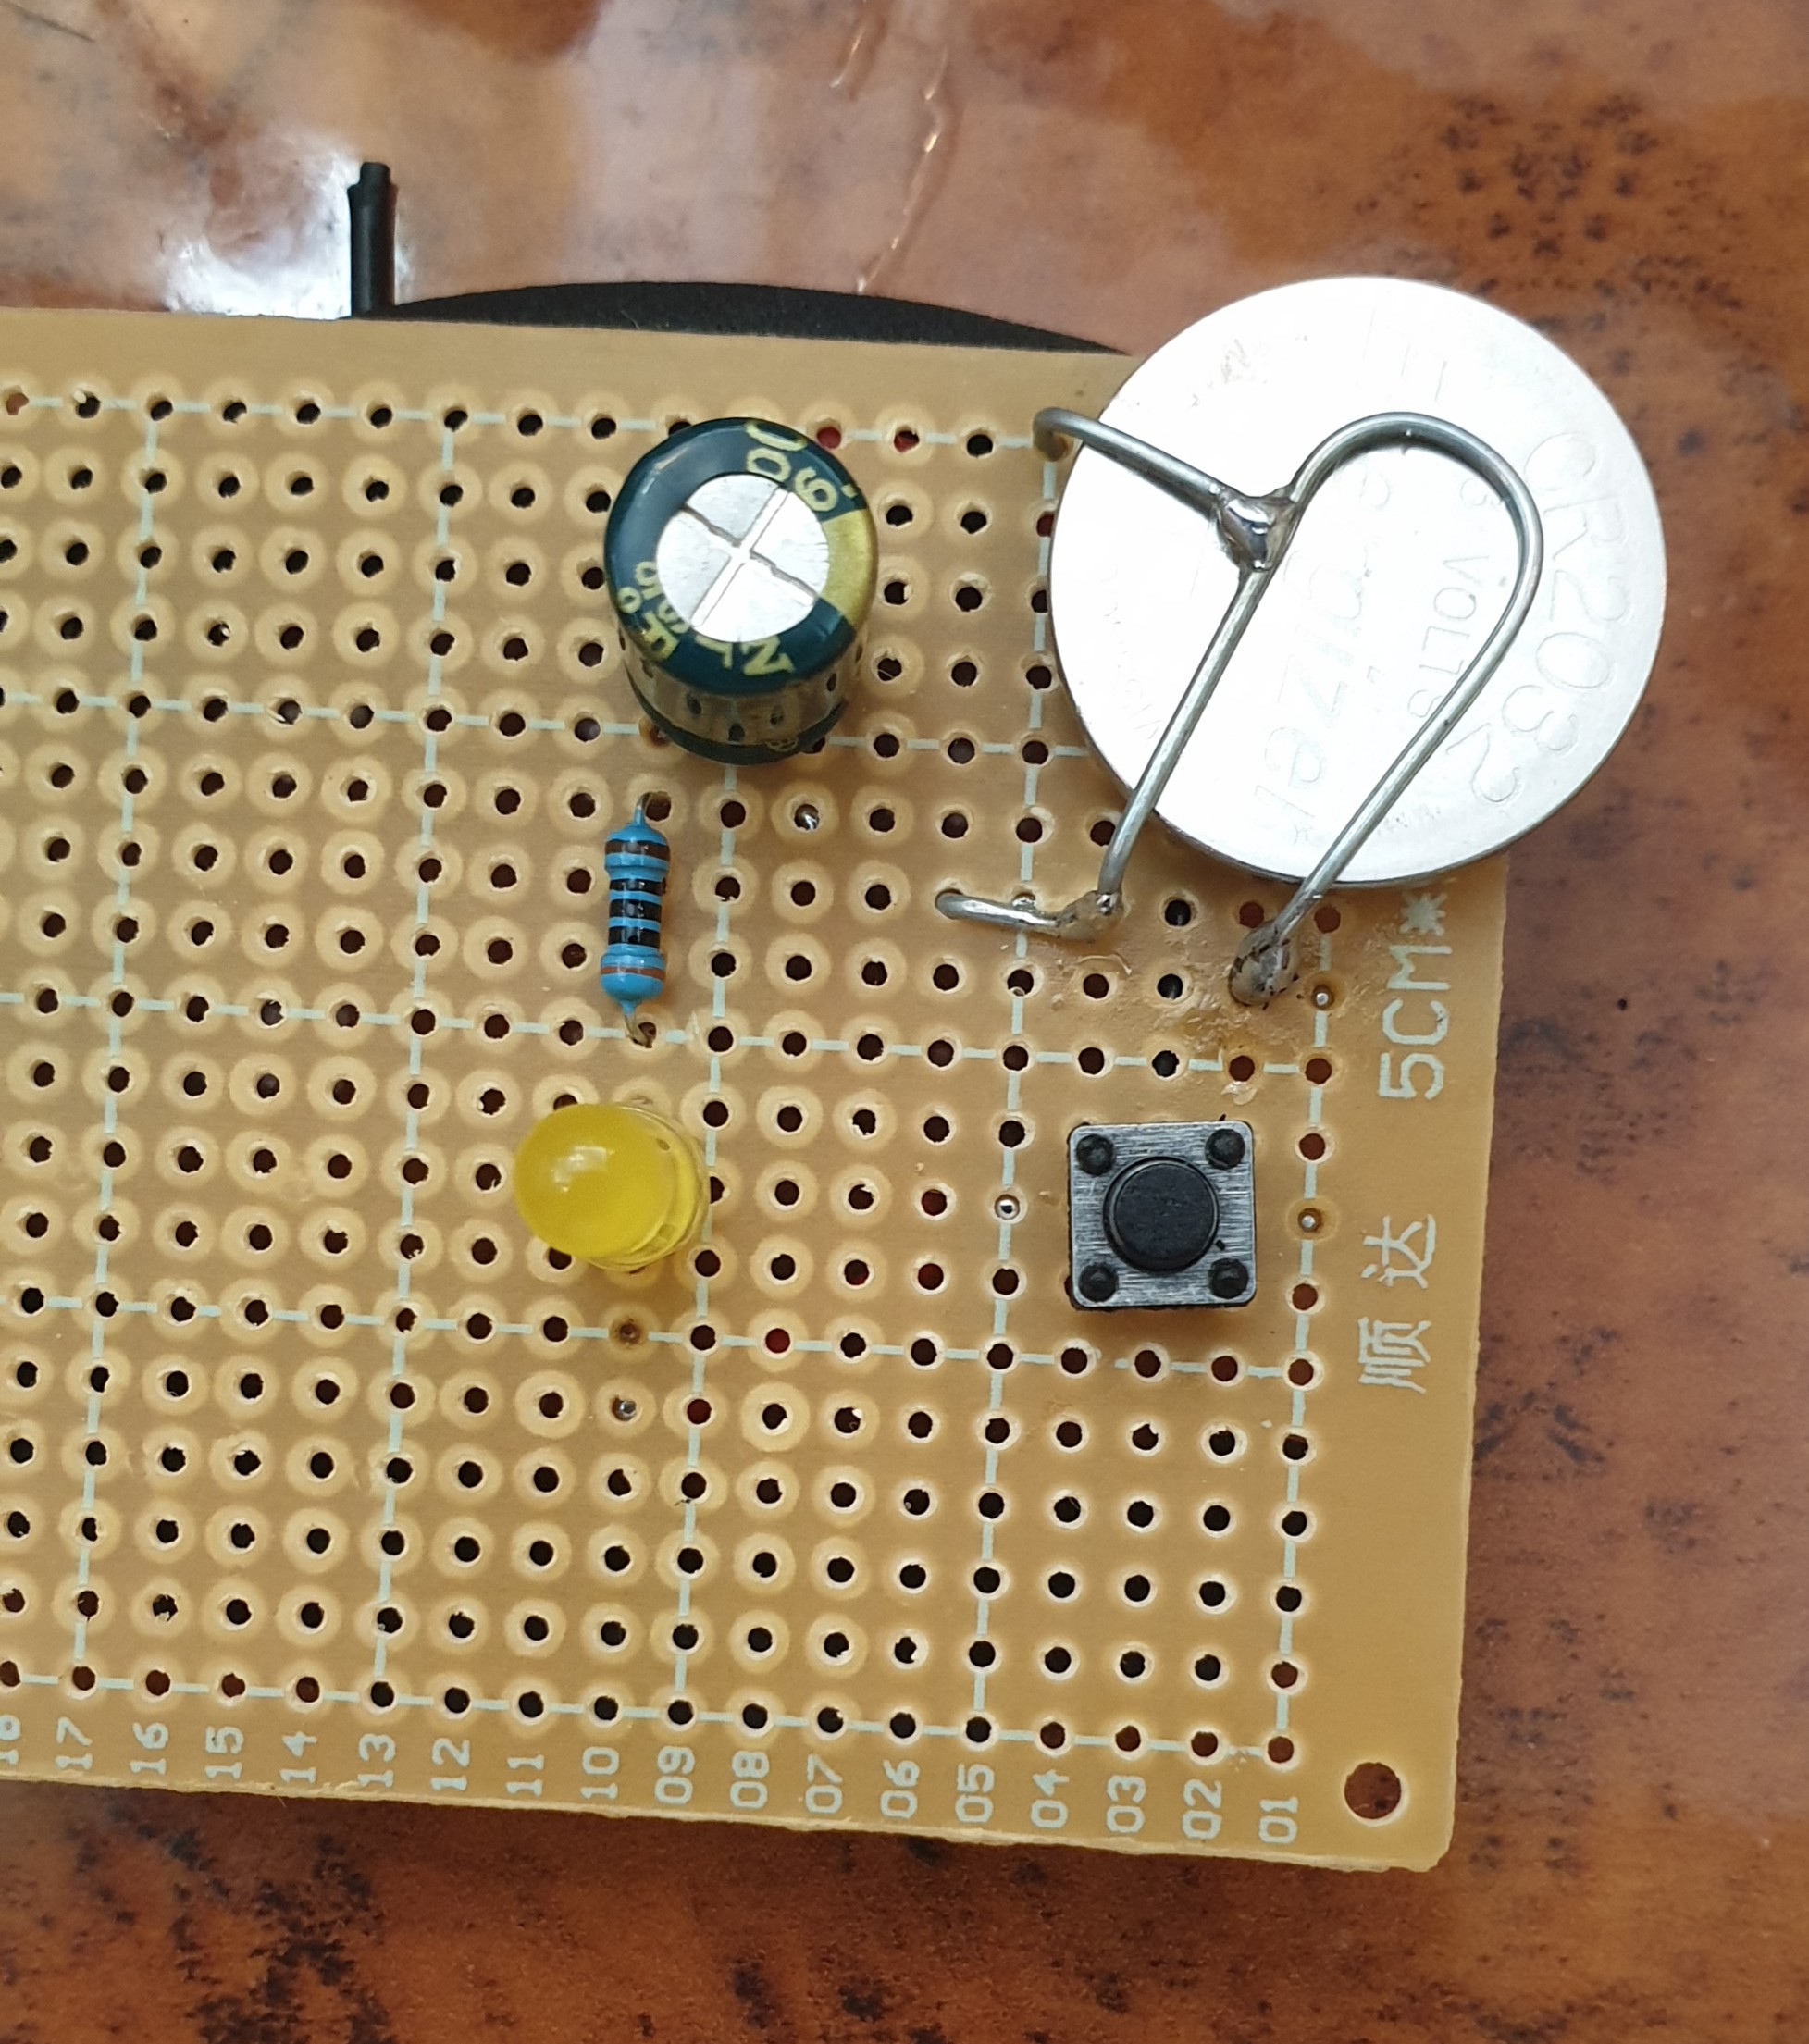 |
Back side Connections.
 |
Finslly, I cut the PCB to a smaller size and Label it.
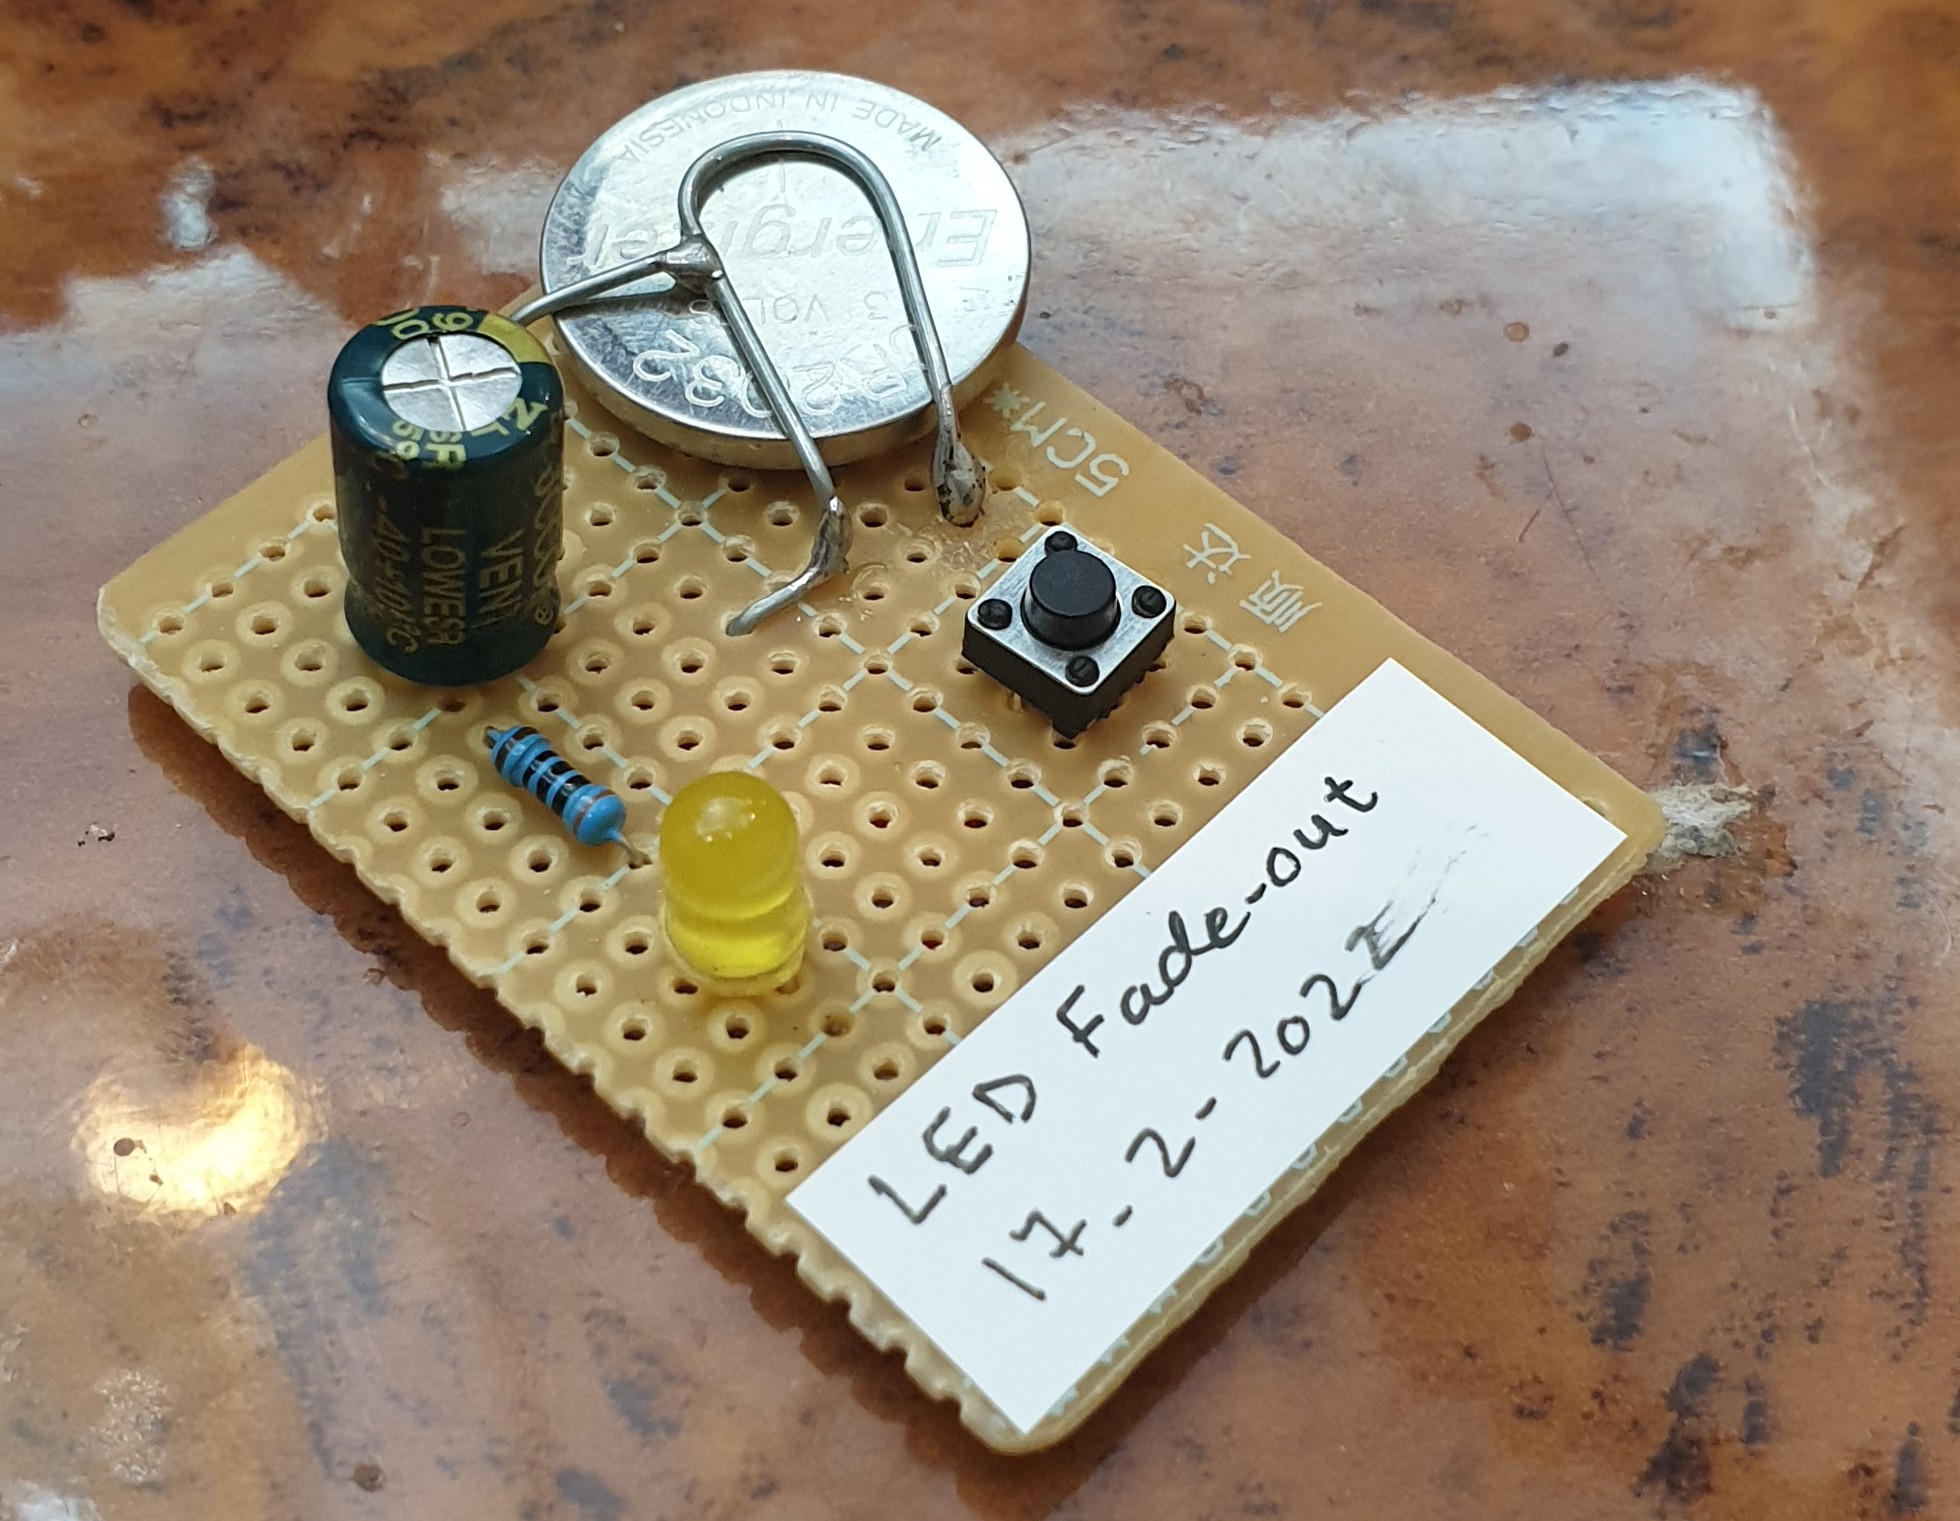 |
Now once we Push the Button the LED Turns On and Start Fading-Out. [you may need to give 5-10sec to charge the Capacitor before seeing the Fading Effect]
:: ARDUINO PROJECTS LIST ::
[ Click Here to See all ARDUINO Projects ]
To Download the ARDUINO Project [Code and Diagram] files {No Code in this Project}
By: Ali Radwani
Arduino: Morse Code Blinking
Learning : ARDUINO, Morse-Code, Electronic Circuit
Subject: LED to Blink Morse Code
[NOTE: We are working on Electronic Devices, Voltage, Resistors and other Electronic Parts that may Become HOT due to un-stable current or Wrong Wire Connections.. PLEASE BE CAUTIOUS AND TAKE SAFETY NEEDED PROCEDURES.]
Some days ago I just went through some pages of Morse-Code. Then I got an idea to write a code for the ARDUINO to blink an LED for some letters.
Morse Code: In a basic and easy way, Morse code is a Dots (.) and Dashs (-) to present alphabet characters. So A = .- ; B = -… ; C = -.-. and so on (Morse code table in Wikipedia)
Morse Code Rules:
if we assume a unit is U, then :
- 1. A Dot is 1U.
- 2. A Dash is 3U.
- 3. A Space between a part of the same letter is 1U.
- 4. A Space between letters is 3U.
- 5. A Space between words is 7U.
In our project here, the Unite U will be the Delay in Arduino, so the LED will be High for 1U to represent a Dot (.) and will be High for 3U to represent the Dash (-).
What we will Need: I will use a Breadboard, ARDUINO Nano , One Red LED, One 300 ohm Resitro, Jumper Wire.
- A BreadBoard.
- ARDUINO Nano.
- 1 Red LED.
- 1 Resistor [I will Use 300 ohm]
- Some Jumper Wire.
Connection:
- The ARDUINO Nano will be on the Breadboard
- Connect D13 on Nano to Column 11 on the Breadboard using Jumper-wire.
- Connect the Resistor on Column 11 and Column 6 on the Breadboard.
- Connect the LED Anode (+) pin on the Column 6 on the Breadboard.
- Connect the LED Cathode (-) pin to the Column 4 on the Breadboard.
- Connect the Column 4 on the Breadboard to the Cathode Row on the Breadboard using Jumper-wire.
- Connect the Column 17 on the Breadboard (Nano GND pin) to Cathode Row on Breadboard using Jumper-wire.
- Connect the Column 19 on the Breadboard (Nano 5V pin) to the Anode Row on Breadboard using Jumper-wire.
Image of the Connected Breadboard. |
The Coding: First we need to define the Dots and Dashs for each Alphbets, in this example I will do only three carecters for my Name A L I, I will create an array of 0 and 1, 0 is a dot, 1 is a dash, here is the code:
int A [ ] = {0,1} ; // 0 = dot (1U), 1 = dash (3U)
int L [ ] = {0,1,0,0} ;
int I [ ] = {0,0} ;
Here is declearing the Unite, u as Delay time:
int u = 170 ; // 1U = 170 delay.
and here is the Arduino pin I will use:
int ledpin = 13 ;
in the void setup, we will only write one line to set the pinMode(ledpin, OUTPUT)
then I create a function to read the letter array-content
 // CODE: Function to read the letters contents.

void letter(int c [], byte s)
{
      if (c[s] == 0)   // dot
        {morse1(ledpin, 1) ;}
      if (c[s] == 1)   // dash
        {morse1(ledpin, 3) ;}
}
In this code, I will let the LED to Blink in Morse code saying “ALI” [My Name 🙂 ]. You may add the Morse code in the Application and making the LED to send you message. Code Available in Download Page.
RUN TIME.. |
:: ARDUINO PROJECTS LIST ::
[ Click Here to See all ARDUINO Projects ]
To Download the ARDUINO Project [Code and Diagram] files Click-Here
By: Ali Radwani
Python Project: Properties Maintenance System P12
Subject: Writing a Full Application for Properties Maintenance System [Delete Maintenance Request]
Learning : Python, Math, SQL, Logeic
[NOTE: To keep the code as simple as we can, We WILL NOT ADD any user input Varevecations. Assuming that our user will Enter the right inputs.]
In this part we will continue write the Functions in Maintenance Request Service. Here we will write the Function to Delete a Maintenance Request.
This is very easy and short Function, first we will list all the requests by calling the def show_maintenance_request, after that we will ask the user to Select the ID of the request to be Delete.
Validation
We will use simple validation code on the User input for the following aspects:
- If the user input E to Exit.
- If the user input digits or Not.
- If the ID is available in the system/Database.
- If the user input Y to confirm the Deleting prosses.
So if the user input pass all the Validations, and he confirm the Deleting, the Record will be Deleting using the following SQL Command:
c.execute (“delete from maint_request_t where m_r_id ={}”.format(int(delete_this)))
db_conn.commit()

|
We done with this part, Next we will write a code to change a request status.
:: PMS Parts ::
| Part 1 | Part 2 | Part 3 | Part 4 | Part 5 | Part 6 | Part 7 |
| Part 8 | Part 9 | Part 10 | Part 11 | Part 12 | Part 13 | Part 14 |
..:: Have Fun with Coding ::.. 🙂
To Download my Python code (.py) files Click-Here
By: Ali Radwani
Python Project: Properties Maintenance System P11
Subject: Writing a Full Application for Properties Maintenance System [Show Maintenance Request]
Learning : Python, Math, SQL, Logeic
[NOTE: To keep the code as simple as we can, We WILL NOT ADD any user input Varevecations. Assuming that our user will Enter the right inputs.]
In this part we will continue write the Functions in Maintenance Request Service. Here we will write the Function to Show Maintenance Request.
Show all Request In this Function we will display all the Properties we have in the system, then the user will Select the ID of the Property, after that we will display all Maintenance Jobs that we have in the system (Maintenance for); again the user need the Select the Job ID and if the required job is not in the list the user need to go-back and add it to the system first. After that the user will Select current Job-Status [also if not in the system we need to add it], then entering the Date of starting the Maintenance, finally the user can write any Notes or just press enter to save the request. With any question above the user can Exit the function by interning [E].
Here are some code sample..
Table header
print(‘ ‘*6,’ID’,’ ‘*3,’Property ID’,’ ‘*5,’Maintenance Date’,’ ‘,’Maintenance For’,’ ‘*7,’Job Status’,’ ‘*12,’Note’)
print(‘ ‘*4,’-‘*120)
Code to fetch-all data in the Maintenance Request Table.
c.execute (“select * from maint_request_t “)
dataset = c.fetchall()
To Get the Property Type, we call our get_lookup_values Function..
prop_type_id = get_lookup_values(‘properties_t’,’p_id’,dataset[each][1])
p_type_name = get_lookup_values(‘prop_type_t’,’pt_id’,prop_type_id[0][2])
To save the time, all the code is available in the Download Page.
:: PMS Parts ::
| Part 1 | Part 2 | Part 3 | Part 4 | Part 5 | Part 6 | Part 7 |
| Part 8 | Part 9 | Part 10 | Part 11 | Part 12 | Part 13 | Part 14 |
..:: Have Fun with Coding ::.. 🙂
To Download my Python code (.py) files Click-Here
By: Ali Radwani
Taking pictures is not my main daily practices, but when i start playing with my camera, i really enjoy my self.
Thanks for visiting my Space..


