Archive
LED Fade-Off from Prototype to Gadget
Learning about : Circutes, Capasitor, Push-Button
Subject: LED Fade-off apply it on a PCB Board.
[NOTE: We are working on Electronic Devices, Voltage, Resistors and other Electronic Parts that may Become HOT due to un-stable current or Wrong Wire Connections.. PLEASE BE CAUTIOUS AND TAKE SAFETY NEEDED PROCEDURES.]
In one of my previous Post [Read Here] I did some connection on a breadboard using BC547 and a Capacitor to make an LED Fade-off in 60sec after pushing a button. In this post we will convert that circuit a simpler circuit doing the same thing from a breadboard to a PCB to be as a Gadget.
What we Need: Here is a list of what we will use:
- 1 LED (I will use a yellow one)
- 1 PCB Board 5x7cm.
- 1 1000uF 6.3v Capacitor.
- 1 Resistor 300 ohm.
- 1 2pin Push Button.
- 1 CR2032 Lithium Cell 3V Battery.
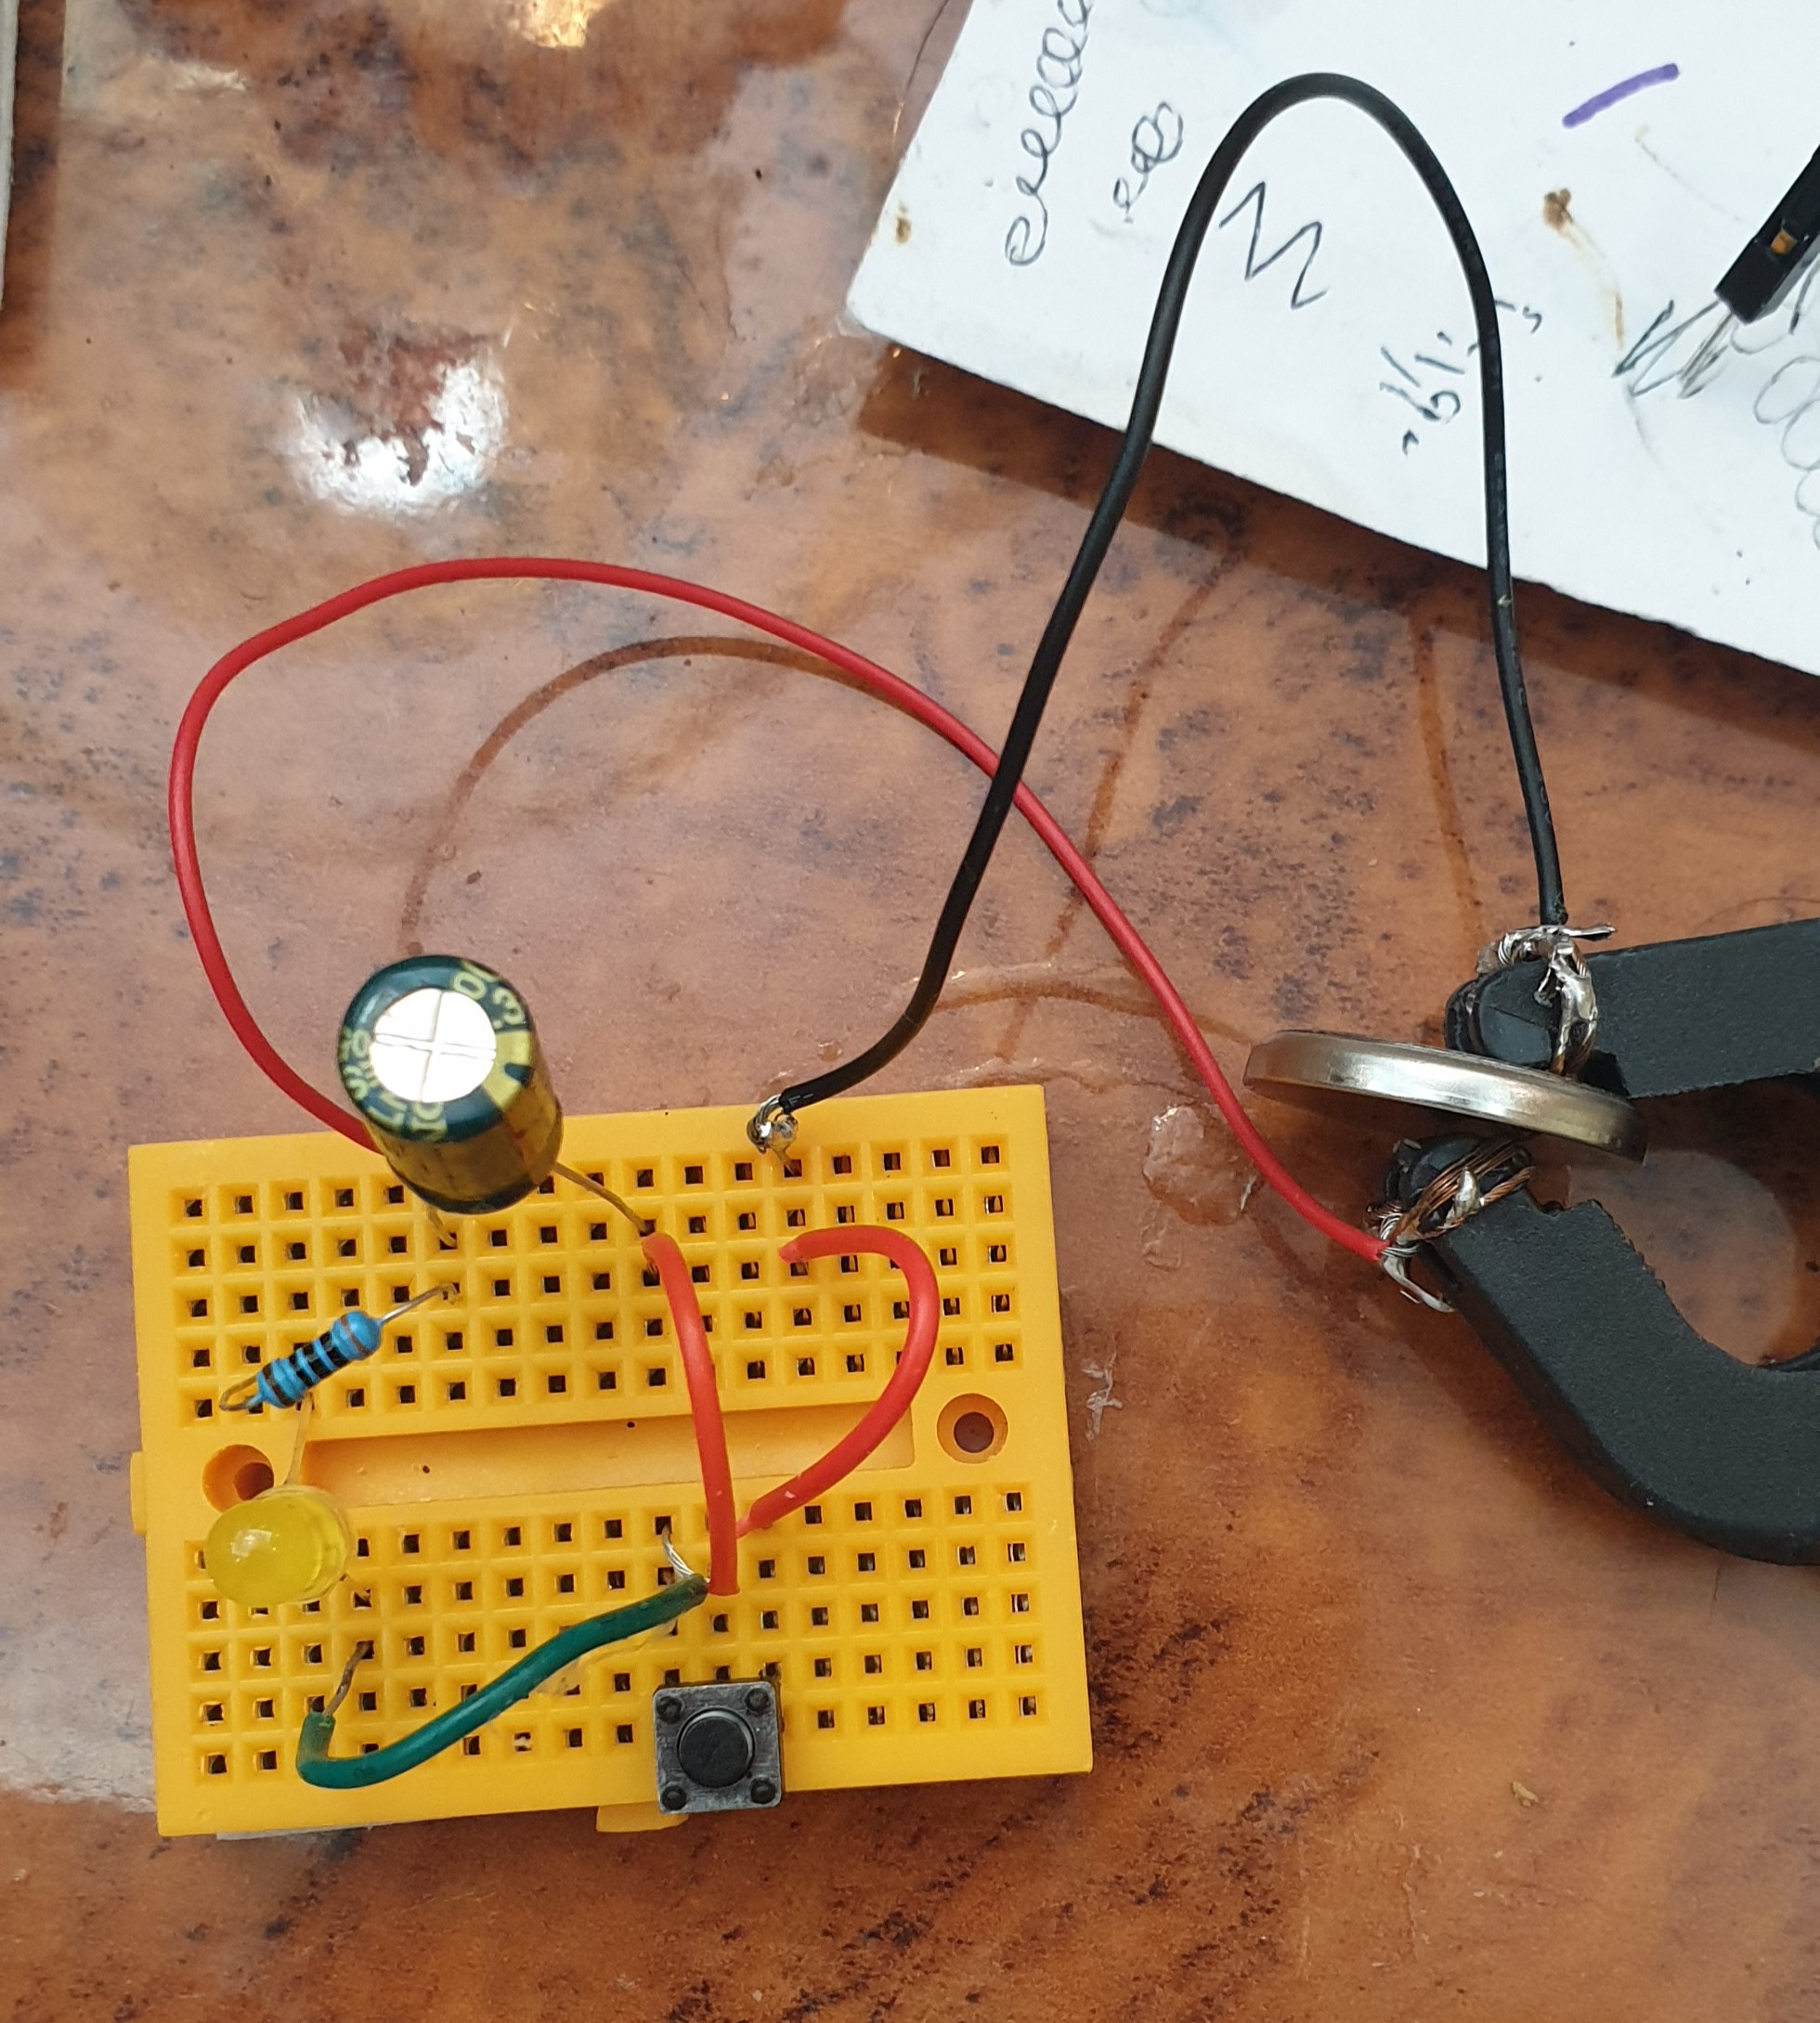
Connection: All the connections will be on a 5x7cm PCB Board, I use a thin steel wire to create a strap to hold the Battery, and:
- Connect the Negative (-) Battery to Pin1 of the Push Button.
- Pin2 of the Push Button will be connected to the Negative (-) pin of the Capacitor.
- Connect the 300ohm Resistor Between (+) Pin of the Capacitor and the (+) Pin of the LED.
- The Negative(-) Pin of the LED will be connected to the Pin2 of the Push Button.
Here is all connections on a small breadboard.
 |
Here I copy the circuit on a small 5x7cm PCB.
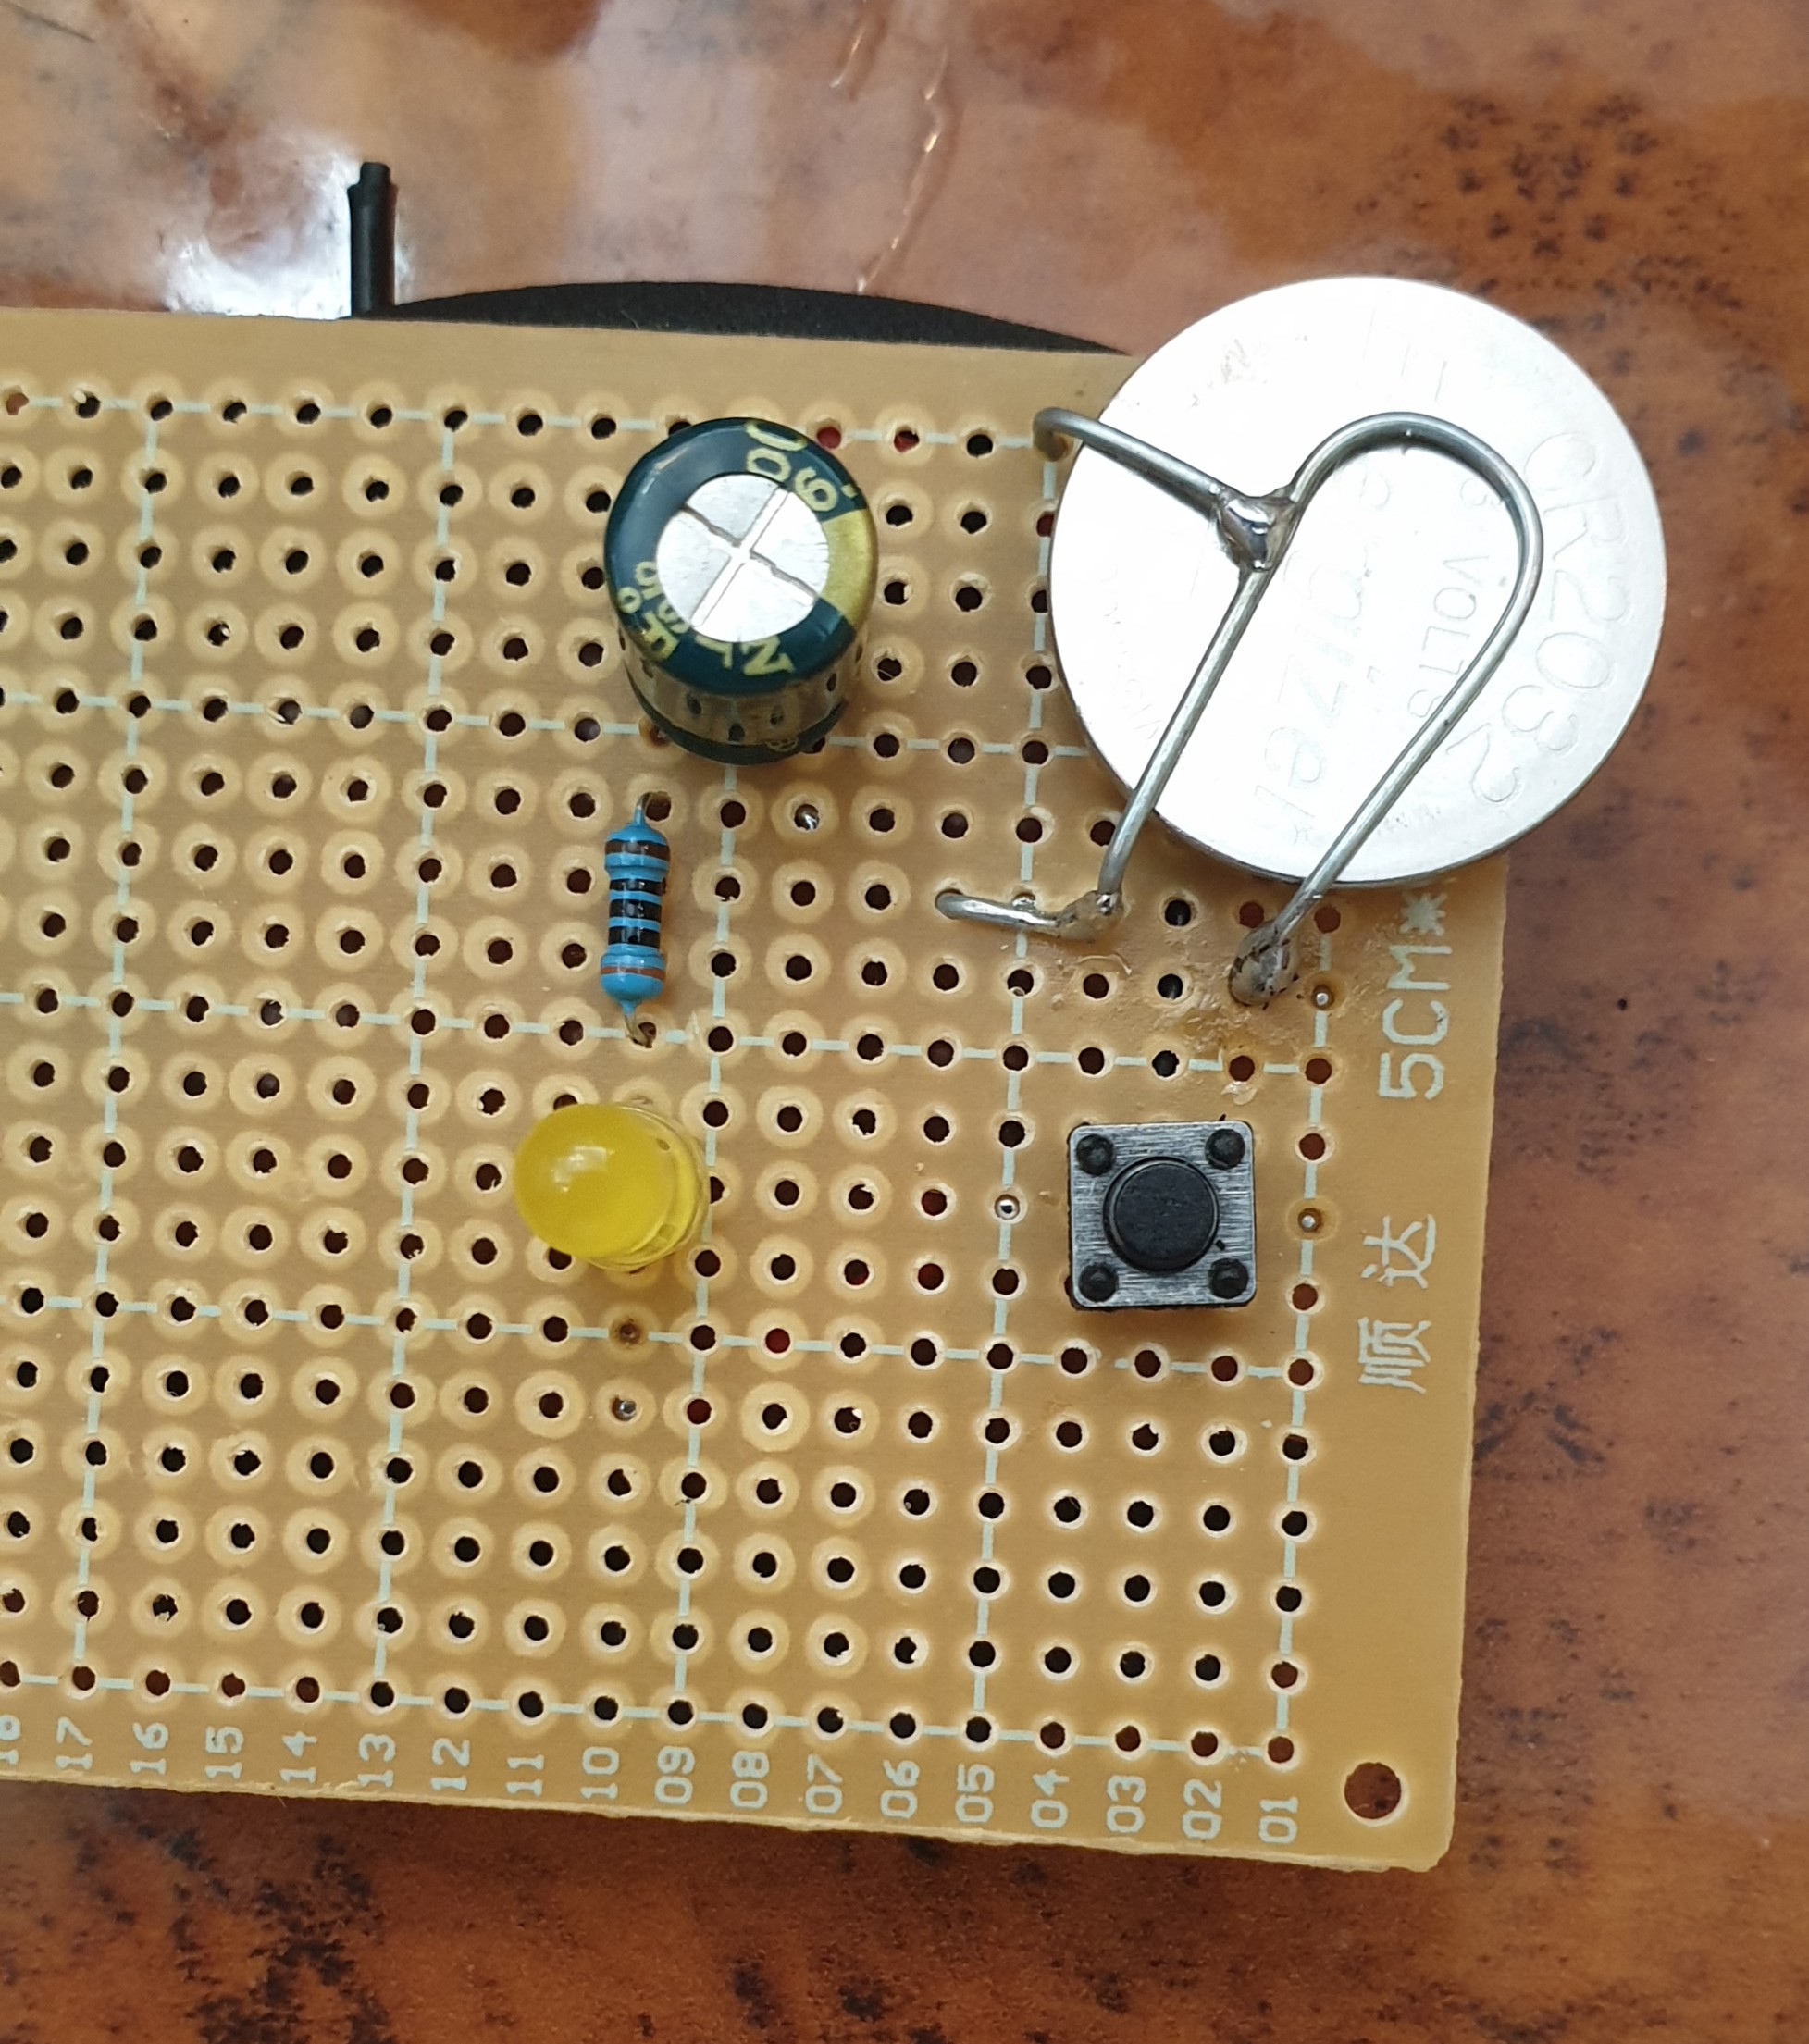 |
Back side Connections.
 |
Finslly, I cut the PCB to a smaller size and Label it.
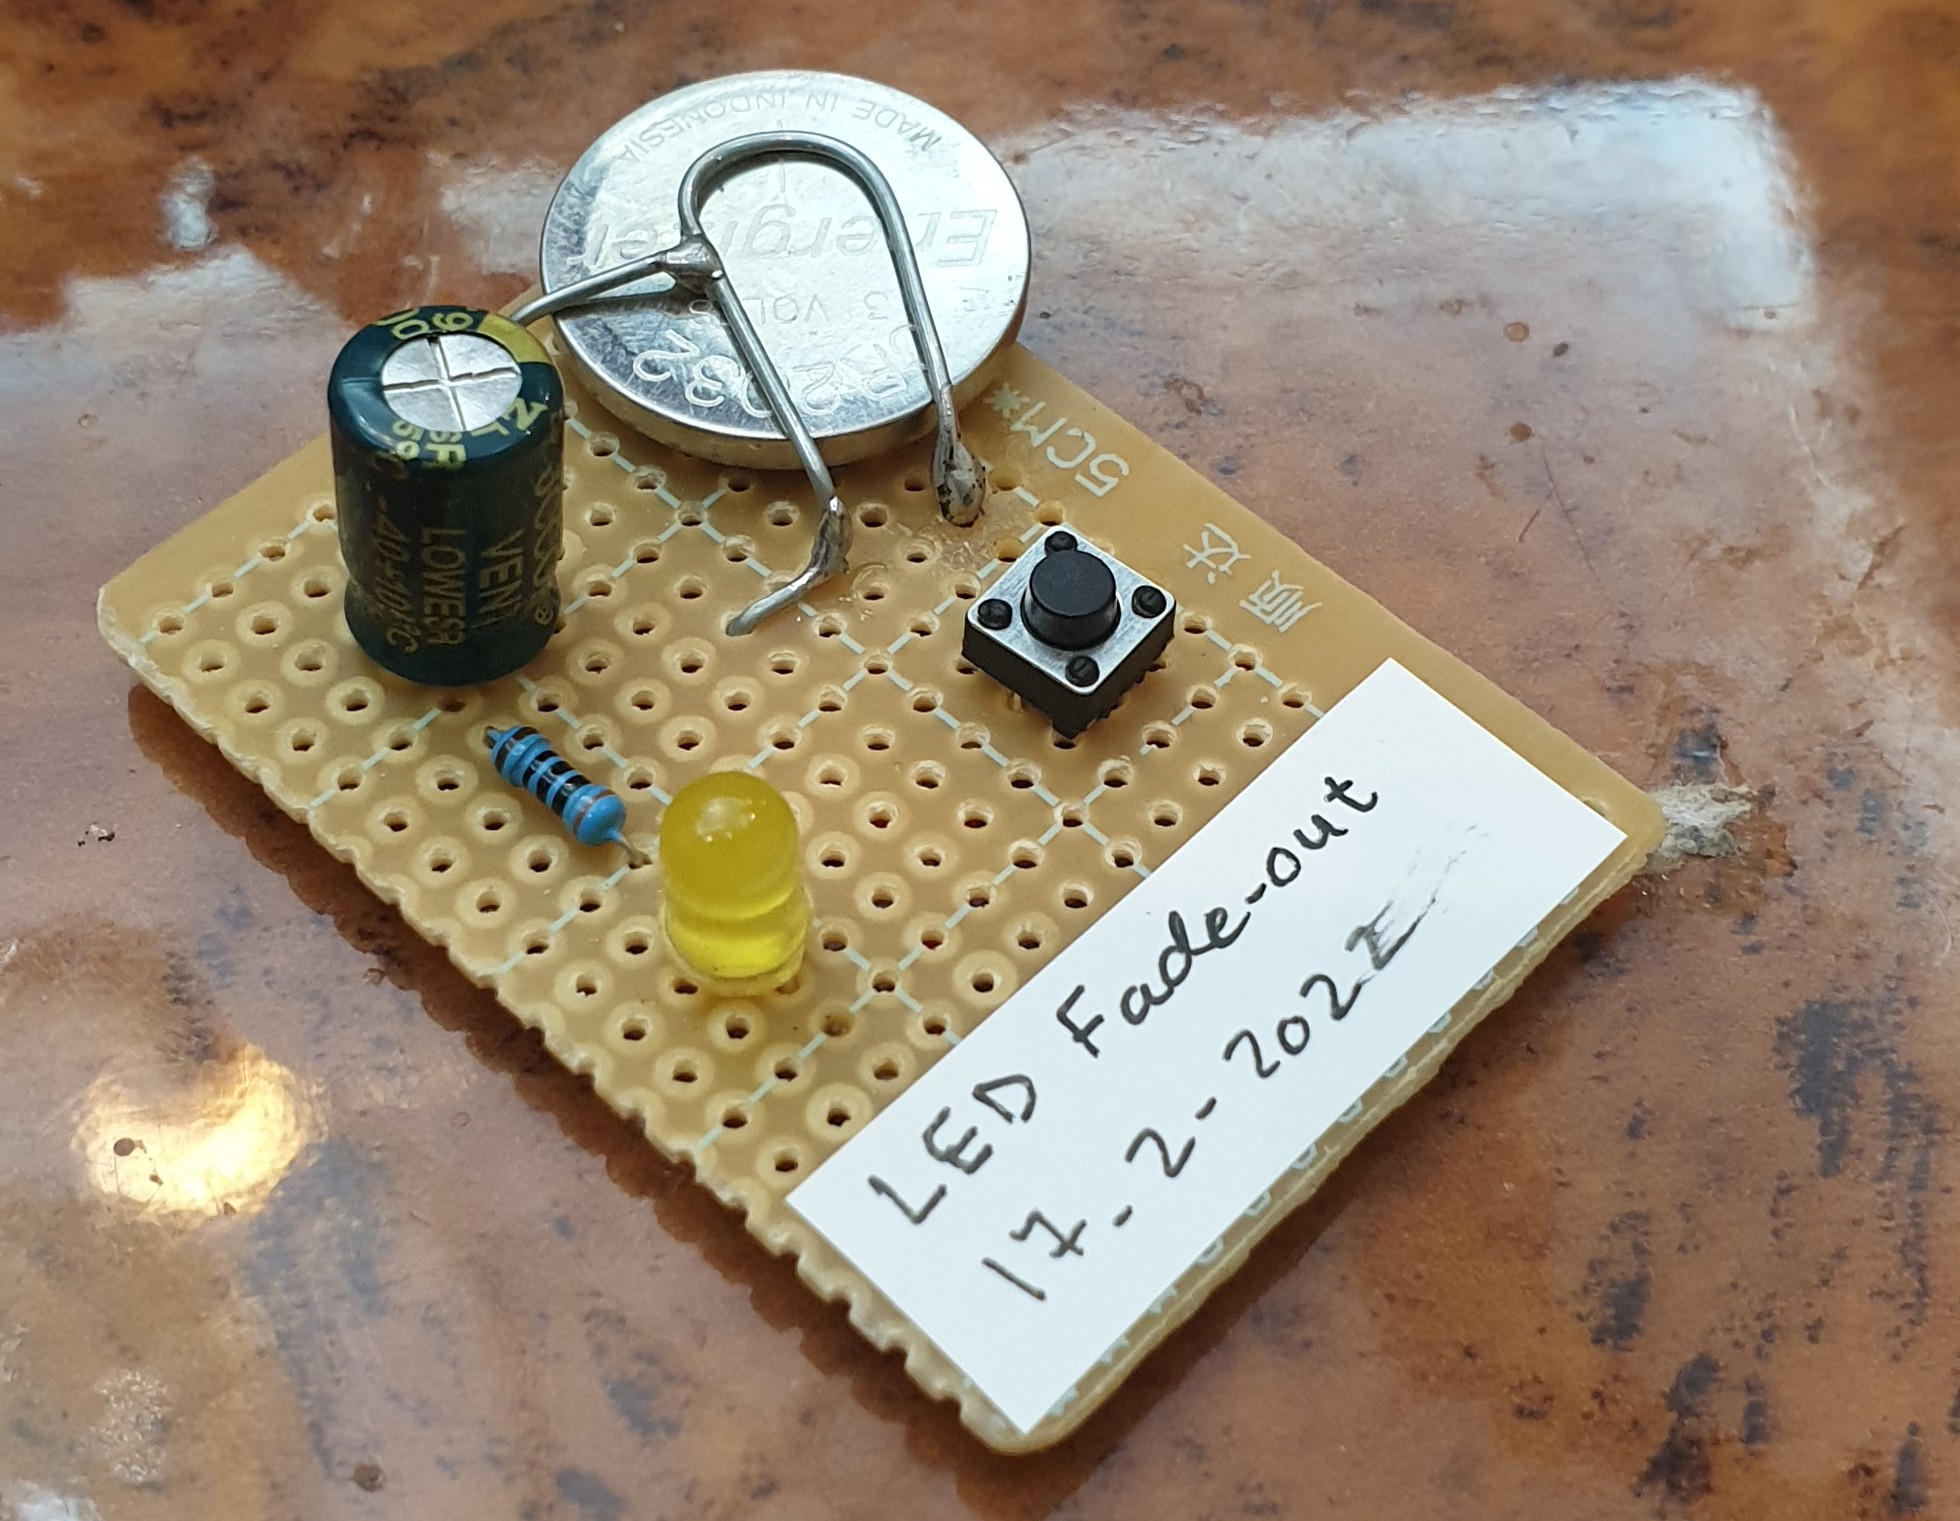 |
Now once we Push the Button the LED Turns On and Start Fading-Out. [you may need to give 5-10sec to charge the Capacitor before seeing the Fading Effect]
:: ARDUINO PROJECTS LIST ::
[ Click Here to See all ARDUINO Projects ]
To Download the ARDUINO Project [Code and Diagram] files {No Code in this Project}
 Follow me on Twitter..
By: Ali Radwani
Arduino Project: LED Fade-off in 60sec using BC547
Learning : Circutes
Subject: LED Fade-off in 60sec using BC547
[NOTE: We are working on Electronic Devices, Voltage, Resistors and other Electronic Parts that may Become HOT due to un-stable current or Wrong Wire Connections.. PLEASE BE CAUTIOUS AND TAKE SAFETY NEEDED PROCEDURES.]
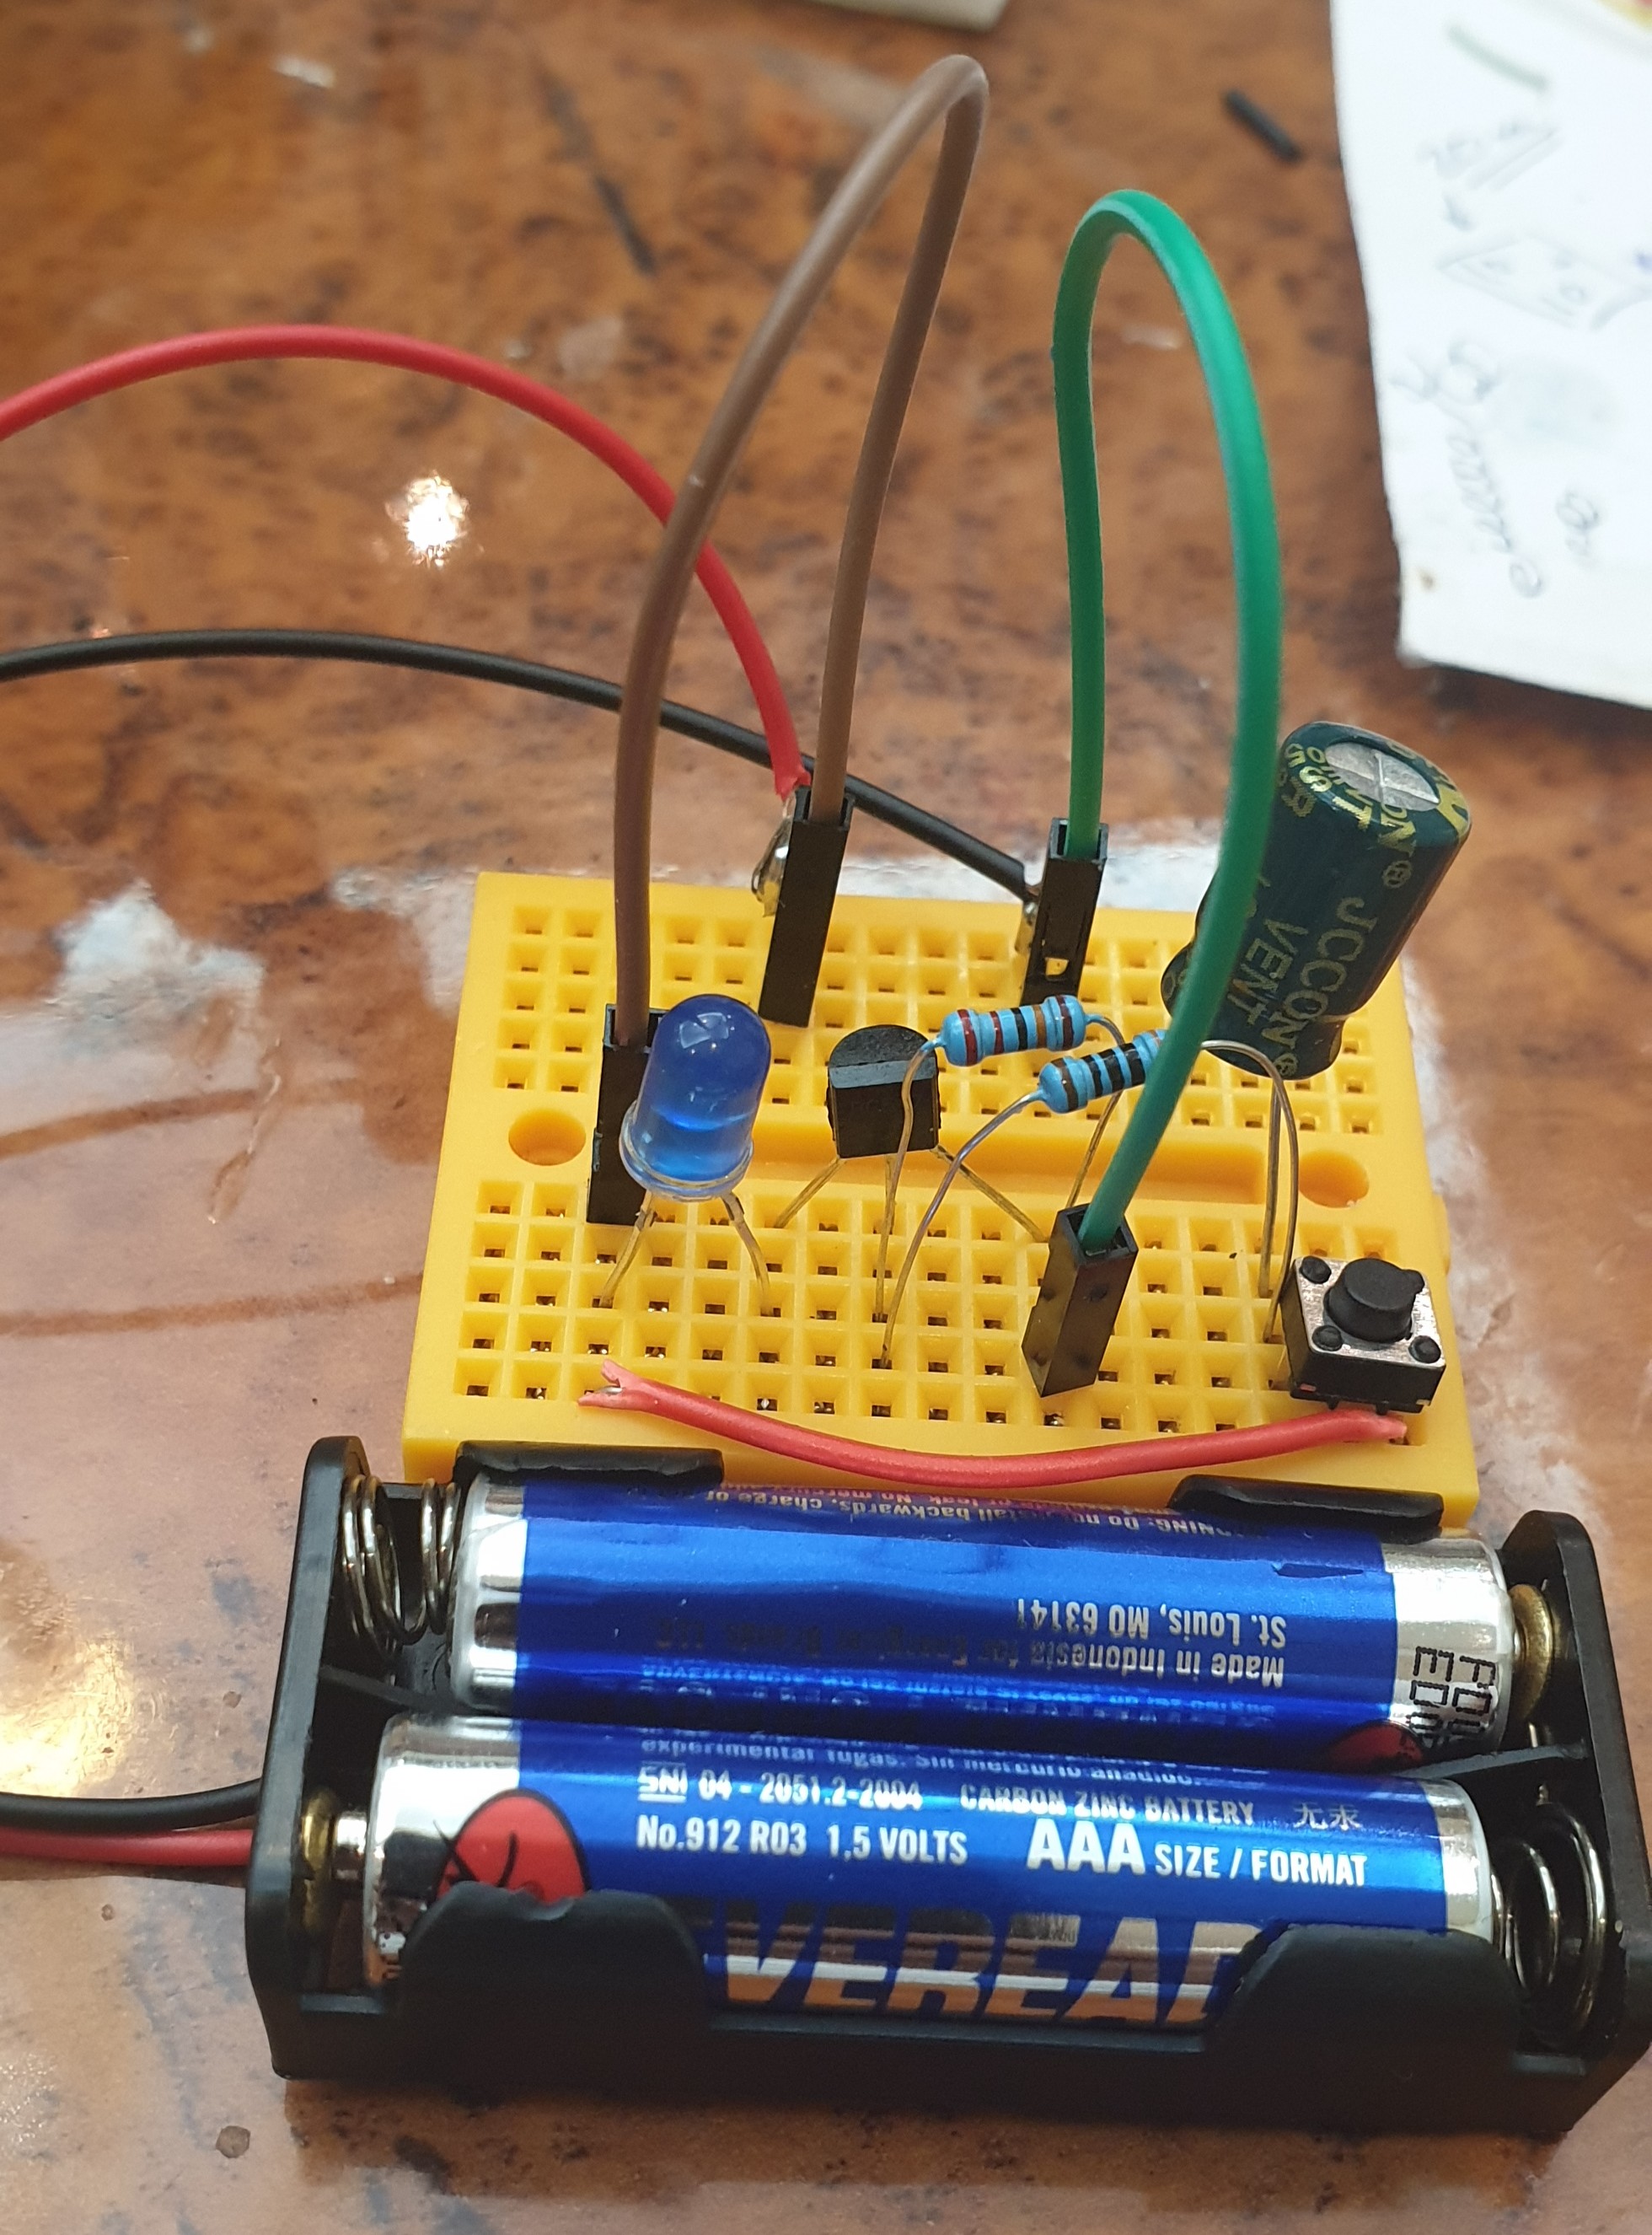
In most Projects here i am using ARDUINO, but in this Project we will use a Transistor BC547 to make an LED Fade-off.
What we Need In this Project we will use the Following:
- 1 LED.
- 1 BC547 Transistor.
- BreadBoard
- 2 300 ohm Resistors.
- 1 Capacitor.
- 1 2pin push button.
- Some Jumper wires.
- 3V Battery.
Connections:
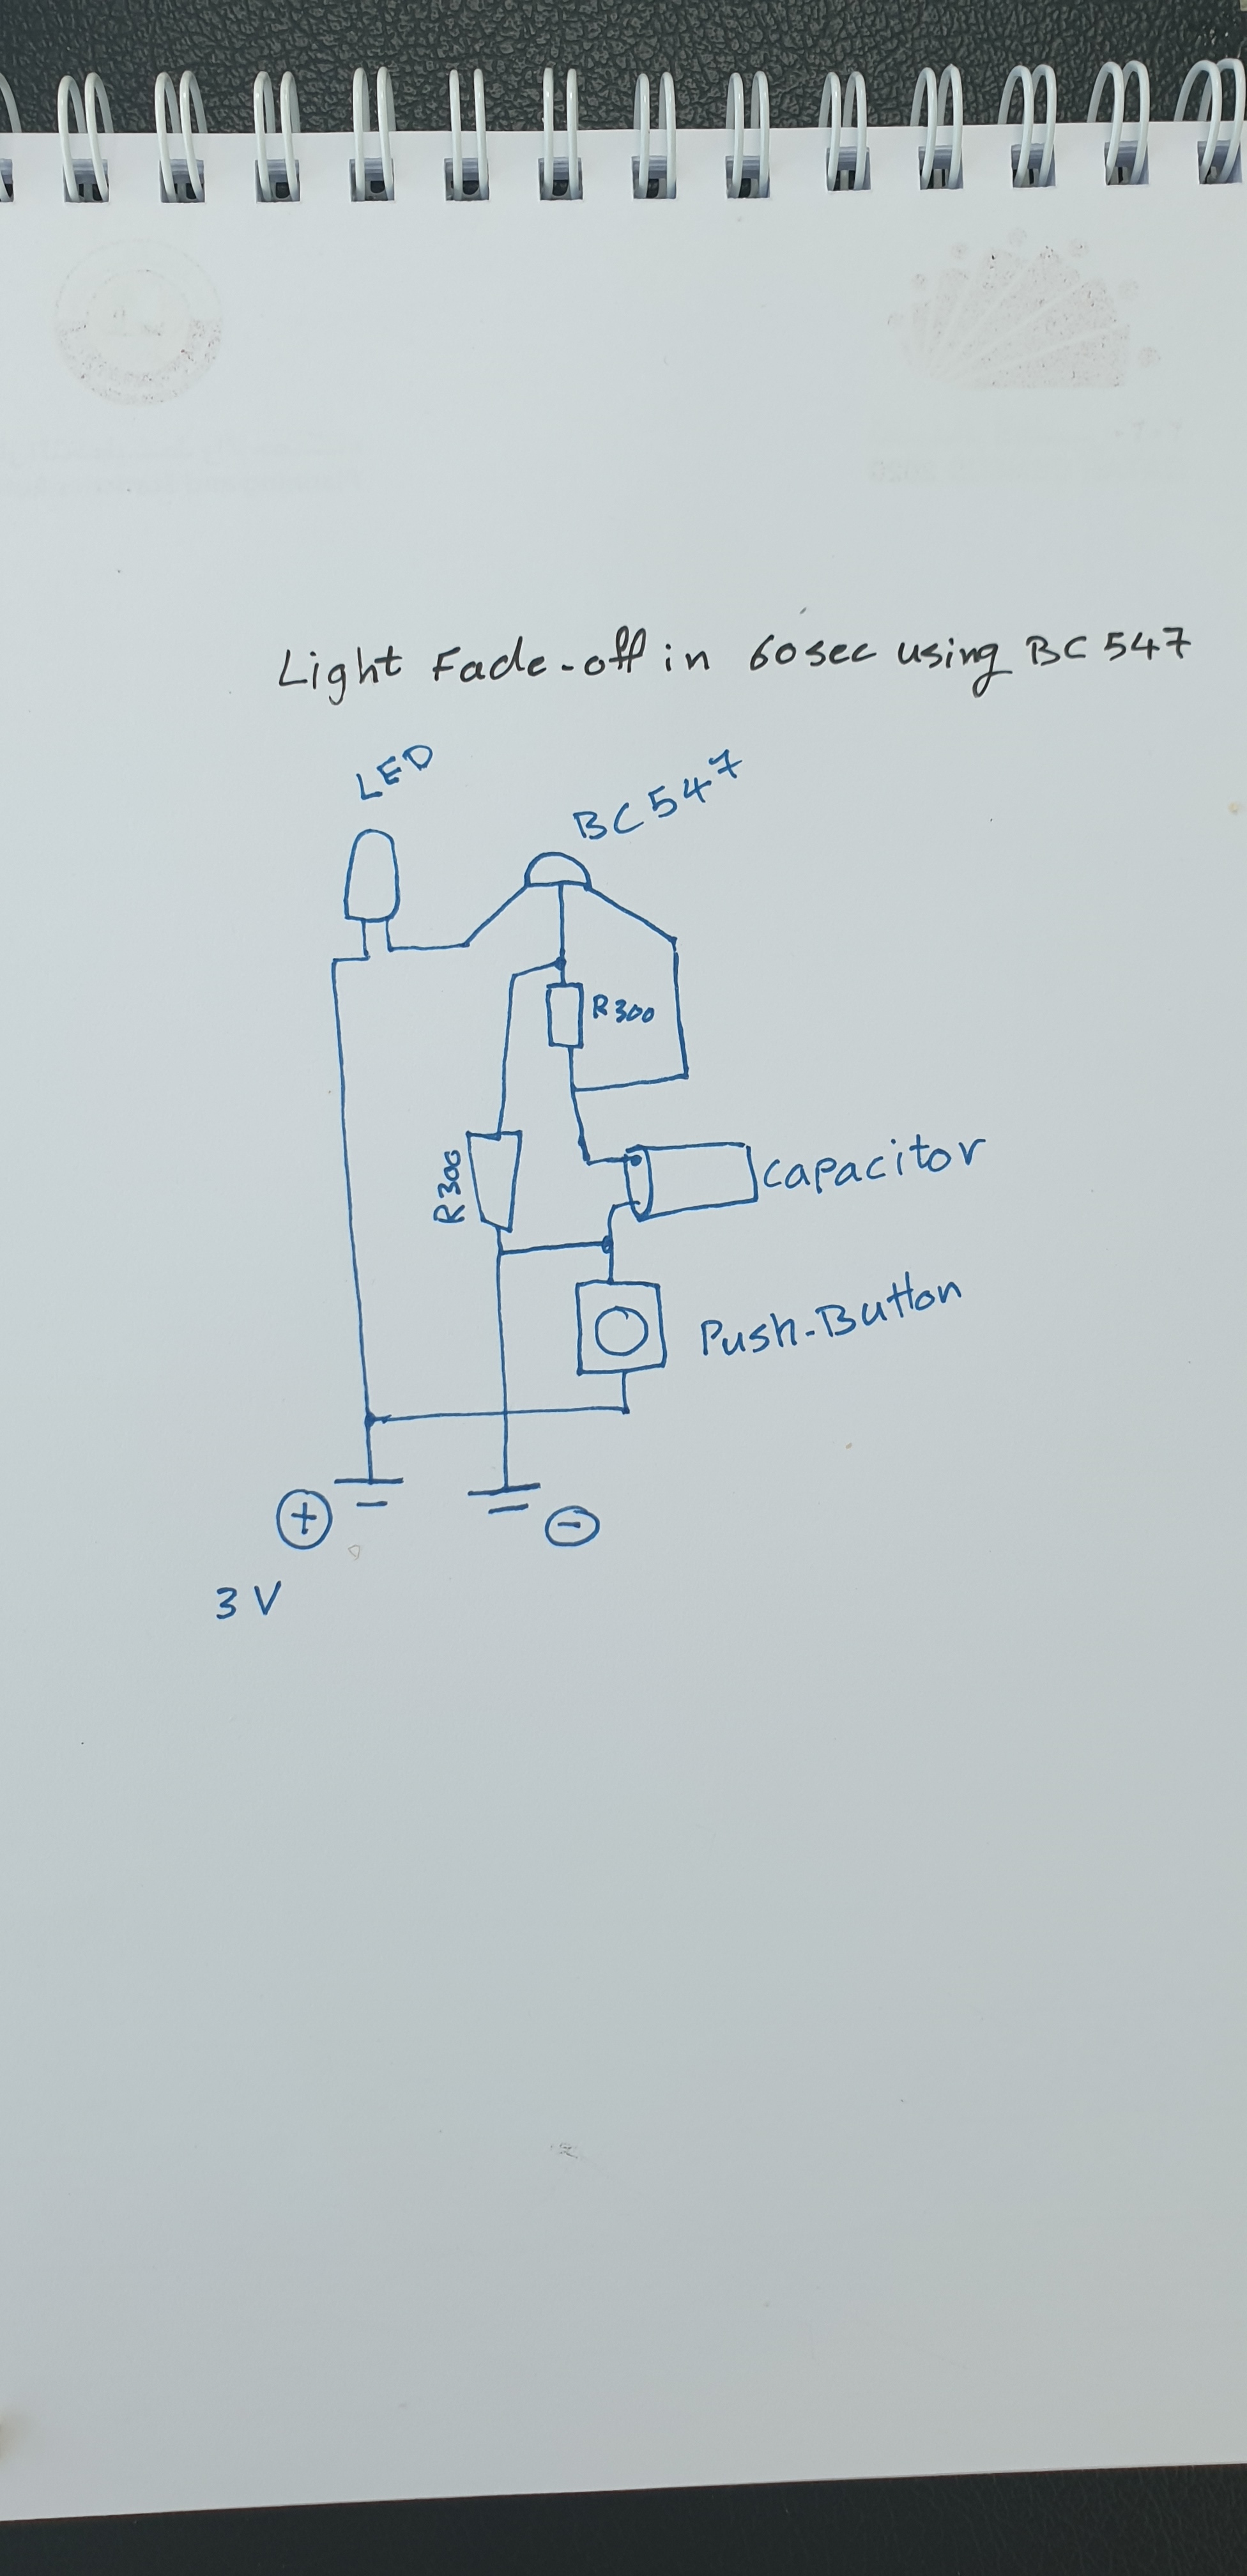
The BC547 has three legs,
Collector
Base
Emitter
So, Starting From BC547 Base will be connected to Resistor 1, and Resistor 2 [in Parallel], Resistor1 will connect to the Capacitor Anode(+), Capacitor Anode(+) also will be connected to the BC547 Emitter.
Capacitor Cathode(-) will be connected to pin1 Push-Button, also Capacitor Cathode(-) is connected to the Resistor 2.
Resistor 2 will be connected to the Battery (-)
BC547 Collector will be connected to LED Cathode(-), LED Anode(+) will be connected to the Battery(+). And the Push-Button Pin2 will be connected to Battery(+).
Here is the diagram:
 |
 |
Push the Button Now if we Push the Button, the LED will Go NO, and start Fading-out (OFF), I start a stop-watch it count almost 60Sec. Here is a speed-up RUN video.
Speed-up Video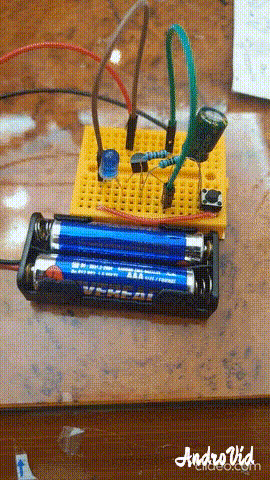 |
:: ARDUINO PROJECTS LIST ::
[ Click Here to See all ARDUINO Projects ]
To Download the ARDUINO Project [Code and Diagram] files {No Code in this Project}
By: Ali Radwani
Arduino: IDE and Coding
Learning : Arduino Projects, Arduino Coding, Electronic Circutes
Subject: First Application, Light the LED
[NOTE: We are working on Electronic Devices, Voltage, Resistors and other Electronic Parts that may Become HOT due to un-stable current or Wrong Wire Connections.. PLEASE BE CAUTIOUS AND TAKE SAFETY NEEDED PROCEDURES.]
IDE: IDE is the place or the editor that we can write the code in. Arduino has one that can be Downloaded from [ www.arduino.cc] then from the menu > Software.
Coding: The coding rules and best practes:
- Essentially consist of Two Main Functions: void setup() and void loop().
- Each Code line MUST end with Semicolon ;
- Code block Must be between two Curly-Brackets { }
- Declaration: if we have variavbles we need to declare them before we use them. Best-Practice: we put them at the top of our code page.Sample: int x ; int y = 50; const int t = 250
- Our Functions: Best-Practice: Put them between the void setup() and void loop(). SAMPLE: void led_on ( ){ digitalWrite(12, HIGH);}
- To put a comments in the code we use double front-slash // use it for one line comments. Best-Practice: Use comments to describe your codes and Functions.
- To Comments several lines we use /* /* all the lines between it will be as comments.*/
- IF Statment: if (int x > 10) { your code }
- For-loop: for(int x = 0; x < 5; x++) { your code }
So, I think this is the most important things we have to know to start coding our Arduino. With each practice and project we will work on we will describe coding-lines and commends we use.
I am not sure if i will continue in this way or say “New Learning Curve”, The Coding and Commanding an Electronic-Bord to Work as my Application says .. THIS PART WAS WHAT LIT THE FUSE IN MY BRAIN.
:: ARDUINO PROJECTS LIST ::
| 3 | First Project: Coming Soon.. |
| 2 | Code Editor, coding Blocks, learn Coding |
| 1 | Arduino, The Story, Components, Parts and What we will Do? |
To Download the ARDUINO Project [Code and Diagram] files Click-Here
By: Ali Radwani
Arduino Projects: The Story
Learning : Arduino, Arduino Coding, Electronic Circutes
Subject: The Story and Orders
[NOTE: We are working on Electronic Devices, Voltage, Resistors and other Electronic Parts that may Become HOT due to un-stable current or Wrong Wire Connections.. PLEASE BE CAUTIOUS AND TAKE SAFETY NEEDED PROCEDURES.]
The Story: Last month i was searching the net for something, Someway, Some projects make my Kids love Math and Science Subjects, I went through several pages … then I fond classes teaching the young students how to build simple circuits, using Led’s and 9V Batteries.. I start reading more in this subject then I found the ARDUINO Chip, were the students can write a code to switch on/off some LED’s. This thing Triggered the Passion of learning and trying new things. So I spend two/three days reading about it, and decide to give it a try.
What I Need: This is my first time reading about Electrical Circuits, I have some ides, but I Don’t have any Equepments to start. So from there I start submitting orders to buy things that I will need, i got the list from tutorial youtube. Here is the list of my orders:
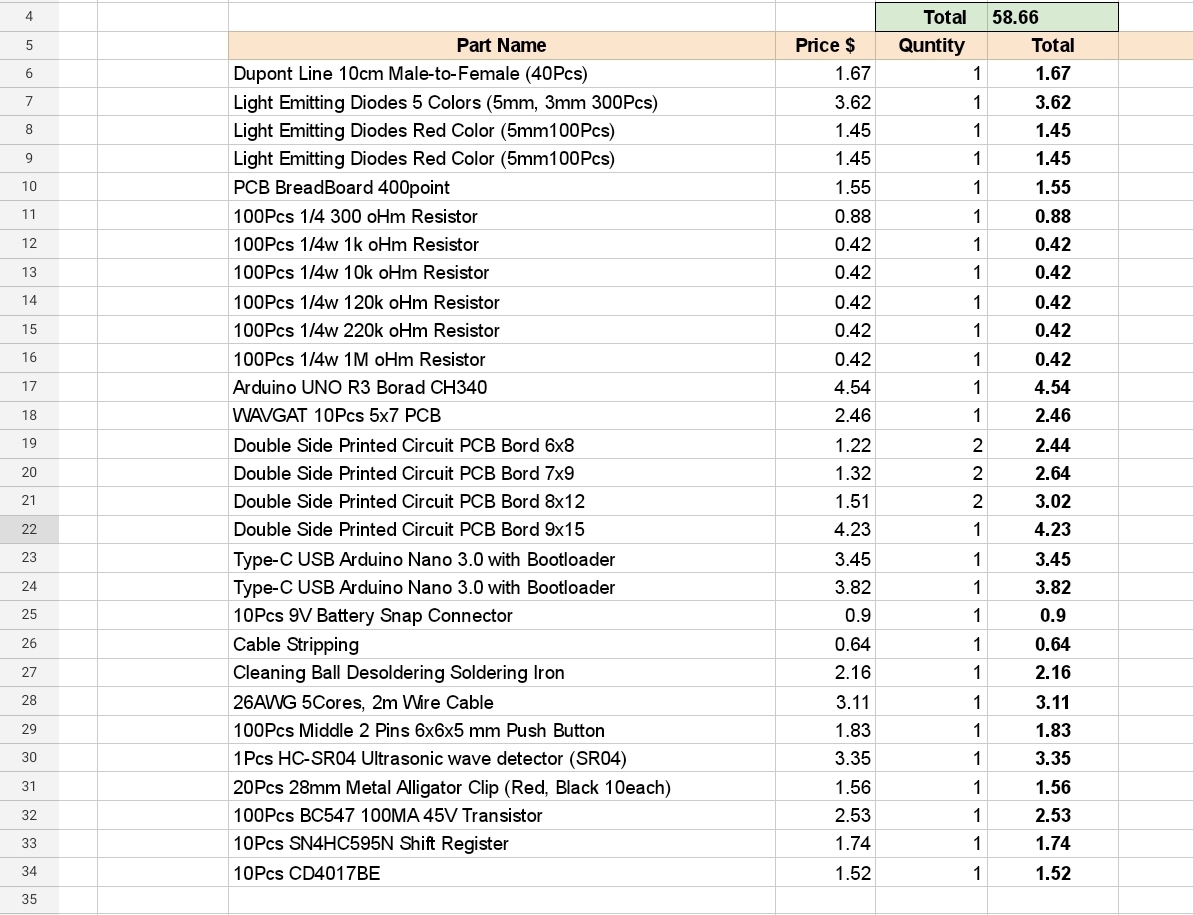 |
I am not sure if i will continue in this way or say “New Learning Curve”, The Coding and Commanding an Electronic-Bord to Work as my Application says .. THIS PART WAS WHAT LIT THE FUSE IN MY BRAIN.
.. NEXT POST .. In Next post I will write about ARDUINO [simple information as far I know 🙂 ] How it Works, and Firs simple Project [without coding].
:: ARDUINO PROJECTS LIST ::
| 2 | Code Editor, coding Blocks, learn Coding |
| 1 | Arduino, The Story, Components, Parts and What we will Do? |
To Download the ARDUINO Project [Code and Diagram] files Click-Here
By: Ali Radwani
Taking pictures is not my main daily practices, but when i start playing with my camera, i really enjoy my self.
Thanks for visiting my Space..


