Archive
Python : Expenditure App
Expenditure Application
Loading and testing the Data:
In this post we will load the data from json file and print it to the screen, also will use one of our functions called “get_year_total” to get the sum amount in a given year.
First we assume the our file.json is there in the same directory of the Expenditure.py file (read previous post here) so our code will upload the data in a variable named “data” and we will print the file to our screen, this line of code (print to screen) is there in our coding process and should be removed from the last version of our application.
# This function will load the json file data into var data and return it back so we can use it
def get_all():
with open(‘expen_data.json’) as f:
data = json.load(f)
return data
# This function will take a year from the user input and return the total of amount we expend in that year.
def get_year_total(my_year):
tot=0
for my_date in data[‘expenditure’]:
if my_year in my_date[‘date’]:
tot=tot+int(my_date[‘amount’])
return tot
data = get_all() # Load the file in to data
print(data)
# Ask the user to Enter a year.
my_year=input(‘Enter a year as yyyy: ‘)
# pass the year to the get_year_total function
total=get_year_total(my_year)
# print the total
print(total)
If every thing goes fine, you should see the data on your screen and a prompt will ask you to enter a year, at this point we are not doing any try … except block to our code so we assume that we are entering a good/right inputs. I am attaching images for the code and output screens.
Table of posts regarding the Expenditure App..
| Title | Description | Post Link |
| The Case | Talking about the case study of the application | Click to Read |
| leveling the Ground | Talking about: Requirement, folder structure, data file json, sample data and .py file and other assumptions | Click to Read |
| The Menu | Talking about: The application menu function | Click to Read |
| User input ‘choice’: | Talking about: The user input and the if statement to run the desired function | Click to Read |
Here is the code shot..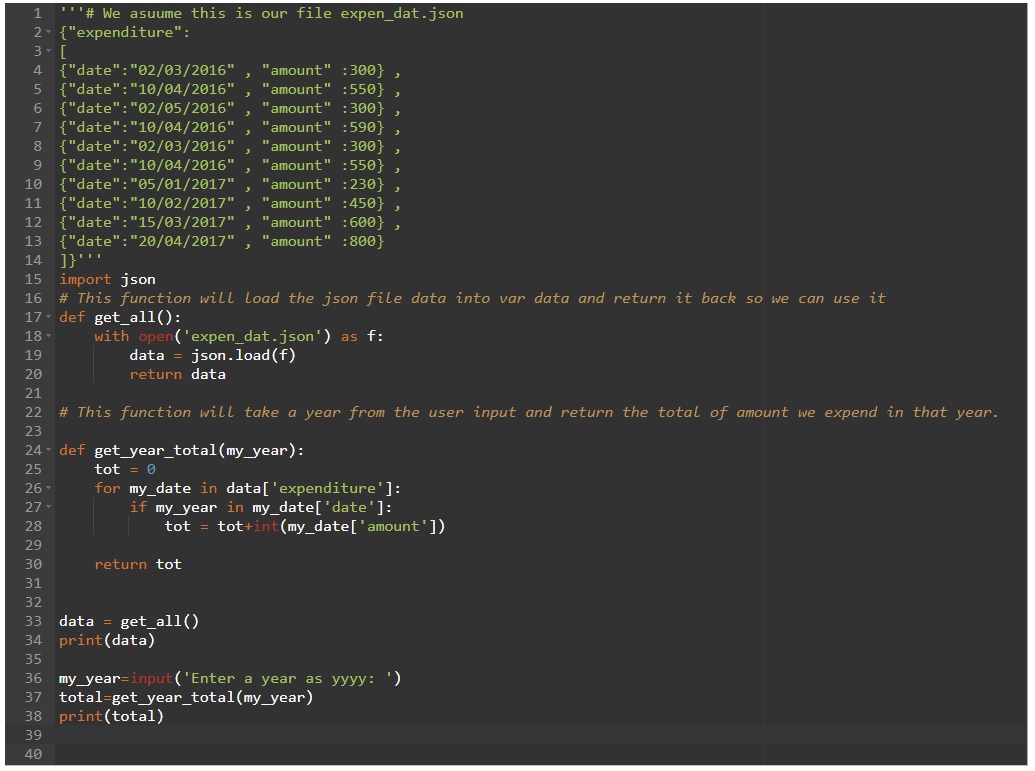
|
Here is the output screen..
|
Python code: Date Validation
Python: Date Validation
As in any application there is lots of functions and procedures helping the application, some of these functions are directly related to the menu bar other are there just to work on back ground to perform a task and return something that another function need to complete an action.
Here is a python code to ask the user to input a date and check if the date is in the format we want to be.
I am new in python so maybe there is a code or a function to perform this, so if any one can help in this.
#python code: Date Validation
def valid_date():
my_date=input(‘Enter the date as dd/mm/yyyy :’)
try:
d,m,y=(my_date.split(‘/’))
if len(d)==1: d=’0’+d
if len(m)==1: m=’0’+m
if len(y)==2: y=’20’+y
if int(d)>31: print(‘Day must be less then 31’), brake
if int(m)>12: print(‘Mounth must be less then 12’), brake
my_date=d+’/’+m+’/’+y
return my_date
except:
print(‘Enter a valid date.’)
return ‘false’
vd=valid_date()
if vd == ‘false’ : valid_date()
else:
print(‘OK’, vd)

Python : Expenditure App
Expenditure Application
User input ‘choice’:
In today post we will add the user input to our menu and based on the user input the app some function will run. As we said in the previous post ‘The Menu‘ we will use (9) to Exit from the application.
To read the user input we will use ‘input(‘something’)’ statement and The Menu def will return the choice back so our if statement will take us to another function, or EXIT if choice = 9, so let’s start.
As we can see in the last two lines of the_menu def, we have
choice = input(‘What you want to do? ‘) and return choice
Then in the main application body we will have while statement holding if statement as here:
choice = the_menu() # Here we are calling the menu and putting the return in the choice.
while choice != ‘9’ :
if choice == ‘1’:
# Calling “Add New Entry” function
choice = the_menu()
if choice == ‘2’:
# Calling “Delete an Entry” function
choice = the_menu()
if choice == ‘3’:
# Calling “Change an Entry” function
choice = the_menu()
if choice == ‘4’:
# Calling “Show Total Expenditure in a Year.” function
choice = the_menu()
if choice == ‘5’:
# Calling “Show Expenditure Details in a year.” function
choice = the_menu()
if choice == ‘9’:
choice = the_menu()
brack
Your code should be something like what we have in the image.

Flowers Wheelbarrow
Project Name: Flowers Wheelbarrow
Start Date: 7/1/2018
End Date: 24/1/2018
Working hours: 1 hours daily (not working in weekends)
|
Tools: Drill || Screws/Nails || Saw | Gloves || Wood || Sander or Sander paper || Measure || Pencil || Paint |
Wheelbarrow Size:
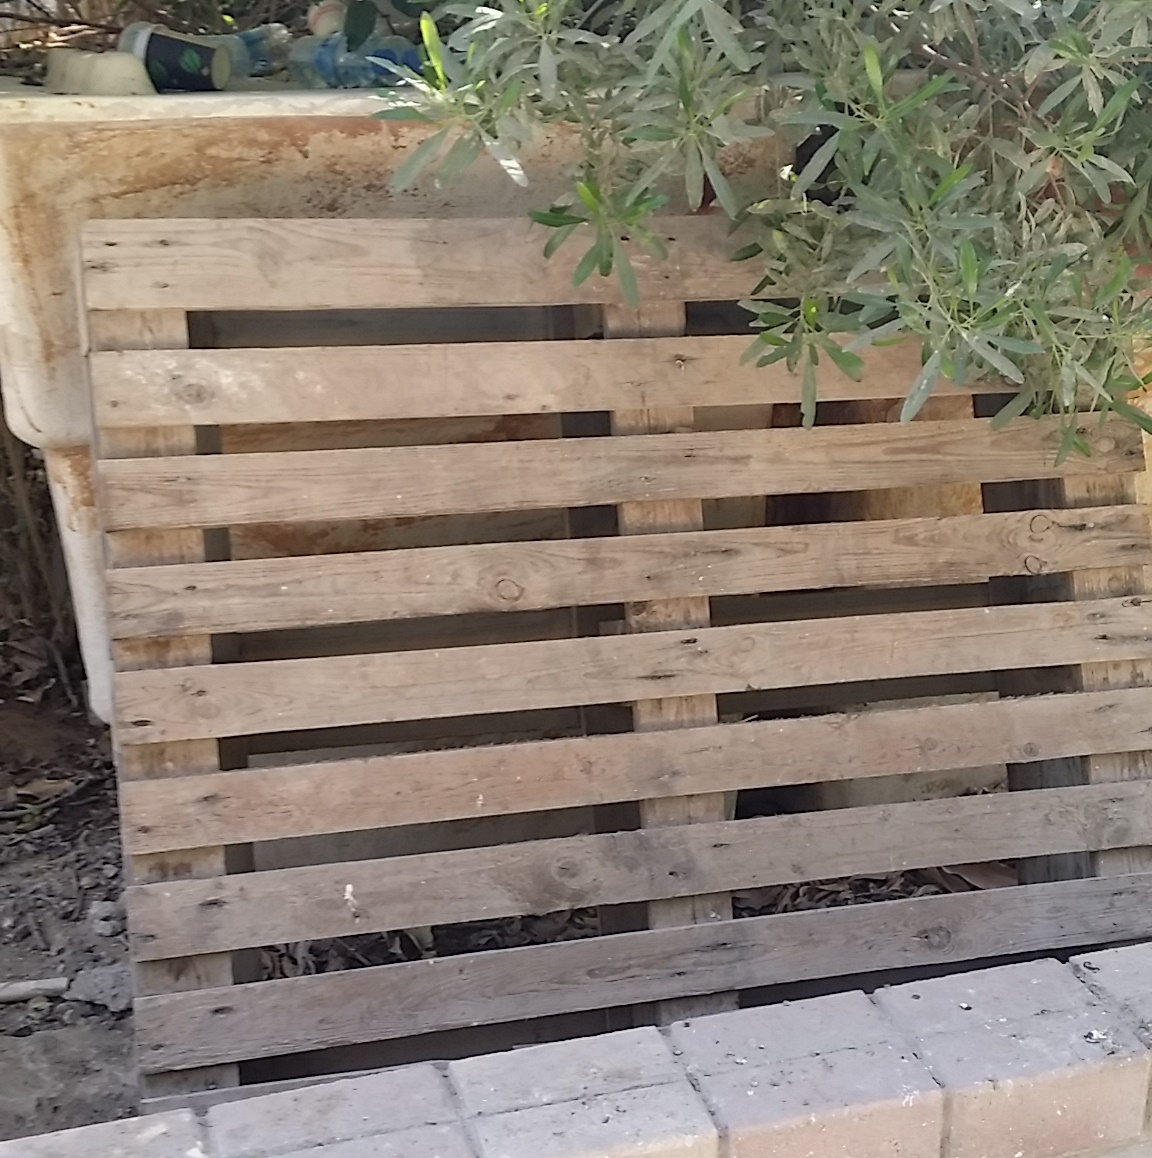
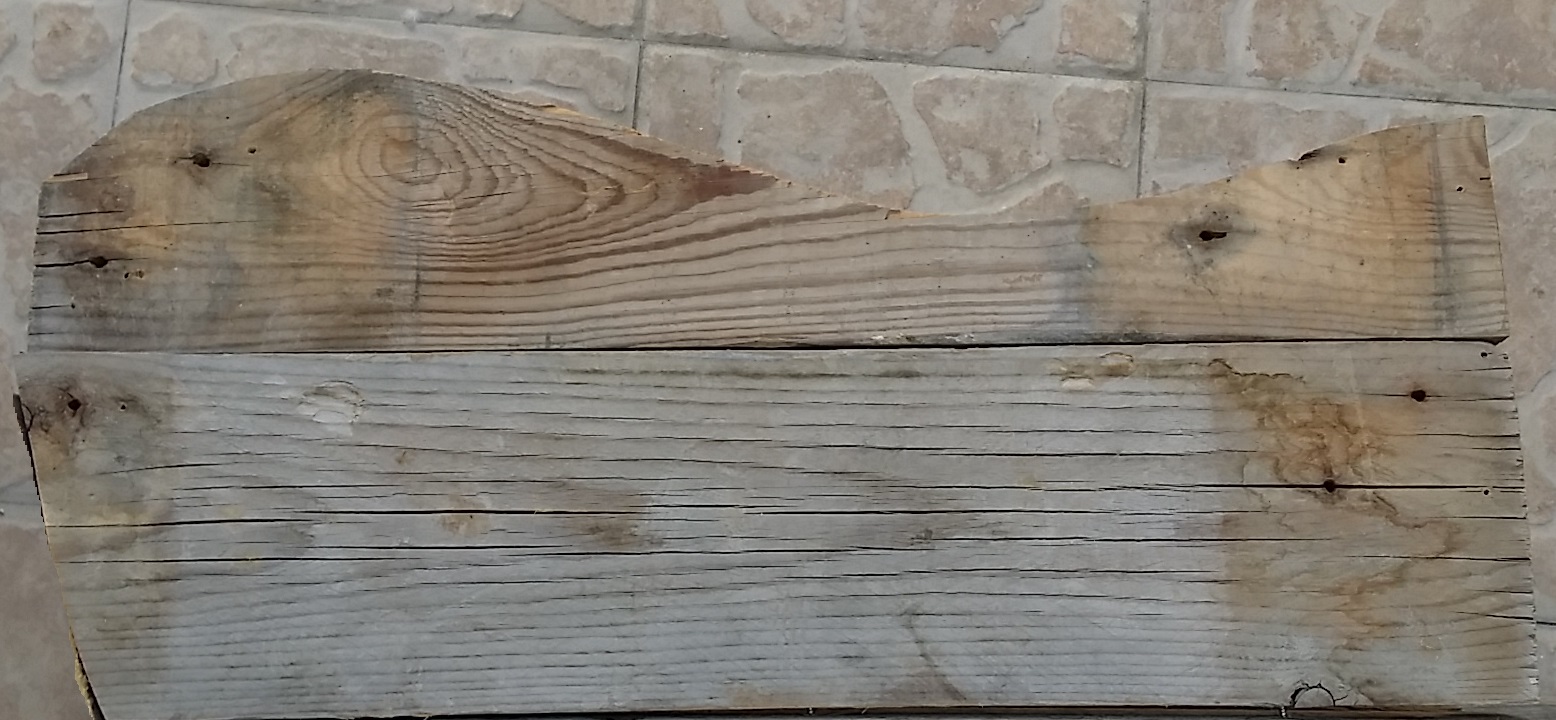
You have to decide the size of the Wheelbarrow you want to build, this will give you an idea of how much wood and Nails you may need. I use a old wood pallet in my yard; the disassembling it was not easy.
|

|
| Wood pallte | After Disassembling |
Sketches: First thing to start with..
Start with some Sketches, Here is my fast sketch of this Flowers Wheelbarrow i start with fast lines then add the measures and dimensions, the image here before the measures.

Fast Sketches of the Wheelbarrow parts
To create the wheel:
I draw a circle on a paper (diameter is important) glue it on a 2 pieces (5″ diameter, 2.5cm-thick ) wood strips from the pallet, and cut-off.

Needs more sandpaper
Wheelbarrow Side:
You need two pieces for the side, I cut the upper side in curve to give it some design.
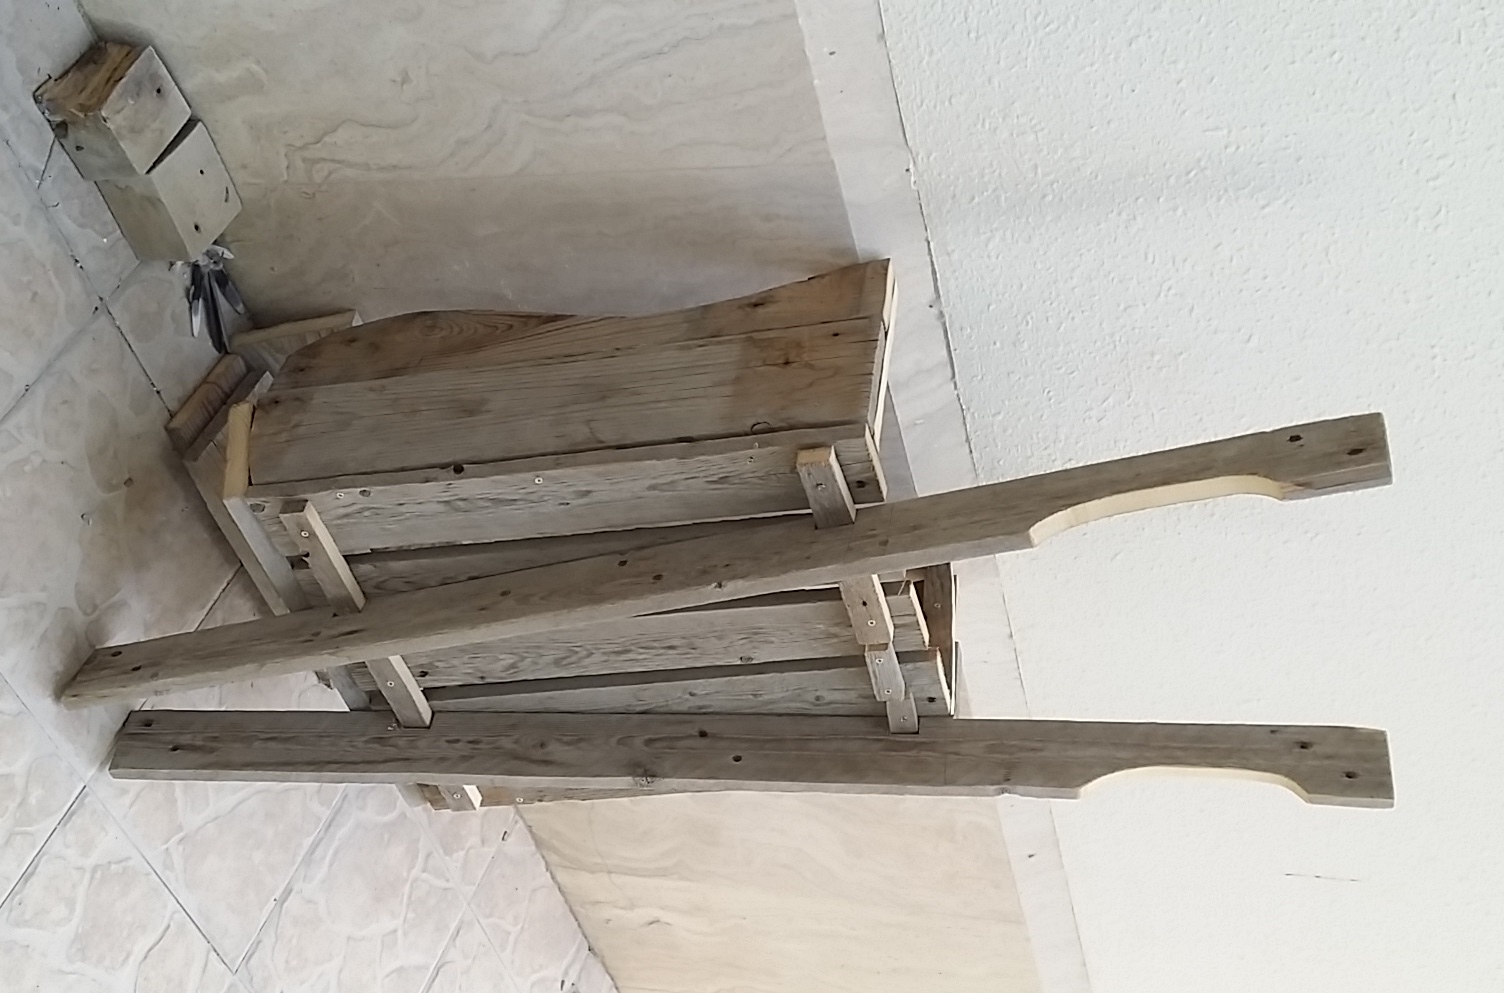
Fixing everything: re-assembling
After fixing all parts you will get something like this, also I apply the sander machine on all the parts to make it smooth.

|
 |
 |

|
Paints:
I am using the Dark Walnut (code: PPF-51 or #4e3d36) color.
Final looks
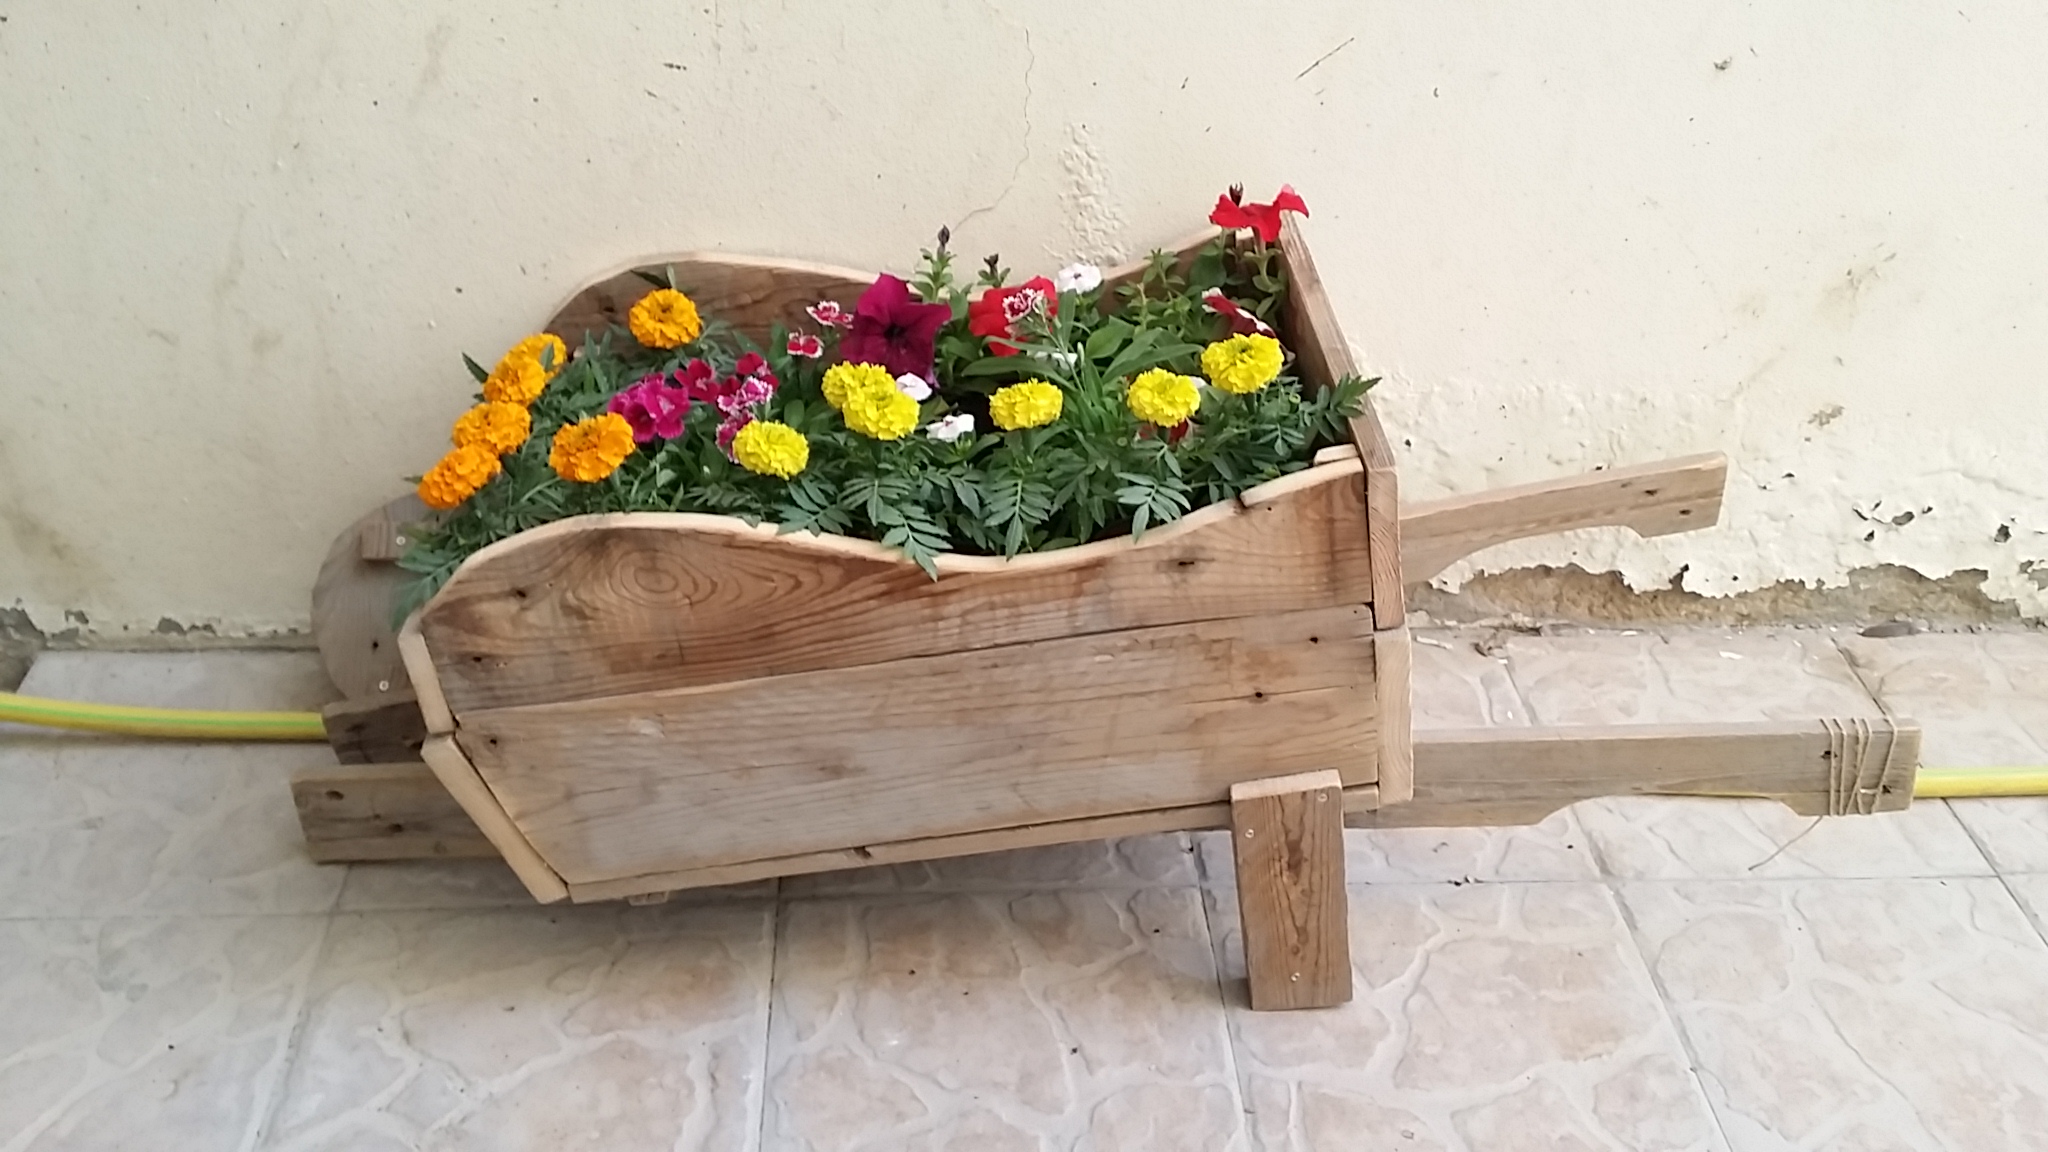
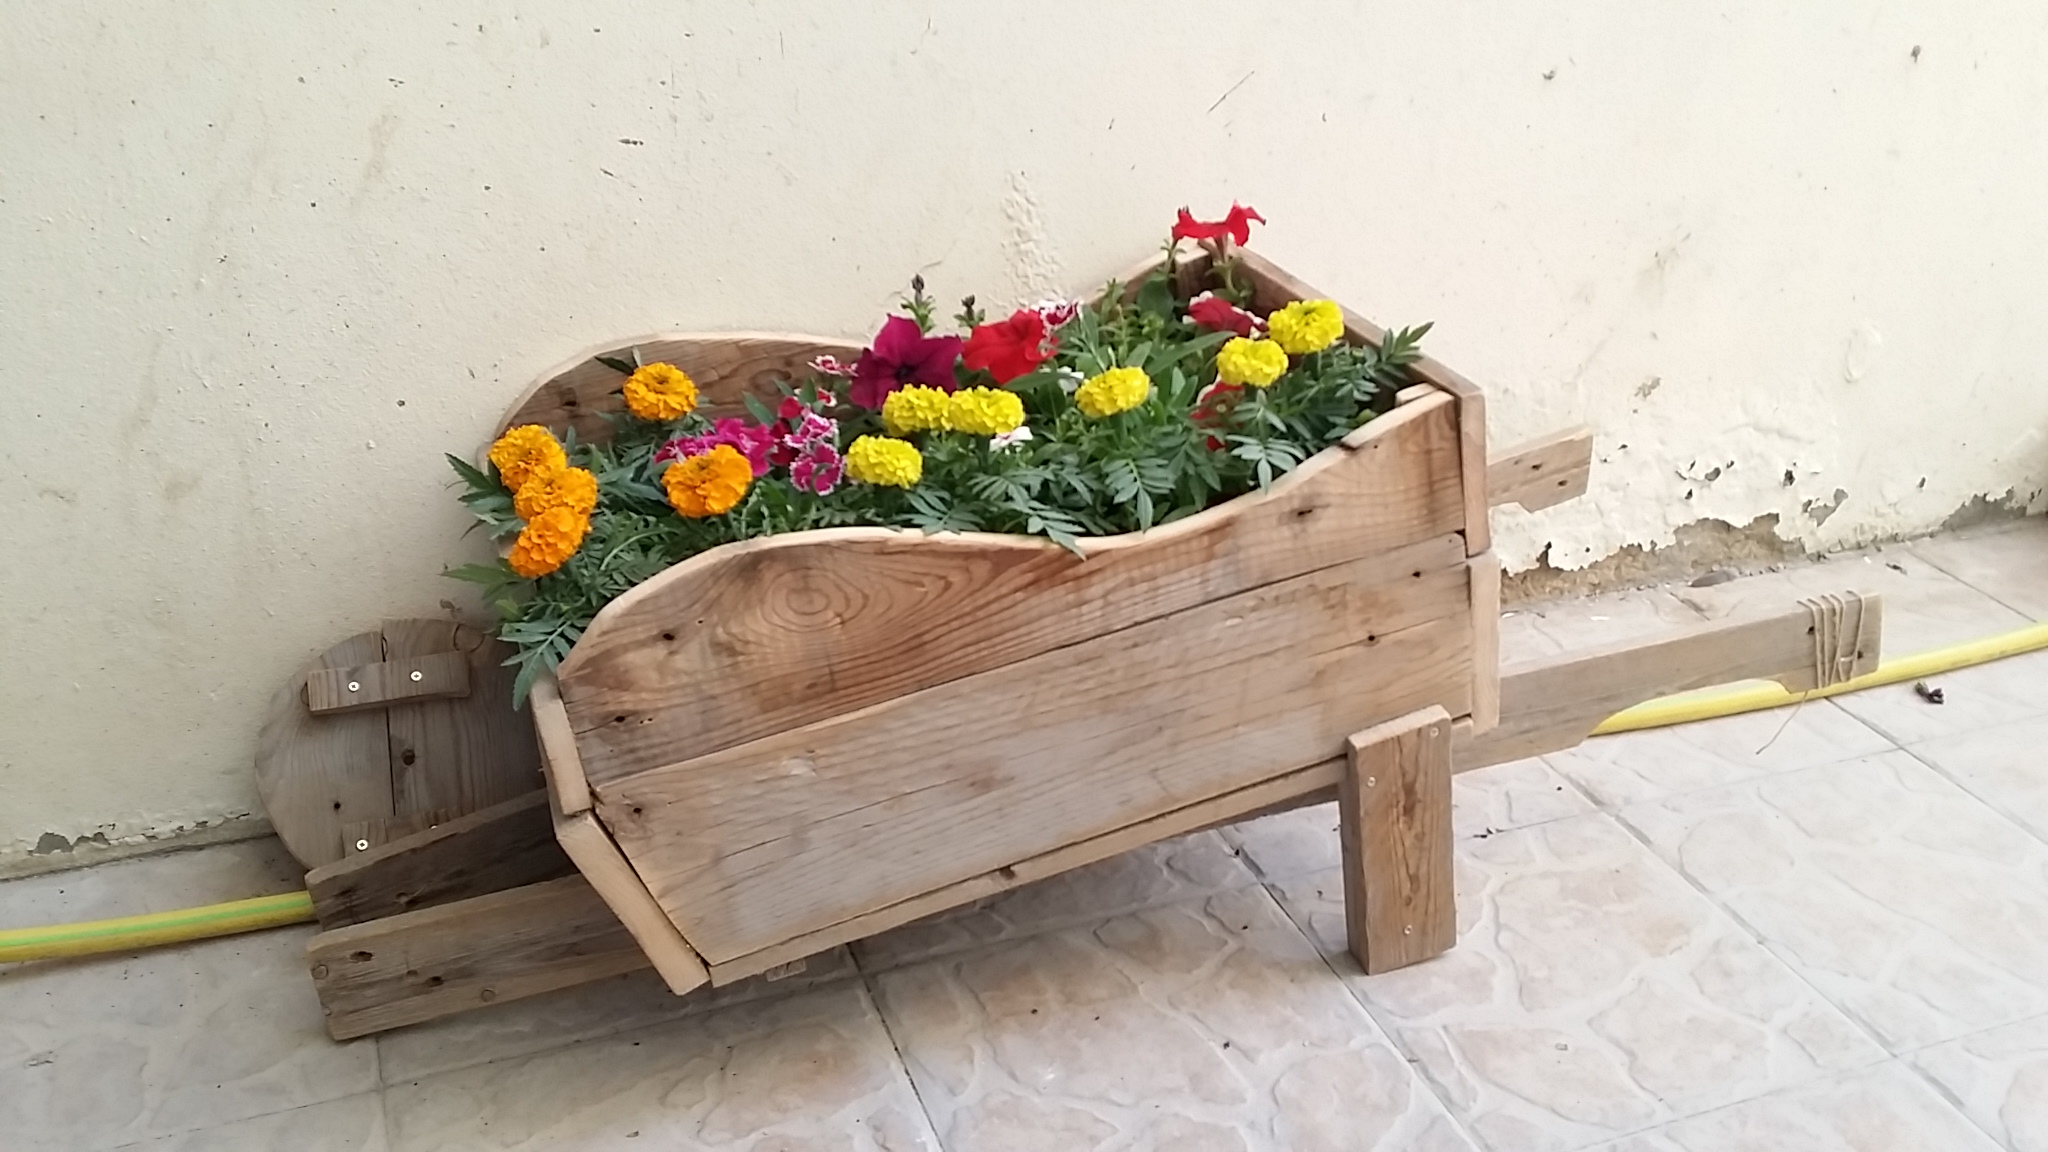
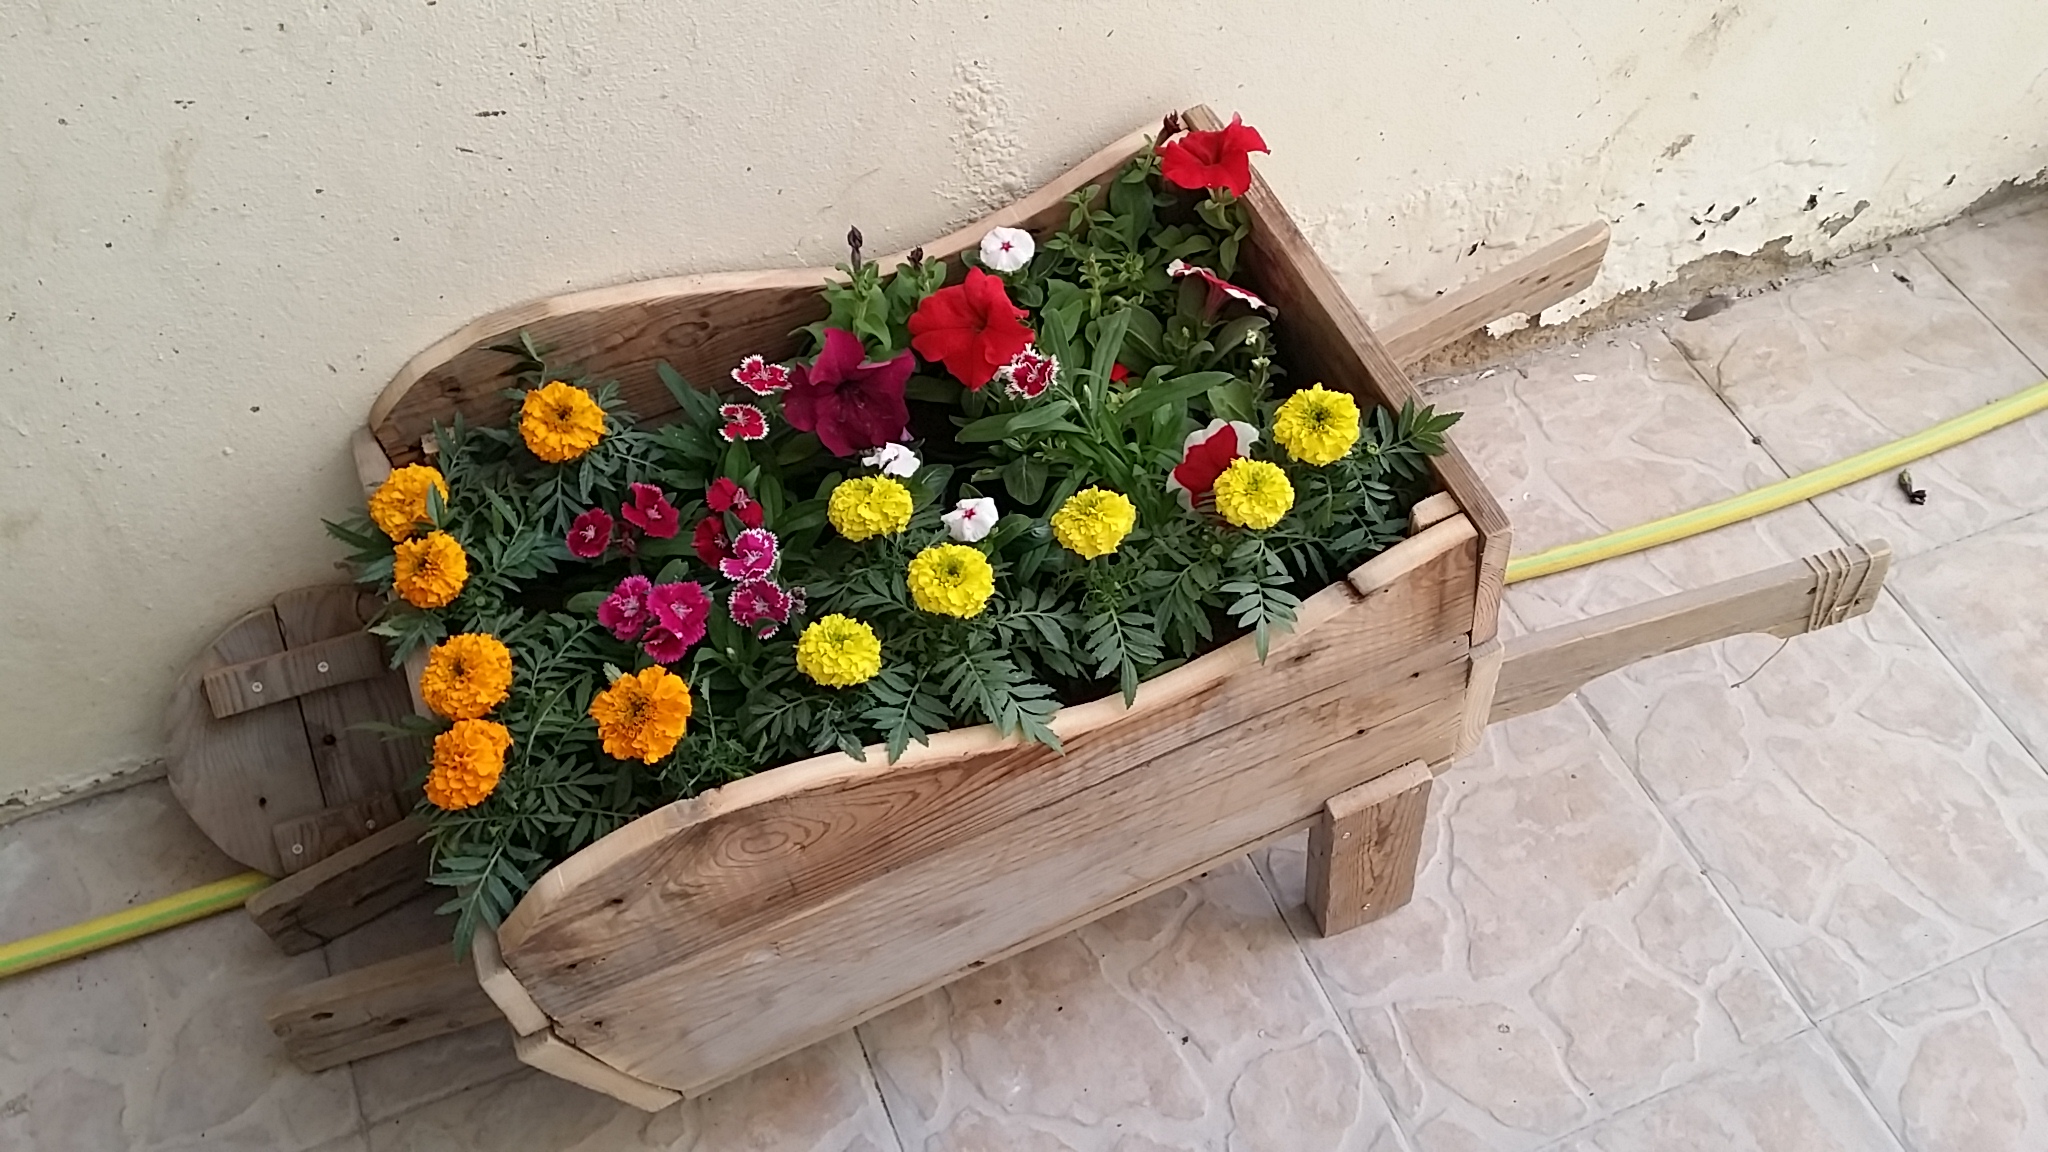
This is the final look of my Flowers Wheelbarrow still did not paint it, i may keep it like this.. am not sure.
|
|
|
|
Tips: Don’t throw out any remaining parts of what you are cutting, you may need it for this project or for other once. |
The Bonsai experiment -3
Back to my “Bonsai experiment” Follow-up post #3.
Today is 3 weeks from starting this project …
After 8 days of putting the Pots in the Plastic Bags I notes that some seeds in bag 2 (Mountain Pine -Pinus Mugo Pumilio) start to germinate with a small green head showing it self. I am very exciting .. and don’t know what to do now 🙂 … and also What to do with other (non germinated) Pots.
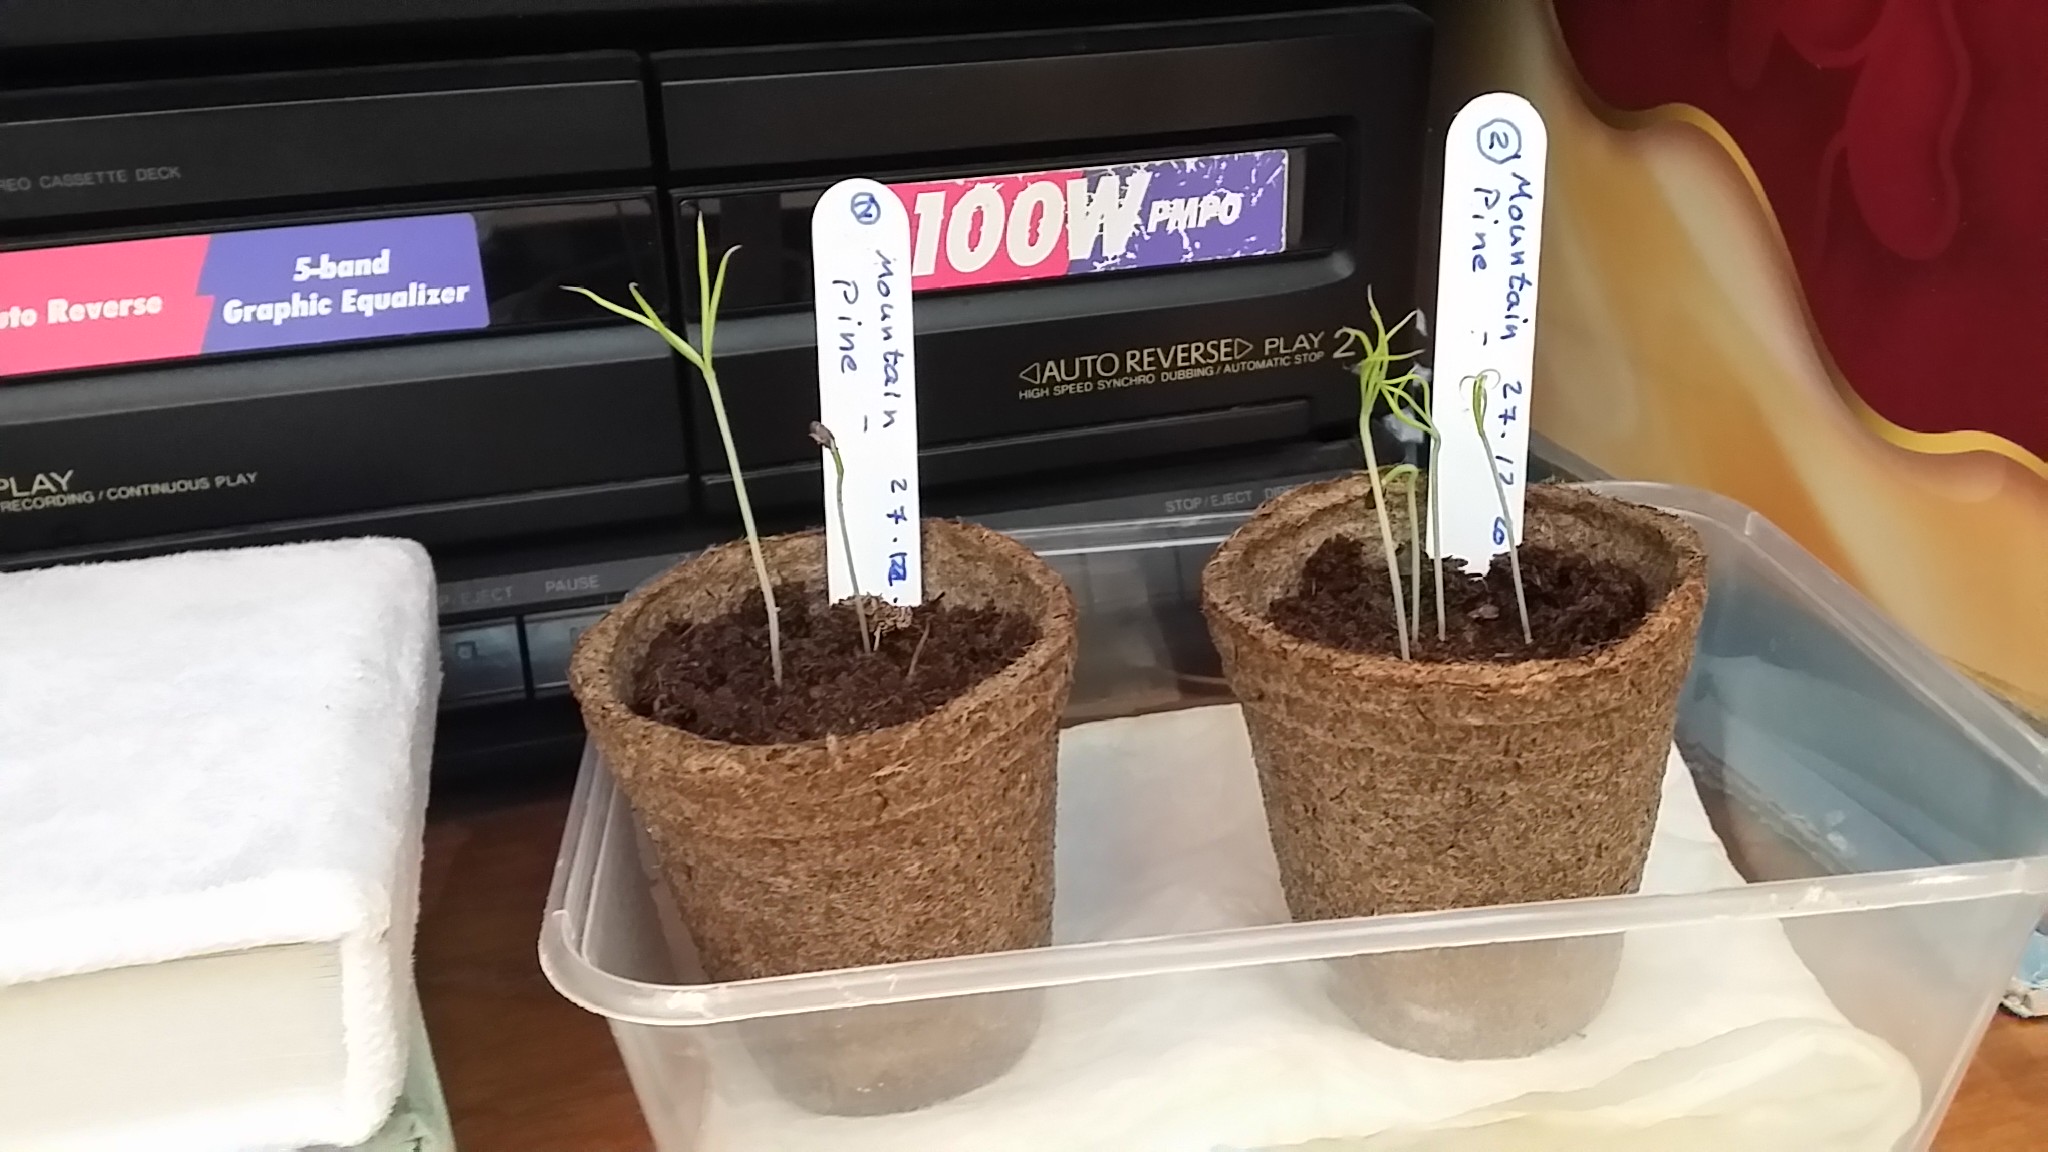
So after 3 weeks … I have 2 pots with germinated seeds . . .. WHAT TO DO ???!!!!!
OK .. I am THINKING … OK ..
1. Those who start germinate:
I will take it off the Plastic Bags and keep eye on it with some drop watering twice a week.
2. Other pots: I will put them in refrigerator for 4-6 weeks.
… Anyone has a better idea ??
Bonsai Experiment Follow-up:
Bonsai post 1 | Bonsai post 2 | Bonsai post 3 |
The Bonsai experiment -2
Back to my “Bonsai experiment” this part was on 27/12/2017 but I am posting it now..
Phase 2:
So, after 24h of putting the seeds in water, I drop the compost discs in water for some time it absorbs some water and get swell. Then I prepare the Plastic Bags label them with date and seeds name, then I squeeze each compost to get rid of the extra water and open the thin surround tissue and put it in the pots. Add the seeds to each pots (don’t miss the labels) and put it in the Plastic Bags.
Now, Move them to cool area for 2-3 weeks and lets see what will happen..
Here are some photos:
Seeds are in water for (24 hours) 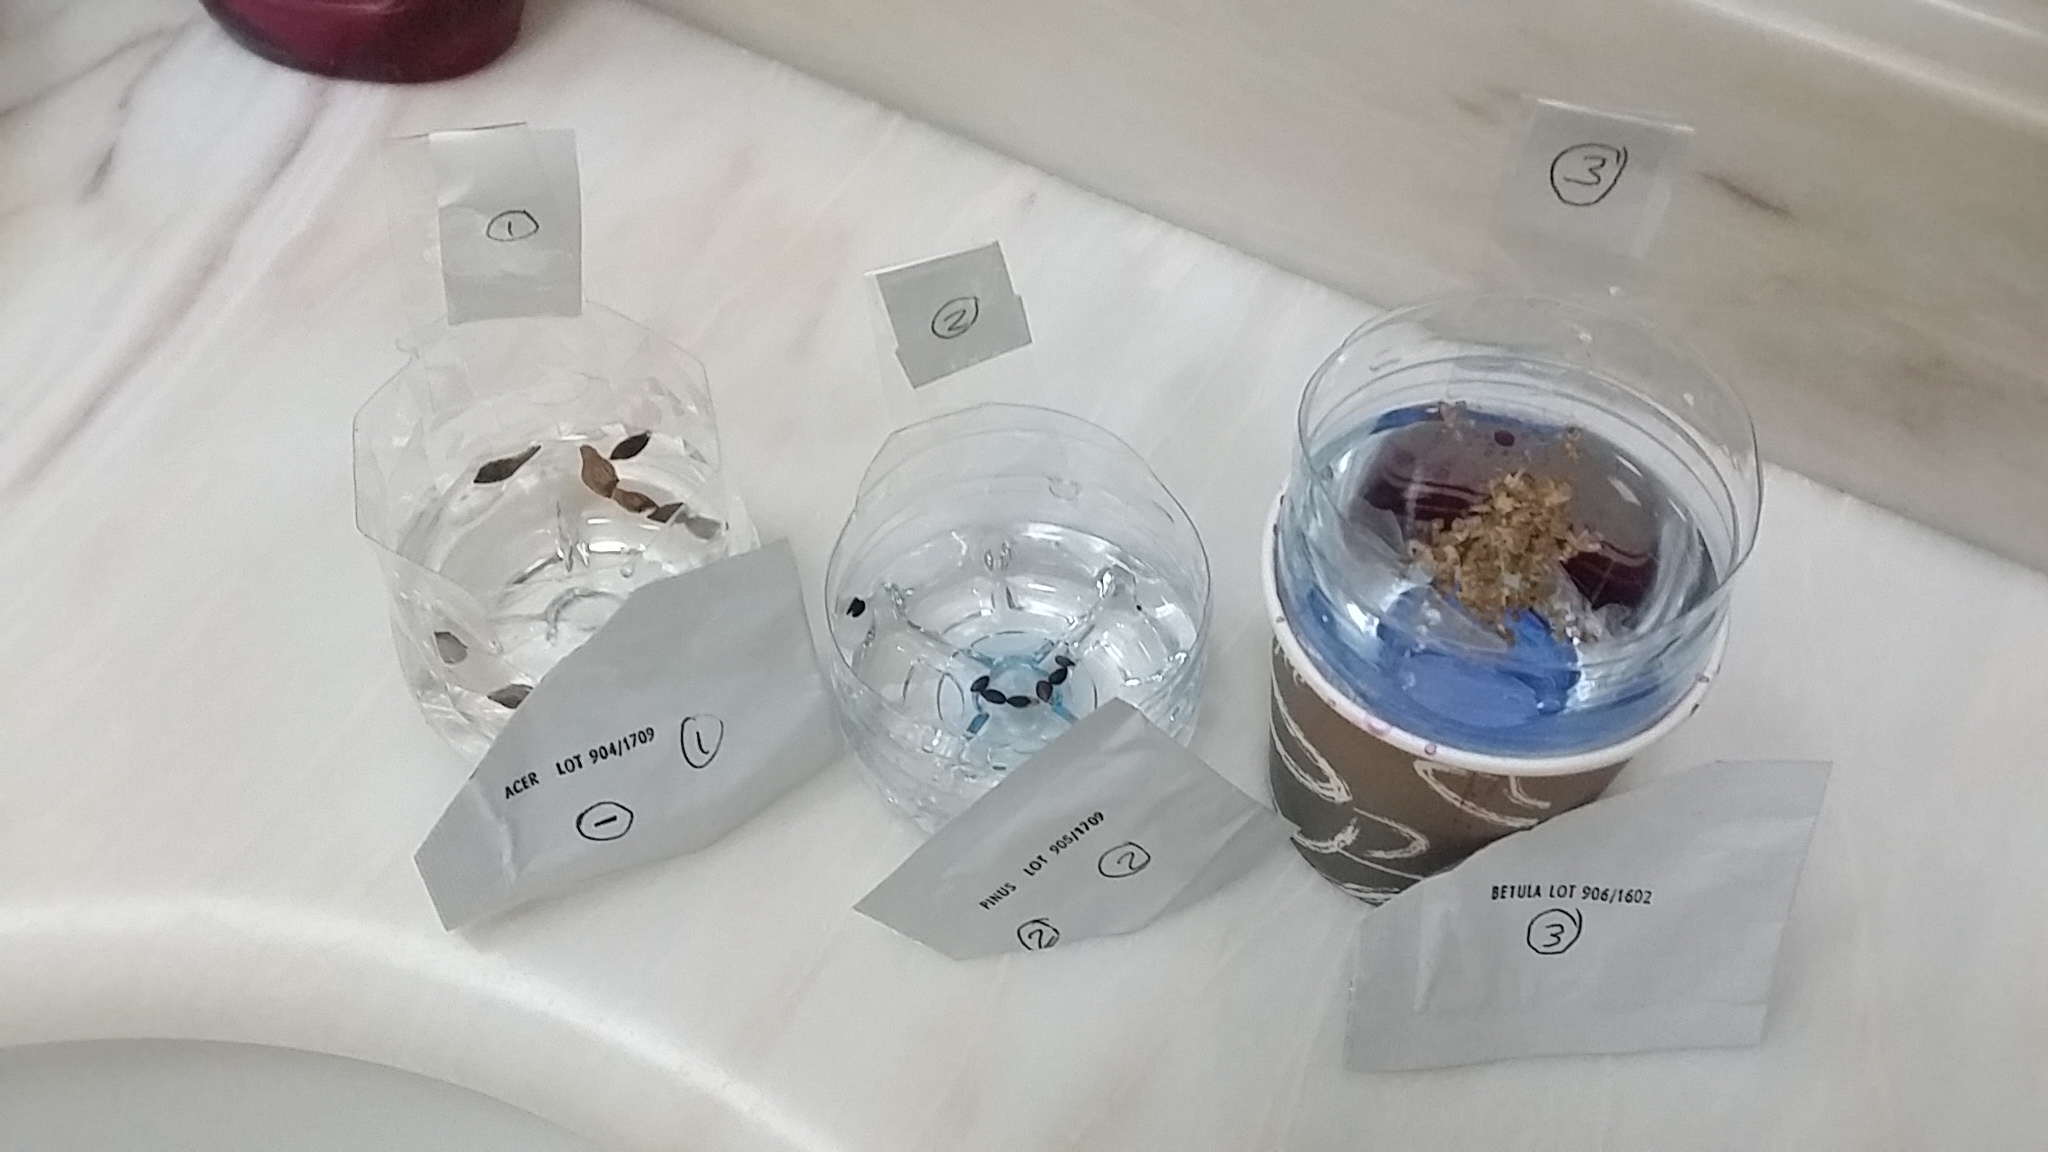 |
Compost discs are in water and they get swell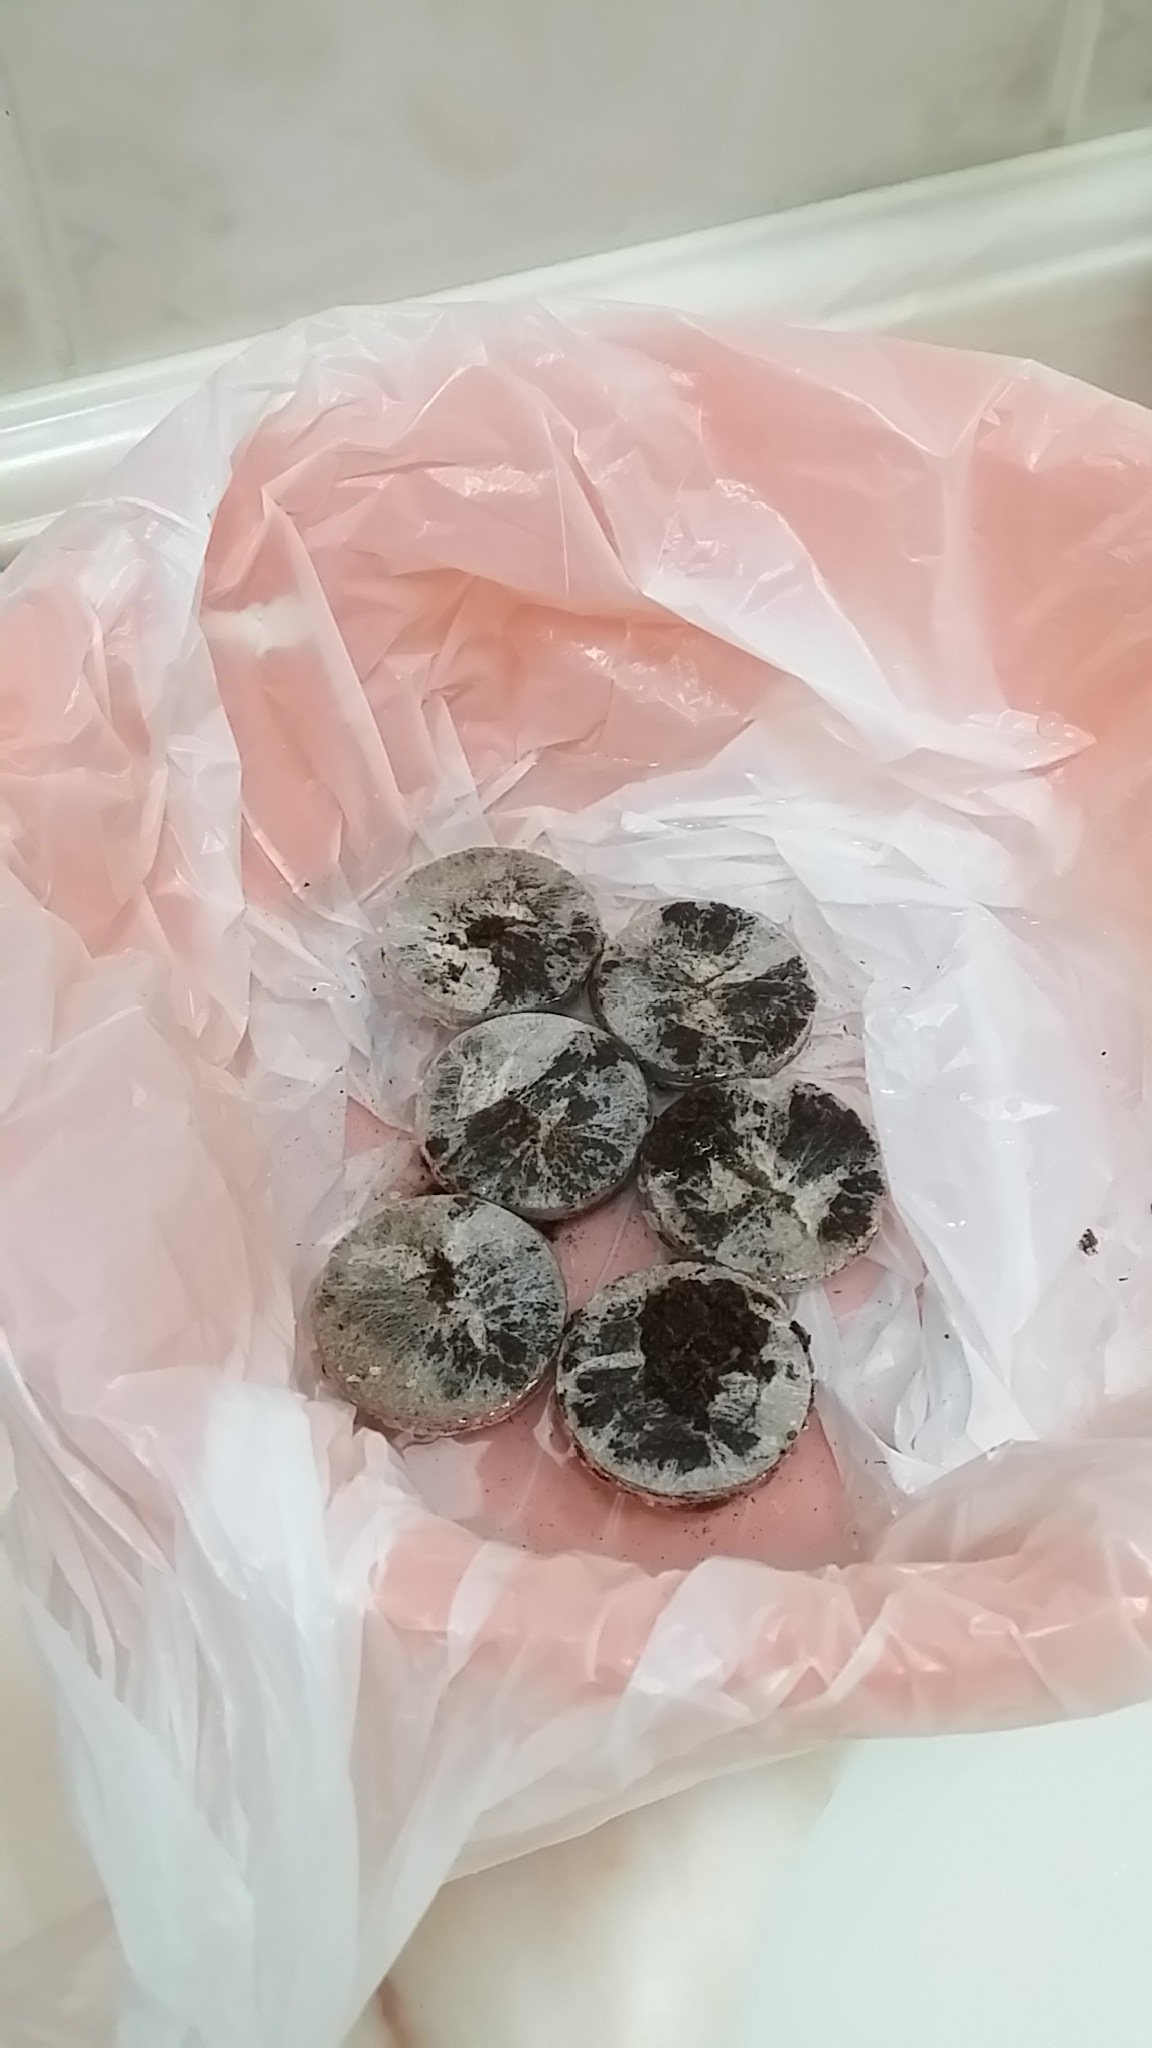 |
Posts are in the Plastic Bags after adding the seed to the Compost 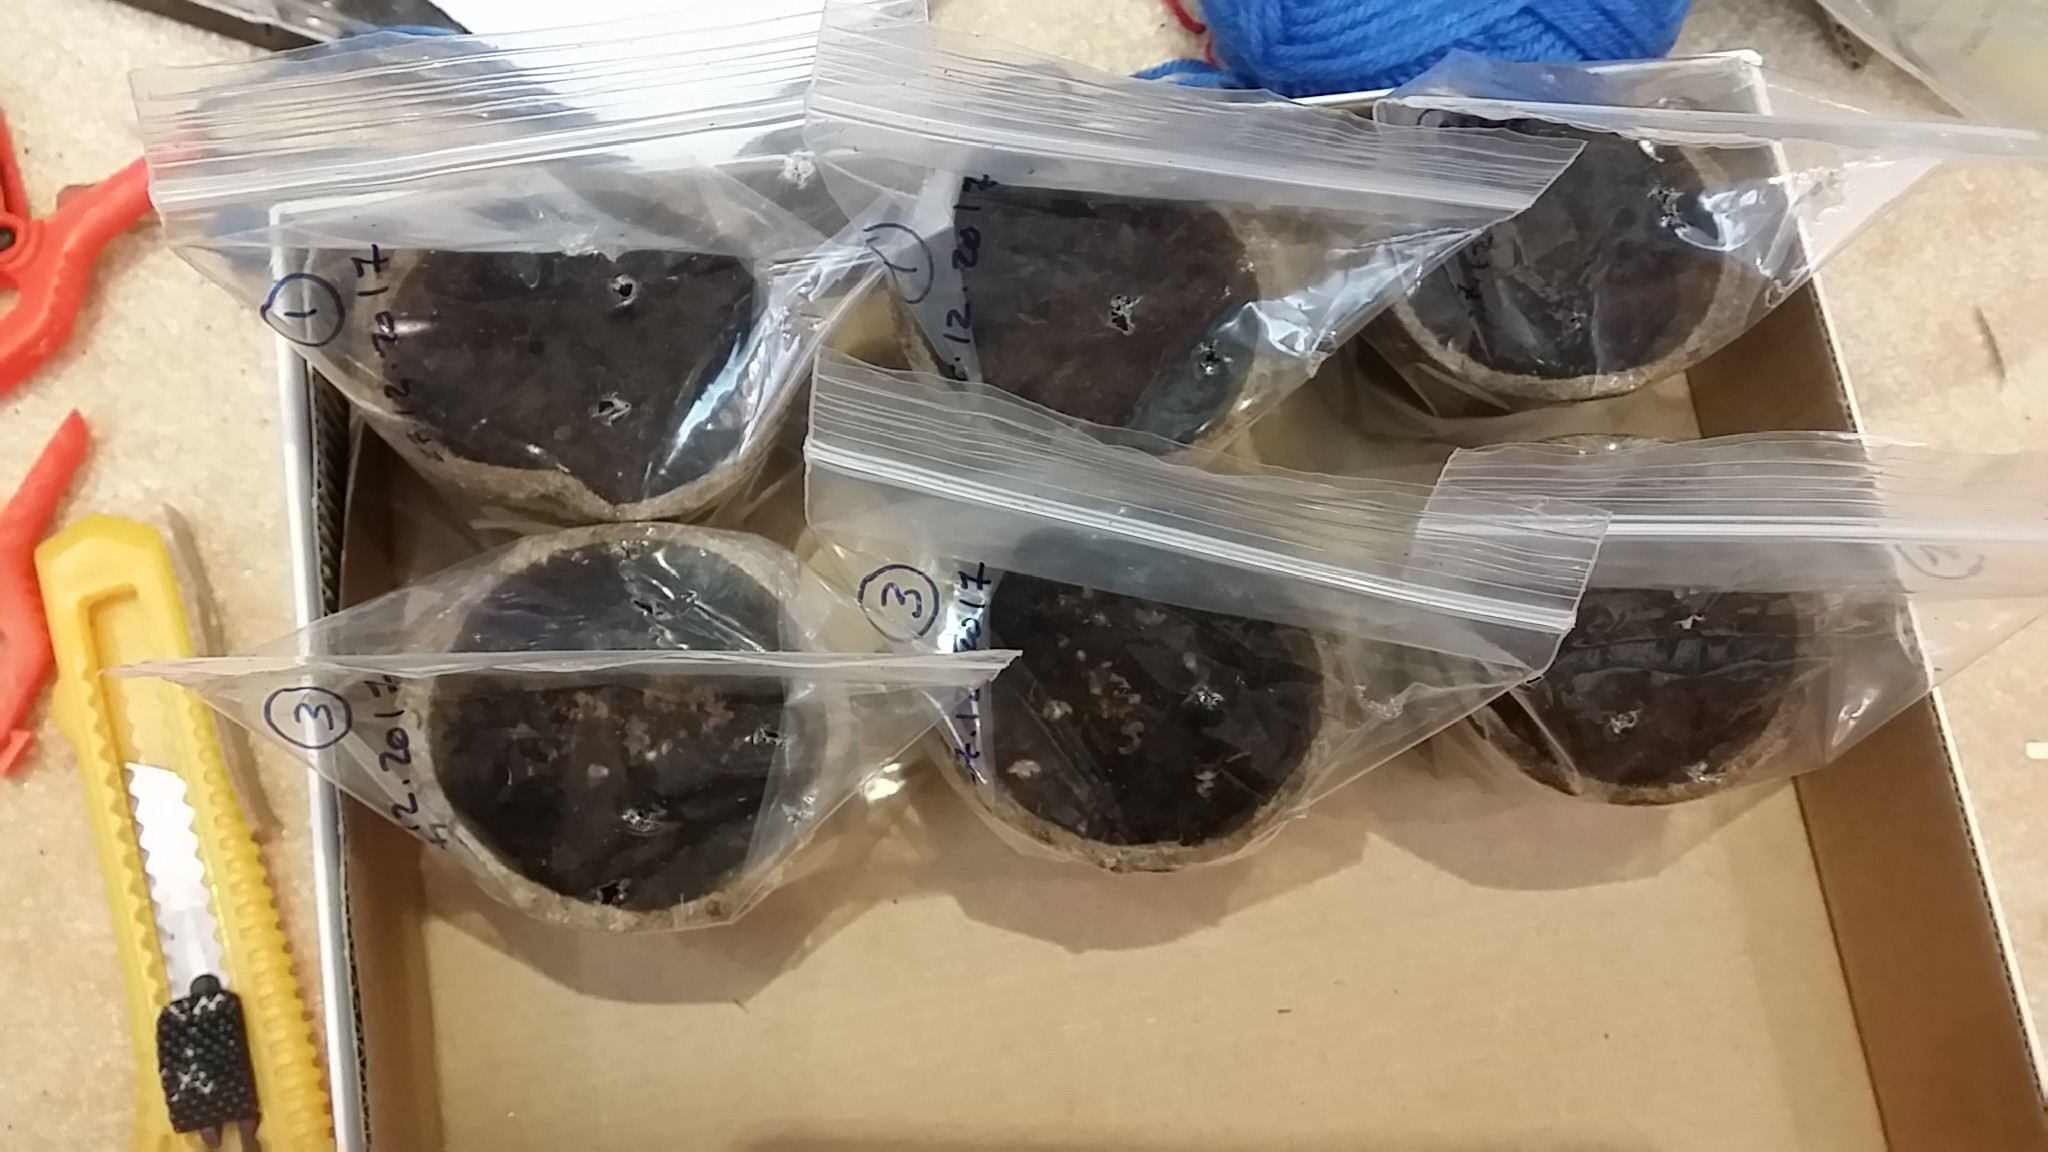 |
Now… we will come back after 2-3 weeks to see what may happen..
Bonsai Experiment Follow-up:
Bonsai post 1 | Bonsai post 2 | Bonsai post 3 |
The Bonsai experiment
Two weeks ago I was jumping through some web pages and i come over the Bonsai trees, I like the idea and the over-all tree looks and shapes, later I fond the Bonsai kit in amazon, so i add it to my cart and 10days later I got it (International Shipping).
Now, I will start this experiment of growing a Bonsai 🙂 I will do some other posts about this project to follow up.
The Bonsai kit:

Contain:
- Plastic Bags
- Peat plugs
- labeling sticks
- 6 pots
- 3 packets of seed: (Seeds are)
- Silver Birch (Betchula Pendula)
- Red Maple (Acer Rubrum)
- Mountain Pine (Pinus Mugo Pumilio)
- instruction book
The instruction:
Ok, it was not easy to understand the instruction, I tried to simplify it into some point and I hope I am right.
1. To put the seeds in water for (24 hours)
2. Then put the compost discs in water for some time it will absorbs water it will swell.
3. Open it and put it in the pots.
4. Add the seeds to each pots. (label each pots with the date and seeds name)
5. Put the pots in the Plastic Bags for 2-3 week in cool place.
6. Then move the Plastic Bags into refrigerator for 4-6 weeks. (not sure about the points 5 and 6)
7. Now, after that the seeds should be start germinate!! so we then remove it from the bags.
This process should take 1 year before the Bonsai Tree takes it shape. I will do other post with more photos of this experiment.
Bonsai Experiment Follow-up:
Bonsai post 1 | Bonsai post 2 | Bonsai post 3 |
The Light
Camera on the ground in my dining room where the day lights coming through the window.
::Camera Setting::
Camera: Nikon D7100, F-number: f/22, Exposure: 20 sec., ISO: 100
Lens: Nikkor 18-300m @ 48m

 Follow me on Twitter..
Ali,
Berries Session
Here are Berries Session photography, I am using the Nikkor Macro 105mm lens mounted on my great Nikon D90 camera using Nikon SB900 Speedlight, camera in-hand.
First lets see the setup, here is my Nikon SB900 flash with the homemade diffusers.

Here we are with the Raspberries, a beautiful red/pink sweet fruit.
see more photos of this Macro session click Macro on Berries
The JR
Here is a shot of product, the subject is JR Perfume located in the lightbox using the Nikon D7100 camera in-hand, Nikkor 10-300m and TT520 flash with TTL cable and a diffuser [Here is the Studio]

::Camera Setting::, Camera: Nikon D7100, F-number: f/13, Exposure: 1/250sec., ISO: 200, Lens: Nikon 18-300m @ 38m
Taking pictures is not my main daily practices, but when i start playing with my camera, i really enjoy my self.
Thanks for visiting my Space..


