Archive
Flowers in my lens.. 3
Here is another photo sample taken with #galaxy #Note9 phone for some flowers in my garden..
For mor follow me on Twitter @h_ta3kees

Mushroom House
Here is another attempt to improve my skills in sketching and Coloring using water color. Mushroom House.

Python: Shares Speculation System – Part 5
Learning : Python, DataBase, SQL, SQlite3
Subject: Plan, Design and Build a Shares Speculation System
Project Card:
Project Name: Shares Speculation System
By: Ali
Date: 2.7.2020
Version: V01-2.7.2020
In this part we will talk or say will work on two functions, Buying Transactions and Show All Transactions, both are fill in Transactions Managment. But first we will do some changes in our main codes as following:
1. Add New Table to the DataBase named s_basket using this code:“CREATE TABLE if not exists s_basket (sb_id INTEGER PRIMARY KEY AUTOINCREMENT, sn_id integer, ts_amount float, min_p float, max_p float)” also we will Insert the zero record as: c.execute (“INSERT INTO s_basket (sb_id) VALUES(:sb_id)”,{“sb_id”:0})
2. Changing in Main Menu.
[Important Note]: This application Purpose for Saving Transactions and NOT for Desetion Making and dose’t have any type of AI or ML Model to Predict the Prices and/or Giving Sugestions on Buying or Selling Shares.
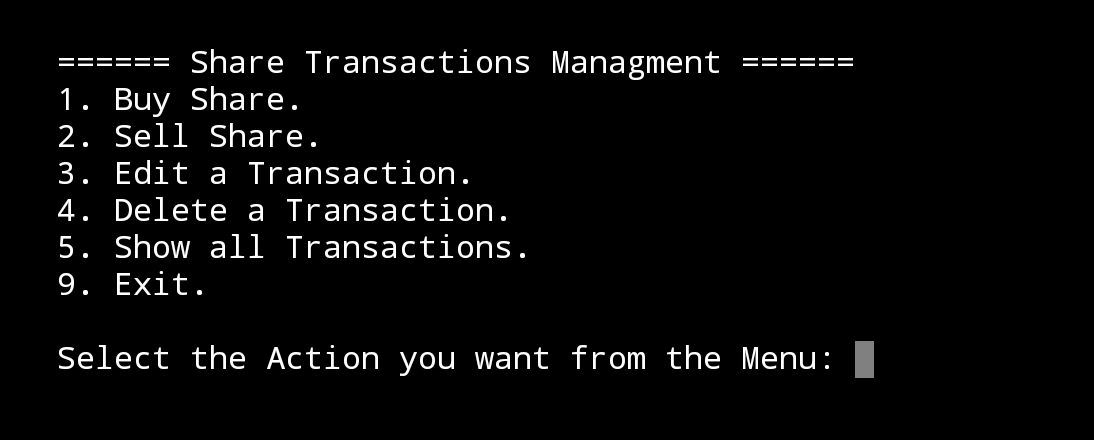
Transactions Managment: In our previous parts and codes we published, we used two options in the main menu (Buying Transaction, Selling Transaction) in this part we will change this to have one menu option called Transactions Managment this option will take the user to a sub-menu having some other options as shown:
The Main-Menu Code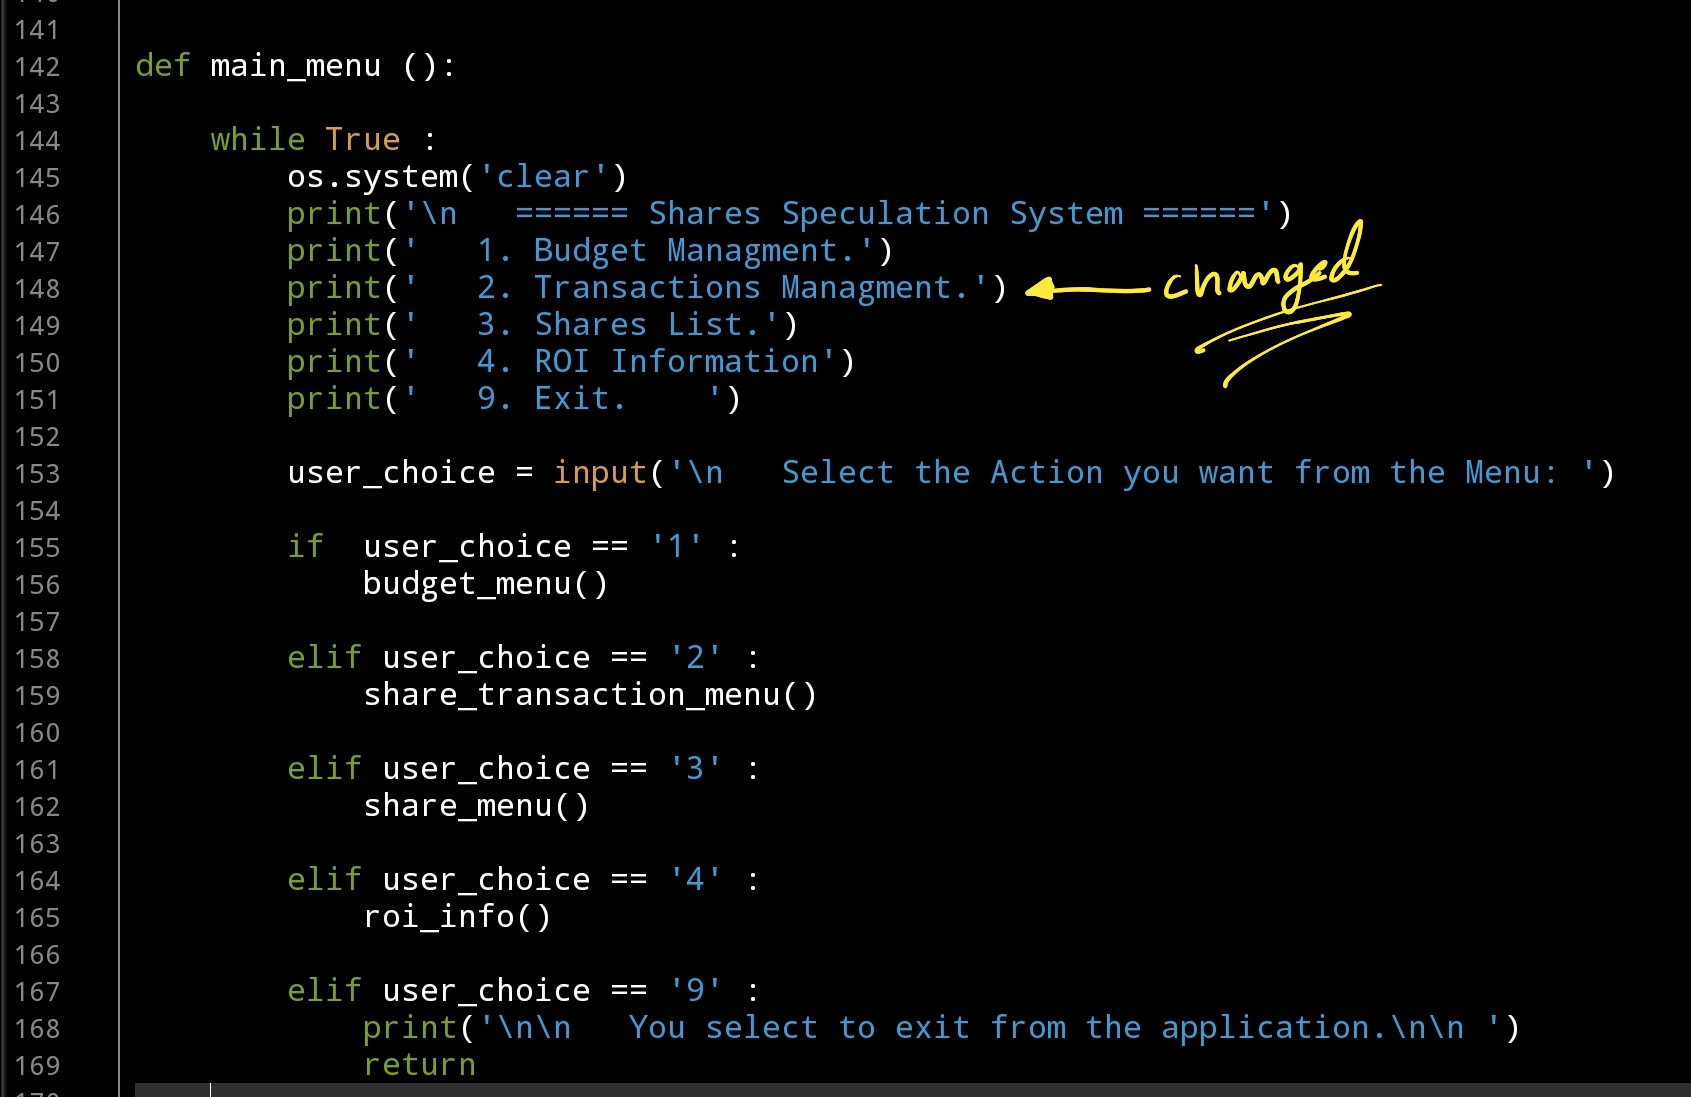 Out-Put 
|
Transaction Managment Menu
Out-put |
Buying Transactions: we will start writing the functions to Insert a Buying Transactions, in this function first we will display a list of Shares we have and the user will select the ID of the share needed, here is the code ..
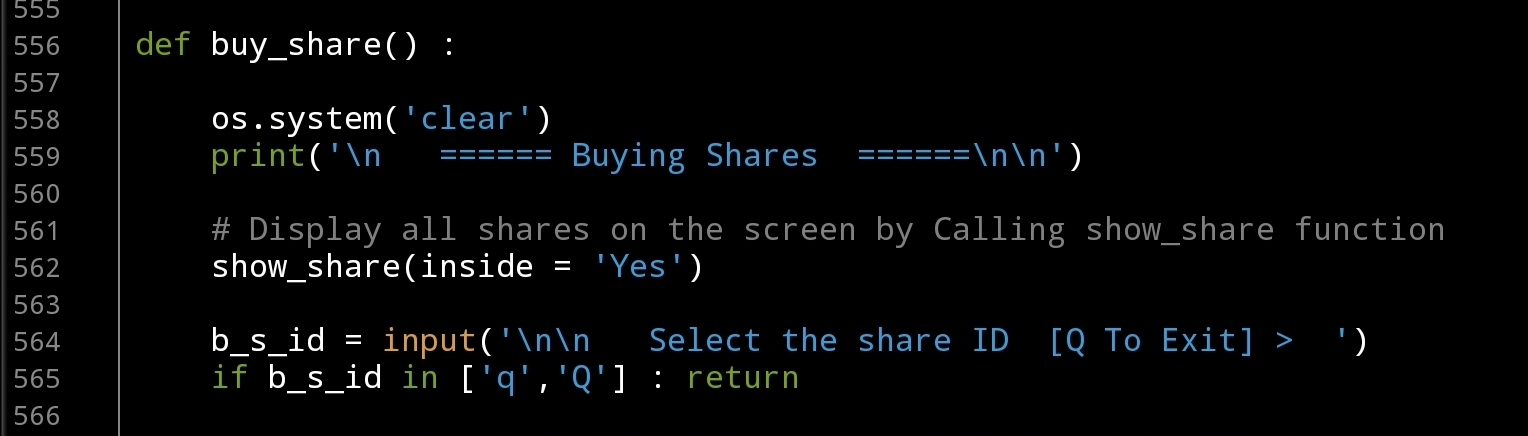 |
Now we will use the ID to get the selected share Full-Name and it’s Abbreviation also the amount of shares we have with the lowest and highest price we bought this share before and will display all this information on the screen. Next step is to collect the buying record information to be saved, so we will ask the user to Enter the Date, Share Amount and the Price. With each Data-Entry line we will give the user the ability to terminate the process by Entering ‘Q’, for the date we will use date_validation function. Here is the code for this section..
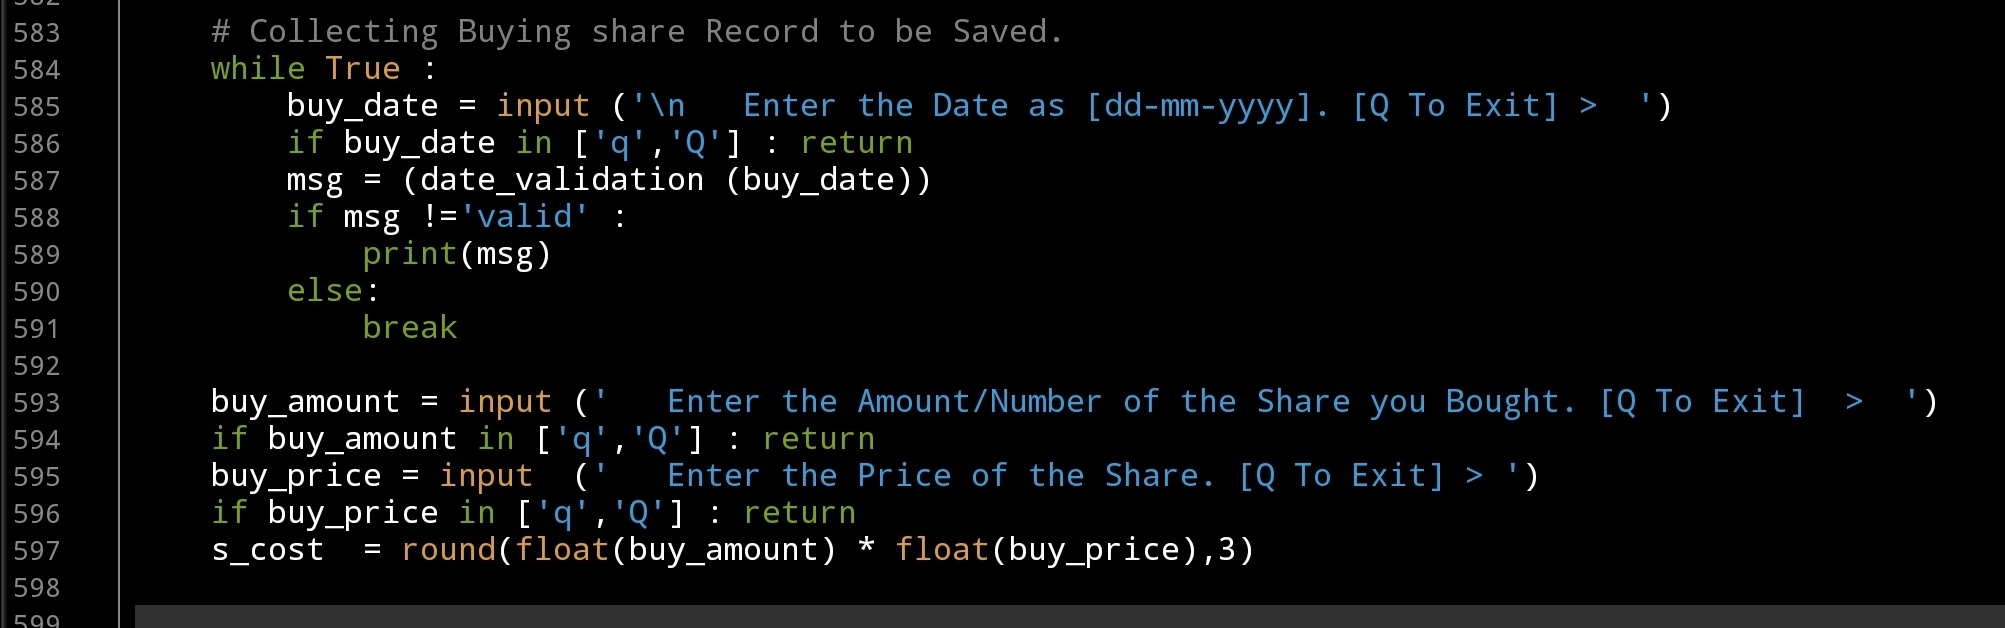 |
After that we are ready to Insert the data into the Database, and update other records. Here is the code..
 |
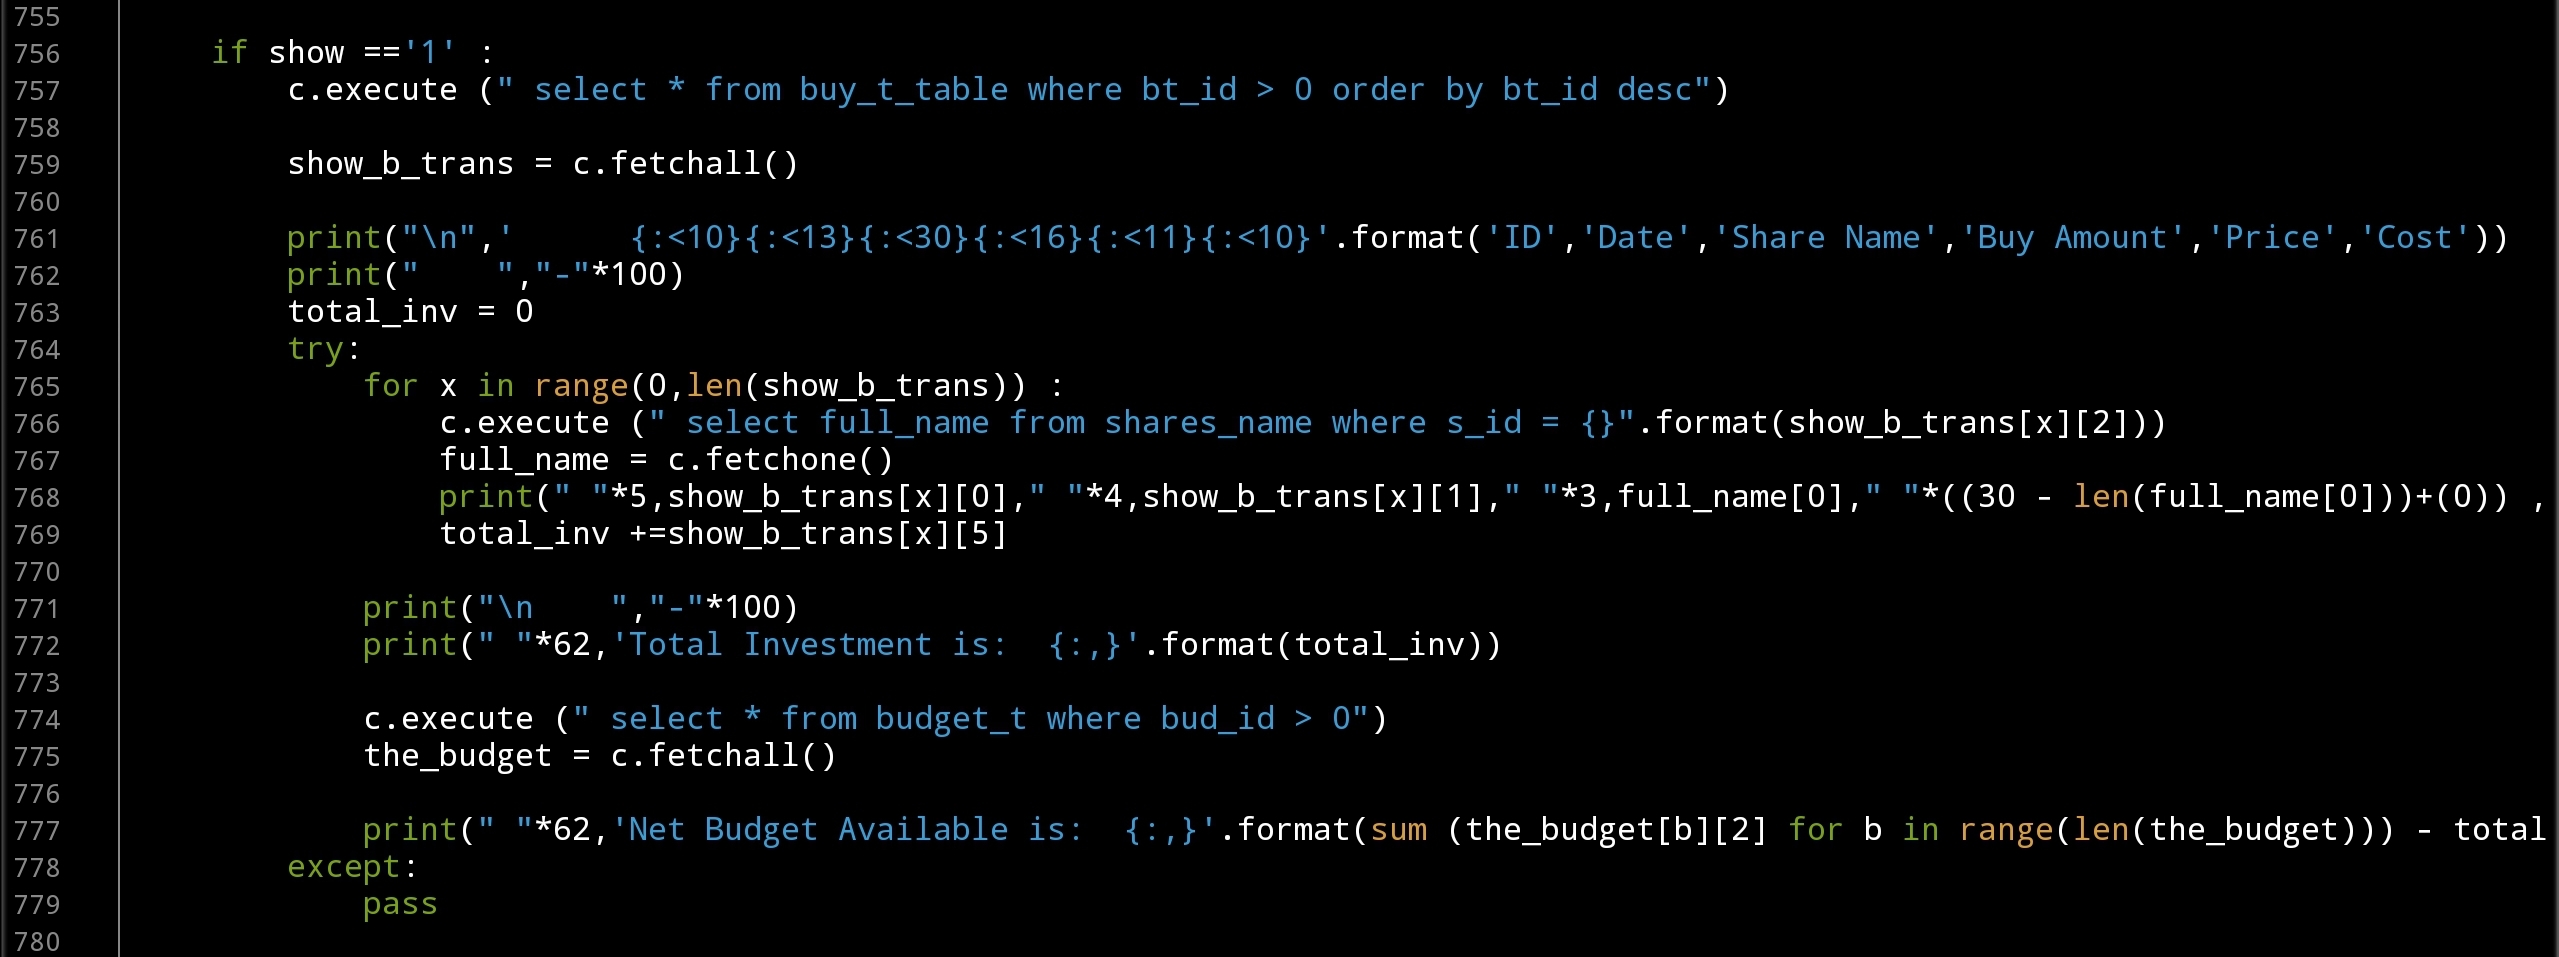
Now we have saved one Buying record, before we continu with Selling Transactions we will write the Show All Transactions this function will display all the records of Buying Transactions and Selling Transactions. Now we will write the section to display the Buying Transaction records. We will call the function def show_all_trans () and we will ask the user to select “What type of Transaction to Show:”1. Buying Transaction.2. Selling Transaction.3. All Transactions.
then we will display the transactions in a table format. In this part we will write the code for the Buying Transaction. Here is the code ..
 |
We Done in this Part ..
Coming Up: In Next part we will write the Function Save Selling Transactions to our system, also updating the Show
[NOTES]
1. Part-1 has no code file.
2. We are applying some basic Validations on some part of the code, and assuming that the user will not enter a messy data.
3. This Application Purpose for Saving Transactions and NOT for Desetion Making and Dose’t Have any type of AI or ML Model to Predict the Prices and/or Giving Sugestions on Buying or Selling Shares.
:: Shares Speculation System ::
| Part 1 | Part 2 | Part 3 | Part 4 |
| Part5 |
All the Codes in this Post Available here ..
To Download my Python code (.py) files Click-Here
 Follow me on Twitter..
By: Ali Radwani
To The Freedom

Python: Drawing Math Equations
Learning : Python and Math
Subject: Python Project to Draw a Math Equations
In the past week or so I saw a tweet from @matthen2 it was about drawing half circles on 99 points, the 99 points was distributed on a hidden circle, each line (or half circle) connecting x (a point on the circle) and it’s double, so point num 2 is connected to P num 4; (P3 to P6, P4 to P8, …) and so-on
This inspired me to write a Python app (code) to perform same action. Then I just upgrade the idea to draw any mathematical Equation. (Lets say simple mathematical Equations)
In our project, the user will enter the number of points and the starting circle radius, also I fond that we can do more by reducing the circle radius after each point, so i add this to the project.
Coding: We will write a function to collect the points in a list as [x,y], and returns the list. Then we pass each two points of (x1,y1) and (x2,y2) to another Function to draw a line between those points. In this version we will write the Equations as hard-code in our project.
So First Function will be the get_points() here the systems will ask the user to Enter some variables. We will collect the number of points P, the raidus of the circle circumference that points will be distributed On it’s, also we will ask the user if circle radius is fixed or decreased by a given factor.
Using mathematics we know that a circle has 360degree, so if we divide 360 over P we will have (if we can call it) the arc_angle. .. Here is the code for the function …
# Function to collect the x,y points

def get_points() :
  p = int(input('  Enter number of Points:  ')) # number of points.

  arc_angle = 360 / p
  circle_r = int(input('  Enter the Cricle Radius: ') )
  fix_r = int(input('  Enter a number to reduce the Radius:'))

  #To return the x,y list of the points that we want to connect.
  p_list = []
  t.goto(0,0)
  t.setheading(-90)

  for p in range (0,p+1) :

    t.goto(0,0)
    t.forward(circle_r)
    nx = t.xcor()
    ny = t.ycor()

     # If the user want to reduce the radius.
    circle_r = circle_r - fix_r
    p_list.append([nx,ny])
    t.right(-arc_angle)

  return p_list
By now, we have a list of points [x,y], and we will passing two points to another function def draw_line(x1, y1, x2, y2): to draw a line between the points. Very simple and easy Function …
# Function to draw a line

def draw_line(x1, y1, x2, y2):

  t.goto(x1,y1)
  t.pendown()
  t.goto(x2,y2)
  t.penup()
Now the tricky part, How to select the points?. To do this we assume we have an Equation (e1) and if we got any errors like (division by zero, or out of index) we will apply another Equation (e2), e1 and e2 will be hard-coded and each time we need to change it and run the application again to see the result. And to draw a line between the points based on e1 and e2 we will run a for loop …. Here is the code ..
# drawing the equations


for d in range(len(p_list)-1) :

  e1 = d * 2
  e2 =  abs( len(p_list) - (d*2))

  try:
    draw_line(p_list[d][0], p_list[d][1],p_list[e1][0], p_list[e1][1])
  except:
    if e1 > len(p_list) :
      draw_line(p_list[d][0], p_list[d][1],p_list[e2][0], p_list[e2][1])
Here is some output
 |
 |
 |
|
 |
 |
This is the end of this project, Do we need any upgrading in any part of it?
To Download my Python code (.py) files Click-Here
By: Ali Radwani
Python : Triangle Parameters
Learning : Python to Draw a Triangle
Subject: To get the Parameters of a Triangle
A week ago I start helping a friend in a mathematics geometric to draw a Triangle from Two points that represent the The Hypotenuse of a Triangle, then I deside to write a python project to Draw a triangle based on two given points (x1,y1) and (x2,y2) and to print it’s parameter (other sides and angles). We will use the Trinket.io as a Python interrapter and will draw with turtle library.
Project Details: The system will ask the user to Enter the coordinates of Two points To draw a Right Angle Triangle. In our Triangle, we will call the (x1,y1) as Point A, and (x2,y2) as Point C. From our starting poins we can calculate the distance between point A and point (B), also the length of Hypotenuse and the angels in the Triangle.
So, What we have:
tri_opposite = abs( y2 – y1 )
tri_adjacent = abs( x2 – x1 )
From a mathimatics triangle formula we know that:
Opposite^2 + Adjacent^2 = Hypotenuse^2
where: x^2 = square(x)
So:
tri_hypo = tri_opposite**2 + tri_adjacent**2
tri_hypo = math.sqrt(tri_hypo)
tri_hypo is the distance between point A and Point C (the opposite
side of the right angle)
Now the Angels:
As we know that in a triangle the summation on all inside angles is 180deg, and in a Right Triangle we will have a one fixed 90 degree angle (ABC), so the first thing we will work on calculating the Opposite angle (BAC).
From a Triangle math:
tri_opposite = abs( y2 – y1)
tri_adjacent = abs(x2 -x1)
the_deg (BAC) = inverse tan for (tri_opposite / tri_adjacent)
# get the inverse of Tan
the_ang = math.degrees(math.atan(the_deg))
Now, lets do some coding ..
First thing we will import two libraries turtle and math, also we will do some setting for our turtle. … Here is the code ..
# Turtle setting


import turtle, math
# turtle_setting
t = turtle.Turtle()
t.penup()
t.shape("non")
#t.speed(9)
t.speed('fastes')
#t.visible = False

t.hideturtle()
Then we will write a code to draw a ‘Gray’ coordinates cross lines for our project. Here is the code for it ..
def the_cross() :
     # To draw the cross represents the coordinate.
    t.penup()
    t.pencolor('gray')
    t.goto(-200,0)
    t.setheading(0)
    t.pendown()
    t.forward(400)
    t.penup()
    t.goto(0,200)
    t.setheading(90)
    t.pendown()
    t.forward(-400)
    t.penup()
    t.goto(2,0)
    t.pendown()
    t.circle(2)
    t.penup()
    t.goto(0,0)
    t.setheading(0)

# calling the function
the_cross()


Now we will write the main function code, First we will ask the user to enter the x,y for two points, then we will do our calculations to get other Triangle parameters and angles, finally we will draw the Triangle. .. Here is the code..
def draw_triangle(x1, y1, x2, y2) :

# draw the Triangle.
    style = ('Courier', 20)   # font style.
    t.penup()
    t.goto(x1,y1)
    t.setheading(0)
    t.pendown()
    t.circle(1)  # To draw small circle on point A.
    t.write('A',font = style)  # To write A next to the point.
    t.forward((x2-x1))
    x3 = t.xcor() # here is the x for point B
    y3 = t.ycor() # here is the y for point B

    t.right(-90)
    t.forward((y2-y1))
    t.write('C',font = style)  # To write C next to the point.
    t.goto(x2,y2)
    t.setheading(0)
    t.pendown()
    t.circle(1)  # To draw small circle on point C.
    t.penup()
    t.goto(x3,y3)
    t.pendown()
    t.circle(1)  # To draw small circle on point B.
    t.penup()
    t.setpos(x3-15,y3-15)
    t.write('B',font = style)  # To write B next to the point.


    # To calculate the angle of BAC using Triangle Math Equations.
    tri_opposite = abs( y2 - y1)
    tri_adjacent = abs(x2 -x1)
    the_deg = tri_opposite /  tri_adjacent

    # get the inverse ot Tan using Triangle Math Equations.
    the_ang = math.degrees(math.atan(the_deg)) #atan(x) is the inverse of math Tan function.

    t.goto(x1,y1)

    # To correct the rotation angle based on it's coordinates.
    if (x1 > x3) and (y2 > y1) :
      rotation = the_ang - 180

    elif (x1  y1):
      rotation =  360 - the_ang

    elif (x1 > x3) and  (y2 < y1) :
      rotation =  180 - the_ang

    elif (x1 < x3) and  (y2 < y1) :
      rotation =   the_ang - 360

    #t.right(rotation)
    #t.pendown()
# From using Triangle Math Equations, we know that Hypotenuse^2 = Opposite^2 + adjacent^2.

    tri_hypo = tri_opposite**2 + tri_adjacent**2
    tri_hypo = math.sqrt(tri_hypo)
    t.right(rotation)
    t.pendown()
    t.forward(tri_hypo)
    t.penup()

    print('\n  The Triangle Information:')
    print('  Point A= ({},{})'.format(x1,y1))
    print('  Point B= ({},{})'.format(x3,y3))
    print('  Point C= ({},{})'.format(x2,y2))
    print('  Adjacent',tri_adjacent)
    print('  Opposite',tri_opposite)
    print('  Hypotenuse',tri_hypo)
    print('  Angle: ABC = 90')
    print('  Angle: BAC = ',the_ang)
    print('  Angle: ACB = ',180 - the_ang - 90)
Finally, we need to call the function and pass the two point to it, to do this first we will ask the user to Enter the Two Points and we will make sure that the points are not the same.. Here is the code ..
# calling the draw_triangle function ..

print('\n   To draw the Triangle you need to Enter Two Points as X,Y for each one.')
x1 = int(input('   Enter x for First point: '))
y1 = int(input('   Enter y for First point: '))
x2 = int(input('   Enter x for Second point: '))
y2 = int(input('   Enter y for Second point: '))

if (x2==x1) or (y2==y1) :
   print('  Your Points are not valid, (x1,x2) or (y1,y2) can't be equal ')
else :
   draw_triangle(x1, y1, x2, y2)
 |
To Download my Python code (.py) files Click-Here
By: Ali Radwani
Coloring Some Sketches
Again I just pecked one of my sketches and color it using my galaxy Note9 mobile... Usually I use pencil then ink-ed the sketch, some time I color it with Watercolor or Promarker. Just to kill the time, I load one of them to the “Autodesk Sketchbook” App on my Galax Note9 and color it. The sketche is from my SKB 39 ..and here it is . .
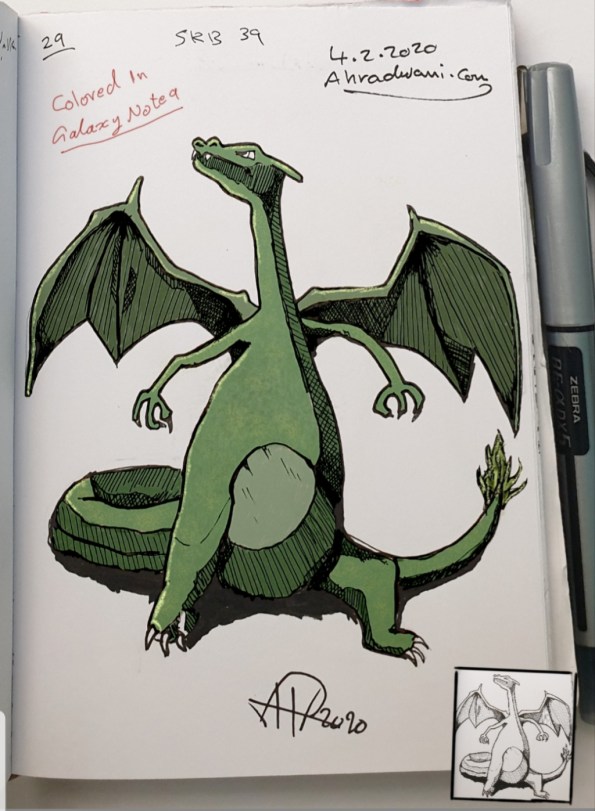
More sketches on my-Sketch page.
Excel, VBA Codes and Formulas-4
Learn To : In Excel – Highlight the Row when clicked.
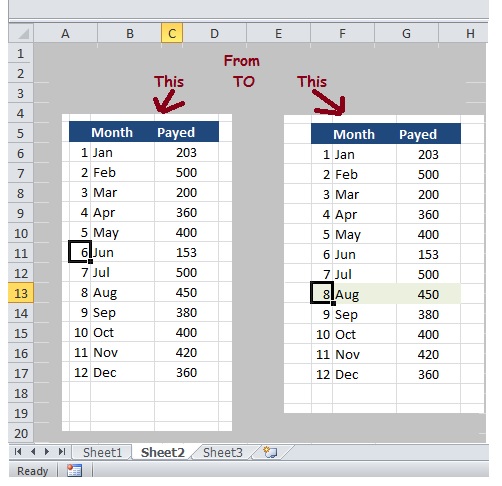
Assume we have a table, and all we want to do is that if the user click anywhere in the table that ROW will change it’s color.
 |
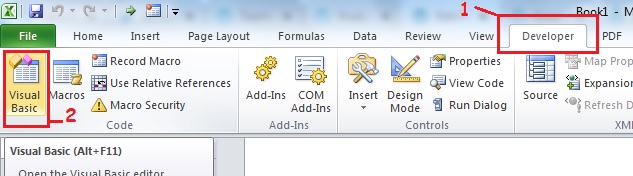
Steps
1. From the Top menu, Go to “Developer”, then Press Visual Basic.
 |
2. from the select the sheet name containing the table. ( We have it in Sheet 2 )
3. Then we select “SelectionChange” action from the
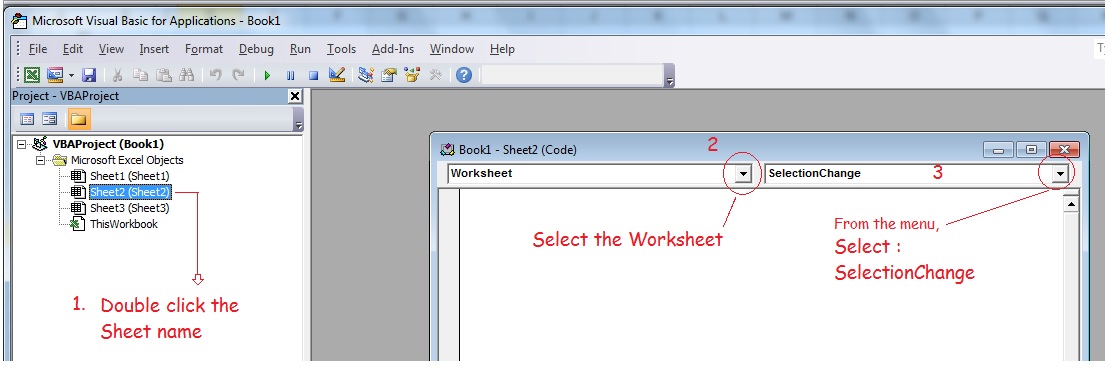 |
4. Write this code:
If Not Intersect(ActiveCell, Range(“C8:E9999”)) Is Nothing Then
Range(“A1”).Value = Target.Row
End If
5. You need to know your Table Range, in my example, the range is (“C8:E9999”). I add the “9999” so i will be sure the even if we add more data to out Table the code will handle it.
6. Now we need to add a rule in the “Manage Roles” in “Conditional Formatting” from the Excel Menu. Here is how to Open it.
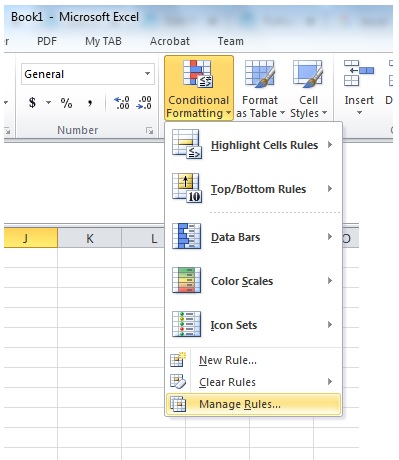 |
7. Select the “” then add new Rule, Follow the Image showing the steps to do that. Once we finish it should work fine.
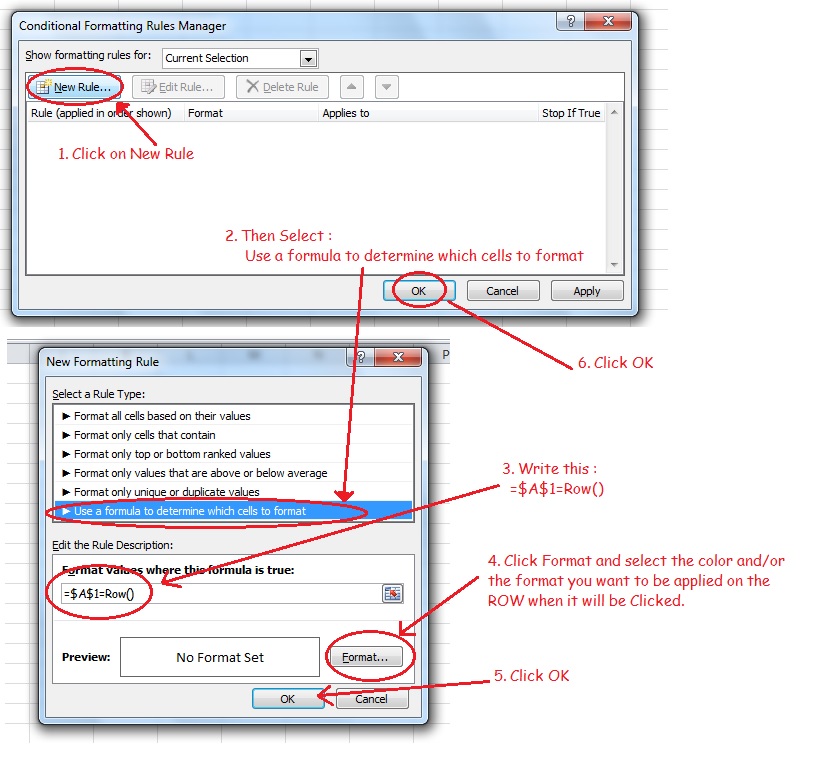 |
Now, when the user click any cell in the Table the Row will change it’s color (Format) as we set it.
🙂 Have Fun ..
By: Ali Radwani
Python and Excel P1
Learning : Python and Excel Part-1
Subject: Read Excel file
In the coming four or five Lessons we will work on reading and writing to Excel file using Python code.
First we need to import os and Pandas as in coming code block, I will use os later to fetch file information. Also we will set the file_name variable to our file assuming it is in the same .py directory and we will call [read] the file in to df [dataframe]. Here is the code
 # Import and call the File into DataFrame.

  import os, pandas as pd
  file_name = 'python_sheet_4.xlsx'
  df = pd.read_excel(file_name, sheet_name='Sheet1')
Now let’s talk about my excel file “python_sheet_4.xlsx” has two sheets named “sheet1 and sheet2” both contin same table sheet1 the table start from cell A1 and in sheet2 the table start from cell C7. So first we will work on sheet1 that’s way we call sheet1 in our df setting statement.
Now we have the df (dataframe), and if we run the this code:
 # To print out the data from df DataFrame.

print(df)
The Output.. |
Here is the original shot for our excel table
 |
Here is a list of commands that we can use..
| Command | Action |
| print(df) | Print all the data in the table |
| print(df.head()) | Print the first 5 record in the table |
| print(df.head(10)) | Print the first 10 records in the table, and print(df.head(x)) will will print the first x record. |
| print(df.columns) | Print out the table header as a list along with data type. |
| print(*df.columns,sep=’,’) | This command will printout only the table header separated by (,) |
| print(df.shape) | This will print the size of the table, in our case the out-put will be (17,3) so we have 17 records and 3 columns. |
| sheets_name = (pd.ExcelFile(file_name)).sheet_names | This command will return the Number and name of sheets in the file, then we can print it out like this: print(‘\n Number of Sheets in the file: ‘,len(sheets_name)) print(‘\n Sheets Name :’,*sheets_name,sep=’,’)
|
To make things in a professional way, we will write a function so we can use it with other applications, here is it..
The Code |
[Out-Put]: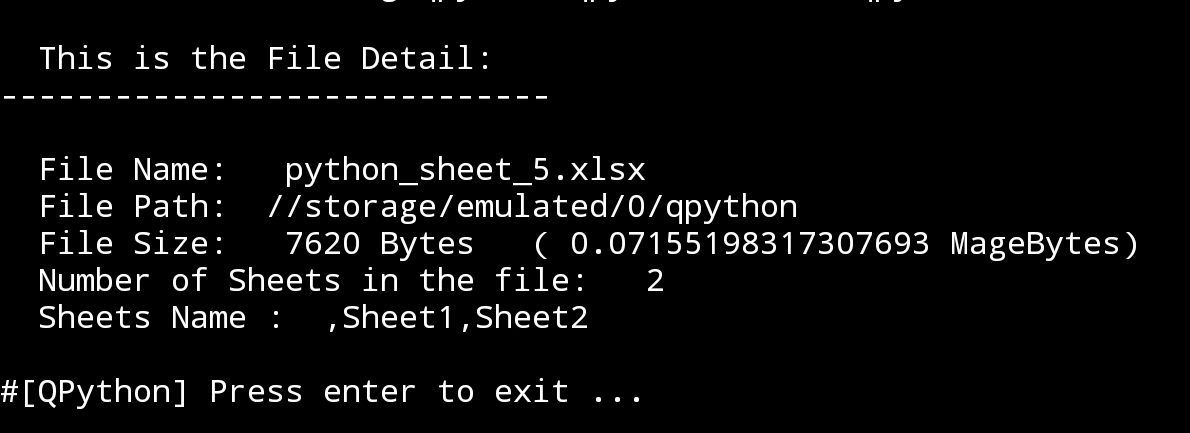 |
To Download my Python code (.py) files Click-Here
By: Ali Radwani
Excel, VBA Codes and Formulas-3
Learn To : In Excel – SUMIF and SUMIFS [ Part-2 SUMIFs ]
In SUMIFS we are talking about more than one conditions to apply on the same range or other range before we calculate the SUM of the target range.Case Assumption: As in Part-1, Assume we have a table, with 5 columns (as in image-1) columns titles are [Date, Item, Quantity, Price and Total] containing our Expendituer and we have another table call it Summaries, we want some totals to be in this table. We can see the main table [Expendituer] and the Summary table as in part-1 but here we will add a year column to the Item-Quantity box, so we want to have the Quantity of an Item in given year. Image-2.
Image-1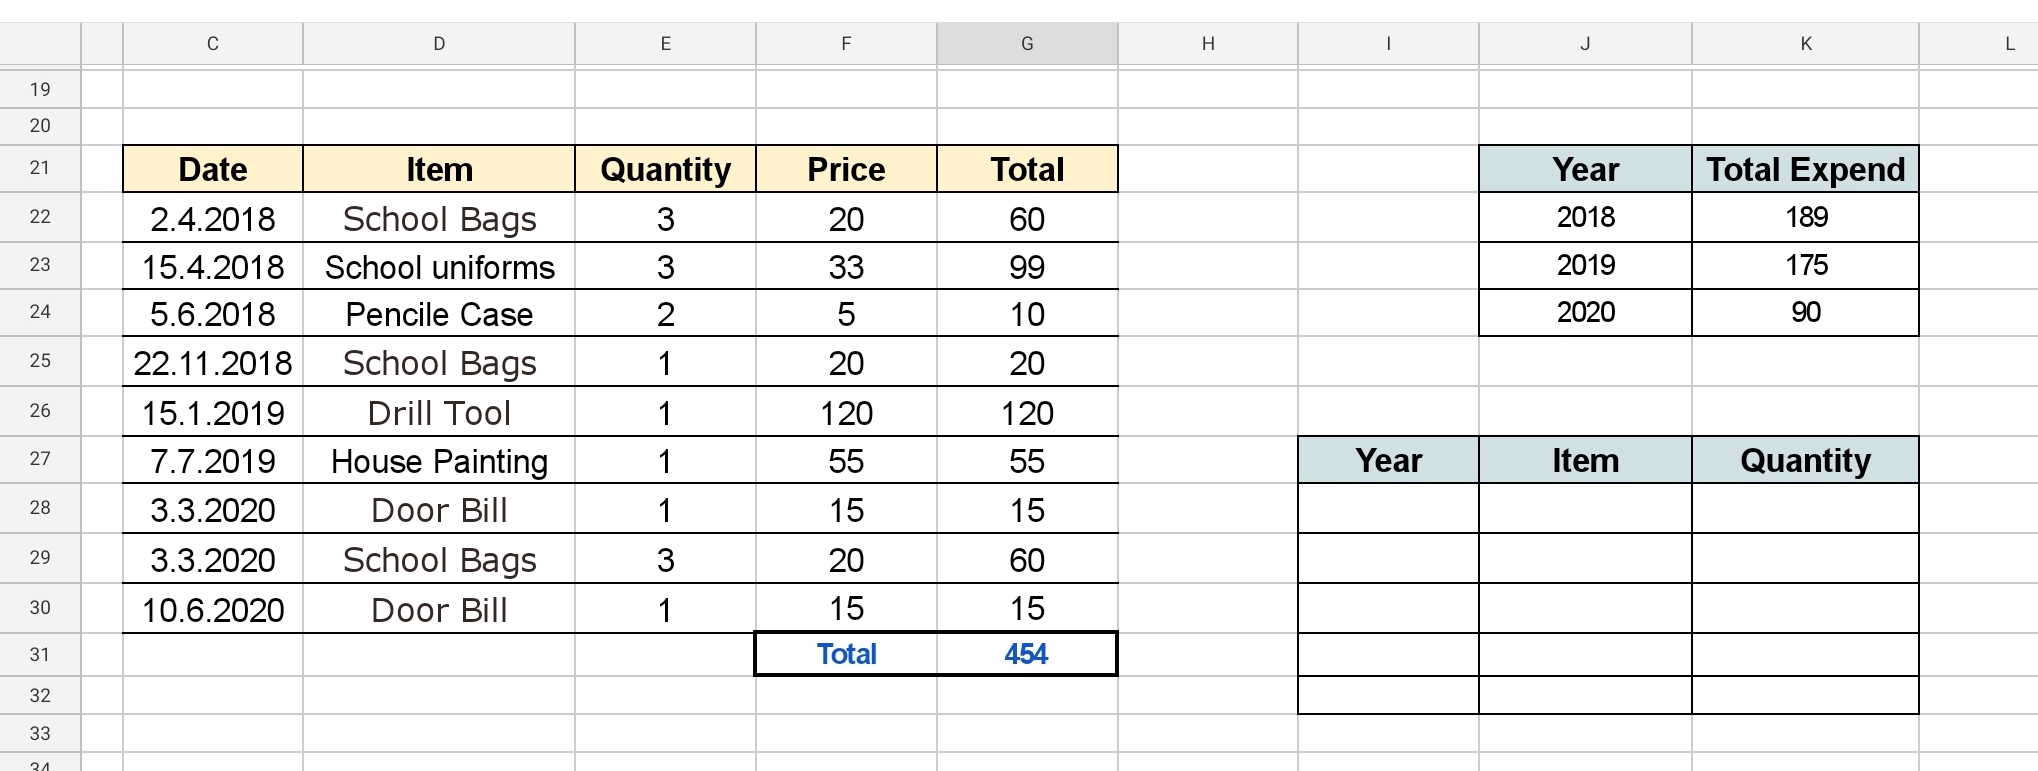 |
Image-2 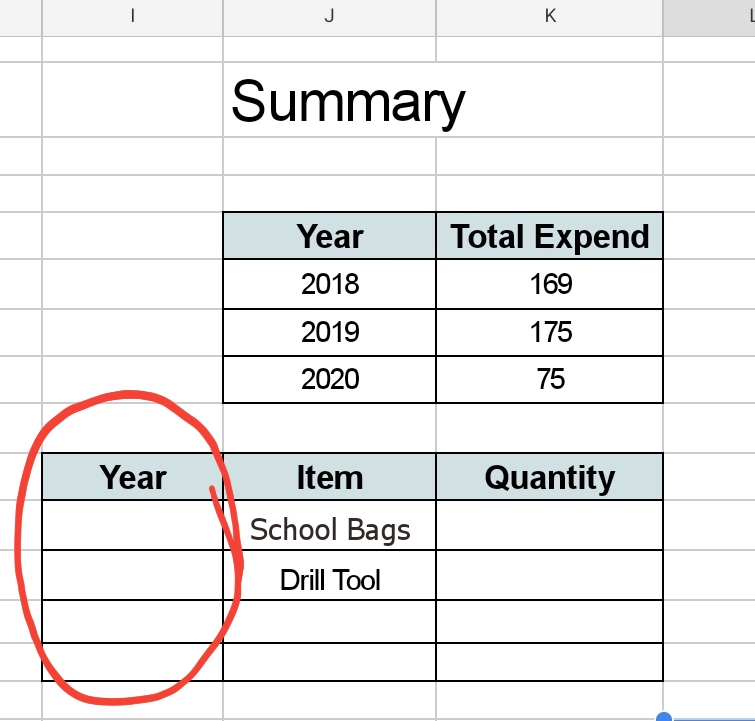
|
So if we write 2018 in Cell I27 we Must get the Quantity of School Bags we bought in 2018. To do this we will write this formula:
SUMIFS ()
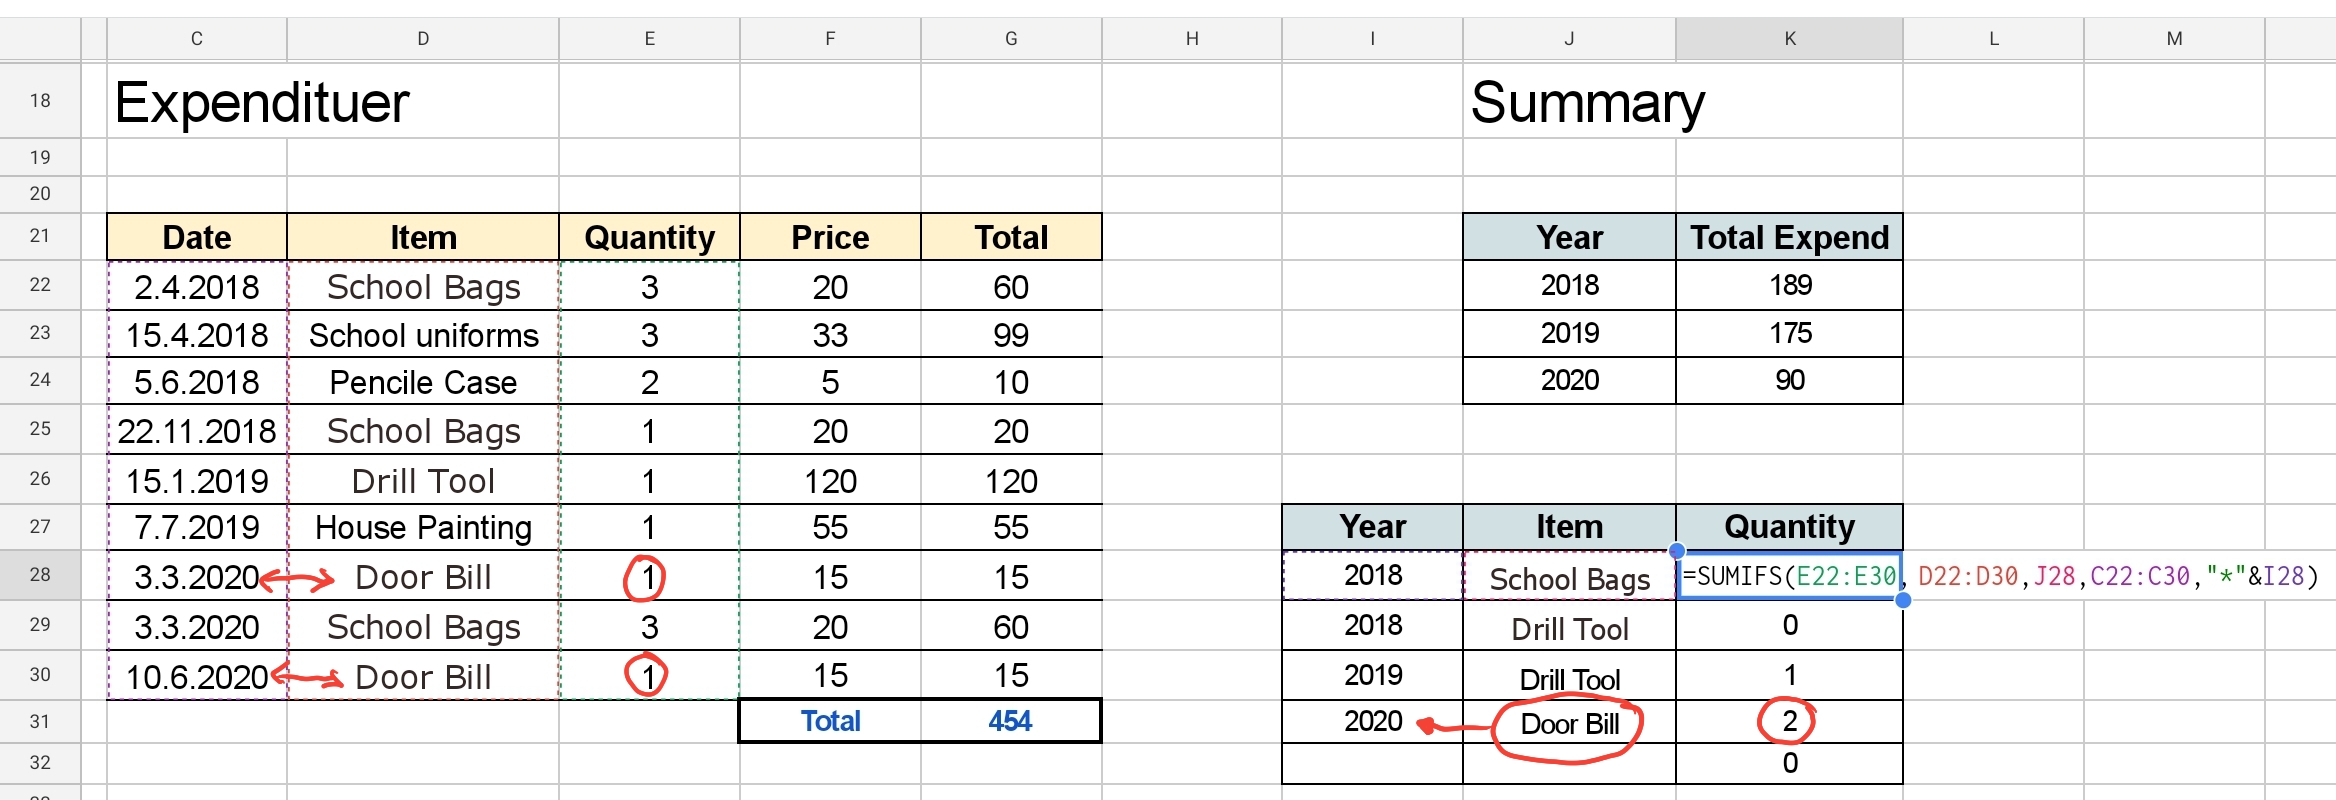
=SUMIFS(E22:E30, D22:D30,J28,C22:C30,”*”&I28)
So in Cell K28 we will write =SUMIFS(E22:E30, D22:D30,J28,C22:C30,”*”&I28)
then we can copy the formula to other cells.
Now we have the formula in all the cells we want, we may need to do a little changes to cells number or columns that may been changed during the copy. And here is a screen shot of what we must have.
|
🙂 Have Fun ..
By: Ali Radwani
Taking pictures is not my main daily practices, but when i start playing with my camera, i really enjoy my self.
Thanks for visiting my Space..


