Archive
Ricoh GR3, Fujifilm XF10 or Keep my Niko S9900
On London 2023 trip I take two cameras with me the Fujifilm X-T30ii and the Nikon S9900. From accessing Instagram I note some posts using Ricoh GRiii cameras and from there I search and read more about it, then I search more and find the Fujifilm XF10. I start watching videos on YouTube about these two cameras and doing some comparison, hearing what other YouTubers are saying, trying to select one to be my new pocket stylish compact camera.
Nikon S9900: I think or let’s say the two things I don’t like about the Nikon S9900 are: The F starts at 3.7. And the AF is slow and sometimes even not getting focused.


I take the Nikon S9900 camera out for a one-day shooting set to Black and White, it was slow in focusing but it convince me that I can take 60% – 85% of good photos with it. It has a very good zoom range and sharp wide as 5mm images in outdoor photos [Very bad indoor/low light].
Nikon S9900 is a pocket-size camera with 5mm to 30x zoom and a tilt/flip screen that I think gives an advantage on sunny days with a lack of a viewfinder.


The output of the camera is very good, all the photos here are taken with Nikon S9900 and can be clicked to show in full size. In some cases I went (+ – )1/3 stop, then I found that just being in default is a better choice.
So now, Ricoh GR3, Fujifilm XF10, or Keep my Nikon S9900 .. I think I will keep using the Nikon S9900 for another one or two years.
What i am waiting for: I will wait for new version of one of the two cameras Fujifilm XF10 or the Ricoh GR3, looking for: view finder, image stabilisation or sensor upgrades.
Check all photos with Nikon S9900. .. Click Here ..
By: Ali Radwani
Python: Library Managment System -P3
Learning : Python, DataBase, SQlite
Subject: Create Simple Library Managment System
In this Part we will work on Classification Managment. As we know each book can fall in one or more subject or say ‘Classification’ then we can search for a book by it’s class, example of this, we may have classifications like: cook, computer, Health, History; also a book can have more than one classifications such as one book we gave it cook and sweet .. and so-on.
To do this we add another table to the project to hold all the Classifications and manage them. Here is the code ..
# New Table to be added.

sql_class  = "CREATE TABLE if not exists classifi_list (class_id INTEGER PRIMARY KEY AUTOINCREMENT, class_name text )"
c.execute(sql_class)
db_conn.commit()

c.execute ("INSERT INTO classifi_list (class_id) VALUES(:class_id)",{"class_id":0})
db_conn.commit()
[NOTE: This code been added to the source file.]
Classification Managment: In Classification Managment we will have four Functions, and will write the codes to perform each function, also we will write the Menu Function to let the user select a function. Functions are:
1. Add New Classification.
2. Edit a Classification information.
3. Delete a Classification.
4. Show Classifications.
First: Here is the class_menu() Function, the user will have the prompt and asked to select an action or (9) to Exit.
# Classification Managment Fumction
def class_menu():

    while True :
        os.system('clear')
        print('\n   ====== LMS - Classification Managment ======')
        print('    1. Add New Classification.')
        print('    2. Edit a Classification information.')
        print('    3. Delete a Classification.')
        print('    4. Show Classifications')
        print('    9. Exit.')

        user_choice = input('\n   Select the Action you want from the Menu: ')

        if  user_choice == '1' :
            # Function to Add New Classification
            new_classification()

        elif user_choice == '2' :
            # Function to Edit a Classification information.
            edit_classification()

        elif user_choice == '3' :
            # Function to Delete a Classification.
            delete_classification()

        elif user_choice == '4' :
            # Function to Show a Classification.
            show_classification()

        elif user_choice == '9' :
            return
Now, let’s start with Add New Classification. Simply we will ask the user to write a classification to be added to the Database, then we will check if it is already available in our Database, If yes then we will till the user so, or (if not available) we will add it, and will give the user the chance to add another one. If the user enter (Q or q) then we exit (Quit) from the function and return to the previous Menu.
# Function to Add New Classification

def new_classification() :
    os.system('clear')
    print('\n   ====== Add New Classification ======')
    while True  :
        class_name = input('\n   Enter the Classification and Press Enter. [ To Exit Enter Q ].. >  ').capitalize()

        c.execute ("select * from classifi_list where class_name='{}'".format(class_name))
        result = c.fetchone()
        if class_name not in ['q','Q']:
            if (result != None) :
                print('\n   We already have [{}] in the Classification Database. '.format(class_name))
            else:
                c.execute ("INSERT INTO classifi_list (class_name) VALUES(:class_name)",{"class_name":class_name})
                db_conn.commit()
                print('\n      One Classification Added ... ')
        else:
            input('\n   To Exit ... Press any key ..')
            return
The Code |
Code, Run-Time |
Another Function to work on is Edit a Classification information In this one we will print-out all the Classifications we have and the user will select the one to Edit and will asked to Enter the ID number next to it. Then to Enter the New One and we will save it. Here is the code and the Out-put screen shot. To display all classifications on the screen we will use this code..
# Code to display the classifications on the screen

# First we list down all classifications.
    c.execute ("select * from classifi_list where class_id > 0  order by class_name")
    class_list = c.fetchall()
    for cla in range (0,(len(class_list)-1),4):
       try:
           print('{:<3}{:<20}'.format(class_list[cla][0],class_list[cla][1]),end="")
           print('{:<3}{:<20}'.format(class_list[cla+1][0],class_list[cla+1][1]),end="")
           print('{:<3}{:<20}'.format(class_list[cla+2][0],class_list[cla+2][1]),end="")
           print('{:<3}{:<20}'.format(class_list[cla+3][0],class_list[cla+3][1]))

       except:
           pass
[NOTE: We use the try: except to avoid any (index out of range) errors.]
Code |
Code, Run-time  |
Next we will work on the Delete a Classification, Deleting may effect on some Books that uses that classification, so we need to till the user to confirm Deleting. Also we will use the same code to list down all the classifications and ask the user to enter the ID of the one to-be Deleted. Here is a part of the code to Delete a classification..
# Part of the code ..

del_class = input('\n\n   To Delete a Classification Enter it''s ID number [Q To Exit]  > ')

if del_class not in ['Q','q'] :
    c.execute ("select * from classifi_list where class_id = '{}' ".format(int(del_class)))
    c_to_del =  c.fetchone()[1]
    print('\n   Are you sure you want to Delete "{}" Classification? '.format(c_to_del))
    print('   This action may effect on books has this Classification.')
    user_approve = input('\n   If you are sure to Delete "{}" Press Y or N: > '.format(c_to_del))
    if user_approve in ['y','Y'] :
        c.execute ("delete from classifi_list where class_id = '{}' ".format(del_class))
        db_conn.commit()
        input('\n   One Classification has been Deleted... Press any Key > ')
    else:
        input('\n\n   You Select NOT to Delete the "{}" Classification, Press any key to go back.. '.format(c_to_del))

    if input('\n   Do you Want to Delete Another Classification? [Y,N] > ') in ['n','N'] :
         return
else:
    input('\n   You Select to Exit .. Press any Key > ')
    return
The Code |
Code Run-Time |
Last Function to work in this post is Show Classifications the function we will list down all the Classifications on the screen. Very easy one, here it is
# Show Classification Function

def show_classification():
    os.system('clear')
    print('\n   ====== Show Classification ======')
    print('   The List of Classifications We Have, Sort in Alphbatic\n')
    c.execute ("select * from classifi_list where class_id > 0  order by class_name")
    class_list = c.fetchall()
    for cla in range (0,(len(class_list)-1),4):
       try:
           print('{:<3}{:<20}'.format(class_list[cla][0],class_list[cla][1]),end="")
           print('{:<3}{:<20}'.format(class_list[cla+1][0],class_list[cla+1][1]),end="")
           print('{:<3}{:<20}'.format(class_list[cla+2][0],class_list[cla+2][1]),end="")
           print('{:<3}{:<20}'.format(class_list[cla+3][0],class_list[cla+3][1]))

       except:
           # just in case error, pass and do nothing.
           pass
    input('\n\n         ... Press any Key ..')
Code |
Code Run-time |
What’s Coming In coming post, we will write the Functions to Manage the Authors.
[ NOTE ]
1. I am using Galaxy Tab and QPython3 App.
2. All the above codes are available in the Download Section/Page under the project name.
3. The application codes, Functions, Menus and other parts of the Application are subject of changes. In case of changes I will mention that.
:: Library Managment System ::
| Part 1 | Part 2 | Part 3 | |
To Download my Python code (.py) files Click-Here
By: Ali Radwani
Excel : Form to Save Data P-1
Learning : VBA Codes to Save Data
Subject: Create Form to collect Data
In a very fast and as simple as we can, we will design and write VBA codes to transform three fields of Data from an Excel sheet “Form” to another sheet “Data”.
To keep thing as simple as we can, we will not use any Validations on user inputs in this example.
First, we will re-name a sheet to “Form” and another one to “Data”. In sheet [Form] we will create a simple Form to collect Names, Company Name and Emails of our customers, also we add a button and call it Save. As in Image-1
Image-1 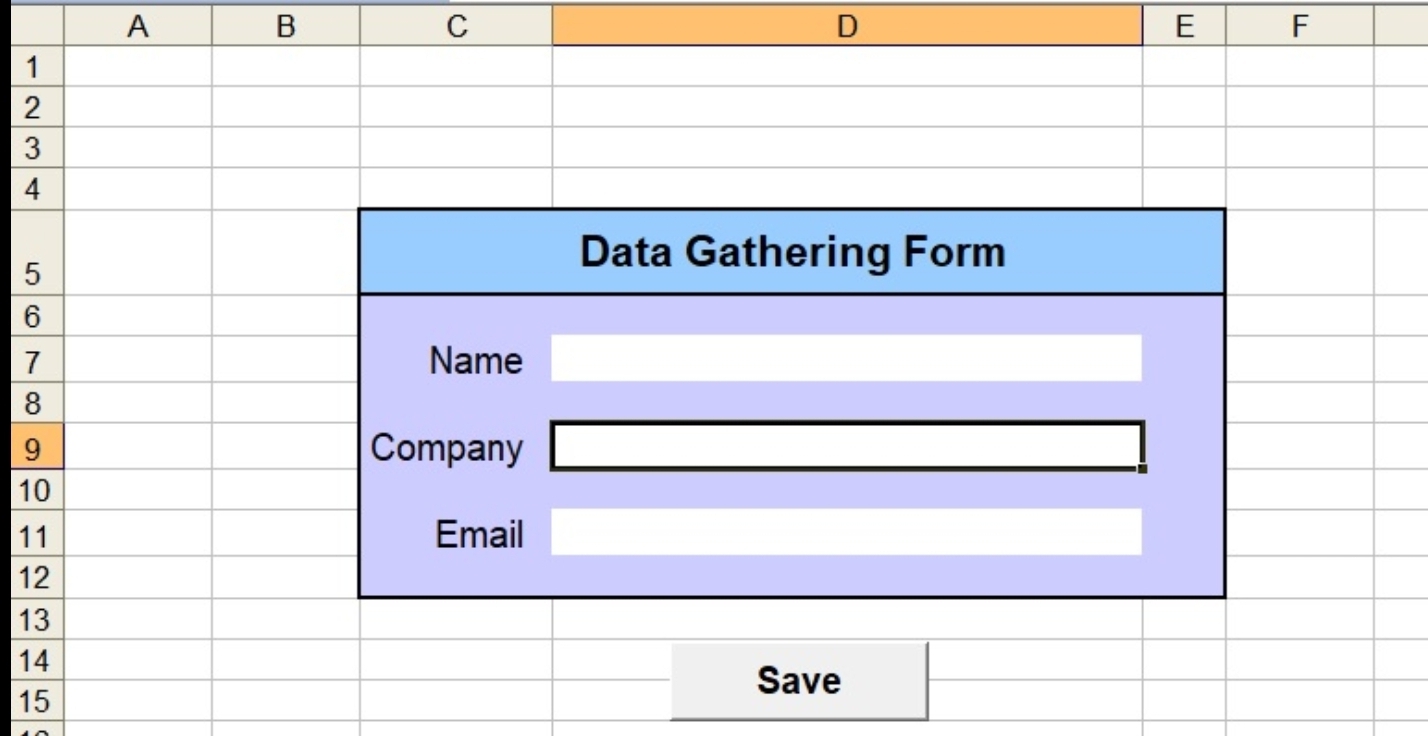 |
For companies Name, We will create a list then we will link it to Cell”D9″ so we can select a “Company Name” from a drop-down list. So to do this First in the Data sheet I will write a list of companies Name as (Comp Name 1,Comp Name 2,Comp Name 3, …. to Comp Name 10). I start my list from Cell “H8” [As in Image-2] you may start from any Cell you want.
Image-2 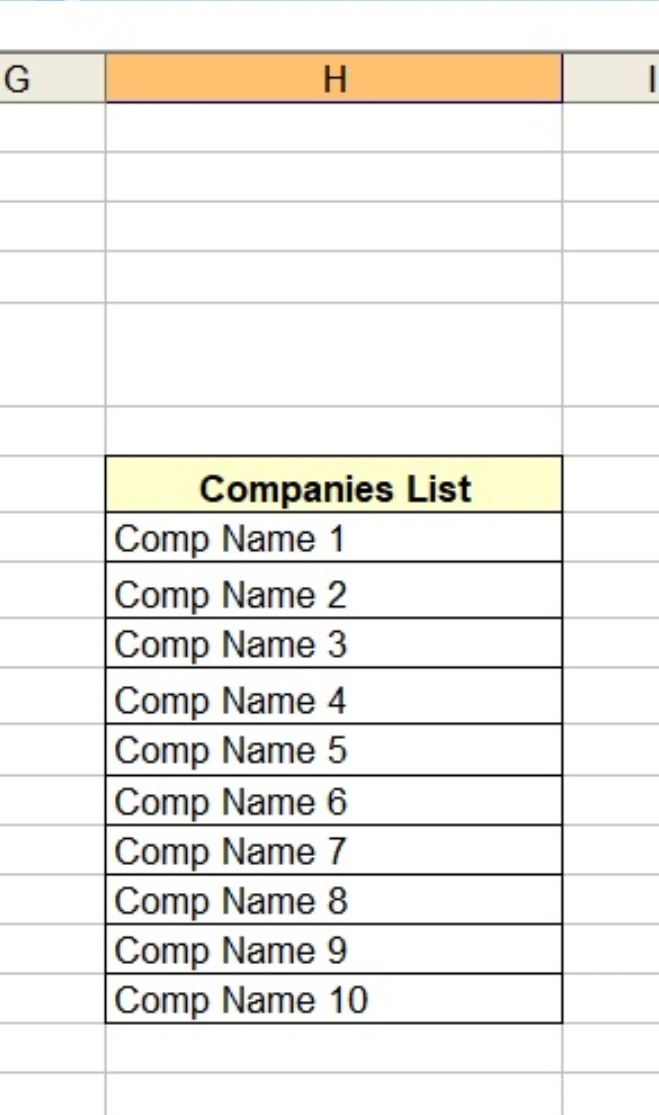 |
Now to link a Dropdown list of our companies Name to Cell “D9″ Do this:
1. Goto Cell”D9”.
2. From the menu we will select “Data” then “Data Validation” and select Data Validation. [Image-3]
Image-3 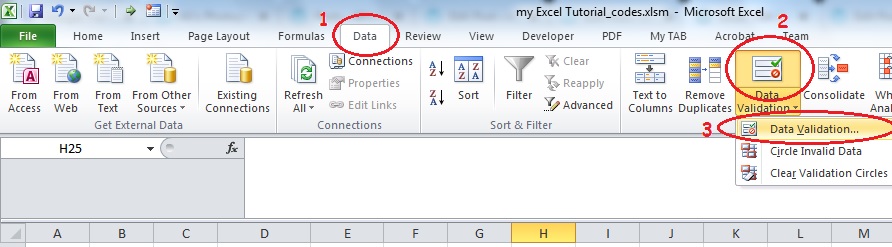 |
3. In the Allow [Select “List”], then in the Source we select the range of Companies we write [Range Cells H8:H17] or just write this: =$H$8:$H$17. Then click OK. See Image-4
Image-4 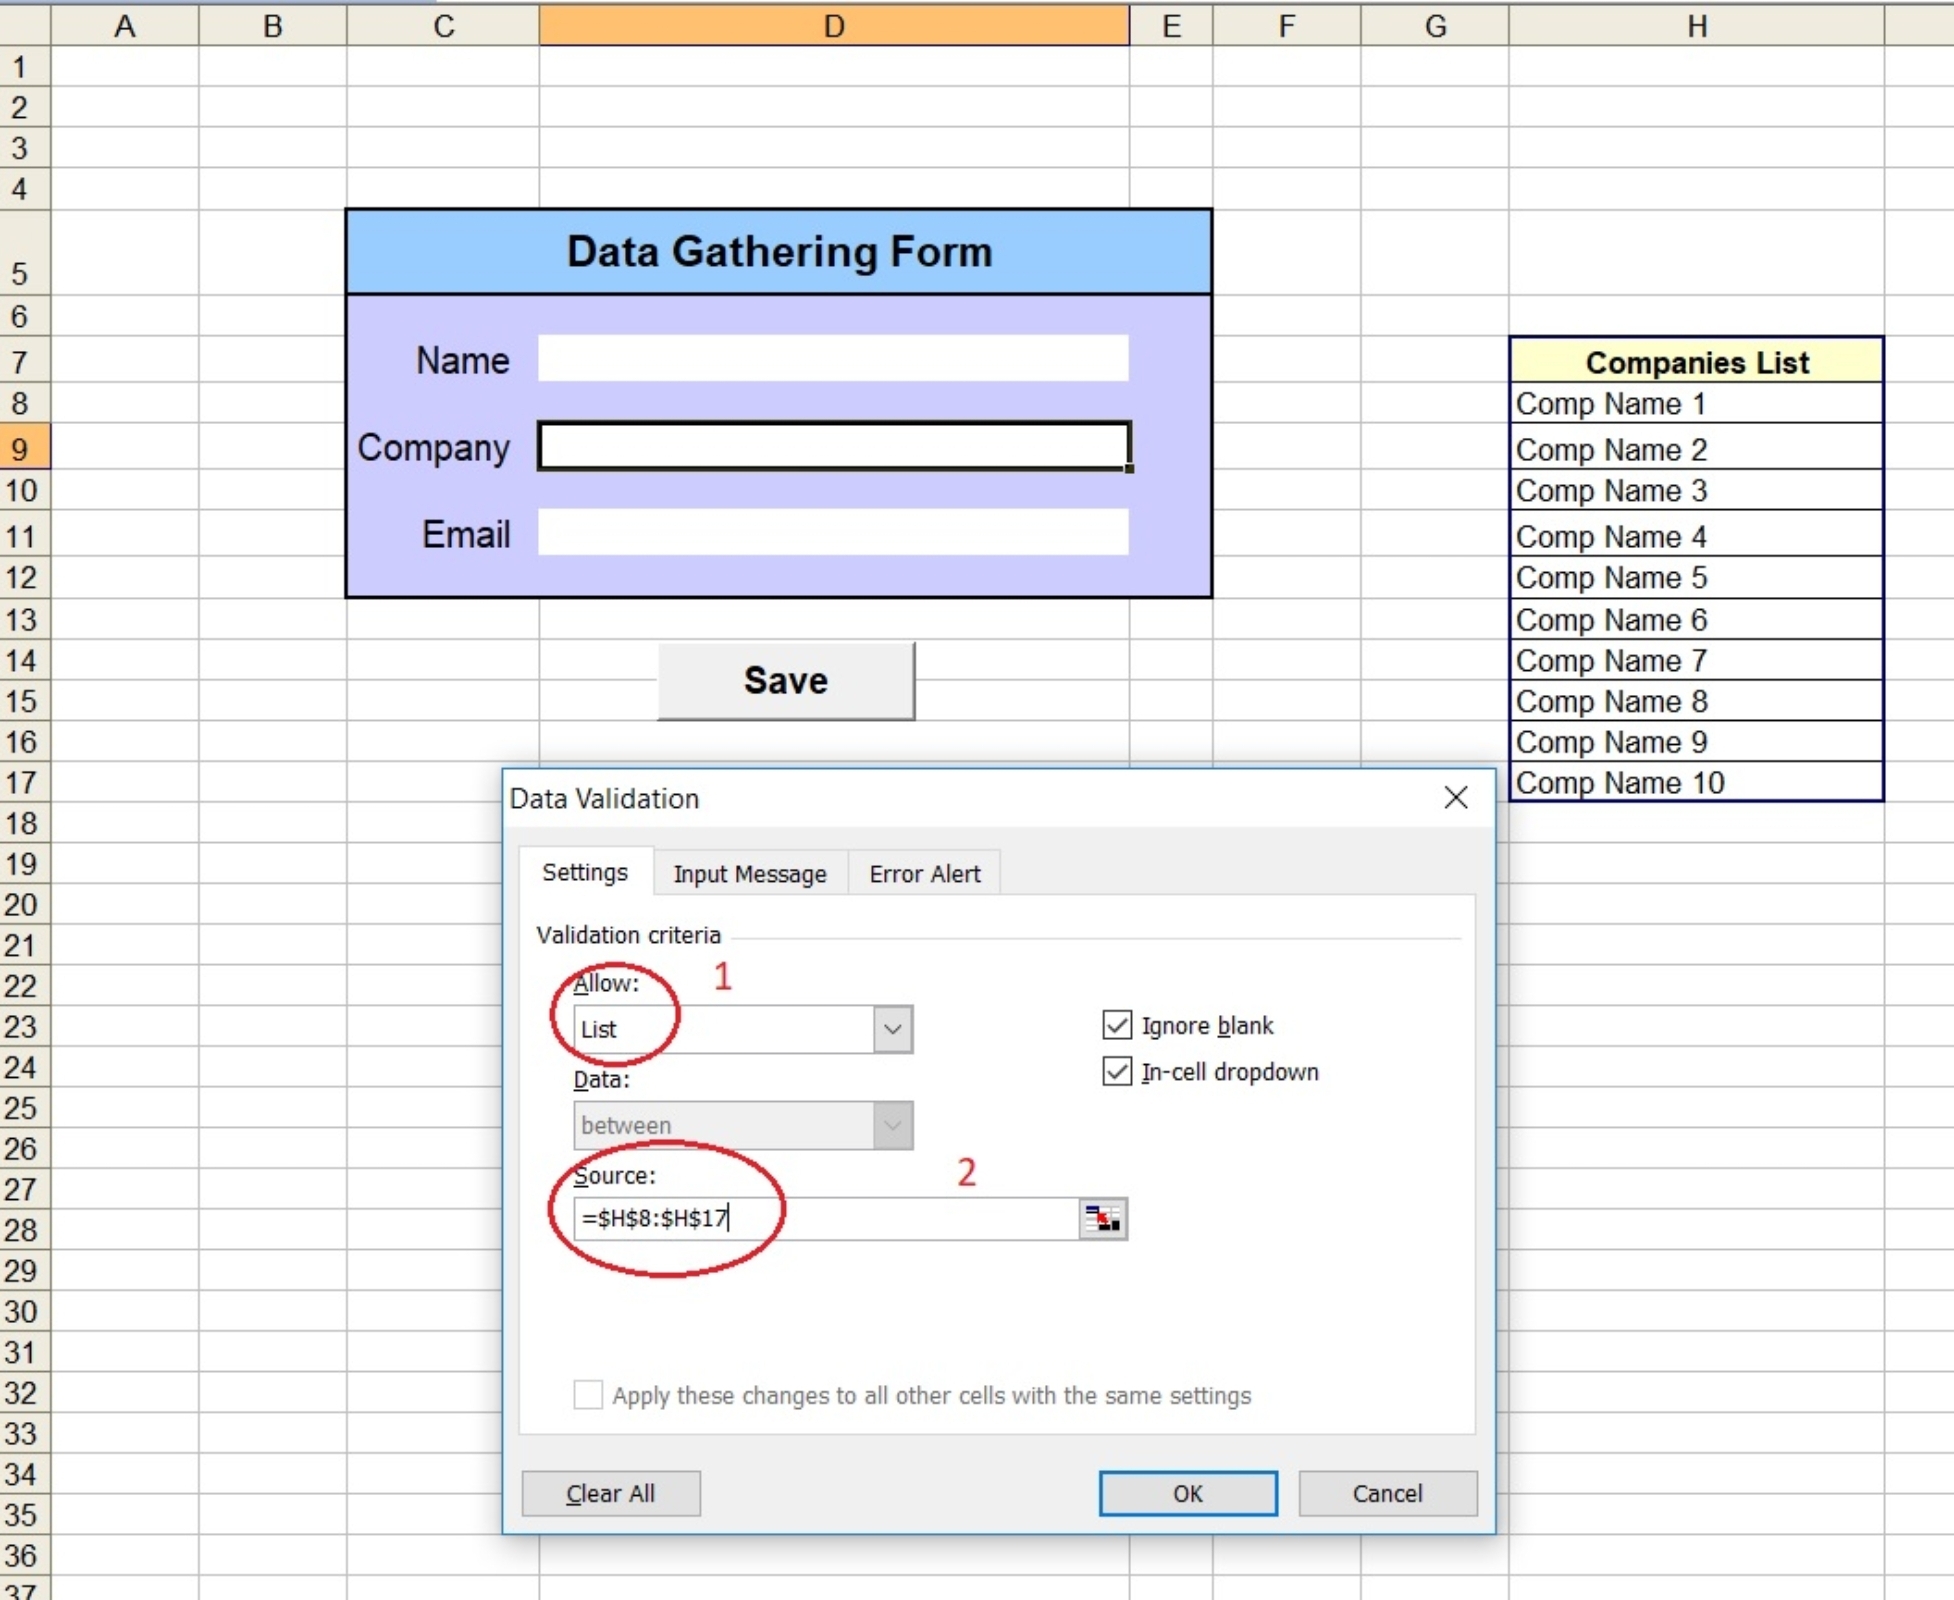 |
Now if we try to click on Cell “D9” we will have a list as in Image-5.
Image-5 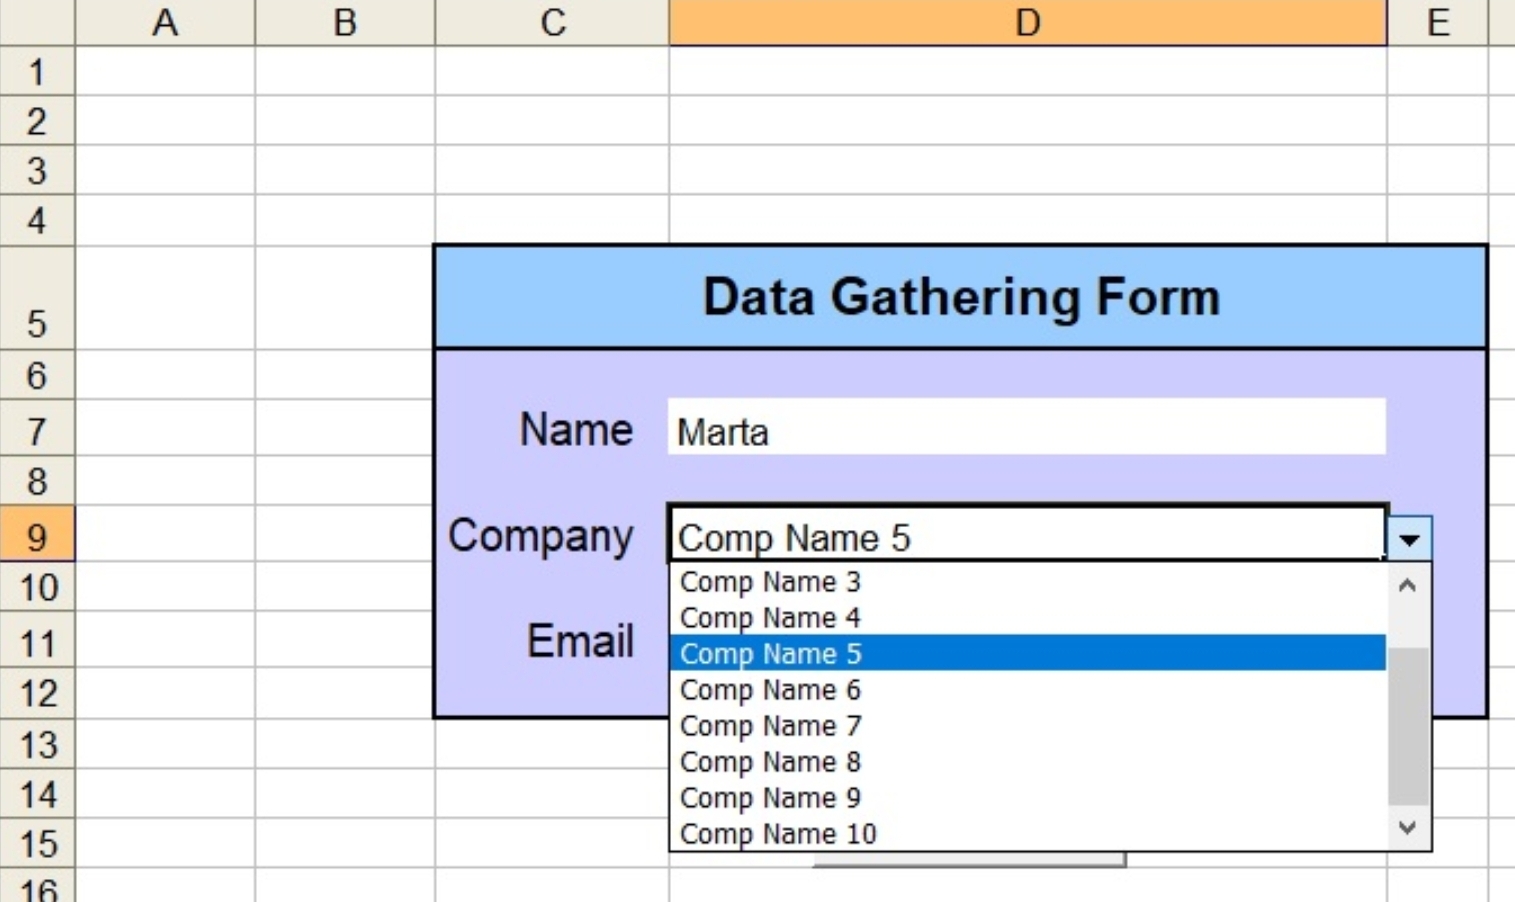 |
In the “Data” Sheet we will just create the Table Header as in Image-6, and will go-back to “Form” Sheet.
| Image-6 |
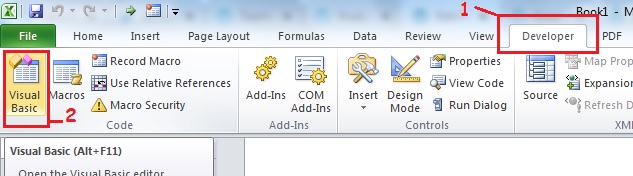
Now we will write the VBA codes and link it to to a “Save” Button we create. To open the Visual-Basic window we select “Developer” From the Top menu, then Press Visual Basic.
 |
Then we write this code and link it to the Save Button. ..
 # VBA Macro code to Save Data to Data sheet

Sub Save_data()
'
' Save_data Macro
' Macro recorded 2020-03-29 by HP
'

'
    ' Set Variables
    Name = Range("D7").Value
    comp_name = Range("D9").Value
    Email = Range("D11").Value


    ' Goto data sheet
    Sheets("Data").Select
    ' This line will get the Next empty Row in the Data sheet.
    emp_row = Range("A" & Rows.Count).End(xlUp).Offset(1).Row
    Range("A" & emp_row).Value = Name
    Range("B" & emp_row).Value = comp_name
    Range("C" & emp_row).Value = Email

    'Go to Form Sheet.
    Sheets("Form").Select

    ' Clear data cells.
    Range("D7").Value = ""
    Range("D9").Value = ""
    Range("D11").Value = ""

    Range("D7").Select

End Sub
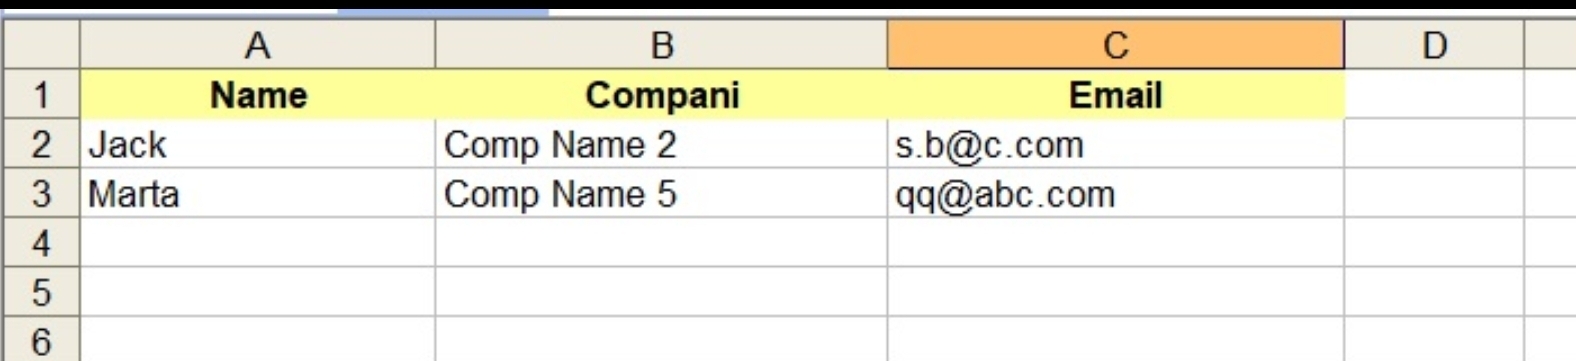
Now if we enter some data [as we said: No Validation on the data] and press the Save button, the data will be coped to next empty row in the Data Sheet.
 |
Enhancement: In some cases as in our coming project, it’s better to create a sheet and call it “Setting”, then we can have our Lists (such as Company-Name), Colors, Filters all to be in the Setting sheet. [We will see this in the Next Project.]
By: Ali Radwani
Python: Cooking App P-5
Learning : Python, Data-Base, SQlite
Subject: Writing a Cooking Application
RECIPES MENU: Once I start reading the Net (blogs and Cooking Books) to see how cookers talking about foods-recipes, I realise that I may need to add something to the DataBase, then I start writing the codes for the “Recipe Menu” and immediately I find the we need to add a new Table; I call it “recipes_steps” it will hold several steps of how to cook a recipe.
DataBase Diagram |
Here is the code to create the new Table and adding the record 0 (Zero).
# To create the Table “recipes_steps” .
sql_recipes_steps =”CREATE TABLE if not exists recipes_steps (st_id INTEGER PRIMARY KEY AUTOINCREMENT,r_id integer, rec_steps text )”
c.execute(sql_recipes_steps)
db_conn.commit()
# To add the Record Zero.
c.execute (“INSERT INTO recipes_steps (st_id) VALUES(:st_id)”,{“st_id”:0})
db_conn.commit()
First let’s see the “Recipe Menu” and from there we will write the codes for each item in the menu. As we saw in Ingredients Menu, same functionality should be here to, Listing all Recipes, Adding new one, Editing and Deleting a recipes. We will write the code for each of them, and here is the code for the “Recipes Menu”
 # Recipes Menu - Function

def recipes_menu ():
    while True:
        os.system("clear")
        print('\n ===========[ RECIPES MENU ]=============')
        print('  --------------------------------------')
        print(' 1. Show Recipes.')
        print(' 2. Add Recipe.')
        print(' 3. Delete Recipe. ')
        print(' 4. Edit Recipe.')
        print(' 9. Exit')
        uinp= input('\n Enter your Selection: ')

        if uinp == '1':
            show_recipes()
        elif uinp == '2':
            add_recipe()
        elif uinp == '3':
            del_recipe()
        elif uinp == '4':
            edit_recipe()
        elif uinp =='9':
            return
        else:
            print('\n  Please select from the Menu.')
So first thing we will work on “Show Recipes”, once the user select Show Recipes another Menu will be display to give more option as in the screen shot..
 |
 |
To display the Recipes based on the options we have, we will write a function that take a parameter based on the user selection so the user can search for a recipe based on it’s Name, Date or other details. Let’s see the code ..
 |
 |
NOTE THAT: We did nothing with Tags option, after we finish the application we will assume that the Business owner ask to add a new requirement to the application, and we will see the impact of this and who to solve it.
In Next Post we will work on the Adding New Recipe to our Cooking Application.
To Download my Python code (.py) files Click-Here
By: Ali Radwani
Elephant Sketch
Here are another Sketch of Elephant face, most of my sketches are from photos I fond in magazines or news-paper or the internet. For this sketch I am using Samsung Galaxy Note3 and Sketchbook Application, but i am using Note 8 and paper with Pen, Ink-pen or pencil.
Other sketches are on My-Sketch page, or you can Follow me on instagram for more sketches.

::Sketching::
Using: Galaxy Note 3
Application: Sketchbook
Ali,
The Schwanenburg
A Germany stamp Issued in 1978 showing the “Schwanenburg” in brown color, this photo is one of my stamps collection, I am using the Nikon D90 camera and the Nikon 35mm lens in a homemade studio.

For more photos of Germany Stamps Click Here
The First Issue
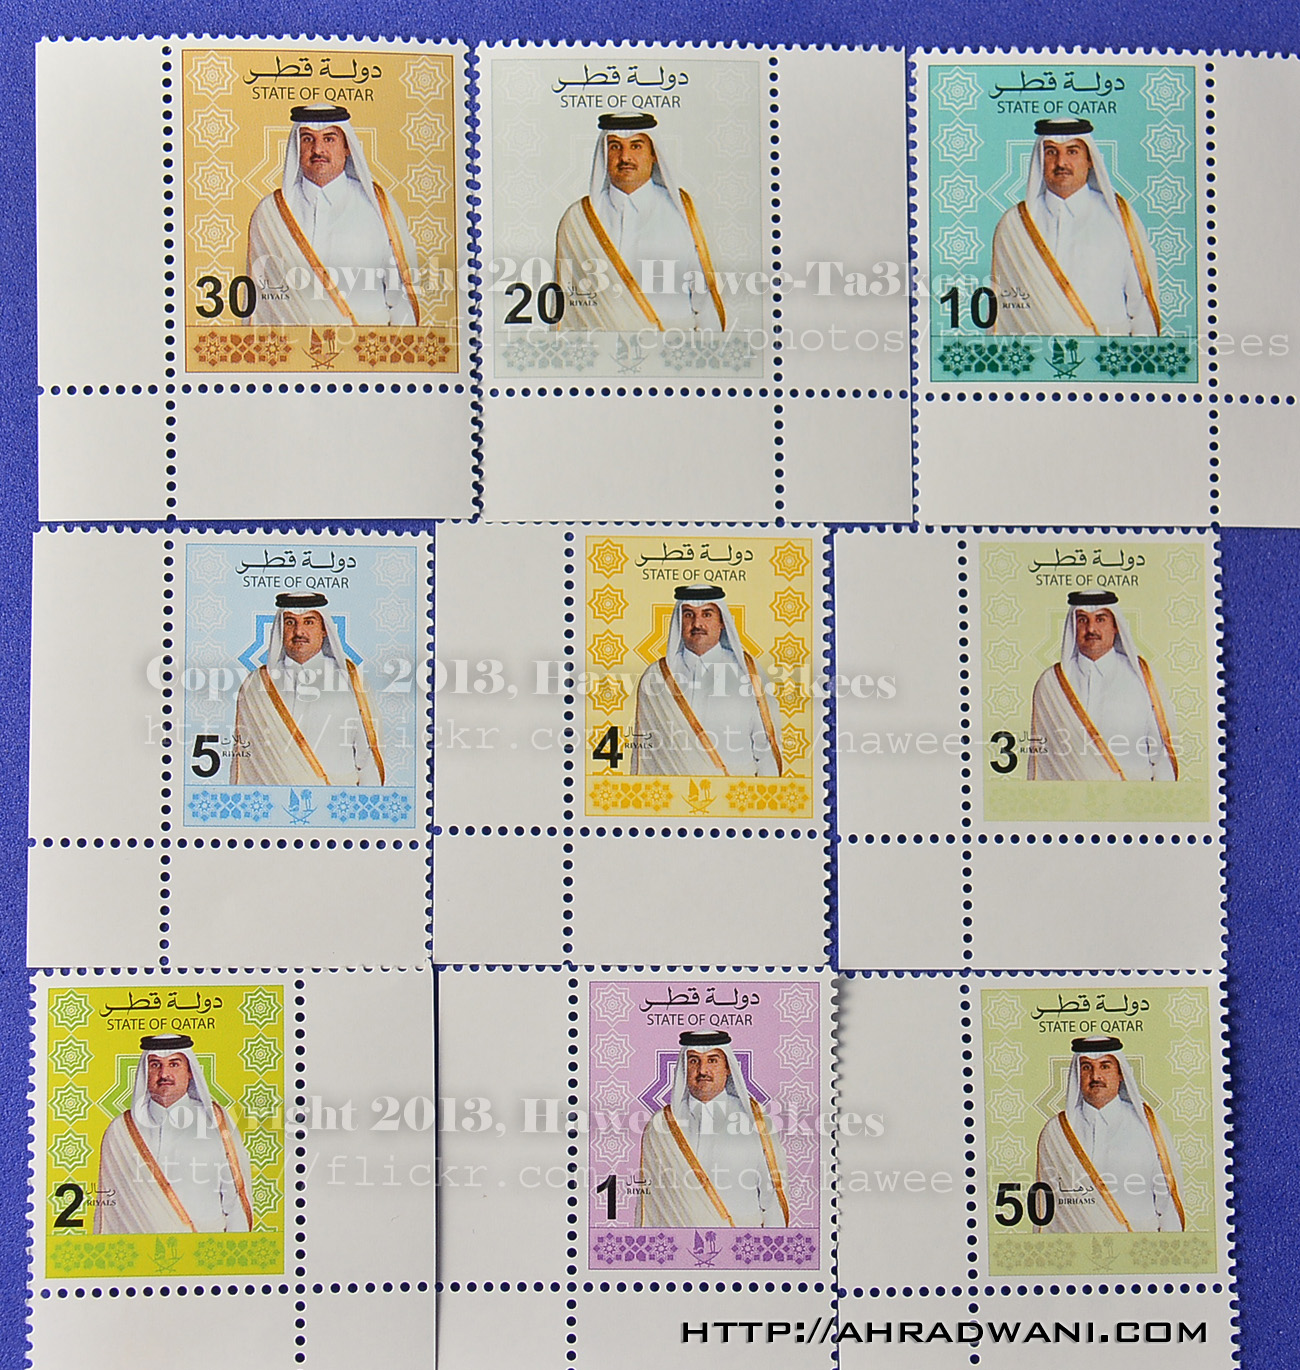
This is the First Issue of Qatari Stamps of the New Emir (Ruler H.H. Sheikh Tamim bin Hamad Al Thani), the set consist of 9 grouped stamps (Denomination: 30QR, 20QR, 10QR, 5QR, 4QR, 3QR, 2QR, 1QR and 50DIRHAMS) the set issued in the occasion of the National Day 18-Des-2013. Click Here to see all the set
المجموعه الاولى لطوابع بريديه تحمل صور الشيخ تميم بن حمد آل ثاني وقد تم اصدارها بمناسبة اليوم الوطني “قلوبنا موارد عزنا” وهي تتالف من 9 فئات
اضغط هنا للمزيد
This is the set.
This is the Studio, I use the Neewer TT520 flash connected to the camera via TTL cable, Nikon D7100 and Nikkor 18-300mm, the circle in the image represent the camera position. all the photos been resized and croped in photoshop.

::Camera Setting::
Camera: Nikon D7100
F-number: f/8
Exposure: 1/400sec.
ISO:200
Lens: Nikon 18-300m @ 195m
UAE 1975 4th NATIONAL DAY..
This Stamp is one of the set of the “UAE 1975 4th NATIONAL DAY”, I think the stamp is for H.H. Hamad bin Mohammed Al Sharqi ruler of the Emirate of Fujairah in the United Arab Emirates (UAE).the stamp is one of my collection of the UAE Stamps Click Here to see all posted collection.

[Click to Enlarge]
 Follow me on Twitter..
Ali,
Kleiber Bird, Stamp from Germany
Issued in 1979-01-09 in Germany, this is one of my stamps from Germany showing one of the birds. This shot is part of my project “Stamp Photography”, more photos Click Here.
مشروع تصوير الطوابع البريديه، كاميرا نيكون دي90 عدسة نيكون 35مم اضاءه فلورسنت الغرفه
طوابع خليجية على هذا الرابط

[Click to Enlarge]
Camera: Nikon D90
Lens: Nikon 35mm
![]() Follow me on Twitter..
Follow me on Twitter..
Ali,
Sheikh Saqr Mosque
The Mosques are the place where the Muslims are praying, in this stamp from the UAE issued in 1991 the photo of “Sheikh Saqr Mosque in Ras Al-Khaimah” it is one of my collection and i think i have another one of the ‘Mosques Set’ but i will try to find it.

[Click to enlarge]
I am using the Nikon D90 with nikon 35mm lens with normal room lights.
Taking pictures is not my main daily practices, but when i start playing with my camera, i really enjoy my self.
Thanks for visiting my Space..


