Archive
Python: Orders Manager P4
Learning : Orders Management System using Python and Pandas
Subject: File Exists and Adding new Record
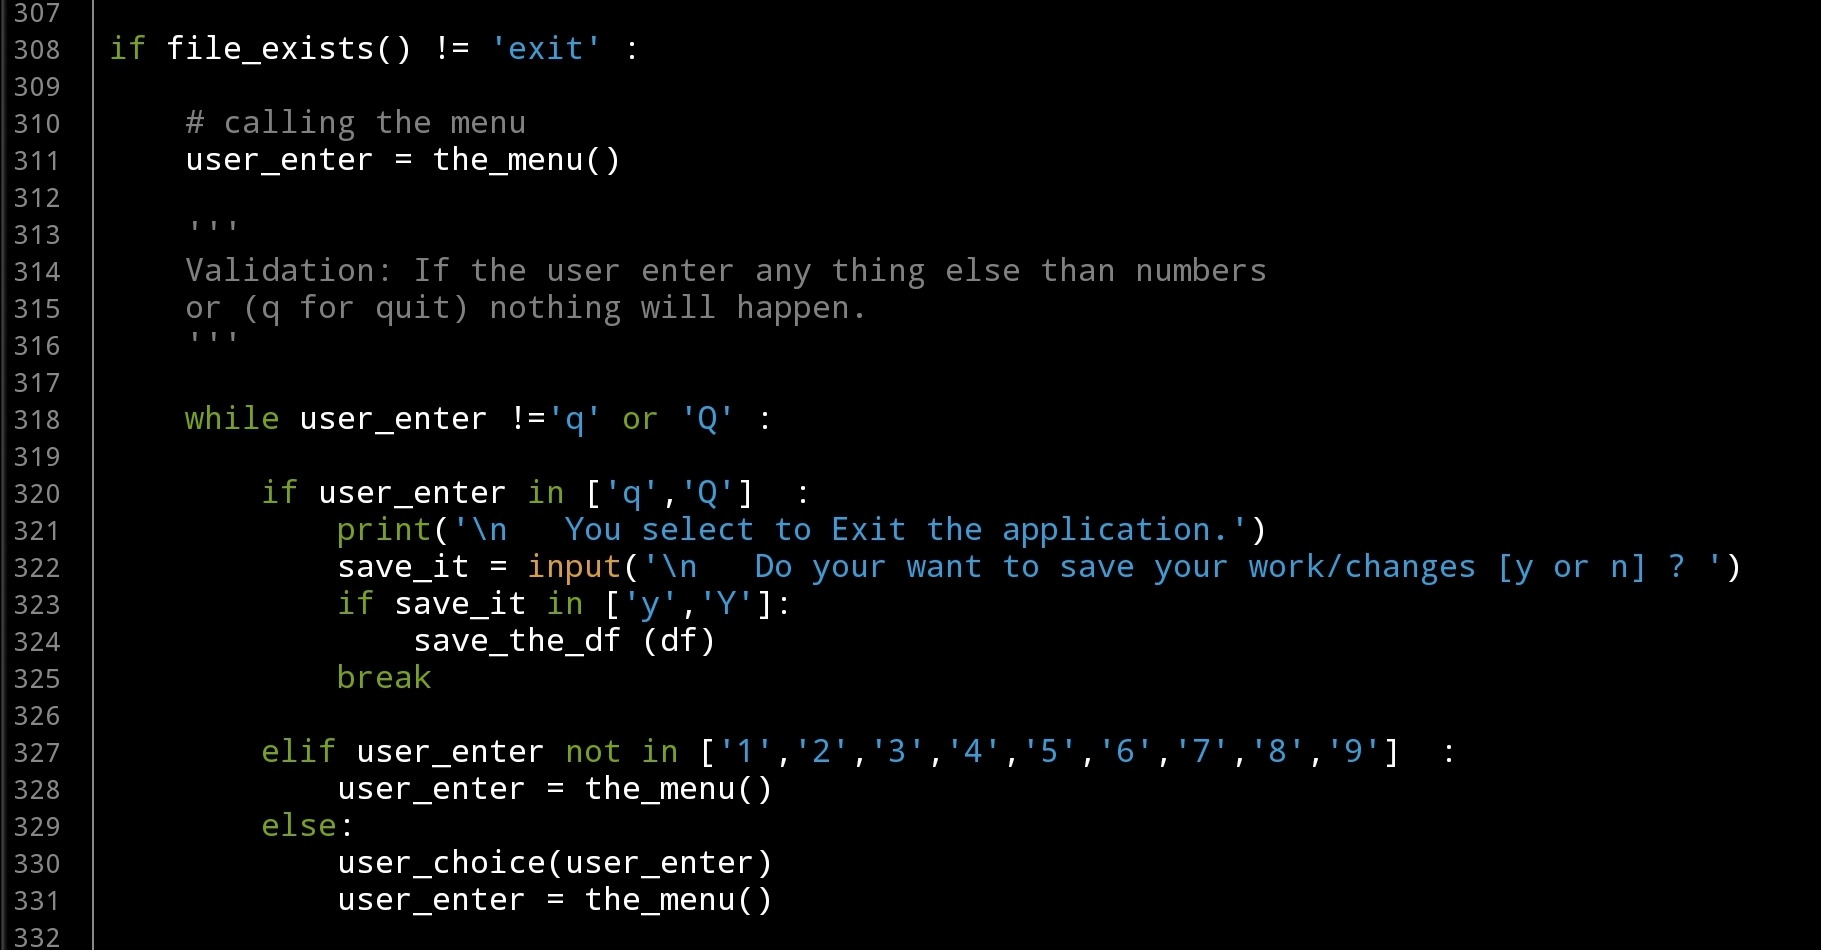
In the last post of our system, we develop the file_exists function, the function is checking if the file not exists then will create ond and enter a dummy data. Now we need to add a code to the application body that call this function and if the file exists the application will run without applying the or creating any file. Here is the code in the application body:
Header here
if file_exists() != ‘exit’ :
# calling the menu
user_enter = the_menu()
”’
Validation: If the user enter any thing else than numbers
or (q for quit) nothing will happen.
”’
while user_enter !=’q’ or ‘Q’ :
if user_enter in [‘q’,’Q’] :
print(‘\n You select to Exit the application.’)
save_it = input(‘\n Do your want to save your work/changes [y or n] ? ‘)
if save_it in [‘y’,’Y’]:
save_the_df (df)
break
elif user_enter not in [‘1′,’2′,’3′,’4′,’5′,’6′,’7′,’8′,’9’] :
user_enter = the_menu()
else:
user_choice(user_enter)
user_enter = the_menu()
|
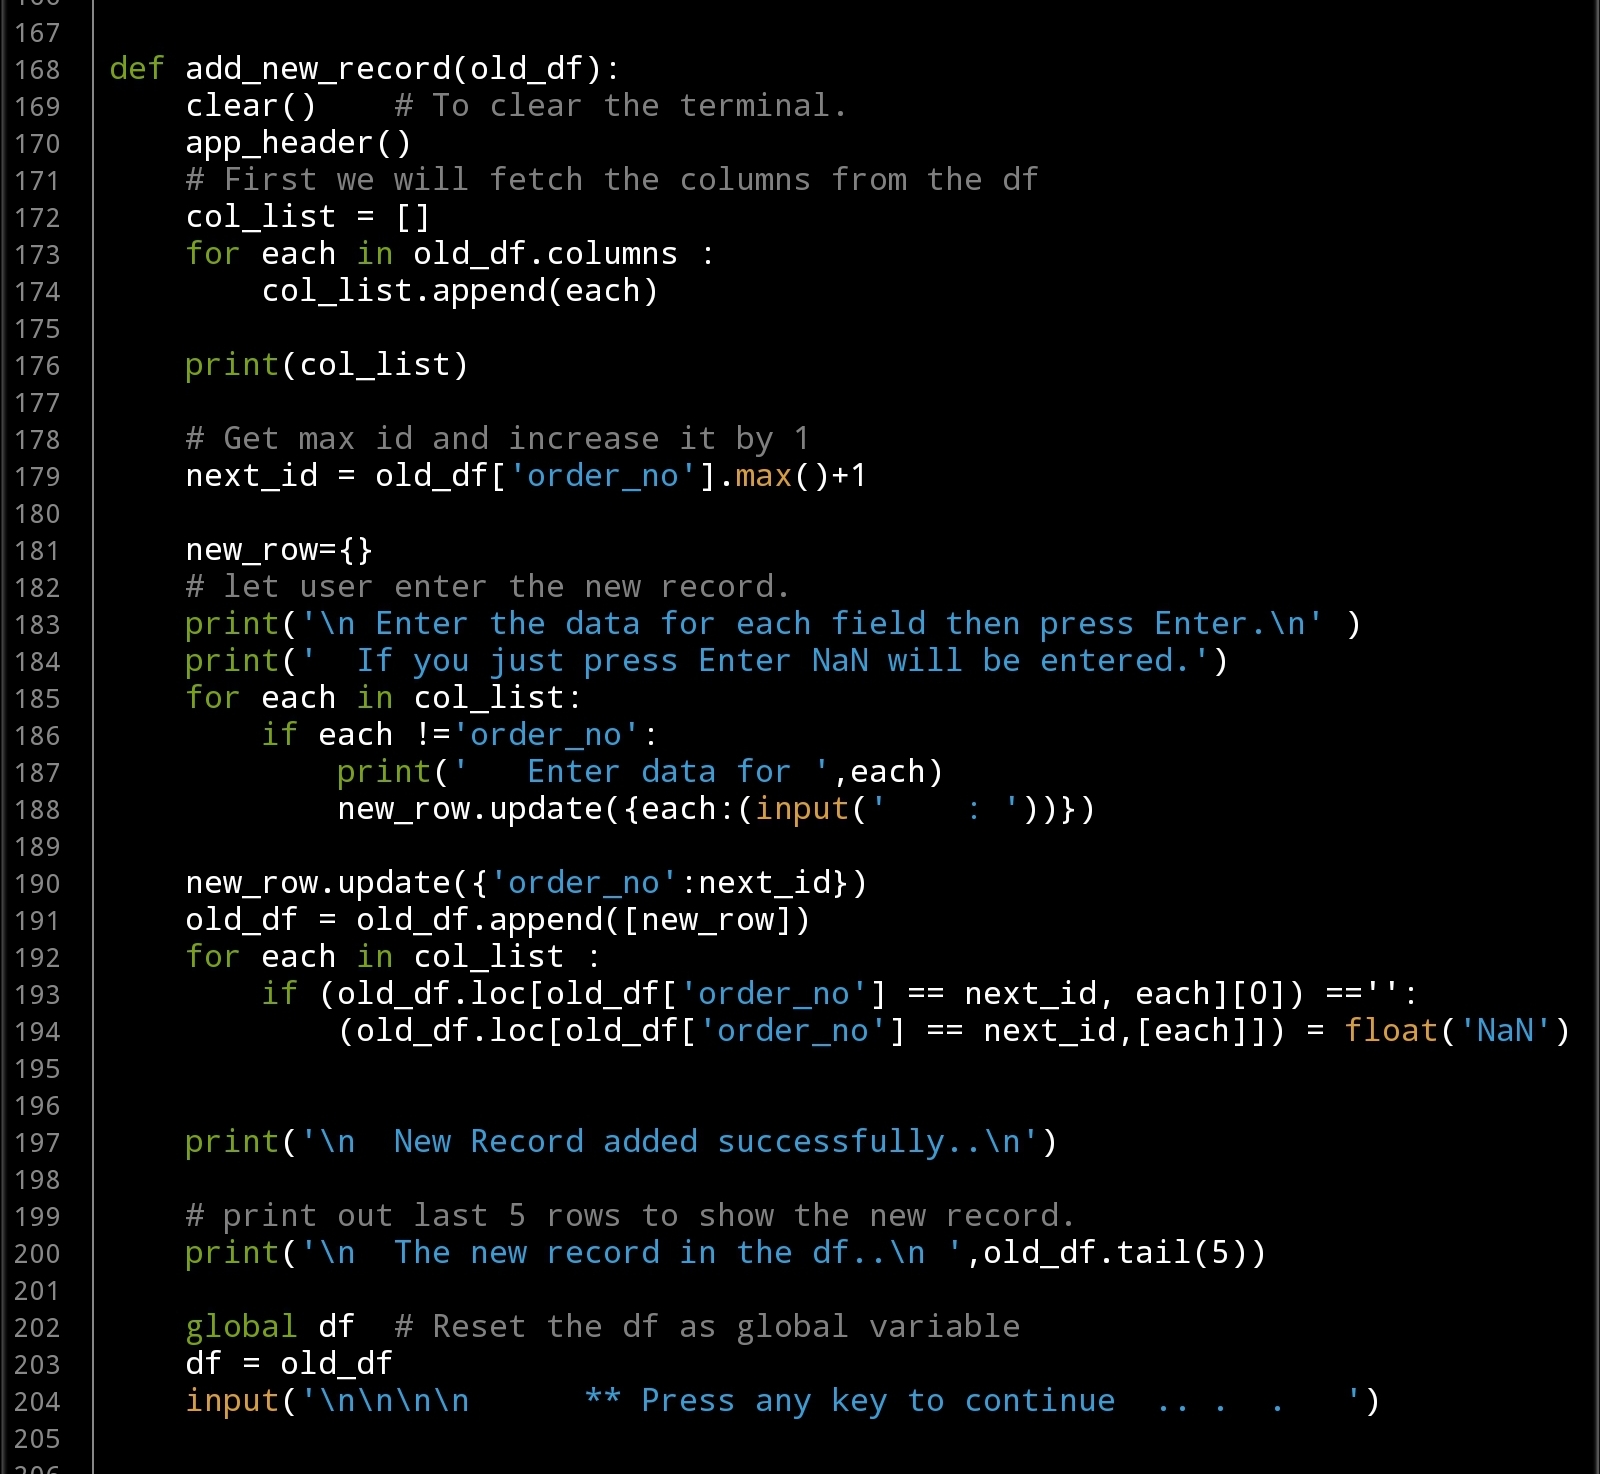
In this post we will talk about the Adding new record function, since we may start from new file we need to enter some records in our data file. Here is the def add_new_record() that will help us to enter our data.
Add New Record Function
def add_new_record(old_df):
clear() # To clear the terminal.
app_header()
# First we will fetch the columns from the df
col_list = []
for each in old_df.columns :
col_list.append(each)
print(col_list)
# Get max id and increase it by 1
next_id = old_df[‘order_no’].max()+1
new_row={}
# let user enter the new record.
print(‘\n Enter the data for each field then press Enter.\n’ )
print(‘ If you just press Enter NaN will be entered.’)
for each in col_list:
if each !=’order_no’:
print(‘ Enter data for ‘,each)
new_row.update({each:(input(‘ : ‘))})
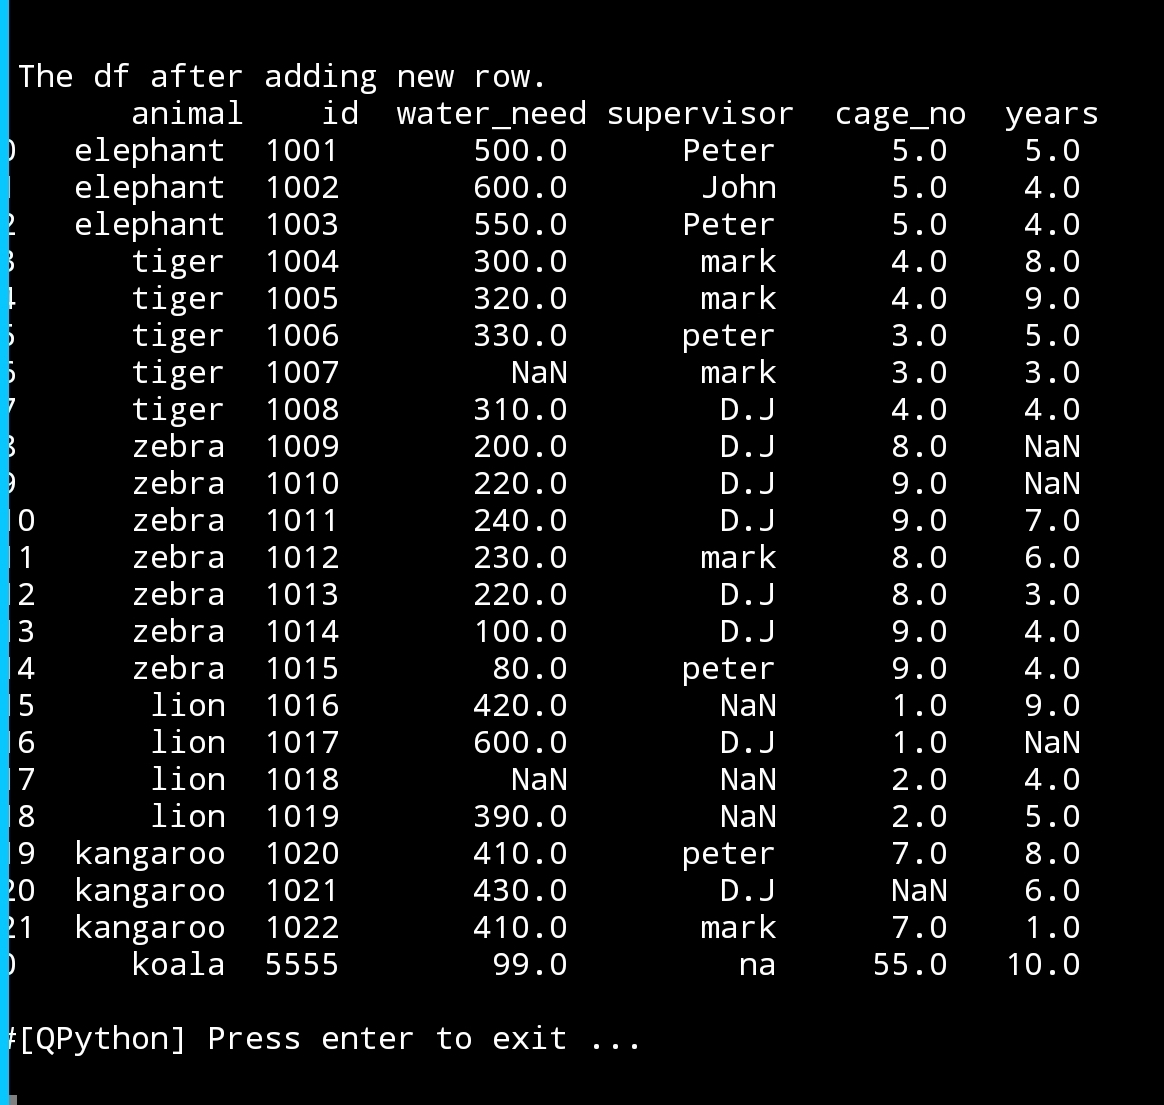
new_row.update({‘order_no’:next_id})
old_df = old_df.append([new_row])
for each in col_list :
if (old_df.loc[old_df[‘order_no’] == next_id, each][0]) ==”:
(old_df.loc[old_df[‘order_no’] == next_id,[each]]) = float(‘NaN’)
print(‘\n New Record added successfully..\n’)
# print out last 5 rows to show the new record.
print(‘\n The new record in the df..\n ‘,old_df.tail(5))
global df # Reset the df as global variable
df = old_df
input(‘\n\n\n\n ** Press any key to continue .. . . ‘)
|
In the coming post, we will work on the date validation function also the user choice loop so we can run the application and test it.
 Follow me on Twitter..
Python: Orders Manager P3
Learning : Orders Management System using Python and Pandas
Subject: Data File and Adding new Record
In This system and once the user run the application we will check if the Data file exists or not. If the file exists then the system will run, otherwise the application will guide the user to some questions to create the new file. Then we will talk about adding new records to our file.
First time run: Each time we run the application the system will chick for the file, at this version we will have only one data file we will call it “orders_dataframe.csv” if the file exists the application will continue and the file will be loaded automaticly, if not, then the first choice of our menu will be called. Function called “create_file()” will run, we will inform the user that the file is not there and if he want to create a new file. If the user select Yes, the file will be created and a dummy row (id = 0) will be added. If the user select No, we will show a message then if any key pressed the system will quite. .. Let’s see the code ..
File Exists check point
def file_exists():
# Check if the data file not exists create one
if not (os.path.exists(‘orders_dataframe.csv’)):
no_file =’o’
while no_file not in [‘y’,’Y’,’n’,’N’]: # Validation for user input
clear() # To clear the terminal.
app_header()
no_file = input(‘\n The file ”orders_dataframe.csv” is not exists, Do you want to create new one: [ y , n ] ‘)
if no_file in [‘y’,’Y’]: # Validation for user input
create_file() # Call the function create_file
return
elif no_file in [‘n’,’N’]: # Validation for user input
print(‘\n You select not to create a data file, so the system will Exit. ‘)
input(‘\n\n Press any key …’)
return ‘exit’
|
|
Validation:
To keep asking the user for his input until he enters one of [ y,Y,n,N]
while no_file not in [‘y’,’Y’,’n’,’N’]:
no_file = input(‘\n The file ”orders_dataframe.csv” is not exists, Do you want to create new one: [y,n] ‘)
Last, I am thinking to add a header for our app, so this header will be at the top of all out screens. Here it is ..
Application Header
def app_header():
print(‘\n ********************************’)
print(‘ ** Orders Managment System **’)
print(‘ ** App V.08-19 **’)
print(‘ **********************************\n’)
In the next post we will look at the Validation on the File Exists check and create file function, also first row added to our dataframe.
Python: Pandas Lesson 12
Learning : Pandas Lesson 12
Subject: Zoo Management System – P6
In this last post of Zoo Managment System series we will cover two of most important functions after the Adding Records, they are Editing a Record and Deleting Record, both will be in there simplest form with no validations code or try … Exception block.
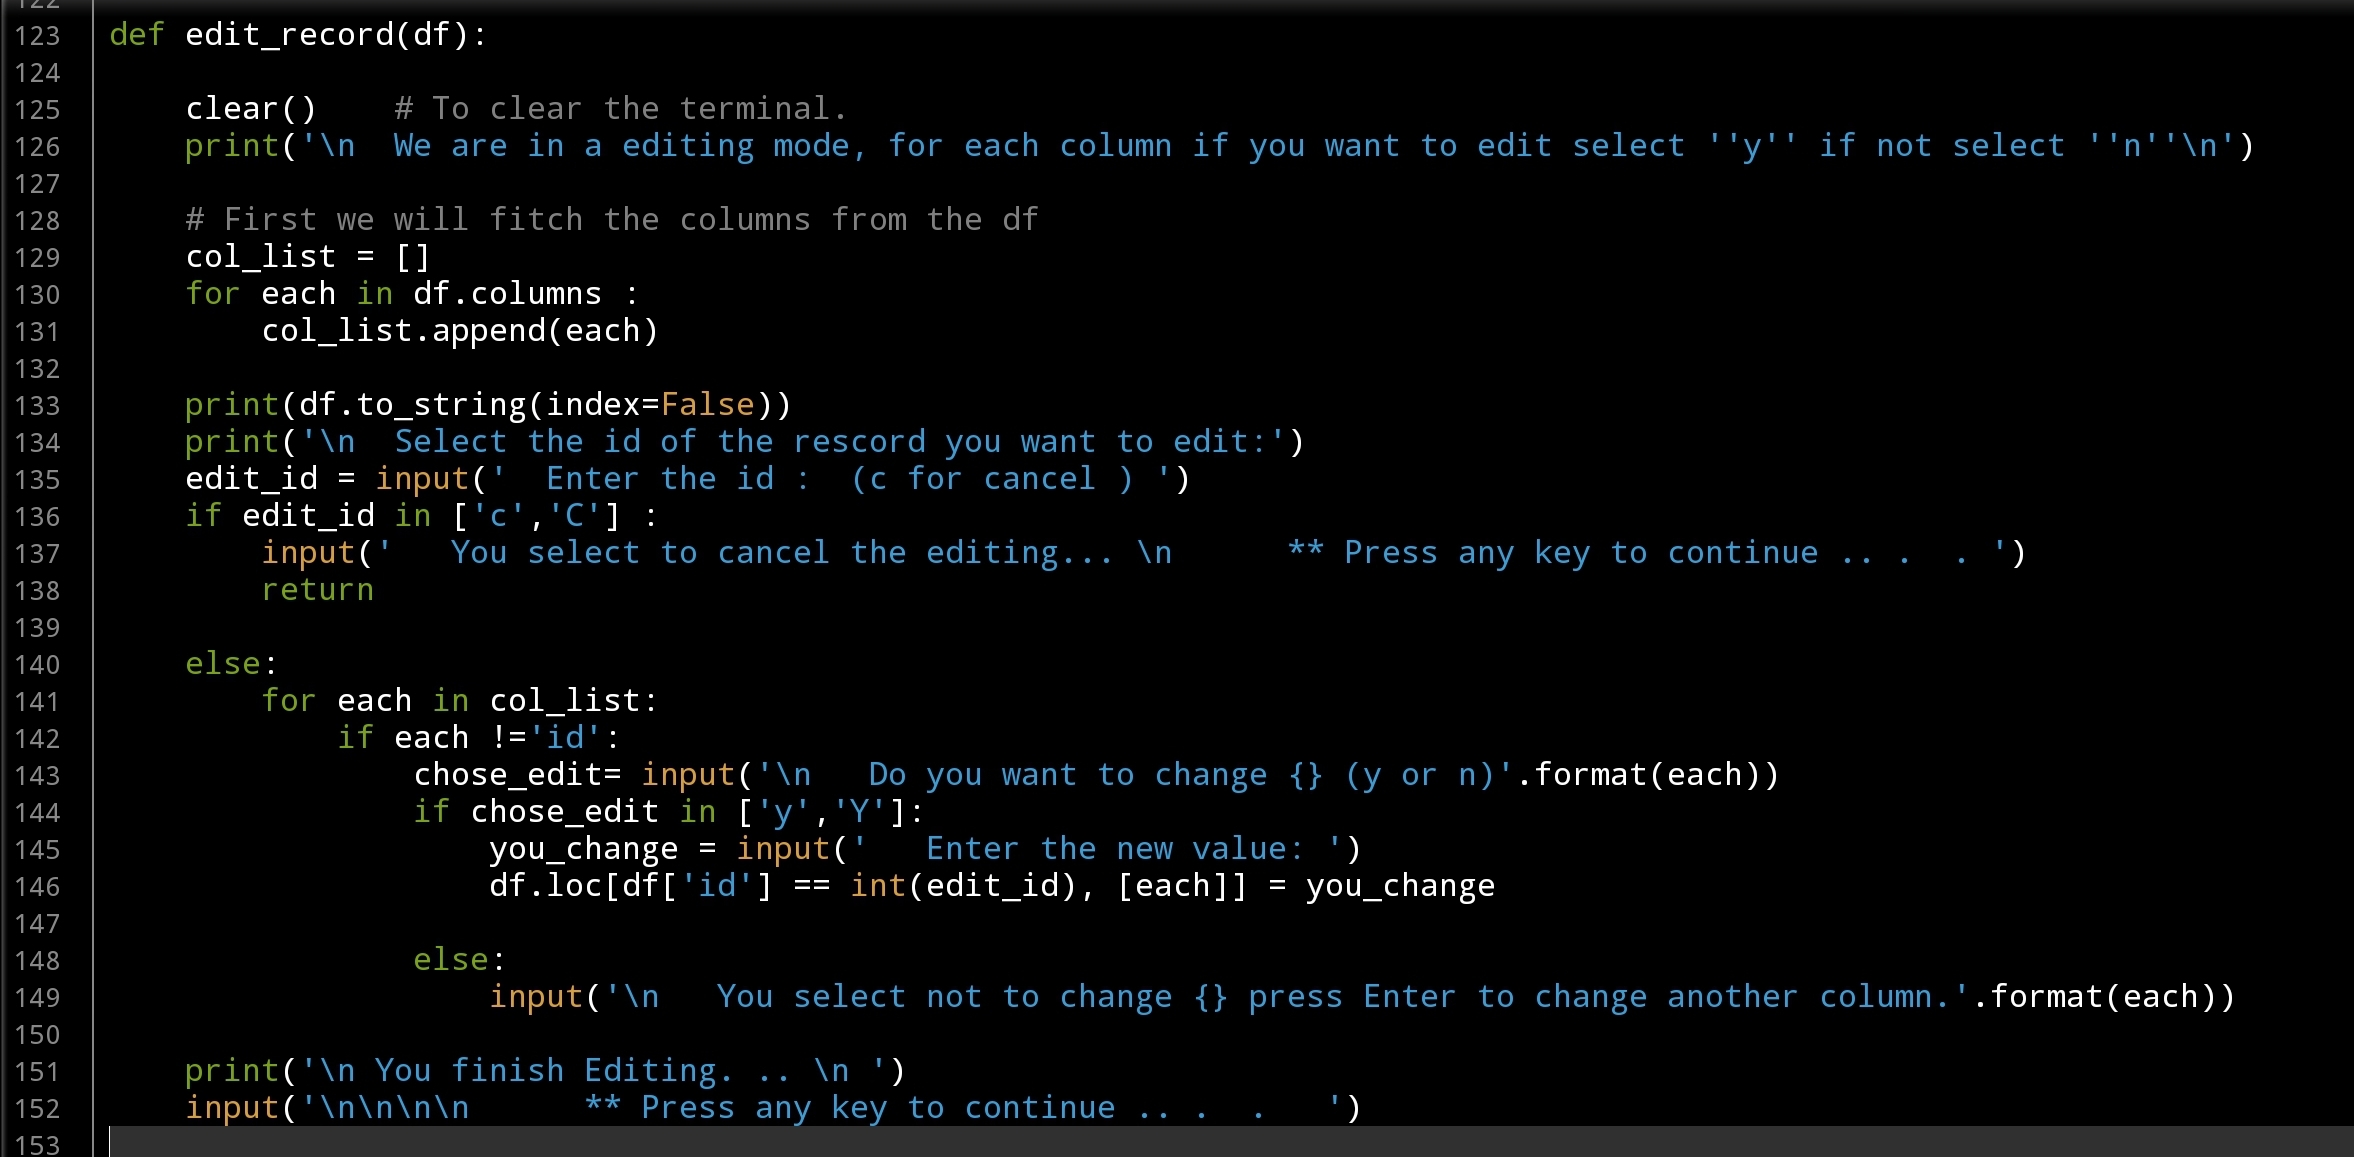
Editing Record: To edit a record we need to identify it first, so we will use the id then the function will ask the user for each column if he want to change/update the data, if the user select Yes (y) then he will get the prompt to enter the new data, and if he select No (n) then the application will ask him about the other column. Here is the code ..
Edit a Record
def edit_record(df):
clear() # To clear the terminal.
print(‘\n We are in a editing mode, for each column if you want to edit select ”y” if not select ”n”\n’)
# First we will fitch the columns from the df
col_list = []
for each in df.columns :
col_list.append(each)
print(df.to_string(index=False))
print(‘\n Select the id of the rescord you want to edit:’)
edit_id = input(‘ Enter the id : (c for cancel ) ‘)
if edit_id in [‘c’,’C’] :
input(‘ You select to cancel the editing… \n ** Press any key to continue .. . . ‘)
return
else:
for each in col_list:
if each !=’id’:
chose_edit= input(‘\n Do you want to change {} (y or n)’.format(each))
if chose_edit in [‘y’,’Y’]:
you_change = input(‘ Enter the new value: ‘)
df.loc[df[‘id’] == int(edit_id), [each]] = you_change
else:
input(‘\n You select not to change {} press Enter to change another column.’.format(each))
print(‘\n You finish Editing. .. \n ‘)
input(‘\n\n\n\n ** Press any key to continue .. . . ‘)
Here is a screen shot of the code …
|
Deleting a Record:A last function we will work on is deleting a record. To do this first we will show the user all the rows in the DataFrame then he will select the id of the column to be deleted. Here is the code..
Delete a Record
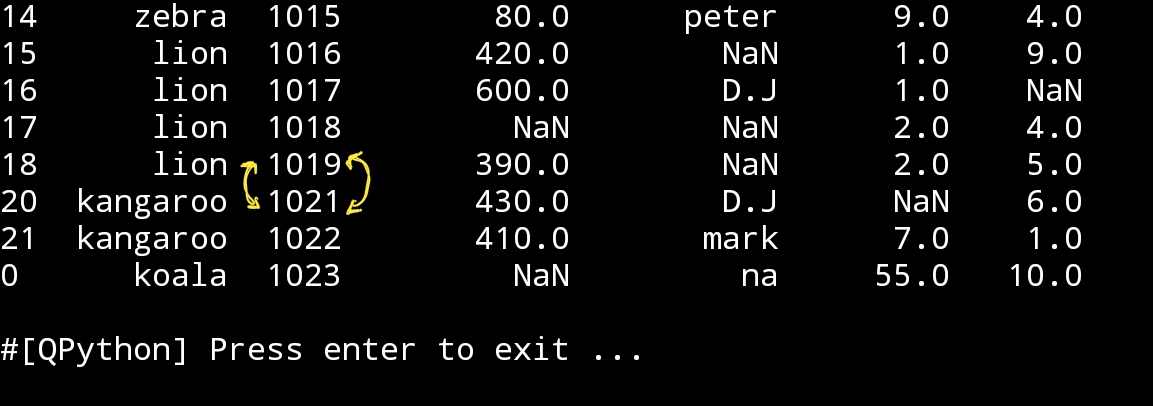
def delete_record(df1):
clear()
print(‘\n’,df1.to_string(index=False))
del_record = input(‘\n Enter the ”ID” for the record you want to delete: ‘)
#Delete the row with id = del_record
df1 = df1[df1.id != int(del_record)]
print(‘\n Record been deleted … .. \n ‘)
global df # Reset the df as global variable
df = df1
input(‘\n\n\n\n ** Press any key to continue .. . . ‘)

|
Now we just finish a simple application to manage our zoo file. When we start writing pandas lessons I select a simple data frame csv file fond on the web, and we work on it as simple as we can to go through a most important functions in any application we plan to write. We did’t cover any validations part or any mistakes the user may do. So to avoid all this I am planning to start working on another project that we will cover any missing part here.
Also I am working on publishing the source code of this application on my download page here..
:: Pandas Lessons Post ::
| Lesson 1 | Lesson 2 | Lesson 3 | Lesson 4 |
| Lesson 5 | Lesson 6 | Lesson 7 | Lesson 8 |
| Lesson 9 | Lesson 10 | Lesson 11 | Lesson 12 |
Python: Pandas Lesson 11
Learning : Pandas Lesson 11
Subject: Zoo Management System – P5
In this post we will cover another three functions, let’s start.
Missing Data: A commun problems we will face in any data file is Missing data, and if we are doing data analysis this may ledd us to a real problem. In this section we will cover only the missing data and will not go through any filling techniques.
Missing Data Report
def missing_data(df):
clear() # To clear the terminal.
print(‘\n\n *** Missing Data Report ***\n’)
print(‘ There are {} rows and {} columns.’.format(df.shape[0],df.shape[1]))
print(‘\n Number of missing data in each columns are:\n’)
total_miss = 0 # Counter
for each in df:
print(‘\n We have {} missing data in {} column.’.format(df[each].isnull().sum(),each))
total_miss = total_miss + df[each].isnull().sum()
print(‘\n Total missing data :’,total_miss)
print(‘\n The missing data represent {}% of the DataFrame.’.format((df.size*total_miss)/100))
input(‘\n\n\n\n ** Press any key to continue .. . . ‘)
|
|
This is a very simple missing data report, but doing the job for-now, we cover some part of missing data in lesson 5 read it Here.
Add New Record: I divide the editing function into three parts or three functions, Add new record, Edit a record and delete a record.
First we will work on Add New Record, from the name we know that this function will allow the user to add a record to the DataFrame, first we will get all columns in the dataframe, also we will get the maximum value in the ID column and increase it by one, then we will ask the user to enter the data for each column, and we are assuming that the user will (or MUST) enter a valid data since we agree that we will not have any validation test in this version of the application, also if the user just press ‘Enter’ thats mean NA data so we will add NaN to the field.
So let’s start..
Add New Record
def add_new_record(old_df):
clear() # To clear the terminal.
# First we will fitch the columns from the df
col_list = []
for each in old_df.columns :
col_list.append(each)
print(col_list)
# Get max id and increase it by 1
next_id = old_df[‘id’].max()+1
new_row={}
# let user enter the new record.
print(‘\n Enter the data for each field then press Enter.\n’ )
print(‘ If you just press Enter NaN will be entered.’)
for each in col_list:
if each !=’id’:
print(‘ Enter data for ‘,each)
new_row.update({each:(input(‘ : ‘))})
new_row.update({‘id’:next_id})
old_df = old_df.append([new_row])
for each in col_list :
if (old_df.loc[old_df[‘id’] == next_id, each][0]) ==”:
(old_df.loc[old_df[‘id’] == next_id,[each]]) = float(‘NaN’)
print(‘\n New Record added successfully..\n’)
# print out last 5 rows to show the new record.
print(‘\n The new record in the df..\n ”,old_df.tail(5))
global df # Reset the df as global variable
df = old_df
input(‘\n\n\n\n ** Press any key to continu .. . . ‘)
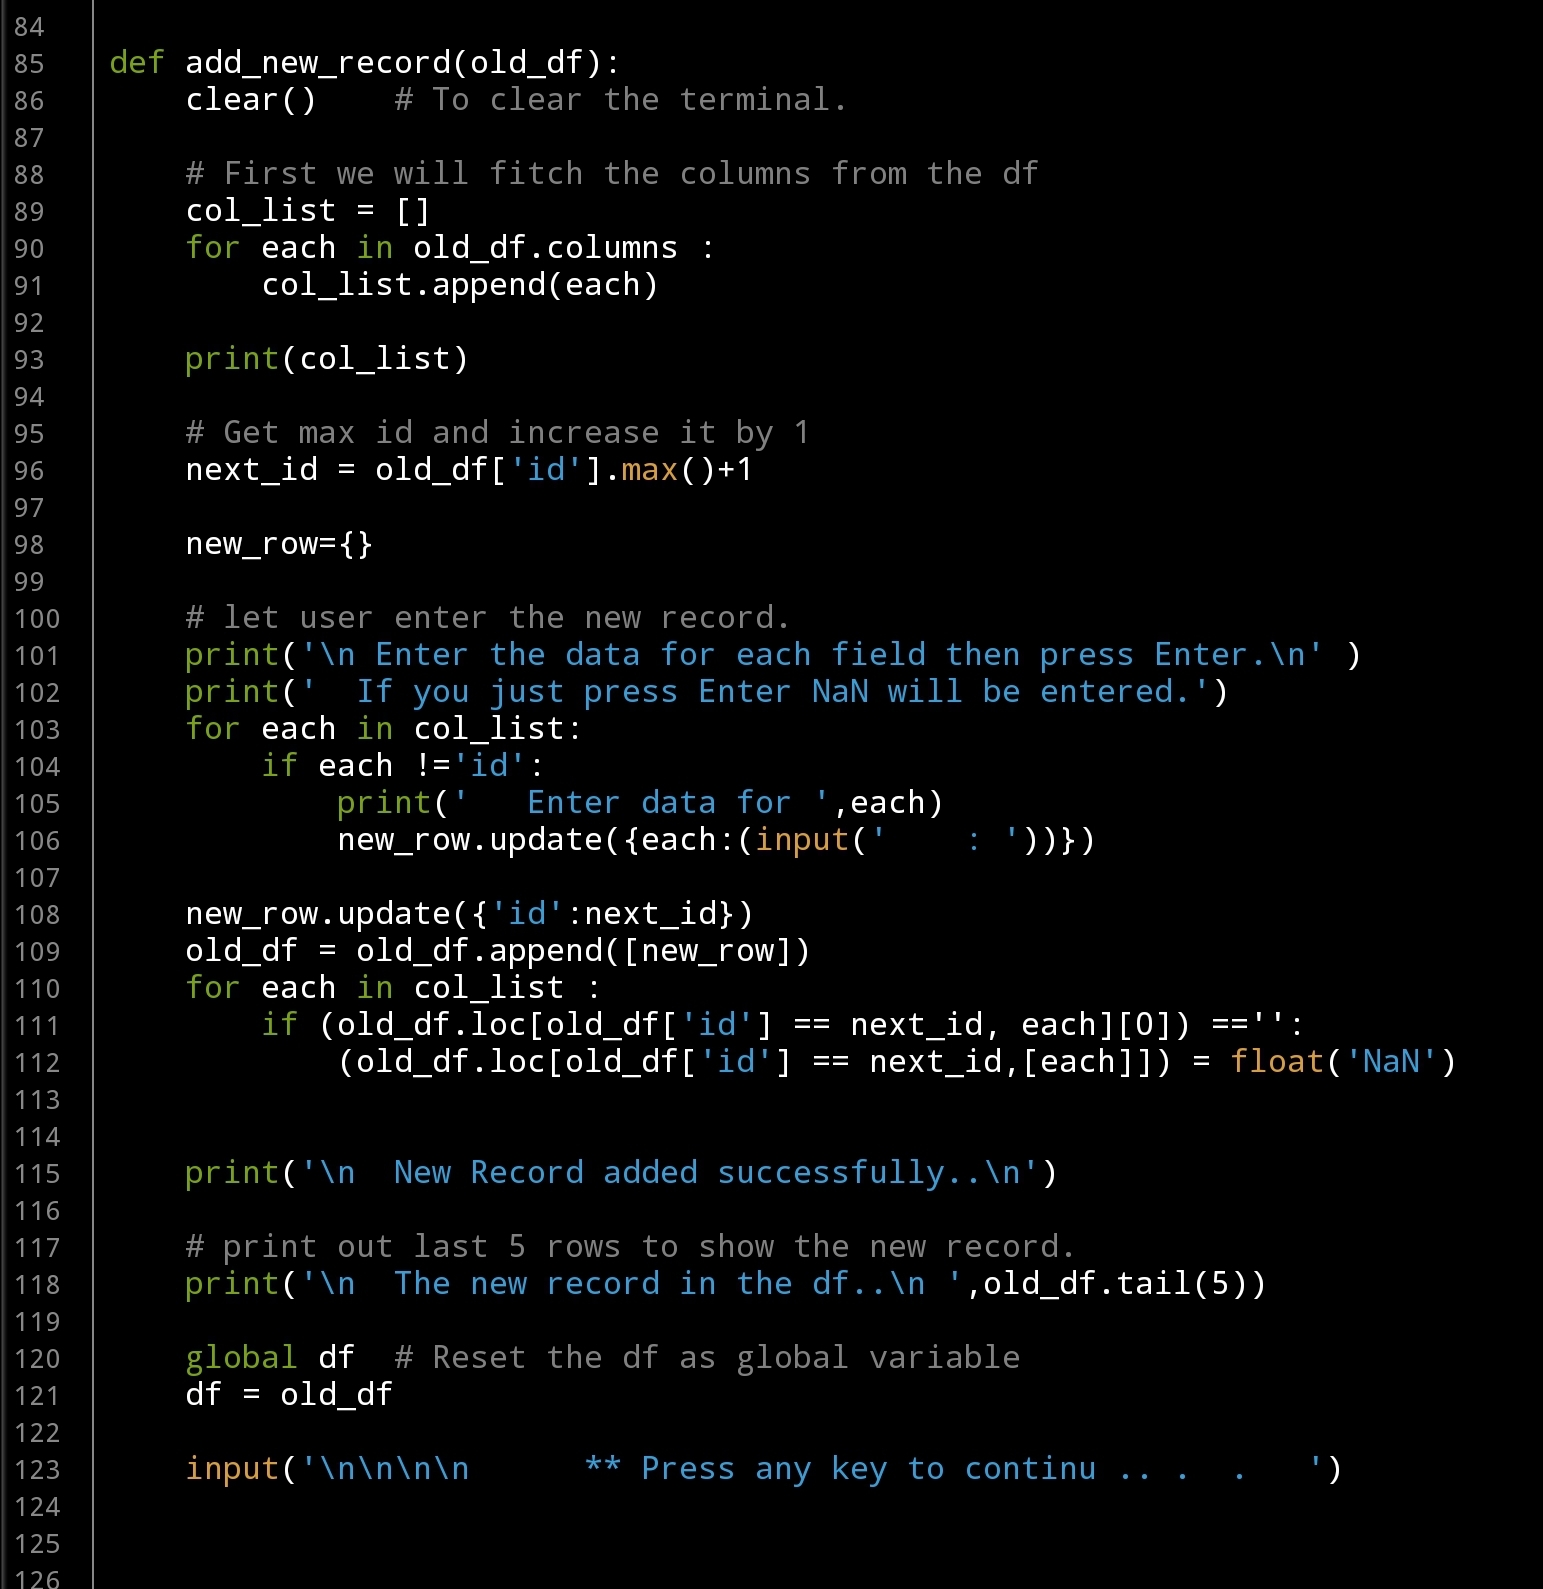
|
Save : At this point we will jump to the last function, simply after adding data to our DataFrame we need to keep this change, we need to save the new record so we can retrieve it next time we run the application. So to do this we will re-write the csv file again.
Save the DataFrame
def save_the_df (df):
clear() # To clear the terminal.
file_name=’data_file_zoo.csv’
df.to_csv(file_name, encoding=’utf-8′, index=False)
print(‘\n File saved .. ‘)
input(‘\n\n\n\n ** Press any key to continue .. . . ‘)
|
|
Now, if we close the application then re-open it again we will have the new records that we add. We just save the file and will not have any option to rename it.
In Next Post.. in coming post we will cover deleting and editting functions, also I will upload the full code file to the portal so any one can download it as python file.
:: Pandas Lessons Post ::
| Lesson 1 | Lesson 2 | Lesson 3 | Lesson 4 |
| Lesson 5 | Lesson 6 | Lesson 7 | Lesson 8 |
| Lesson 9 | Lesson 10 | Lesson 11 |
Python: Pandas Lesson 10
Learning : Pandas Commands
Subject: Zoo Management System – P4
In the last lesson, we wrote the first two function (loading the file and showing some sample data), now we will show the columns in our data file, showing the data type of each column and sorting the data based on certain column.
Show Columns: In most or all cases, we need to take a look to what we have in our data file and columns name will give us a fast idea of what we should expect. To do this we will write this code..
Show Columns
def show_column(df):
clear() # To clear the terminal.
#first we will count the column.
print(‘\n\n There is {} column in the DataFrame. ‘.format(len(df.columns)))
print(‘\n The columns name: ‘,df.columns)
input(‘\n\n\n\n ** Press any key to continu .. . . ‘)
|
|
Enhancement: If we want to add more flexibility to this function, we may give the user the opportunity to change the columns name, but we want this application to be as simple as we can.
Data Type: Knowing the Data type of our fields is important, in case we want to apply the data validation on user entries we will use the data type, so here is the function to do this.
def data_type()
def data_type(df):
clear() # To clear the terminal.
print(‘\n\n The data type of each columns in the DataFrame is :\n’)
print(df.dtypes)
input(‘\n\n\n\n ** Press any key to continu .. . . ‘)
|
Run Time .. 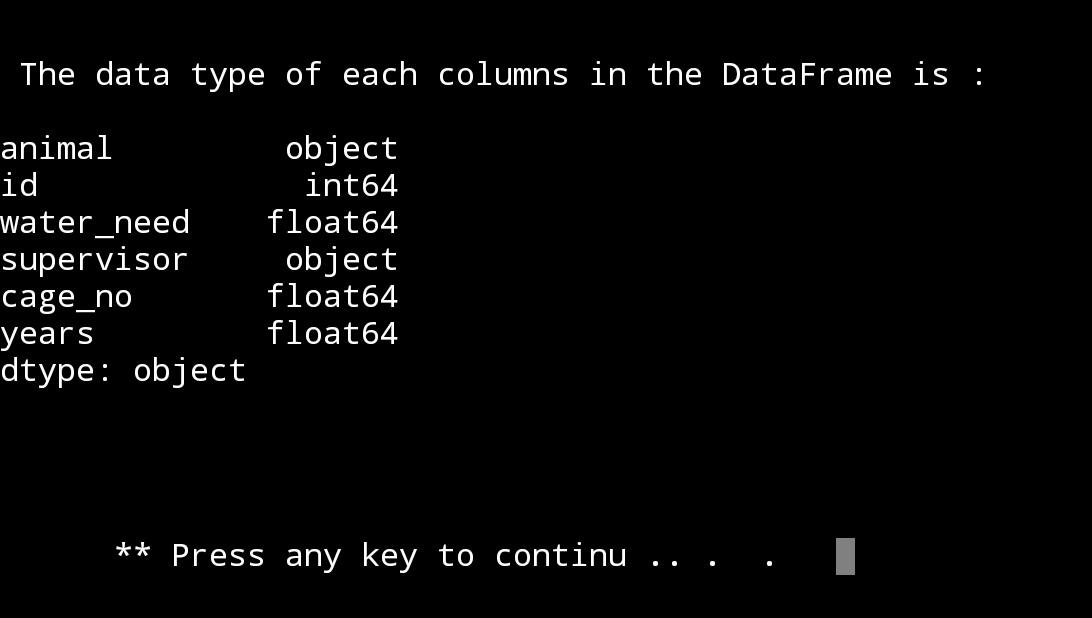
|
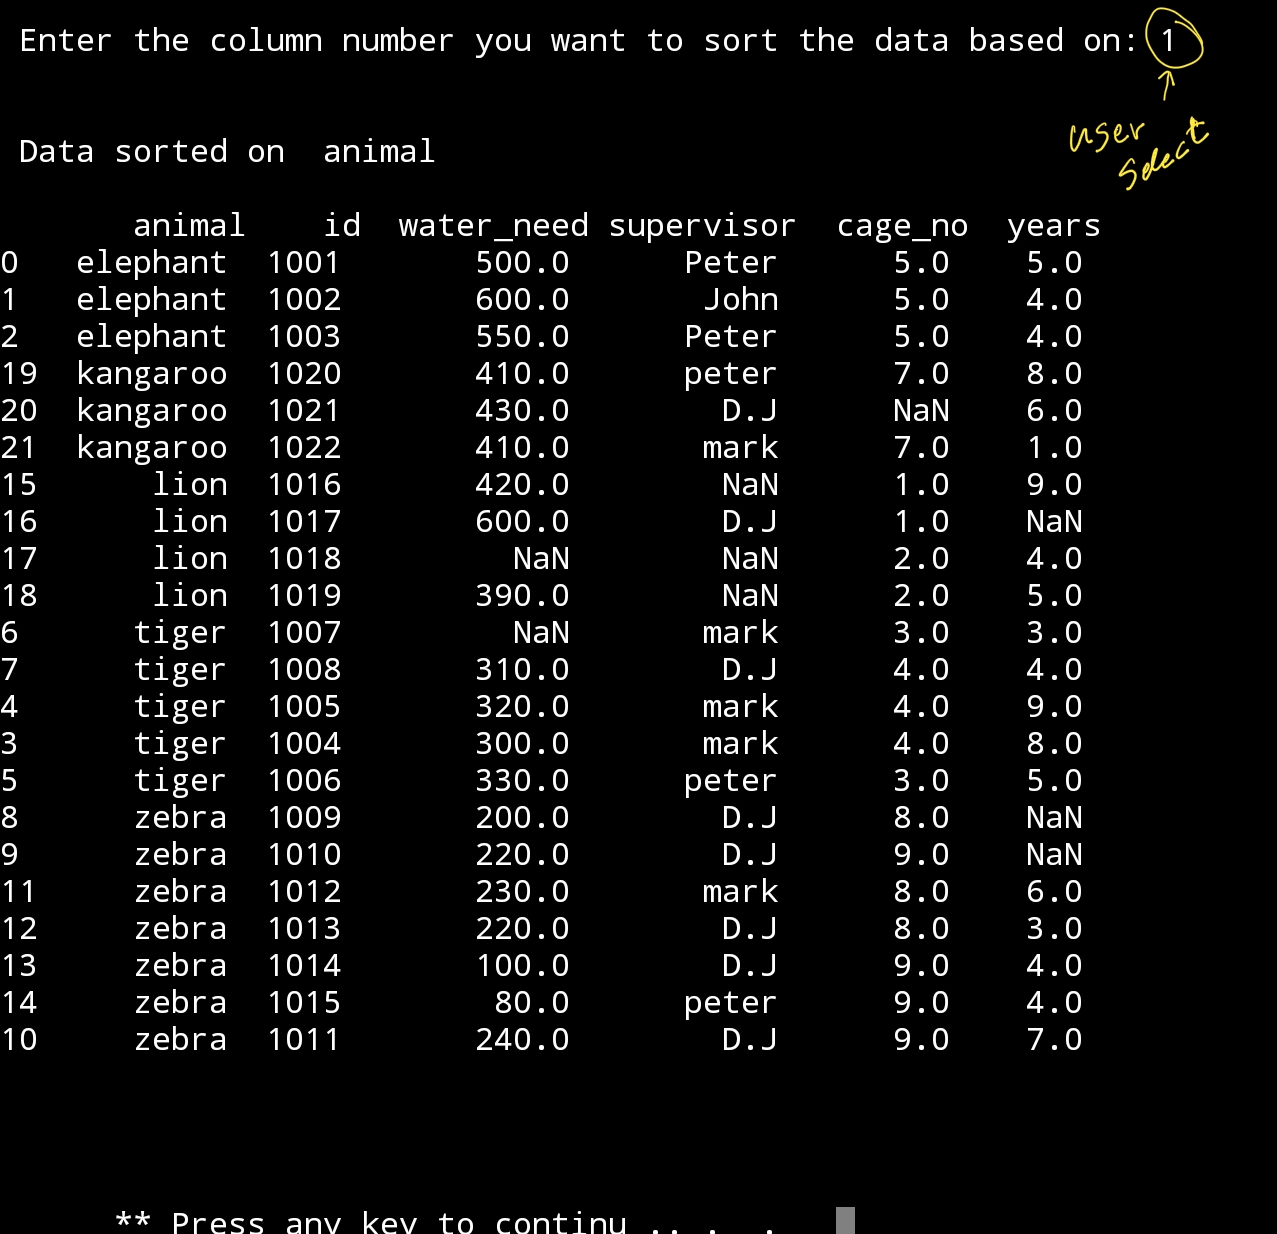
Third function we want to write is Sort, sorting the dataframe and in this function we will give the user the ability to select the column to sort the data based on it.
To do this, we first will list the clomns in the date frame then we will ask the use to select a column of sort.
Here is the code
Sorting based on user selection
def sort_df(df):
clear() # To clear the terminal.
x = 1
print(‘\n\n The list of the columns in the DataFrame are:’)
for each in df.columns : # List the columns in DataFrame
print(‘ ‘,x,each)
x +=1
u_sele=input(‘\n Enter the column number you want to sort the data based on: ‘)
print(‘\n\n Data sorted on ‘,df.columns[int(u_sele)-1])
print(‘\n’,df.sort_values(df.columns[int(u_sele)-1]))
input(‘\n\n\n\n ** Press any key to continu .. . . ‘)
|
|
Screen shot of the code. |
| After selecting option No.5 (Sort) from the main menu, we will have a list of columns in the DataFrame to select from. | |
|
DataFrame sorted based on our selection. |
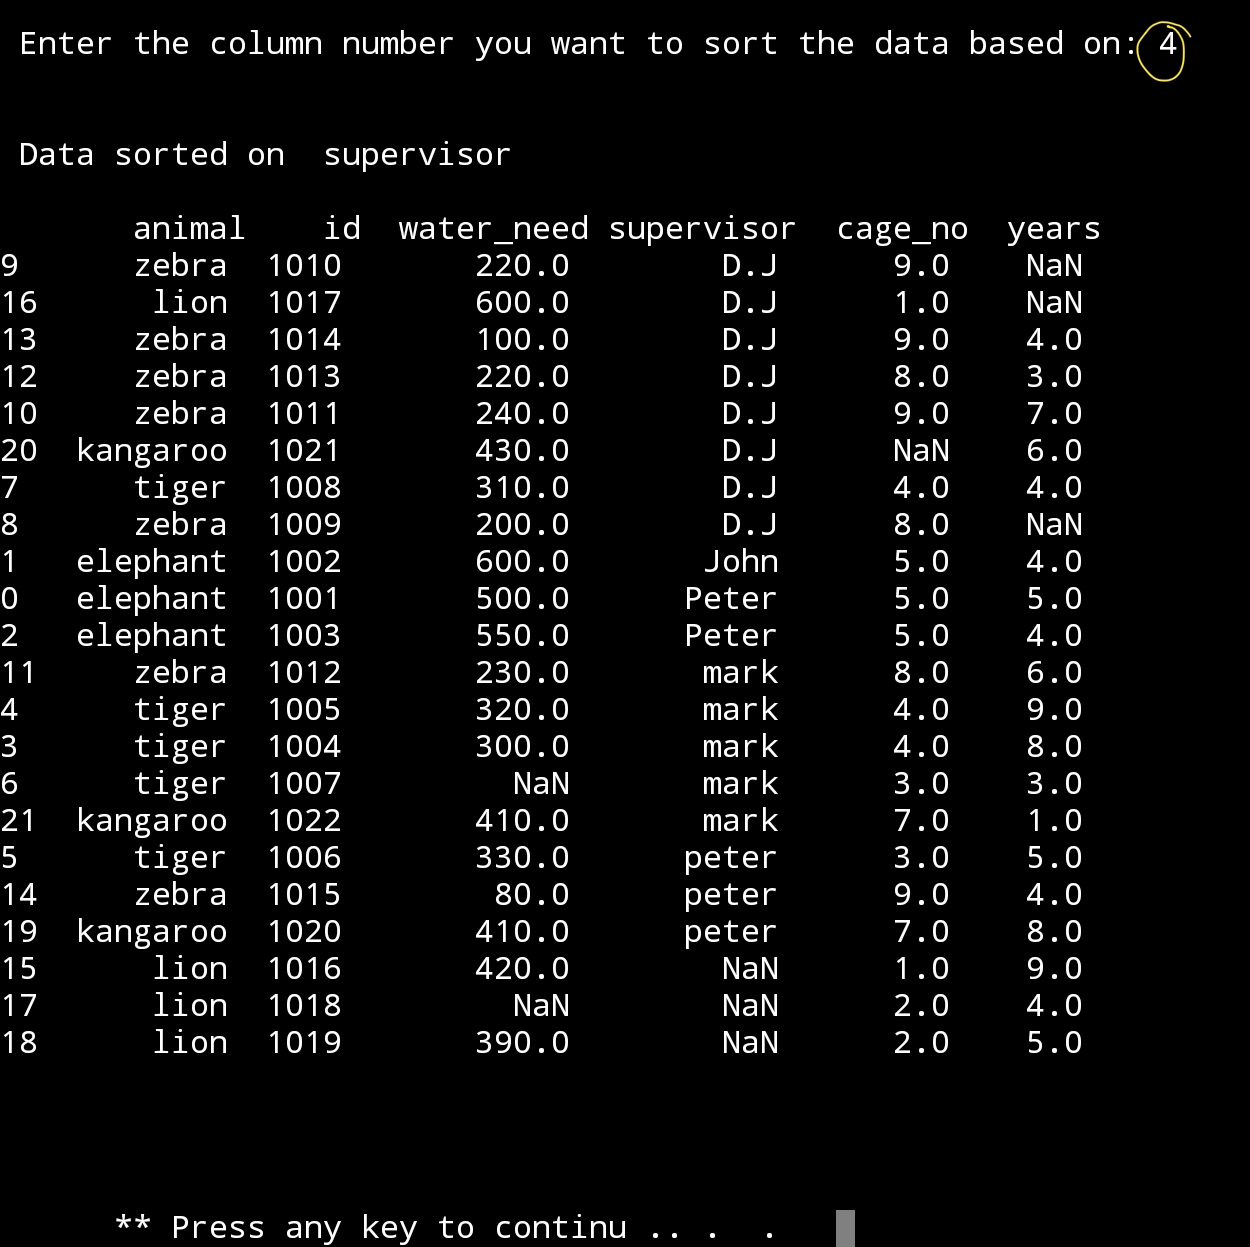 |
Another try of sorting. |
Enhancement: In sorting we can add to sort Descending or Ascending, but we will keep this for next version.
Wrapping Up: At this point we finised five functions of our system, I will upload the code file pandas_zoo_app.py at the end of this lesson section, the file will be on my Download Page.
:: Pandas Lessons Post ::
| Lesson 1 | Lesson 2 | Lesson 3 | Lesson 4 |
| Lesson 5 | Lesson 6 | Lesson 7 | Lesson 8 |
| Lesson 9 | Lesson 10 | Lesson 11 | Lesson 12 |
Python: Pandas Lesson 9
Learning : Pandas Commands
Subject: Zoo Management System – P3
In this lesson we will write two functions in our Zoo Management System-ZMS, first one to load the data file (we assume we have our data file in the same directory of the .py file.) and the second one is to display a sample 5 rows from the data. We will write each function and test it then we will add it to our main app user_choice() section and will try it from there. At the end of this post you can find a screen shot of the user_choice() code with two function in place.
Also I would like to emphasize that I am not using any try .. exception block in this system, so I am expecting that the user will enter a valid data.
Load New File: As far we want to be simple in this lesson, we will assume that we have a file named ‘data_file_zoo.csv’ and that it stored in the same directory as our source file .py, so we will not cover the [find file code] to change or select other file in other directory.(maybe in version 2.0 of this app if we want to upgrade it. ).
Enhancement ides:
1. Giving the user the ability to change the path and the file.
2. User can start form new empty file and create the columns and data of his new data file.
def load_file()
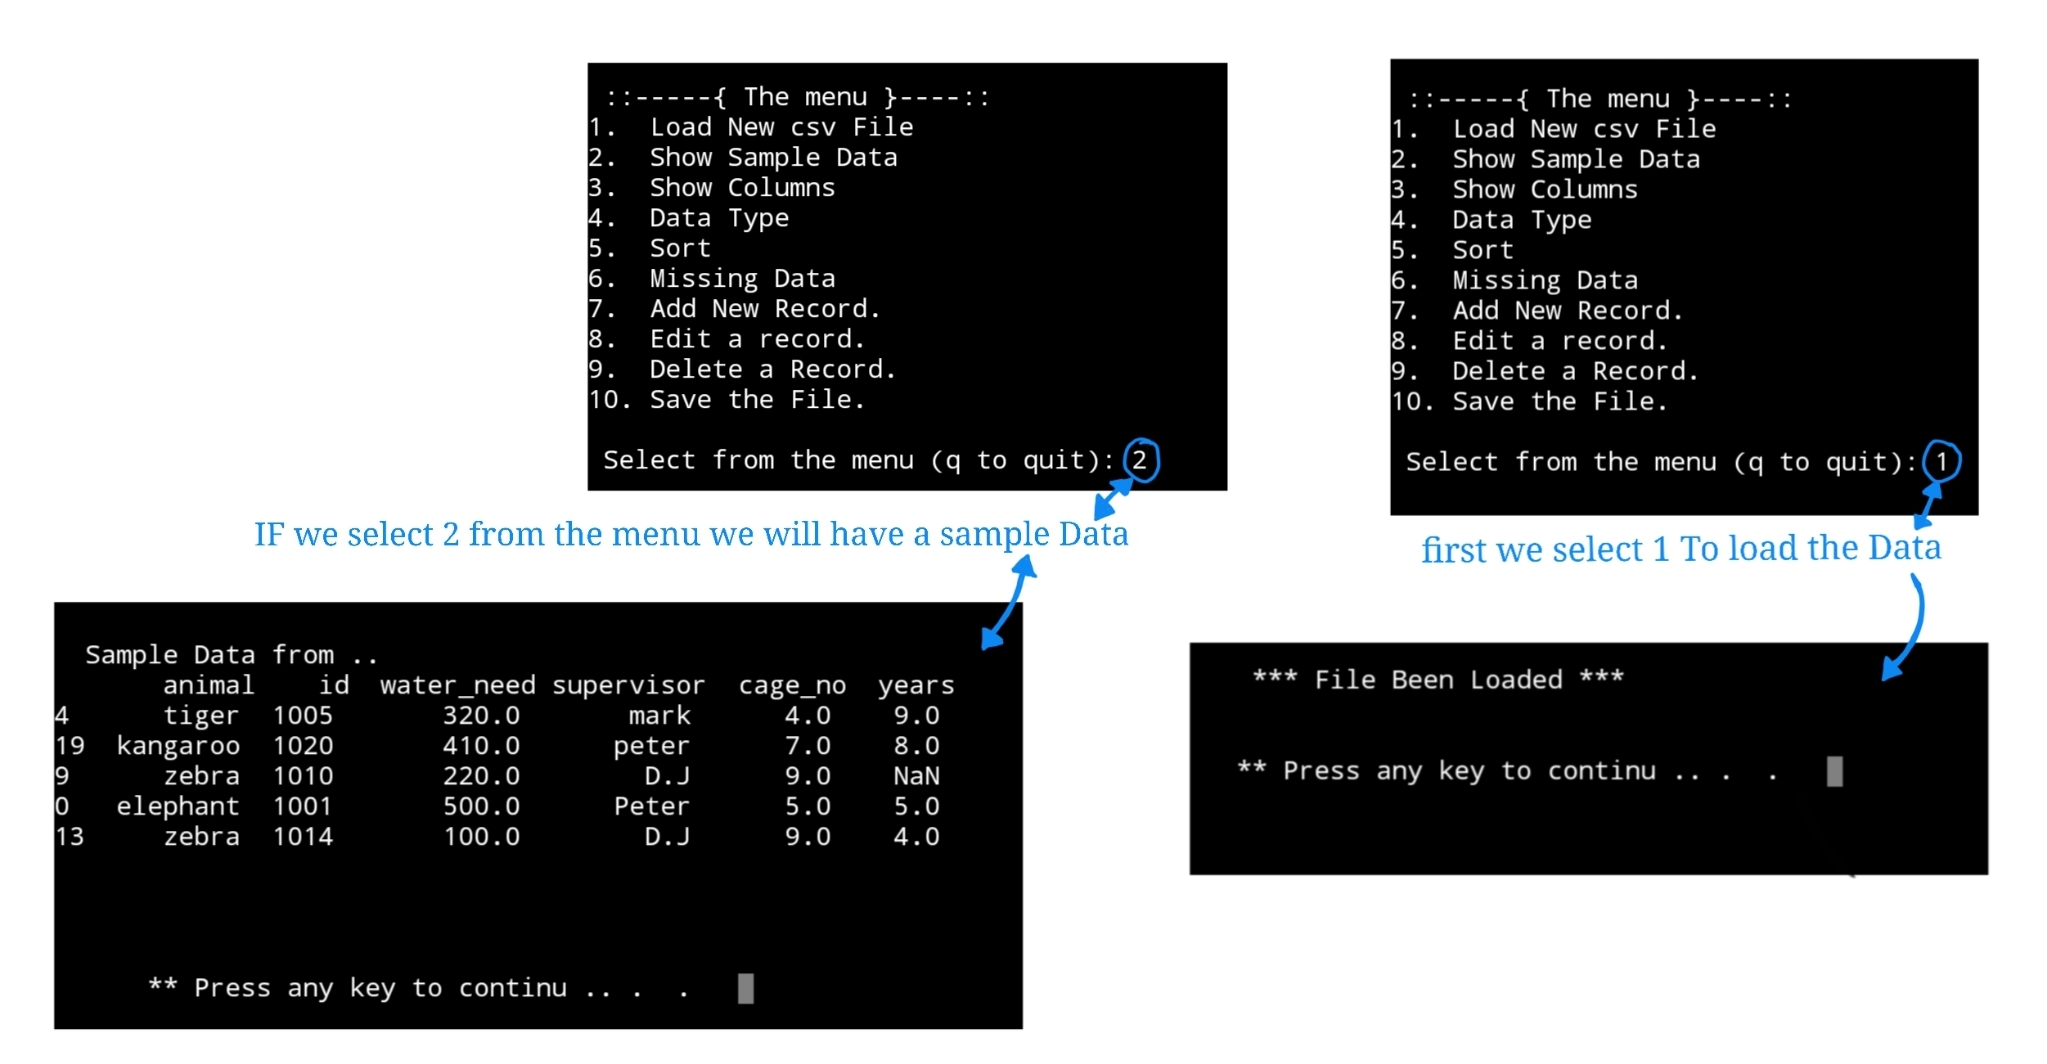
def load_file() :
filename=’data_file_zoo.csv’
global df
df = pd.read_csv(filename)
print(‘\n\n *** File Been Loaded *** \n’)
input(‘\n ** Press any key to continu .. . . ‘)
|
|
Show sample data: After loading the data into a df, and we set the df as a global variable so we can use it any-where in our application. So to print-out a sample data we will use coming code.
get_sample_data(df2)
def get_sample_data(df2):
clear() # To clear the terminal.
print(‘\n\n Sample Data from .. \n’,df2.sample(5))
input(‘\n ** Press any key to continue .. . . ‘)
|
|
Here is the two function in the def user_coice(u_choice):

|
Summary: At this point we have the menu and two functions, each time we run the app we need to select first number 1 to load the data into a df, the idea behind this was to give the user the opportunity to select any data file from any path, but in this stage the data file will be static in the code. this feature will be in version 2.0 After loading the data we can select number 2 from the menu ( Show sample data ).
And here is a run screen shot..
|
In coming Next Post .. in coming post we will cover more functioins in our system. We will check the columns name, seeing the data type of each column and sorting the data in the data frame.
:: Pandas Lessons Post ::
| Lesson 1 | Lesson 2 | Lesson 3 | Lesson 4 |
| Lesson 5 | Lesson 6 | Lesson 7 | Lesson 8 |
| Lesson 9 |
Python: Pandas Lesson 8
Learning : Create simple zoo application P2
Subject: Zoo Management System – user_choice()
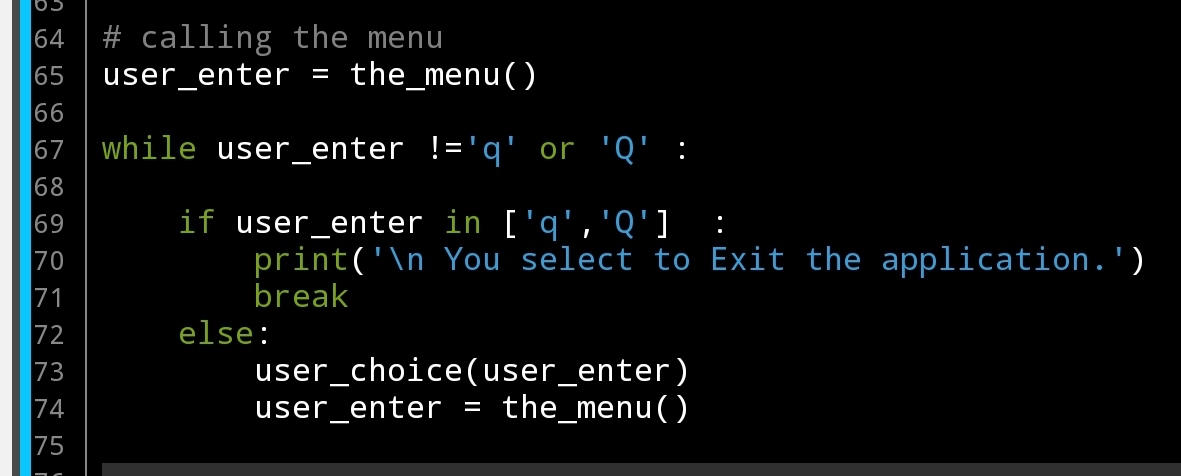
In Part1 we start with menu function and we said it will return the user input that represent the action he select. In this post we will write the choice loop code to determin the action we need to take and we will say if the user enter q or Q the we will exit, to do this i am adding this line in the end of the def the_menu()
return input(‘\n Select from the menu (”q” to quit): ‘)
After the_menu and whatever user chose we need to perform an action, here is another function def user_choice(): we will pass a variable to it and with some if statements other functions will be called.
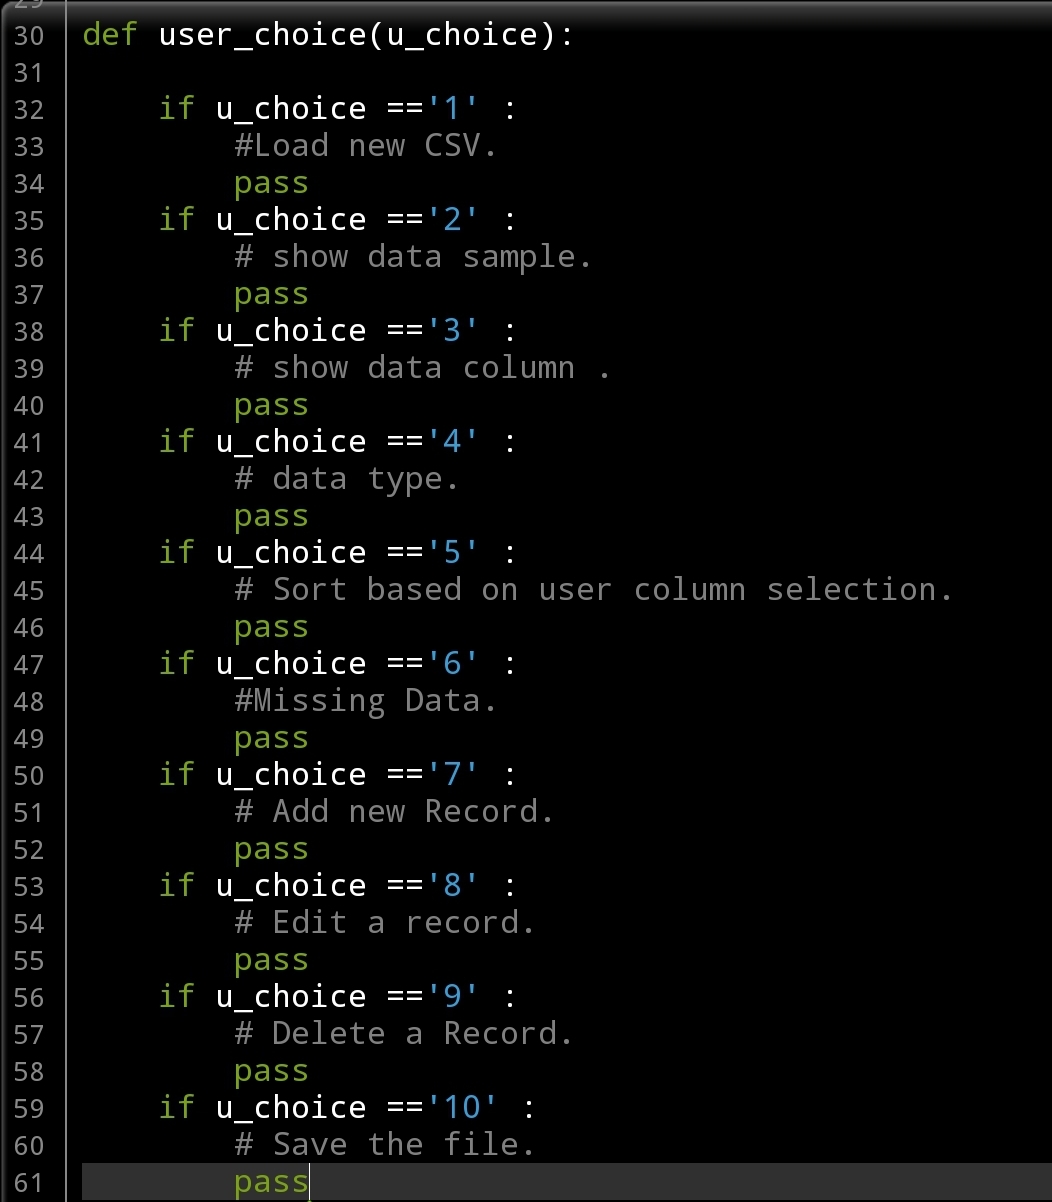
User Choice function
def user_choice(u_choice):
if u_choice ==’1′ :
#Load new CSV.
pass
if u_choice ==’2′ :
# show data sample.
pass
if u_choice ==’3′ :
# show data column .
pass
if u_choice ==’4′ :
# data type.
pass
if u_choice ==’5′ :
# Sort based on user column selection.
pass
if u_choice ==’6′ :
#Missing Data.
pass
if u_choice ==’7′ :
# Add new Record.
pass
if u_choice ==’8′ :
# Edit a record.
pass
if u_choice ==’9′ :
# Delete a Record.
pass
if u_choice ==’10’ :
# Save the file.
pass
|
and to keep the application running until the user enter we will use the while block to do this, here is the code:
|
Starting from the coming lesson we will start to write the functions for each item in our menu, we may add new functions or renaming some and we may not going in order just pick one and work with. Let’s see what will happen then.
:: Pandas Lessons Post ::
| Lesson 1 | Lesson 2 | Lesson 3 | Lesson 4 |
| Lesson 5 | Lesson 6 | Lesson 7 | Lesson 8 |
| Lesson 9 | Lesson 10 | Lesson 11 | Lesson 12 |
Python: Pandas Lesson 7
Learning : Create simple zoo application P1
Subject: The Menu and functions names
Althought we mostly using pandas in reading datafile and analysing it, Here we are thinking as if we have an interface for an application, and we are offering some menu and function to the user so he can use the apps.
As we went throught learnning pandas and from all past lessons we saw alot’s of functions and commands that are enuph to start developing a small application to manage our zoo data. Starting from this post we will bulid parts of our application, so lets start.
The Menu The menu is the way or the tool that will help the user to perform deffernt action on the data. Here is the function of the the_menu and it will return the user selection.
Althought we mostly using pandas in reading datafile and analysing it, but Here we are think as if we have an interface of application, and the we are offering a menu to the user were he can select a function user will
The Menu
def the_menu ():
print(‘\n ::—–{ The menu }—-::’)
print(‘1. Load New csv File’)
print(‘2. Show Sample Data’)
print(‘3. Show Columns’)
print(‘4. Data Type’)
print(‘5. Sort.’)
print(‘6. Missing Data’)
print(‘7. Add New Record.’)
print(‘8. Edit a record.’)
print(‘9. Delete a Record.’)
print(’10. Save the File.’)
return (input(‘\n Enter your selection: ‘))
# calling the menu.the_menu()

|
def the_menu(): The code above will print our menu on the screen and asking the user to select the action and return a number of the menu. From there we will run other functions, we may change or add to the menu if we need to.
First I will define each menu-line to have an overall view of the functionality in the app:
1. Load New csv File: We will ask the user to write the file name he want to upload, and we will assume that the file is in the same directory and if the file not exist we will create one.
2. Show Sample Data: Print out sample data from the dataframe using df.sampl().
3. Show Columns: List all the columns in the dataframe.
4. Data Type: Show the data Type of each column.
5. Sort: The user will select the sorting column.
6. Missing Data: This command will give the user a report of how many data are available in the columns and if there is any missing data.
7. Add New Record: Adding new row to the data file.
8. Edit a record: Editing a row.
9. Delete a Record: Deleting a row from the data file.
10. Save the File To save the file, and we will save it under new name.
Whats in the next lesson:
:: Writing the menu selection loops.
:: Writing the first two functions in the application.
:: Pandas Lessons Post ::
| Lesson 1 | Lesson 2 | Lesson 3 | Lesson 4 |
| Lesson 5 | Lesson 6 | Lesson 7 | Lesson 8 |
| Lesson 9 | Lesson 10 | Lesson 11 | Lesson 12 |
Python: Pandas Lesson 6
Learning : Panda Lesson 6
Subject: Pass variable to df
In this post we will cover some commands that we will re-use in a coming post were we will start to develop a small system/app to do full managing of our zoo file. currently i am putting the BluePrint of the app, basically the menu will have these functions:
The Menu: [load, view, add-edit-delete, sort, missing data, save to csv …], so lets start..
If we want to add new row to our dataframe, first we need to know our columns name. In our case data file zoo here is the column we have:
( animal, id, water_need, supervisor, cage_no, years ), at this point we will do this as static variable, but in coming lesson we will use an interactive sample.
So, we will write a dictionary that hold our new_row and append it to the dataframe.
Add new row to the datafram
new_row={‘animal’:’Koala’,’id’:5555,’water_need’:99,’supervisor’:’na’,’cage_no’:55,’years’:10}
df=df.append([new_row])
print(‘\n\n The df after adding one new row.\n’,df)
|
You can see that there is a problem here, the id of our new row was entered manually (in this example) but we need this to be automatic and to do so we must first get the max value in the id column, add 1 to it then use it for the new entry. So we need to add this code:
next_id=df[‘id’].max() + 1
new_row={‘animal’:’koala’,’id’:next_id,’water_need’:99,’supervisor’:’na’,’cage_no’:55,’years’:10}
|
|
To delete a row, we simply re-define the df without that row we want to delete. Say we want to delete the row that has id = 1020. The id is a primary key in our data-set and there is no duplicated numbers in id column so we can use it to identify a specific row. I assume that we know that we read the datafram and we want to delete the row id number 1020, here is the code:
Delete the row with id = 1020
df=df[df.id !=1020]
print(‘\n\n df after deleting row id:1020\n’,df)
|
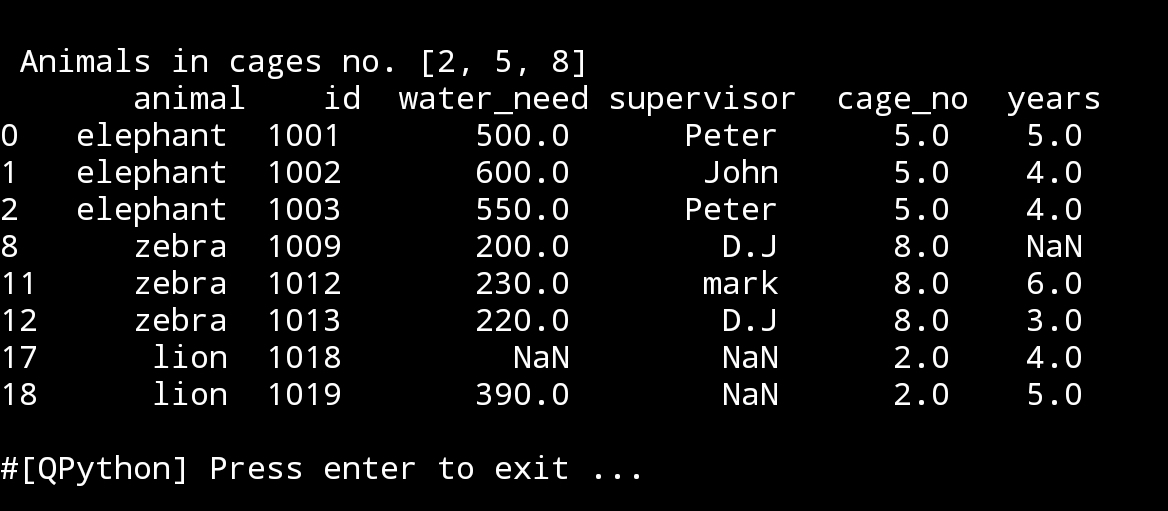
At the first paragraph i was talking about writing an app that fully manage the zoo file, so if the user want to read the rows based on a particular selection like : what are the animals in the cages number 2,5 and 8. Here is the code :
Animals in cage no 2,5 and 8
cage_arr=[2,5,8]
print(‘\n\n Animals in cages no.’,cage_arr,’\n’,df.loc[df[‘cage_no’].isin(cage_arr)])
|
:: Pandas Lessons Post ::
| Lesson 1 | Lesson 2 | Lesson 3 | Lesson 4 |
| Lesson 5 | Lesson 6 | Lesson 7 | Lesson 8 |
| Lesson 9 | Lesson 10 | Lesson 11 | Lesson 12 |
Python: Pandas more commands
Learning : Pandas more commands
Subject: DataFrame Simple Statistics
In this post we will just go through some commands in pandas that related to simple statistics of dataframe, in coming table first we will list down all the commands then will see each in cation.
| Function | Description |
| 1. sum() | Get the sum of the value |
| 2. cumsum() | cumsum() is used to find the cumulative sumvalue over any axis. Each cell is populated with the cumulative sum of the values on upper cells. |
| 3. count() | counting the NaN in the DataFrame. |
| 4. mean() | |
| 5. median | |
| 6. std() | Standard deviation measures the spread of the data about the mean value. |
| 7. max() | Return the maximum value in each column. |
| 8. min() | Return the minimum value in each column. |
| 9. prod() | Return the value of product operation of the items in the column. (works only for number columns) |
| 10. Cumprod() | Return the number in the cell * all the cells over it. |
| 11. abs() | Returns the absolute value of the column and it is only applicable to numeric columns. |
| 12. mode() | It returns the most repeated value in the column. |
1. sum() Using command as: print(df.sum()) it will return a sum of columns, if contain numaric then it will be a normal sum, if it is string return a string contain all as one string without spaces.
In our cas (data_file_zoo) the only practical result is the water-need where it represent the total amout of water we need in our zoo. So to get the sum of one column we can write it as: df[column name].sum()
print(‘\n\n Total amout of water we need is: ‘, df[‘water_need’].sum())
|
|
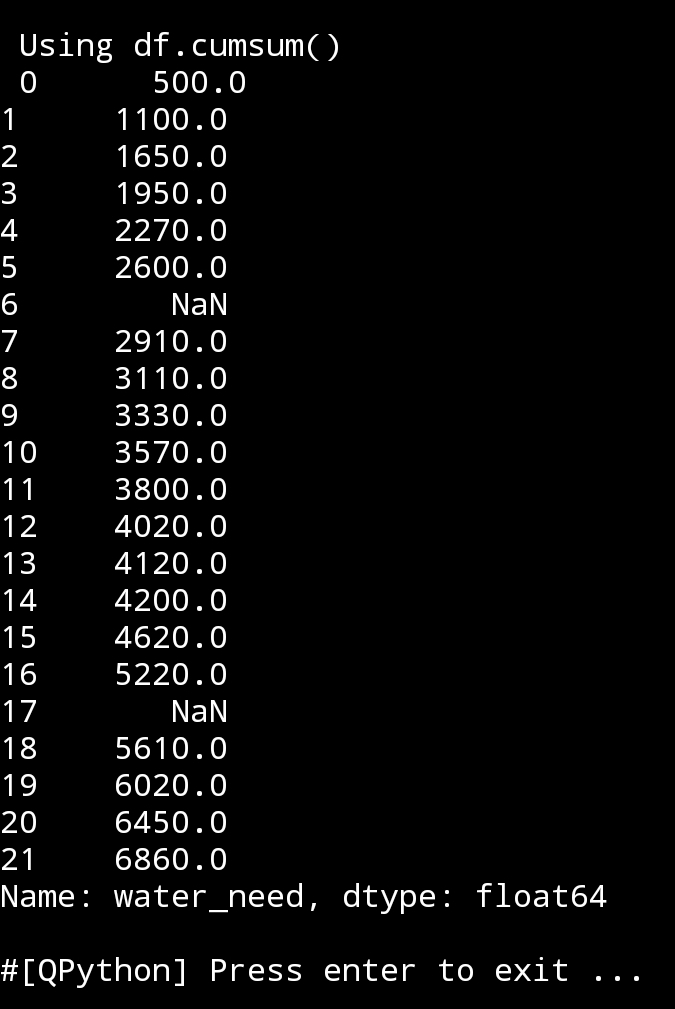
2. cumsum() Using command as: print(df.cumsum()) cumulative sumvalue will return the number in the cell + the sum of all the cells over it, we may need this function in a data analysis.
|
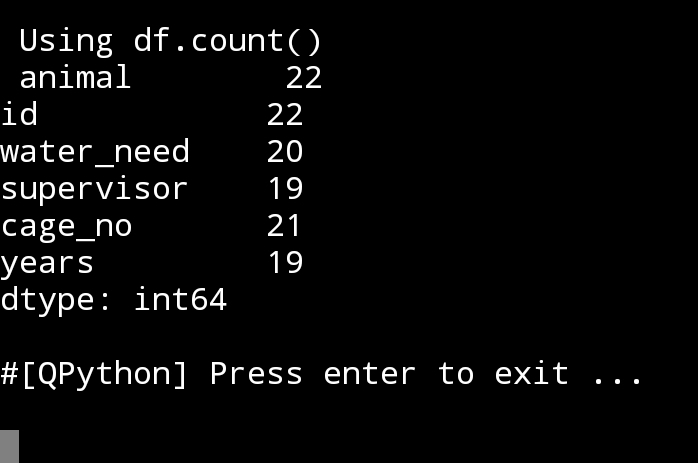
3. count() Using command as: print(df.count()), this function gives us the total data in each columns, so we know how many NaN or empty cells are in our table.
|
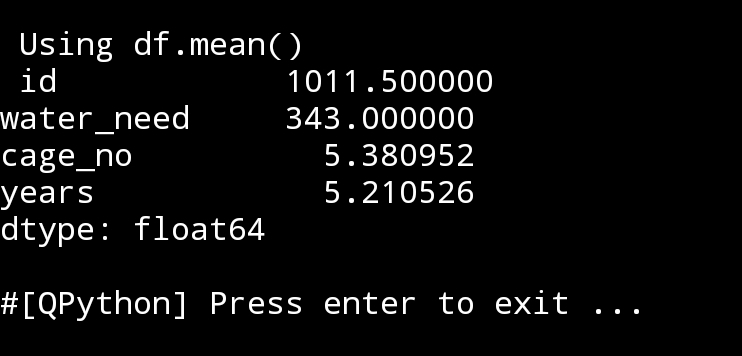
4. mean() Using command as: print(df.mean()), Thw Arithmetic Mean is the average of the numbers in the df for each columns.
|
5. median() Using command as: print(df.mediam()), in a sorted list
median will return the middle value, If there is an even number of items in the data set, then the median is the mean (average) of the two middlemost numbers. We can get the median of the specific Column.
# median of water_need column..
print(‘\n\n Median of the Water Need: ‘,df.loc[:,”water_need”].median()

|
6. sdt() Using command as: print(df.std()), it is the Standard deviation of the dataframe, or columns in the df.
The standard deviation measures the spread of the data about the mean value. It is useful in comparing sets of data which may have the same mean but a different range. In our example here (zoo file) some functions is not given the meaning that we may need, but if we have a data from statistical modeled or other scientific field this std() sure will be helpful.
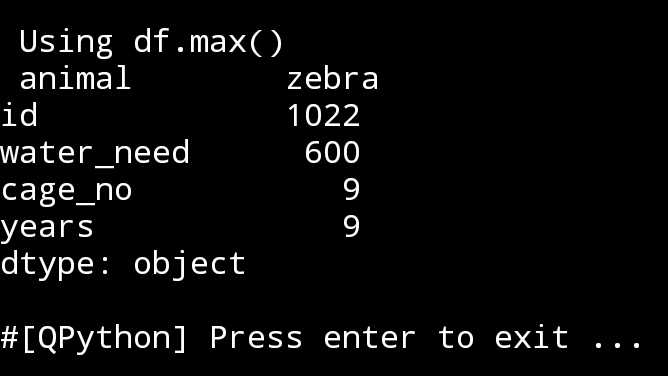
7. max() Using command as: print(df.max()), return the maximum value in each column. If we want the max. value in a specific column then we use theis code:
print(‘\n\n’,df.loc[:,”water_need”].max())
|
8. min() Using command as: print(df.min()), same as max, the min() will return the minimum value in the df for each column, and we can get the min for only one column by using:
print(‘\n\n’,df.loc[:,”water_need”].min())
9. prod() Using command as: print(df.prod()), return the value of product operation of the items in the column. (works only for number columns)
10. cumprod() Using command as: print(df.cumprod()), cumulative product will return the number in the cell * all the cells over it.
To show this i will use a Series of numbers and apply cumprod.
cumprod()
some_value = pd.Series([2, 3, 5, -1, 2])
print(‘\n\n some_value in a column.\n’,some_value)
print(‘\n\n some_value.cumprod()\n’,some_value.cumprod())

|
11. abs() Using command as: print(df.abs()), It returns the absolute value of the column and it is only applicable to numeric columns.
12. mode() Using command as: print(df.mode()), It returns the most repeated value in the column.
Find the most repeated value:
print(‘\n\n Function: df.count()\n’,df.mode())
# mode of the specific column
df.loc[:,”animal”].mode()
:: Pandas Lessons Post ::
| Lesson 1 | Lesson 2 | Lesson 3 | Lesson 4 |
| Lesson 5 |
Taking pictures is not my main daily practices, but when i start playing with my camera, i really enjoy my self.
Thanks for visiting my Space..


