Archive
Python Project: Properties Maintenance System P9
Subject: Writing a Full Application for Properties Maintenance System [Property: Delete a Record]
Learning : Python, Math, SQL, Logeic
[NOTE: To keep the code as simple as we can, We WILL NOT ADD any user input Varevecations. Assuming that our user will Enter the right inputs.]
In this part we will write a Function to Edit a record on the database, first we will call the def show_property(inside) to display all the records on the screen and ask the user to Select [enter] the ID of the Property to be Edited. Next we will Display the Record again on the screen and ask the user to Confirm the Editing by entering [Y] and any things else will be as [Don’t Edit]. Here is the code ..

|
Next we will ask the user about each attributes in the system, so the user will enter the new data (update the current one) or just press enter to keep the existed data. Here is a part of the code ..
 |
After That we will check on each user input for the attributes, if the user change/Edit the data [did not press enter] then we run an SQL command to alter the database. Here are part of the code we use ..
 |
Now we have an updated record, so we will show a message to inform the user that the records been updated.
NOTE: If you Download this Part you MUST Run the Option 82 (82. Delete the Data-Base and Start Again.) from the Main Menu to do the following Updates:
- Updates some attributes in the Database Level.
## Highly Recommended ##
In Part-10 the Next Part, we will add the Function to Backup our data .
:: PMS Parts ::
| Part 1 | Part 2 | Part 3 | Part 4 |
| Part 5 | Part 6 | Part 7 | Part 8 |
| Part 9 | Part 10 | Part 11 | Part 12 |
..:: Have Fun with Coding ::.. 🙂
To Download my Python code (.py) files Click-Here
 Follow me on Twitter..
By: Ali Radwani
Python: Generate your Data-Set
Learning : Python, pandas, function
Subject: Generate your CSV dataset using python
[NOTE: To keep the code as simple as we can, We WILL NOT ADD any user input Varevecations. Assuming that our user will Enter the right inputs.]
The Story: last week i was reading about Data Cleaning, Deep Learning and Machine Learning, and for all we need some data to play with and testing our code. There are several sites providing a free (to certain limits) Data-set. But while i was working, it just come to my mind Why not to write a code to generate some Fake data-set.
Before I start: The main question was “What is the subject of the data” or Data about What? This is the main question that will guide us to write our code, and tha answer was very..very fast 🙂 .. at that moment I was holding my Coffee Mug, and just jump to my mind, Data about Coffee … Coffee Consumption. So we are taking the data of Coffee Consumption from a Coffee-Shop, the coffee-shop is collecting the following data: Date-Time (of the order), Coffee-Name, Coffee-Type, Coffee-size, Sex, Rank. Here is in more details..
Dat-Time: Date and Time of Order, Date format: dd-mm-yyyy, the Time format: hh:mm (24h)
Coffee-Name: Such as: [black, latte, espresso, americano, cappuccino, mocha, lungo, flat white, irish, macchiato,ristretto, iced coffee]
Coffee-Type: 3n1 , pods, grounded
Coffee Size: samll, medium, large, venti
Sex: The person how order it male, female
Rank: if the customer drink the coffee in the shop, will ask for a ranks (1,10) 1:bad, 10:Grate
Scope of Work: We will write several functions to generate random data for each attribute we have, saving the data into a list, then combining all the lists in a pandas dataframe df and save the data_set df to a csv file. Later on we can re-call the file using pandas command df.read_csv(file_name) and manipulate the data.
.::.. Coding ..::.
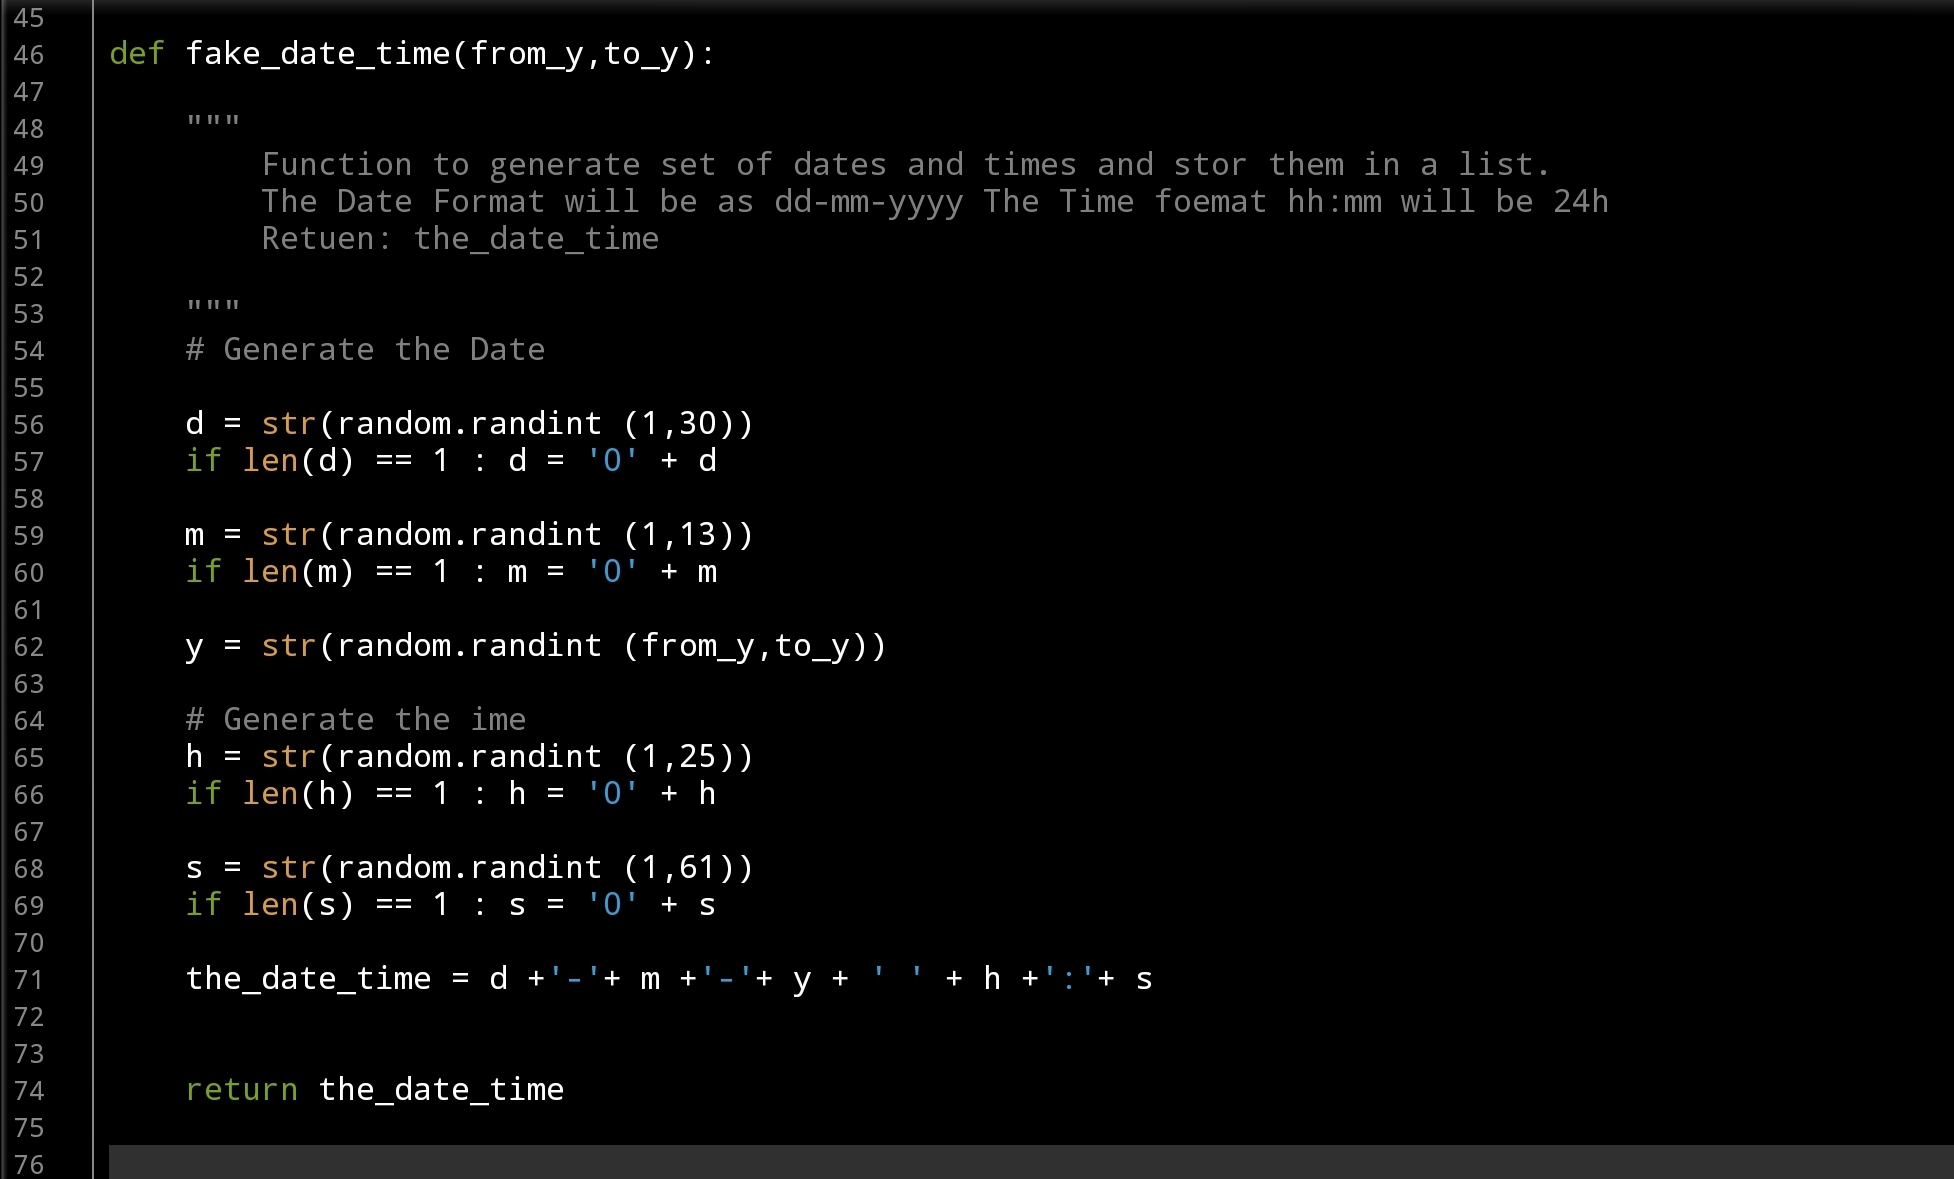
Let’s start with Date-Time Function: def fake_date_time(from_y,to_y): In this function we will use a random.randint() to generate numbers for day’s, months and years, also for hours and minites. The function will take two arguments from_y, to_y and will return a string like this: dd-mm-yyyy hh:mm … here is the code ..
 |
Now,Coffee Name: def fake_coffee_name() : for Coffee Name I create a list of Coffee Names (from the net) and use random.choice(coffee_name_list) to select one from the list. this function is a one-line code .. here it is ..
 # fake_coffee_name() function

def fake_coffee_name() :
    """
        Function to randomly select one from the list.

        Return coffee_name

     """

    coffee_name_list = ['black', 'latte', 'espresso', 'americano', 'cappuccino',
                         'mocha', 'lungo', 'flat white', 'irish', 'macchiato', 'ristretto',
                         'iced coffee'
                         ]
    return random.choice(coffee_name_list)
Here are another two Functions def fake_coffee_type(): and def fake_coffee_size(): Both are using the random.choice to select from a list.. here is the code ..
] |
More over, in out dataset we need another two variables sex and rank, both are simple and we don’t need to put them in separate function, we will call the random.choice(‘f’,’m’) to select between Male and Female, and random.randint (1,11) to select a Rank between (1 and 10). Here is the main part of the application, we will use a for loop and append all the returns from the function’s in a list (a list for each attribute) after that we will combine all the list in a dataset using pandas command. Here is the code..
 # Main body of the application

# empty lists of the columns
d_d =[]
cn_d =[]
ct_d =[]
cs_d =[]
s_d =[]
r_d = []

number_of_rows = 1000

for x in range(1,number_of_rows):
    d_d.append(fake_date_time(2000,2022))
    cn_d.append(fake_coffee_name())
    ct_d.append(fake_coffee_type())
    cs_d.append(fake_coffee_size())
    s_d.append(random.choice(['f','m']))
    r_d.append(random.randint (1,11))


the_data ={'date_time':d_d, 'c_name':cn_d, 'c_type':ct_d, 'c_size':cs_d, 'sex':s_d, 'rank':r_d }

df = pd.DataFrame (the_data)

# to create a CSV file and save the data in it.
file_name = 'coffee_consumption_v1.csv'
df.to_csv(file_name, index=False)

print(f'\n\n    The data been generated, a file named: {file_name} saved')
Now we have a file called: coffee_consumption_v1.csv saved in the same directory of the .py code file. Here is a sample of the data.
 |
We will stop here, and we will do another post to apply pandas commands over the dataset.
..:: Have Fun with Coding ::.. 🙂
To Download my Python code (.py) files Click-HereAlso the Date-Set coffee_consumption_v1 file (.csv) files is available in the same page.
By: Ali Radwani
Python: Testing the SQL joines Commands
Learning : SQL Commands, DataBase, Python
Subject: Testing the SQL Join Commands
Introduction In this post we will apply several SQL Join Commands to test them, here are them:
| Left Join: All the Data in the Category |  |
| Right Join: All the Data in the Products |  |
| Inner Join: All the Data that in Both Tables. |  |
| Left Join Only Data in Category Table and NOT in Product Table. |  |
| Right Join:Only data in Product Table and NOT in Category Table. |  |
| Full Outre:All the Records in both Tables |  |
| Full Outre:All the data from the Category Table that are NOT linked to any Product, AND all the data in Product Table that has NO Category. |  |
First: let’s talk about the Tables,we will create two Tables (Category and Products) each will be very simple, the Category will have two fields [c_id, and cat_name],
the Products will have [p_id, pro_name, cat_id]. (cat_id is the foreign key that connicting the two tables). Some test data will be inserted in both Tables so we can demonstrate the SQL Commands. I create a Dictionary storing information/summary about the project named about_the_project the user can read it in run time.
Coding: We will do the fowlloing:
1. Set a Database for the Project.
2. Writing the codes to Create the Tables.
3. Writing the codes to insert some test Data in the Tables.
4. Creating a Menu for the Project.
5. Writing the Functions to Apply the SQL Join commmands.
NOTE: All the code will be avilable in the DOWNLOAD page.
Let’s import some lybraries, we will need this code:
import sqlite3, os
And here is the code to set the data base and create the connection.
# Create the data-base and name it as Share_S_System.
db_conn = sqlite3.connect (“sql_join_test.db”)
# set the connection.
c = db_conn.cursor()
First function is to create the Tables:
 # Function to create the Tables.

def create_tables ():

    # CREATE TABLE:
    category_t = "CREATE TABLE if not exists category_t (c_id INTEGER PRIMARY KEY AUTOINCREMENT, cat_name text)"
    c.execute(category_t)
    db_conn.commit()

    product_t = "CREATE TABLE if not exists product_t (p_id INTEGER PRIMARY KEY AUTOINCREMENT, p_name text, cat_id integer)"
    c.execute(product_t)
    db_conn.commit()
Now we will insert some Test data.
 # Function to insert some Data into the Tables

def insert_sample_data():

    #First we will call the Function to Crete the Table.
    create_tables ()
    print('\n   Category Table has been Created. ')
    print('\n   Product Table has been Created. ')

    # Insert into Category Table
    c.execute ("INSERT INTO category_t (cat_name) VALUES(:cat_name )",{"cat_name":"Mobile Phone"})
    c.execute ("INSERT INTO category_t (cat_name) VALUES(:cat_name )",{"cat_name":"Labtop"})
    c.execute ("INSERT INTO category_t (cat_name) VALUES(:cat_name )",{"cat_name":"Ext. HD"})
    c.execute ("INSERT INTO category_t (cat_name) VALUES(:cat_name )",{"cat_name":"CCTV Camera"})
    db_conn.commit()

    # Insert into Product Table.
    c.execute ("INSERT INTO product_t (p_name, cat_id) VALUES(:p_name, :cat_id )",{"p_name":"Note 9","cat_id":"1"})
    c.execute ("INSERT INTO product_t (p_name, cat_id) VALUES(:p_name, :cat_id )",{"p_name":"iPhone 12 pro","cat_id":"1"})
    c.execute ("INSERT INTO product_t (p_name, cat_id) VALUES(:p_name, :cat_id )",{"p_name":"HP","cat_id":"2"})
    c.execute ("INSERT INTO product_t (p_name, cat_id) VALUES(:p_name, :cat_id )",{"p_name":"Toshiba 1T HD","cat_id":"3"})
    c.execute ("INSERT INTO product_t (p_name, cat_id) VALUES(:p_name, :cat_id )",{"p_name":"iMac","cat_id":None})
    db_conn.commit()

    print('\n   Sample Date Inserted in both tables.\n   Select 9 from the Main Menu to see the Data')

    input('\n      ... Press any key to continue.  > ')
Now, let’s write the function for the Main Menu, it will return the user_choice.. here is the code..
 # Main Menu Function.

def main_menu():
    os.system('clear')
    print("\n==========[ Main Menu ]==========")
    print(' 1. About this Project.')
    print(' 2. All Categories. (Left Join: All in Category Only).')
    print(' 3. All Products. (Right Join: All in Product Only).')
    print(' 4. Only Categories that linked to a Products. (Inner Join: Only if in Ta AND Tb).')
    print(' 5. All Catigories that are NOT linked to a Product. (Left Join: Only in Category AND NOT in Product .')
    print(' 6. All Products that has NO Category. (Right Join: Only in Product AND NOT in Category.')
    print(' 7. All Categories and Products. (Full Outer Join in Both Table)' )
    print(' 8. All Categories that are NOT linked to any Product, and All Products that has NO Categotry. (Full Outer Join NOT in Both Table)')
    print(' 9. Show the Data')
    print(' 11. Setting: Create the Tables and Insert Some Sample Data. Run Only One Time.')
    print(' 99. Exit.')

    user_choice = input("\n Select from the Menu: > ")
    return user_choice
 |
The coming part of the code is calling the functions and running the SQL commands based on the user choice. Here is the Main-code-body..
 # The Main section of the Application..

while True :
    user_select = main_menu()

    if user_select == '1' :
        show_data('cat')

    if user_select == '2' :
        show_data('prod')

    if user_select == '3' :
        os.system('clear')
        print('\n   First: All the Data in Category and Product ')
        show_data('both','inside')
        print("\n==========[ Show Date: INNER JOIN ]==========\n")
        print('   Inner Join: Only the Data that exist in Category AND Product).')
        print('\n   The SQL Statment:\n    select category_t.c_id, product_t.p_name from category_t inner join product_t on category_t.c_id == product_t.cat_id\n\n ')
        c.execute ("select category_t.c_id, category_t.cat_name, product_t.p_name from category_t inner join product_t on category_t.c_id == product_t.cat_id  ")
        innerJ_list = c.fetchall()

        print('   [OUTPUT]:\n       Categories Name      |',' '*2,'Products Name    ')
        for innerJ_data in (innerJ_list):
            print('       ',innerJ_data[1],'.'*(25 - len(str(innerJ_data[1]))),innerJ_data[2])

        print('\n   We can see that the INNER JOIN Command fetched the records of Products that has a Category.\n   iMac Not listed Because it has No Category Data.')
        input('\n\n      ...Press any key to continue.  > ')

   if user_select == '4' :
        os.system('clear')
        print('\n   List of All the Data in Category and Product ')
        show_data('both','inside')
        print("\n==========[ Show Date: LEFT JOIN, Only Data in Categoty Table ]==========\n")
        print('   The SQL Statment:\n     select category_t.c_id, category_t.cat_name, product_t.p_name from category_t\n     left join product_t on category_t.c_id == product_t.cat_id\n     where product_t.cat_id is null\n')
        c.execute ("select category_t.c_id, category_t.cat_name, product_t.p_name from category_t left join product_t on category_t.c_id == product_t.cat_id where product_t.cat_id is null")
        leftJ_list = c.fetchall()
        print('   [OUTPUT]:\n       Categories Name      |',' '*2,'Products Name    ')
        for leftJ_data in (leftJ_list):
            print('         ',leftJ_data[1],'.'*(25 - len(str(leftJ_data[1]))),leftJ_data[2])

        print('\n   We can see that the LEFT JOIN Command fetched all Categories that are not used/linked to/with any Product.\n   CCTV Camera is Not linked. So We can Say: We Do Not have any CCTV Camera Products.')
        input('\n\n      ...Press any key to continue.  > ')

    if user_select == '5' :
    ....
# Just to save the time, i will not post all the code here, you can see all the code and download
# the .py source code from the download page.
Here are some screen shot of the output ..
| The Main Menu
|
| Output Screen for Option 3: Only Categories that linked to a Products. (Inner Join: Only if Data in Category AND Product) 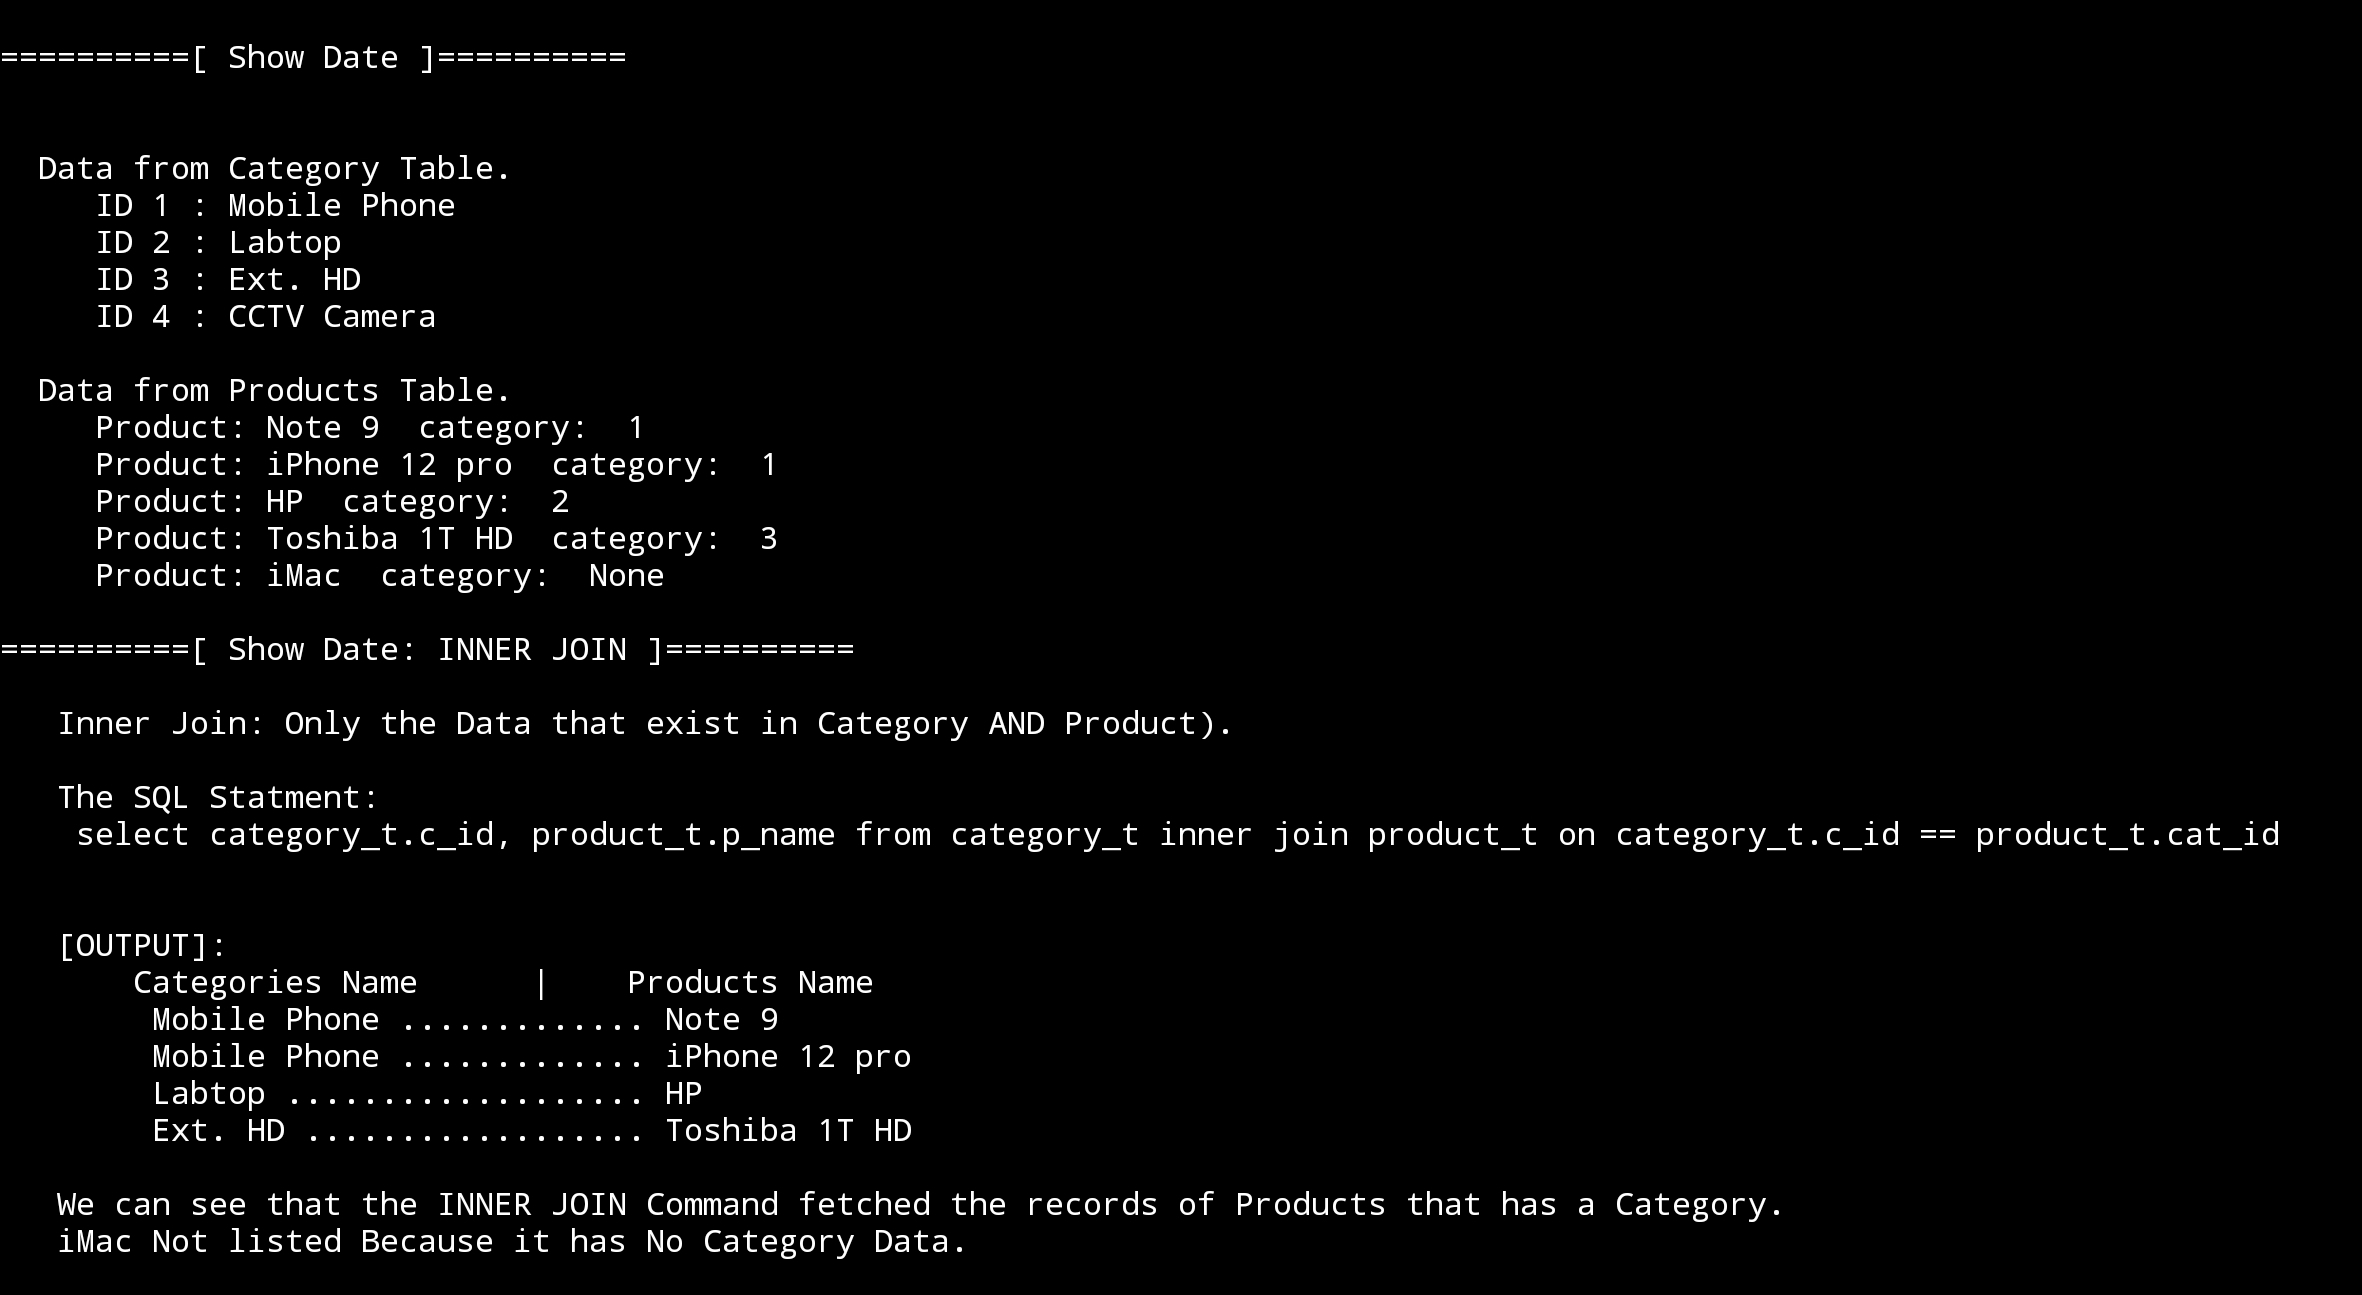 |

End of the Post, and all the code is available to download from the Download page.
To Download my Python code (.py) files Click-Here
By: Ali Radwani
Python: Data Visualization Part-2
Learning : python, pygal, Data Visualization,Line Chart
Subject: Data visualization using pygal library
In this post we will talk about Line-chart using pygal library in python, Line-chart has three sub-type as: Basic, Stacked ,Time. We will use the data-set for Average age of Males and Females at first Marage during 6 yeaars (2000 and 2006), the code line to set the data data will be as :
line_chart.add(‘Females’,[22,25,18,35,33,18])
line_chart.add(‘Males’, [30,20,23,31,39,44])
Line-chart: Basic
This is very normal and basic chart we use in all reports, we are feeding the data for Males and Females average age in first marage.. here is the code and the output ..
import pygal

line_chart = pygal.Line()

line_chart.add('Females',[22,25,18,35,33,18])
line_chart.add('Males', [30,20,23,31,39,44])

line_chart.x_labels=map(str,range(2000,2006))

line_chart.title = "Males and Females first Marage Age (average)"

line_chart.render()
 |
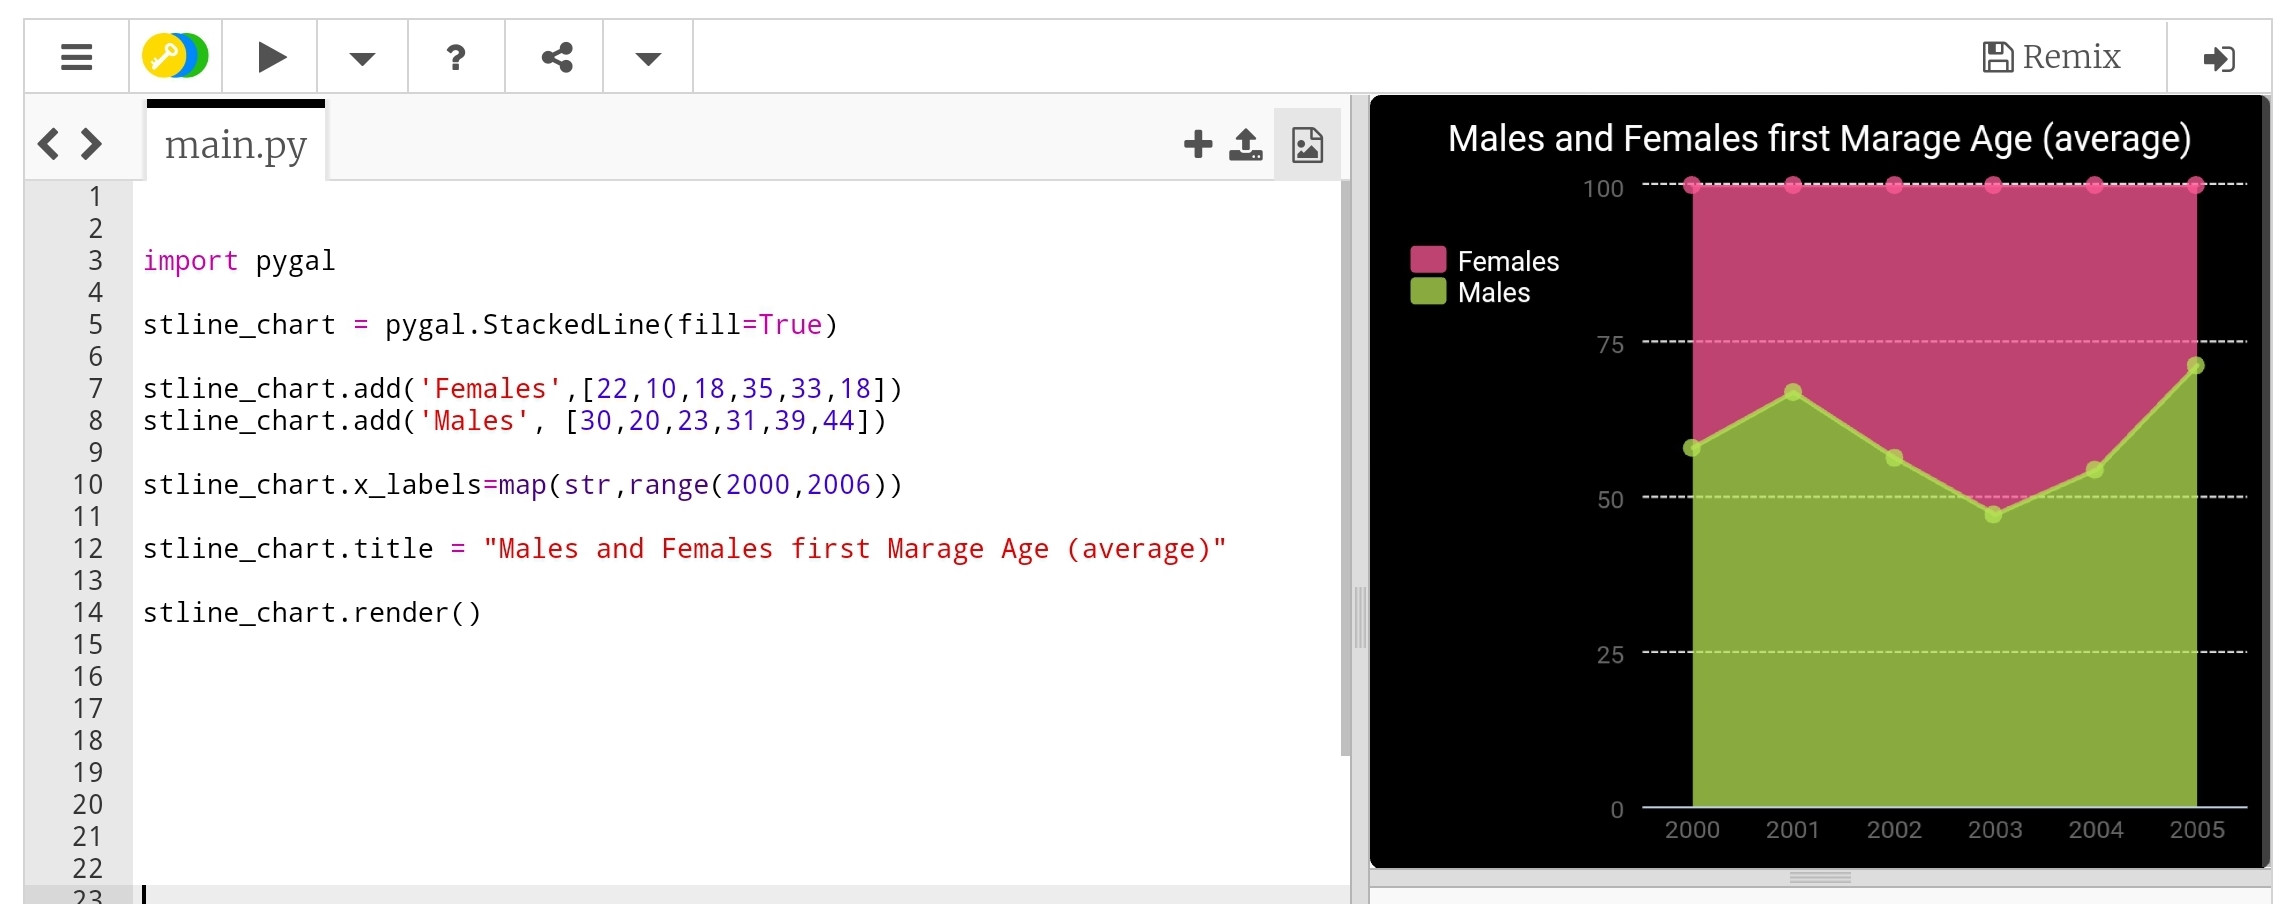
Line-chart: Stacked Line Stacked chart (fill) will put all the data in top of each other. Here is the code.
 |
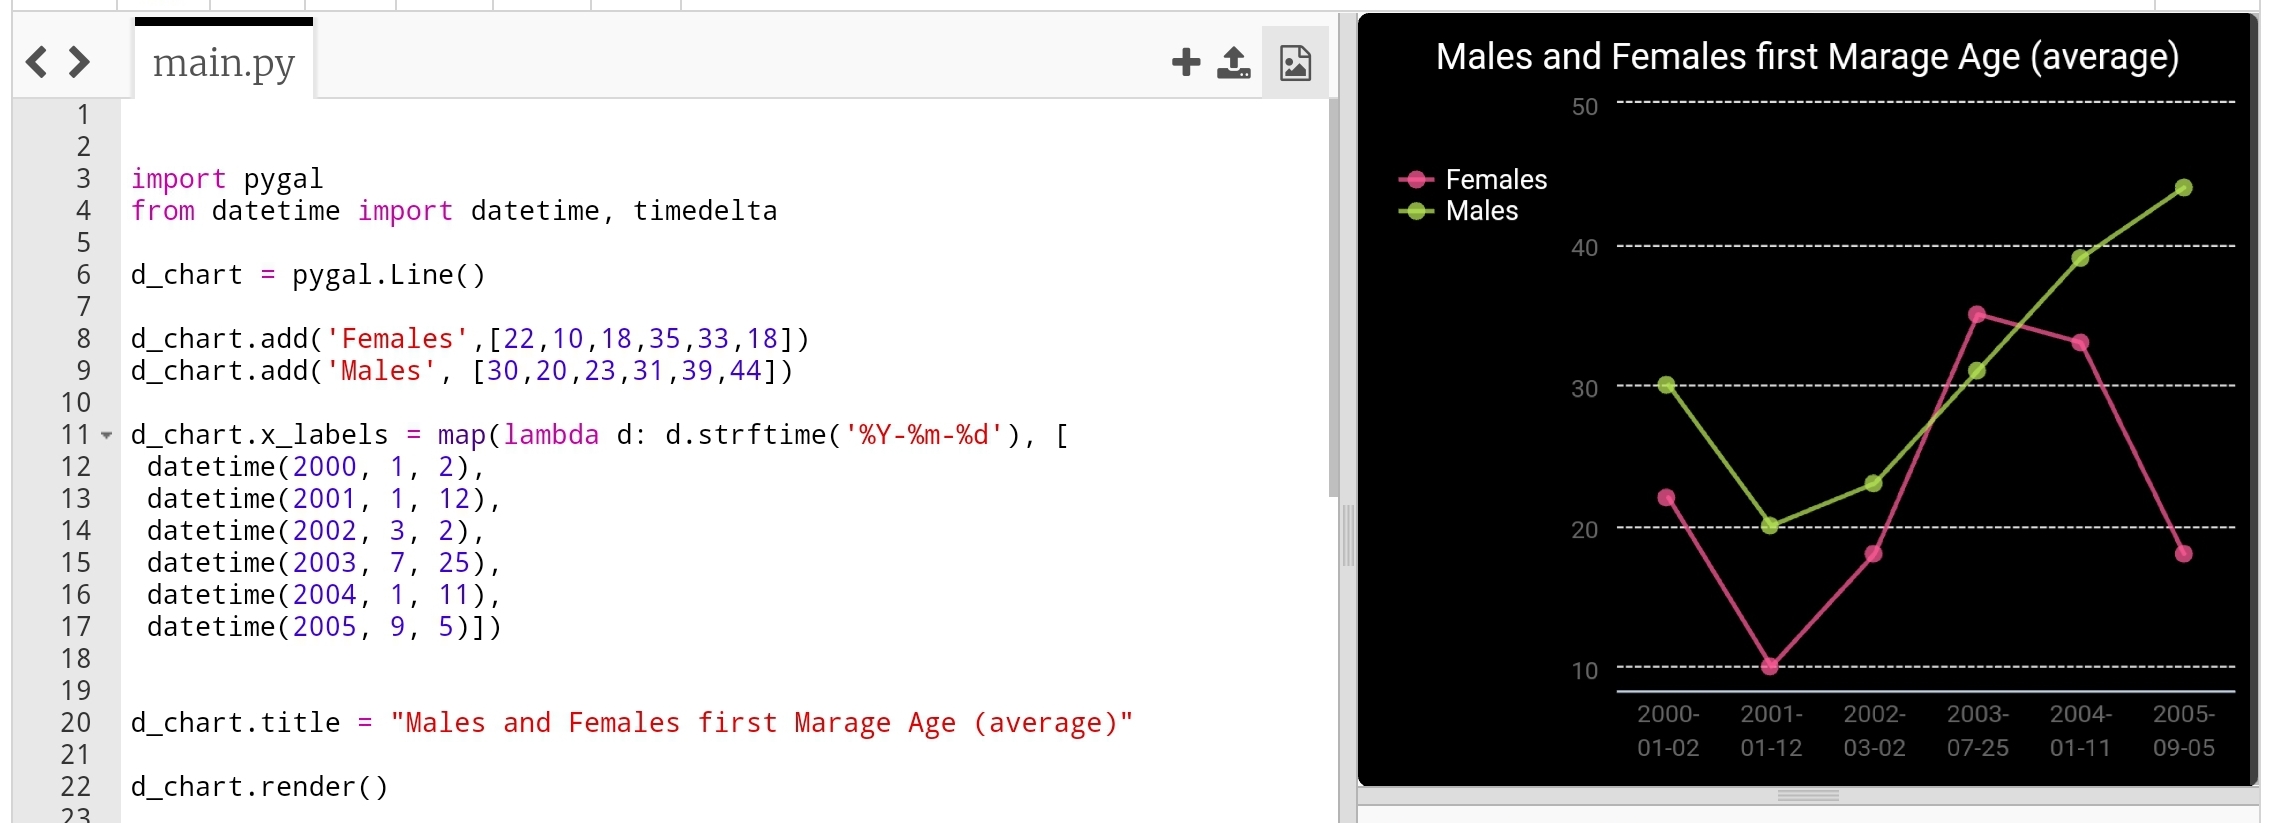
Line-chart: Time Line Last type just to add or format the x_lables of the chart, we can use lambda function to do this (we can use lambda function with any other chart types), here we will do two example, one is using full time/date and another just write the month-year as string and will use the lambda function to calculate second data-set of Tax’s based on the salary amount..
import pygal
from datetime import datetime, timedelta

d_chart = pygal.Line()

d_chart.add('Females',[22,25,18,35,33,18])
d_chart.add('Males', [30,20,23,31,39,44])

d_chart.x_labels = map(lambda d: d.strftime('%Y-%m-%d'), [
 datetime(2000, 1, 2),
 datetime(2001, 1, 12),
 datetime(2002, 3, 2),
 datetime(2003, 7, 25),
 datetime(2004, 1, 11),
 datetime(2005, 9, 5)])

d_chart.title = "Males and Females first Marage Age (average)"

d_chart.render()
 |
To give better example of using lambda function, we will say: we have a salaries for 6 years (May-2000 to May-2006) and a Tax of 0.25, we will let the lambda function to calculate the Tax amount for each salary. Here is the code ..
 # Using lambda to calculate Tax amount

import pygal

d_chart = pygal.Line()

d_chart.add('Salary', [550,980,1200,1800,2200,3500])

d_chart.add('Tax',map(lambda t: t*0.25, [550,980,1200,1800,2200,3500]))
d_chart.x_labels = map(str,(
  'May-2001','May-2002',
  'May-2003','May-2004',
  'May-2005','May-2006'))

d_chart.title = "Salary and Tax (0.25) payment in 6 years"

d_chart.render()
 |
Next we will talk about Histogram chart.
:: Data Visualization using pygal ::
| Part-1Bar-Chart | Part-2 Line Chart | Part-3 | Part-4 |
By: Ali Radwani
Python: Data Visualization Part-1
Learning : python, pygal, Data Visualization, Bar Chart
Subject: Data visualization using pygal library
pygal is a Data Visualization library in python to help us showing our Data as a graph. In coming several posts we will discover and learn how to use the pygal library in simple and easy configuration and style.
First we need to install pygal packeg, to do so write this:
pip install pygal
Now we need some Data to show, in this leson I am using aGalaxy Tab S4, so all the codes will be tested and applyed on trinket.io website [trinket.io alow us to use pygal package online so we don’t need to install it on our divice]
Type of Chart:
pygal has several types of charts that we can use, here we will list them all then in coming posts will use each one with simple data. So what we have:
Line, Bar, Histogram, XY, Pie, Radar, Box, Dot, Funnel, SolidGauge, Gauge, Pyramid, Treemap, Maps
Some of those charts has a sub-types such as in Bar char we have: Basic, Stacked and Horizontal. Also for each chart we can add a title and labels and we can use some styles.
So let’s start ..
First we will go for the Bar chart, and we have three sub-types as Basic, Stacked and Horizontal.
First chart: Bar chart:
In this part we will demonstrate the Bar Chart, it has three sub-types as Basic, Stacked and Horizontal.
We assume that our data is the Males and Female ages on first marage, the data will be as dictionary (later we will see how to customize each bar)
 # Basic Bar Chart using pygal

import pygal
bar_chart = pygal.Bar() # To create a bar graph object
bar_chart.add('Females', [22,25,18,35,33,18])
bar_chart.add('Males', [30,20,23,31,39,44])

bar_chart.title = "Males and Females First Marage Age"
bar_chart.x_labels=(range(1,6))

bar_chart.render()
Sample code for Basic bar chart |
Another sub-type in Bar chart is Horizontal-Bar, it is semelar to the Basic but as if fliped 90 degree. Here is the code ..
 # Horizontal Bar Chart using pygal

import pygal

# HorizontalBar()
HBar = pygal.HorizontalBar()
HBar.add('Females', [22,25,18,35,33,18])
HBar.add('Males', [30,20,23,31,39,44])

HBar.title = "Males and Females First Marage Age"

HBar.x_labels=(range(1,6))

HBar.render()
Sample code for Horizontal Bar chart |
Last sub-type in Bar chart is Stacked Bar were all data of each element will be in one bar. Here is the code and example..
 # Stacked Bar Chart using pygal

import pygal
# StackedBar()
stackedbar = pygal.StackedBar()
stackedbar.add('Females', [22,25,18,35,33,18])
stackedbar.add('Males', [30,20,23,31,39,44])
stackedbar.x_labels=(range(1,0))
stackedbar.title = "Males and Females First Marage Age"

stackedbar.render()
If we say we have another data-set as “age in First-Divorces” and we want to add this set to the Stacked Bar chart, then we first will create the data-set as:
stackedbar.add(‘Divorses’, [35,22,45,33,40,38])
and we will arrange the code line to be at top,middle or bottom of the bar. Here is the code..
Sample code for stacke Bar chart with Divorce data
|
Next we will talk about Line chart.
:: Data Visualization using pygal ::
| Part-1Bar-Chart | Part-2 | Part-3 | Part-4 |
By: Ali Radwani
Python: SQlite Project – P1
Learning : Python and Sqlite3
Subject: Sqlite3, Database functions ” Employee App” P1
One of the most important thing about writing applications is to save or store some Data for later use. This data could be simple as setting information or basic user information or can be a full records about something you need to keep, such as health data, or employee contacts or other projects data. To store a huge data we use a Data-Base, some databases are free and open to be downloaded from the internet, one of them is SQLITE3, in Python we can use the Sqlite for small and personal projects. In this post We will use the Sqlite to write a simple project for Employees.
As that our goal is to learn how to use Sqlite and python code to track our employees, and to keep every thing as simple as we can, we will collect only three piece of information that’s will be First Name, Last Name and the Salary.
Functions: In any application there must be several functions to complete our works and tasks that we need to perform, in our Employee System we need to perform these tasks:
1. Show the Data we have.
2. Insert New Employee.
3. Delete an Employee.
4. Editing Employee information.
5. Search for Employee.
This is the most important functions in any application, we will start working on the system and see how things goes on.
First we MUST Creating the data base and set the connection, here is the code to do this and we will call our database as test.db.
 # Create the database.

import sqlite3, os

db_conn = sqlite3.connect ("test.db")    # set the data-base name

c = db_conn.cursor()  # set the connection
To create the Employee table we will write this code and run it only ONE Time.
 # Create the Employee Table.

def create_tabels_() :    # to create tables.

    # employee table
    sql_s= "CREATE TABLE if not exists emp (emp_id INTEGER PRIMARY KEY AUTOINCREMENT, fname text,lname text, pay integer)"

    c.execute(sql_s)
    db_conn.commit()
    print(input('\n   .. Employee TABLE created..  Press any key .. '))
Since we are learning and playing with our code, we may need to drop the table for some reasons, so here is the code to Drop the table we will re-call the function if we need-so.
 # Function to DROP a Table.

def drop_table(tname):

    c.execute("DROP TABLE {}".format(tname))
    db_conn.commit()
Now after the creating of the Table we need to feed it with some data so we can see the records. To do so we will run a function called dummy_data.
 # Function to INSERT Dummy data into the Employee Table.


def dummy_data():
    """
        This Function will Insert 4 Dummy rows in the temp table, first record will set the emp_id to 1, the other
        record the emp_id will be AUTOINCREMENT.

        This Function to be run one time only.

    """
# First record will have the emp_id set as 1, other records will be AUTOINCREMENT.
    c.execute ("INSERT INTO emp (emp_id, fname,lname,pay) VALUES(:emp_id, :fname,:lname, :pay)",{"emp_id":1,"fname":"James","lname":"Max", "pay":"2000"})
    c.execute ("INSERT INTO emp (fname,lname,pay) VALUES(:fname,:lname, :pay)",{"fname":"Robert","lname":"Ethan", "pay":"1500"})
    c.execute ("INSERT INTO emp (fname,lname,pay) VALUES(:fname,:lname, :pay)",{"fname":"Jack","lname":"Leo", "pay":"890"})
    c.execute ("INSERT INTO emp (fname,lname,pay) VALUES(:fname,:lname, :pay)",{"fname":"Sophia","lname":"Jack", "pay":"320"})
    db_conn.commit()

    print(input('\n  Dummy Data has been INSERTED\n\n  .. Press any key .. '))
Main Menu To use the application we need a Menu to jump between the tasks in the app. Here is the Main-Menu, it will return the user selection.
 # The Main Menu.

def menu():
    os.system("clear")
    print("\n\n      ::: The Menu :::")

    print("   1. Show the Data.")
    print("   2. Insert a New  Employee.")
    print("   3. Delete an Employee.")
    print("   4. Edit/Change employee data. ")
    print("   5. Search.")
    print("   6. Setting.")
    print("   7. Data-Base Information.")
    print("   9. Exit. ")

    uinput = input("\n     Enter a selection: ")

    return uinput
Here is the loop for the Menu and the user selection until (9. Exit) will be selected.
 # The Main Menu.

while True :

    uinput = menu()

    if uinput == '1' :
        show_data()

    elif uinput =='2' :
        insert_emp ()

    elif uinput =='3' :
        delete_record()

    elif uinput =='4' :
        print("Edit")

    elif uinput =='5' :
        search_emp()

    elif uinput =='6' :
        setting_menu()

    elif uinput =='7' :
        #print("DataBase Information.")
        get_db_info()

    elif uinput =='9' :
        break

    else: # If the user select something out of the menu (Numbers or Character)
        print("  You need to select from the list")

|
Now we remember that we run the dummy_data() function (above) so we have four records in our Employee Table, so if we want to see the records we will select first option in the Main Menu: 1. Show the data. this will call a function called show_data() as in this screen shot.
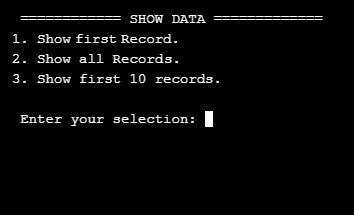
|
The screen prompt will wait for an input of the number that present the task we want. So if we select No. 2 then we will get all the records in the table as this .. .
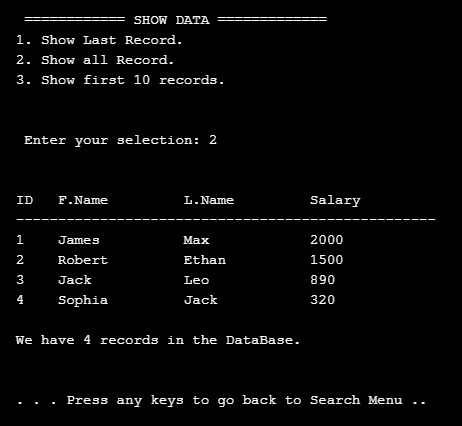
|
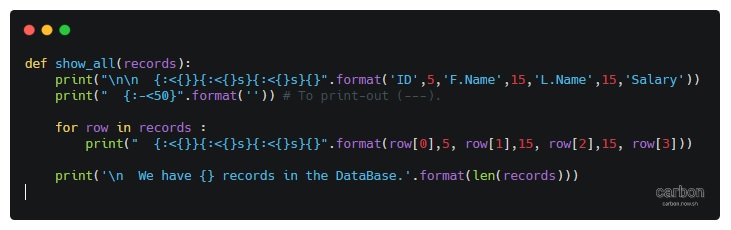
And here is the code behind this function..
|
Done with Part 1, in part 2 we will cover more functions to Search and Add records to the Table.
To Download my Python code (.py) files Click-Here
By: Ali Radwani
Python: My Fake Data Generator P-7
Learning : Python: Functions, Procedures and documentation
Subject: About fake data P-7: (Fake File Name)
In this post we will write a function to generate a file name. Each file name consist of two part, first one is the name which present (or should present) a meaning part, then there is a dot (.) then mostly three characters showing the file type or extension.
Scope of work: Our files names will have 4 syllables all to gather will be one file name. Each syllables will be loaded in a variable as shown ..
1. fext: for Files extensions such as: (doc, jpeg, pdf, bmp …. and so on)
2. name_p1: Is a noun such as (customers, visitors, players .. . and so on )
3. name_p2: will be an nouns, adjective or characteristics such as (name, index, table .. .. and so on)
4. Then we will add a random integer number between (1,30) to give the file a version, or a number.
All parts or syllables will be as one file name.
Let’s Work: First we need to load the File name syllables from the json file called : file_dict.json
 # Loading the json from a url

import json , requests, random

fname = "https://raw.githubusercontent.com/Ali-QT/Ideas-and-Plan/master/file_dict.json"

def call_json_url(fname):
    """
    Function to load the json file from URL.
    Argument: str :fname

    Return : dict: data
    """
    req = requests.get(fname)
    cont = req.content
    data = json.loads(cont)
    return data

fdict = call_json_url(fname)

# Save each syllables into variable.
f_ext = fdict["fext"]
f_p1_name = fdict["name_p1"]
f_p2_name = fdict["name_p2"]
Now we will write the function that will generate the file name:
 # Function to generate the file name

def generate_fname():
    """
    Function to generate a Fake files name.

    File Name consist of four syllables, Two names, a random number and an extension.
    First two syllables of the file name will be selected randomly from a dictuenary stored in a json       file.

    Return : str : f_file_name

    To read the information key in the json file use this code.
    ------ CODE TO READ DATA-SET INFORMATION --------------
     	for each in fdict["information"]:
          print(each,":",fdict["information"])

    ---END OF CODE ------------------------------------------
    """
    fp1 = (random.choice (f_p1_name)["n_p1"])
    fp2 = (random.choice (f_p2_name)["n_p2"])
    fp3 = (random.choice (f_ext)["ext"])

    f_file_name = (fp1 + "_" + fp2 + "_" + str(random.randint(1,30)) + "." + fp3)

    return f_file_name

|
Last thing we just will call the function for X numbers of files Name we want.
 # Generate 15 file Name.

for x in range (15):
    generate_fname()

[Output]:


kids_name_15.ico
speakers_list_1.asp
cars_photos_27.csv
students_database_26.xml
kids_details_27.html
animals_index_10.mov
speakers_parameters_17.csv
drivers_name_8.doc
males_attributes_16.mov
players_sketches_11.py
animals_sketches_3.wav
cars_details_12.css
animals_list_17.txt
flowers_parameters_4.doc
players_database_28.log
:: Fake Function List ::
| Function Name | Description |
| Color | To return a random color code in RGB or Hex. |
| Date | To return a random date. |
| Mobile | To return a mobile number. |
| Country | To return a random country name. |
| City | To return a random City name. |
| ID | To return X random dig as ID. |
| Time | To return random time. |
| Car’s Brand | |
| file_name | file name: list for fake file names. |
| Creatures | Random animal names of a certain type: Mammals, Birds, Insect, Reptiles |
| Foods | To return a random list of foods |
By: Ali Radwani
Python: My Fake Data Generator P-2
Learning : Python: Functions, Procedures and documentation
Subject: About fake data P-2: (Fake ID)
Before we start i’d like to mention that with our last fcolor() function we write some comments in the first part of the function between three double quote(“””), and if we load the function and call help() as help(fcolor()) we will get that information on the python console as a help as in screen shot.

|
In this post we will write a function to generate a fake ID number, for ID’s there could be several styles, sometime we just want a random number without any meaning; just X number of random digits. Most of the time we need this number to be mean-full based on certain rules. For example, in Banks they may use some digits that indicate the branch. In sport club, they may include the date … and so-on.
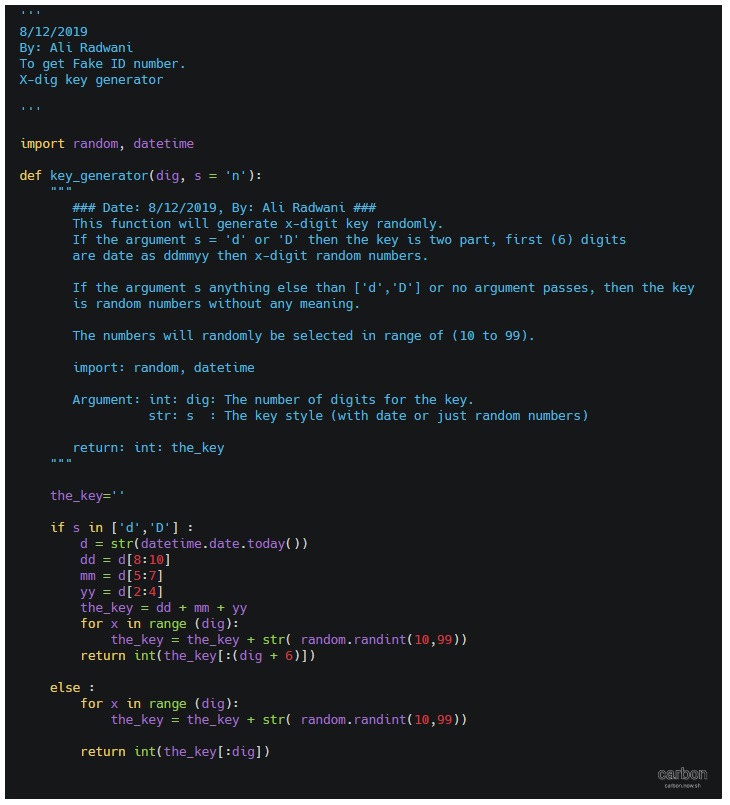
Here we will write a function called key_generator(), the function will take two arguments (dig, s) dig is your key digits number, s is the style, if s = d then the first 6 digits of the key will be the date as ddmmyy + random digits, and if s = anything else or s not passed then the key will be as default (just x-digits). Let’s see the code.
First the summary or say information about the function:
def key_generator(dig, s = 'n'):
    """
       ### Date: 8/12/2019, By: Ali Radwani ###
       Summary:
            This function will generate x-digit key randomly.
            If the argument s = 'd' or 'D' then the key is two part, first (6) digits
            are date as ddmmyy then x-digit random numbers.

            If the argument s anything else than ['d','D'] or no argument passes, then the key
            is random numbers without any meaning.

            The numbers will randomly be selected in range of (10 to 99).

            import: random, datetime

            Argument: int: dig: The number of digits for the key.
                 str: s  : The key style (with date or just random numbers)

            return: int: the_key
    """
Now, if the user pass s=’d’ then part of the key will be the current date, to do this we will call the datetime function in python and split it into dd,mm,yy. Here is the key_generator() function.
def key_generator(dig, s = 'n'):
    """
       ### Date: 8/12/2019, By: Ali Radwani ###
       Summary:
            This function will generate x-digit key randomly.
            If the argument s = 'd' or 'D' then the key is two part, first (6) digits
            are date as ddmmyy then x-digit random numbers.

            If the argument s anything else than ['d','D'] or no argument passes, then the key
            is random numbers without any meaning.

            The numbers will randomly be selected in range of (10 to 99).

            import: random, datetime

            Argument: int: dig: The number of digits for the key.
                 str: s  : The key style (with date or just random numbers)

            return: int: the_key
    """
    the_key=''
    if s in ['d','D'] :
        d = str(datetime.date.today())
        dd = d[8:10]
        mm = d[5:7]
        yy = d[2:4]
        the_key = dd + mm + yy
        for x in range (dig):
            the_key = the_key + str( random.randint(10,99))
        return int(the_key[:(dig + 6)])

    else :
        for x in range (dig):
            the_key = the_key + str( random.randint(10,99))

        return int(the_key[:dig])
|
In next Fake Data function we will try to write one to generate the date. It will be published on next Sunday.
:: Fake Function List ::
| Function Name | Description |
| Color | To return a random color code in RGB or Hex. |
| Date | To return a random date. |
| Mobile | To return a mobile number. |
| Country | To return a random country name. |
| City | To return a random City name. |
| ID | To return X random dig as ID. |
| Time | To return random time. |
| Done |
By: Ali Radwani
python: Fake Data-set
Learning : Python to generate fake data-set
Subject: About Fake data library
Most of the time when we working on a project, we need to test our procedures and functions with some data. In most cases we need just dummy data such as dates, names, address .. and so-on.
Last week, I was reading on the net and i fond an article about generating fake data using a library in PHP (PHP is a Computer Programming Language) so I start to find if we have one in Python! and the answer is YES there is a library that we can import called ‘Fake’. I start to work on it and discover it. This post is about the Fake Data-set Library.
The library called ‘Faker’ and we need to install it in our python environment, i use : pip install Faker to install it. In it’s documentation we can use some properties like : name, city, date, job .. and others. So if we want to generate a fake name we write this:
# Using lib:fake to generate fake name

print(fake.name())
[Output]: Victoria Campbell
Here is a screen-shot from Jupyter notbook screen.

|
To generate more than one name we can use for loop as:
# Using lib:fake to generate (X) fake name

for x in range (10) :
    print(fake.name())
[Output]: Jared Hawkins
Michael Reid
Ricky Brown
Mary Tyler
Kristy Dudley
Karen Cain
Jennifer Underwood
Desiree Jensen
Carla Rivera
Brandon Cooper
Other properties that we can use are :address, company, job, country, date_time and many other, and with all this we can create a data-set full of fake data.
So if we want to create a fake data-set contain:
Name, Date-of-birth, Company, Job, Country as one person data we will use it like this:
# Using lib:fake to generate (X) person fake data
# Data-set contain: Name, Date-of-birth, Company, Job, Country
p_count = 1
for x in range (p_count):
    print('Name:',fake.name())
    print('DOB:',fake.date())
    print('Company:',fake.company())
    print('Job:',fake.job())
    print('country:',fake.country())


[Output]:
Name: Crystal Mcconnell
DOB: 2002-09-30
Company: Bailey LLC
Job: Insurance underwriter
country: Pakistan

|
Now if we want to store the person data in a dictionary type variable and use it later, we can do this as following:
# Using lib:fake to generate (X) person fake data and store it in a dictionary
people_d ={}
p_count = 5
for x in range (p_count):
    ID = x
    people_d[ID]={'name':fake.name(),'date':fake.date(),'company':fake.company(),'job':fake.job(),'country':fake.country()}

# To print-out the people_d data-set.
for x in people_d :
    print(people_d[x])
Just in case we want a complicated ID we can use a random function (8-dig) integer, or combining two fake numbers such as (fake.zipcode() and fake.postcode()) just to make sure that we will not have a duplicate ID.
Using fake library will help a lot, and it has many attributes and properties that can be inserted in a data-set. For more information on this document you may read it here: Fake Library
To Download my Python code (.py) files Click-Here
By: Ali Radwani
Python: Machine Learning – Part 1
Learning :Python and Machine Learning
Subject: Requirements, Sample and Implementation
Machine Learning: I will not go through definitions and uses of ML, I think there is a lot of other posts that may be more informative than whatever i will write. In this post I will write about my experience and learning carve to learn and implement ML model and test my own data.
The Story: Two, three days ago I start to read and watch videos about Machine Learning, I fond the “scklearn” site, from there I create the first ML to test an Iris data-set and then I wrote a function to generate data (my own random data) and test it with sklearn ML model.
Let’s start ..
Requirements:
1. Library to Import: To work with sklearn models and other functions that we will use, we need to import coming libraries:
import os # I will use it to clear the terminal.
import random # I will use it to generate my data-set.
import numpy as np
import bunch # To create data-set as object
from sklearn import datasets
from sklearn import svm
from sklearn import tree
from sklearn.model_selection import train_test_split as tts
2. Data-set: In my learning steps I use one of sklearn data-set named ” Iris” it store information about a flower called ‘Iris’. To use sklear ML Model on other data-sets, I create several functions to generate random data that can be passed into the ML, I will cover this part later in another post.
First we will see what is the Iris dataset, this part of information is copied from sklearn site.
::Iris dataset description ::
dataset type: Classification
contain: 3 classes, 50 Samples per class (Total of 150 sample)
4 Dimensionality
Features: real, positive
The data is Dictionary-like object, the interesting attributes are:
‘data’: the data to learn.
‘target’: the classification labels.
‘target_names’: the meaning of the labels.
‘feature_names’: the meaning of the features.
‘DESCR’: the full description of the dataset.
‘filename’: the physical location of iris csv.
Note: This part helps me to write me data-set generating function, that’s why we import the Bunch library to add lists to a data-set so it will appear as an object data-set, so the same code we use for Iris data-set will work fine with our data-set. In another post I will cover I will load the data from csv file and discover how to create a such file..
Start Writing the code parts: After I wrote the code and toned it, I create several functions to be called with other data-set and not hard-code any names in iris data-set. This way we can load other data-set in easy way.
The Code
 # import libraries

import numpy as np
from sklearn import datasets
#from sklearn import svm
from sklearn import tree
from sklearn.model_selection import train_test_split as tts
import random, bunch
Next step we will load the iris dataset into a variable called “the_data”
 # loading the iris dataset.

the_data = datasets.load_iris()
From the above section “Iris dataset description” we fond that the data is stored in data, and the classification labels stored in target, so now we will store the data and the target in another two variables.
 # load the data into all_data, and target in all_labels.
all_data= the_data.data
all_labels = the_data.target
We will create an object called ‘clf’ and will use the Decision Tree Classifier from sklearn.
 #  create Decision Tree Classifier

clf = tree.DecisionTreeClassifier()
In Machine Learning programs, we need some data for training and another set of data for testing before we pass the original data or before we deploy our code for real data. The sklearn providing a way or say function to split a given data into two parts test and train. To do this part and to split the dataset into training and test I create a function that we will call and pass data and label set to it and it will return the following : train_data, test_data, train_labels, test_labels.
 #  Function to split a data-set into training and testing data.

def get_test_train_data(data,labels):

  train_data, test_data, train_labels, test_labels = tts(data,labels,test_size = 0.1)
  return train_feats, test_feats, train_labels, test_labels
After splitting the data we will have four list or say data-sets, we will pass the train_data and the train_labels to the train_me() function, I create this function so we can pass the train_data, train_labels and it will call the (clf.fit) from sklearn. By finishing this part we have trained our ML Model and is ready to test a sample data. But first let’s see the train_me() function.
 #  Function train_me() will pass the train_data to sklearn Model.

def train_me(train_data1,train_labels1):
  clf.fit(train_data1,train_labels1)
  print('\n The Model been trained. ')
As we just say, now we have a trained Model and ready for testing. To test the data set we will use the clf.predict function in sklearn, this should return a prediction labels list as the ML Model think that is right. To check if the predictions of the Model is correct or not also to have the percentage of correct answers we will count and compare the prediction labels with the actual labels in the test_data that we have. Here is the code for get_prediction()
 #  get_prediction() to predict the data labels.

def get_prediction(new_data_set,test_labels2,accu):

  print('\n This is the prediction labels of the data.\n')

  # calling prediction function clf.predict
  prediction = clf.predict(new_data_set)
  print('\n prediction labels are : ',prediction,len(prediction))

  # print the Accuracy
  if accu == 't' :
    cot = 0
    for i in range (len(prediction)) :
      print(prediction[i] , new_data_set[i],test_labels2[i])
      if [prediction[i]] == test_labels2[i]:
        cot = cot + 1
    print('\ncount :',cot)
    print('\n The Accuracy:',(cot/len(prediction))*100,'%')
The accuracy value determine if we can use the model in a real life or tray to use other model. In the real data scenario, we need to pass ‘False’ flag for accu, because we can’t cross check the predicted result with any data, we can try to check manually for some result.
End of part 1: by now, we have all functions that we can use with our data-set, in coming images of the code and run-time screen we can see that we have a very high accuracy level so we can use our own data-set, and this will be in the coming post.

|
Result screen shot after running the Iris dataset showing high accuracy level.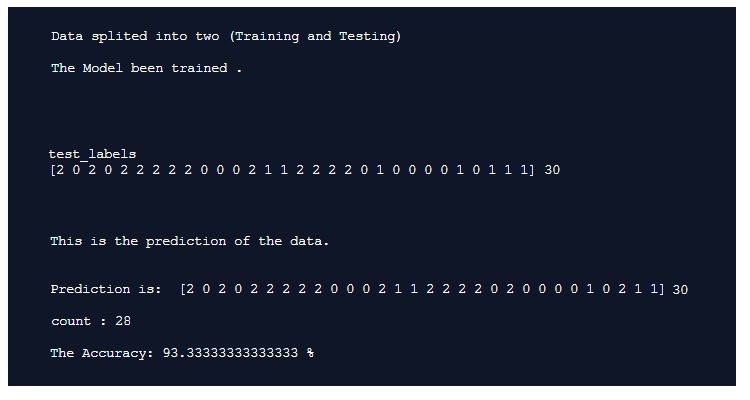
|
To Download my Python code (.py) files Click-Here
Taking pictures is not my main daily practices, but when i start playing with my camera, i really enjoy my self.
Thanks for visiting my Space..


