Python: Machine Learning – Part 1
Learning :Python and Machine Learning
Subject: Requirements, Sample and Implementation
Machine Learning: I will not go through definitions and uses of ML, I think there is a lot of other posts that may be more informative than whatever i will write. In this post I will write about my experience and learning carve to learn and implement ML model and test my own data.
The Story: Two, three days ago I start to read and watch videos about Machine Learning, I fond the “scklearn” site, from there I create the first ML to test an Iris data-set and then I wrote a function to generate data (my own random data) and test it with sklearn ML model.
Let’s start ..
Requirements:
1. Library to Import: To work with sklearn models and other functions that we will use, we need to import coming libraries:
import os # I will use it to clear the terminal.
import random # I will use it to generate my data-set.
import numpy as np
import bunch # To create data-set as object
from sklearn import datasets
from sklearn import svm
from sklearn import tree
from sklearn.model_selection import train_test_split as tts
2. Data-set: In my learning steps I use one of sklearn data-set named ” Iris” it store information about a flower called ‘Iris’. To use sklear ML Model on other data-sets, I create several functions to generate random data that can be passed into the ML, I will cover this part later in another post.
First we will see what is the Iris dataset, this part of information is copied from sklearn site.
::Iris dataset description ::
dataset type: Classification
contain: 3 classes, 50 Samples per class (Total of 150 sample)
4 Dimensionality
Features: real, positive
The data is Dictionary-like object, the interesting attributes are:
‘data’: the data to learn.
‘target’: the classification labels.
‘target_names’: the meaning of the labels.
‘feature_names’: the meaning of the features.
‘DESCR’: the full description of the dataset.
‘filename’: the physical location of iris csv.
Note: This part helps me to write me data-set generating function, that’s why we import the Bunch library to add lists to a data-set so it will appear as an object data-set, so the same code we use for Iris data-set will work fine with our data-set. In another post I will cover I will load the data from csv file and discover how to create a such file..
Start Writing the code parts: After I wrote the code and toned it, I create several functions to be called with other data-set and not hard-code any names in iris data-set. This way we can load other data-set in easy way.
The Code
 # import libraries

import numpy as np
from sklearn import datasets
#from sklearn import svm
from sklearn import tree
from sklearn.model_selection import train_test_split as tts
import random, bunch
Next step we will load the iris dataset into a variable called “the_data”
 # loading the iris dataset.

the_data = datasets.load_iris()
From the above section “Iris dataset description” we fond that the data is stored in data, and the classification labels stored in target, so now we will store the data and the target in another two variables.
 # load the data into all_data, and target in all_labels.
all_data= the_data.data
all_labels = the_data.target
We will create an object called ‘clf’ and will use the Decision Tree Classifier from sklearn.
 #  create Decision Tree Classifier

clf = tree.DecisionTreeClassifier()
In Machine Learning programs, we need some data for training and another set of data for testing before we pass the original data or before we deploy our code for real data. The sklearn providing a way or say function to split a given data into two parts test and train. To do this part and to split the dataset into training and test I create a function that we will call and pass data and label set to it and it will return the following : train_data, test_data, train_labels, test_labels.
 #  Function to split a data-set into training and testing data.

def get_test_train_data(data,labels):

  train_data, test_data, train_labels, test_labels = tts(data,labels,test_size = 0.1)
  return train_feats, test_feats, train_labels, test_labels
After splitting the data we will have four list or say data-sets, we will pass the train_data and the train_labels to the train_me() function, I create this function so we can pass the train_data, train_labels and it will call the (clf.fit) from sklearn. By finishing this part we have trained our ML Model and is ready to test a sample data. But first let’s see the train_me() function.
 #  Function train_me() will pass the train_data to sklearn Model.

def train_me(train_data1,train_labels1):
  clf.fit(train_data1,train_labels1)
  print('\n The Model been trained. ')
As we just say, now we have a trained Model and ready for testing. To test the data set we will use the clf.predict function in sklearn, this should return a prediction labels list as the ML Model think that is right. To check if the predictions of the Model is correct or not also to have the percentage of correct answers we will count and compare the prediction labels with the actual labels in the test_data that we have. Here is the code for get_prediction()
 #  get_prediction() to predict the data labels.

def get_prediction(new_data_set,test_labels2,accu):

  print('\n This is the prediction labels of the data.\n')

  # calling prediction function clf.predict
  prediction = clf.predict(new_data_set)
  print('\n prediction labels are : ',prediction,len(prediction))

  # print the Accuracy
  if accu == 't' :
    cot = 0
    for i in range (len(prediction)) :
      print(prediction[i] , new_data_set[i],test_labels2[i])
      if [prediction[i]] == test_labels2[i]:
        cot = cot + 1
    print('\ncount :',cot)
    print('\n The Accuracy:',(cot/len(prediction))*100,'%')
The accuracy value determine if we can use the model in a real life or tray to use other model. In the real data scenario, we need to pass ‘False’ flag for accu, because we can’t cross check the predicted result with any data, we can try to check manually for some result.
End of part 1: by now, we have all functions that we can use with our data-set, in coming images of the code and run-time screen we can see that we have a very high accuracy level so we can use our own data-set, and this will be in the coming post.

|
Result screen shot after running the Iris dataset showing high accuracy level.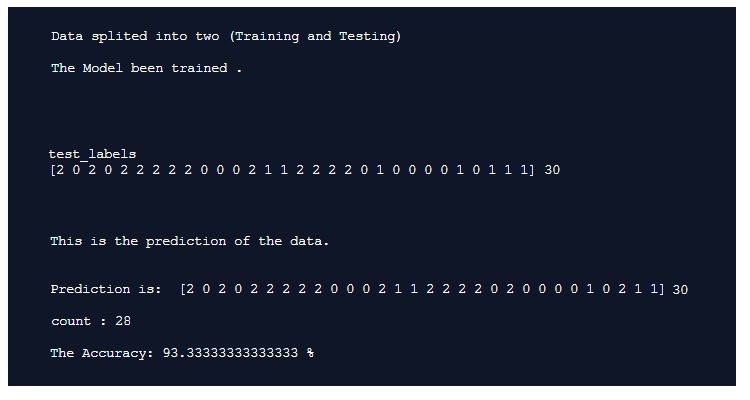
|
To Download my Python code (.py) files Click-Here
 Follow me on Twitter..
-
December 1, 2019 at 8:04 amPython: Machine Learning – Part 2 | Ali's Photography Space...
Taking pictures is not my main daily practices, but when i start playing with my camera, i really enjoy my self.
Thanks for visiting my Space..


