Archive
Library System with Excel -P3
Learning :Excel formulas and VBA Cods
Subject: To Develop a Library System with Excel
In last post we wrote all the codes needed to Manage the Classifications.
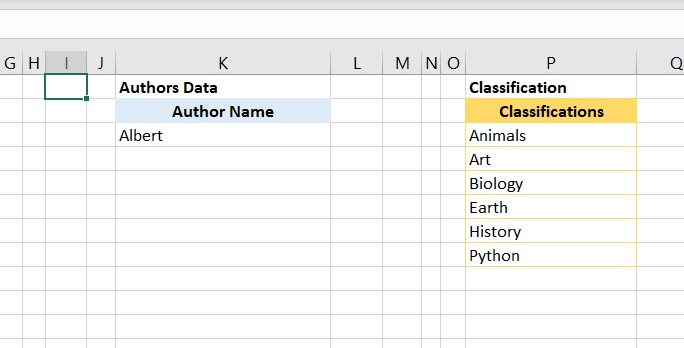
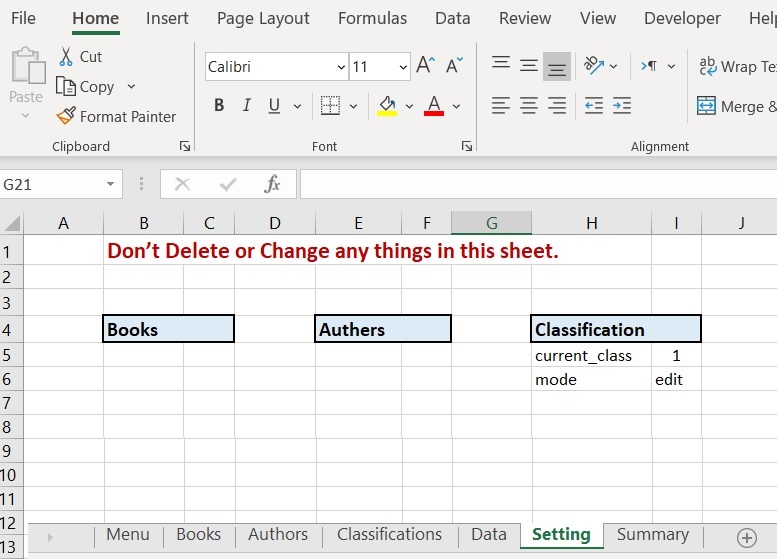
In this part we will do all the coding needed to enter the Authors and Edit or Delete anyone we select, so first we will go to the “setting” sheet and will write the following: E5:current_author, F5:1, E6:mode, F6: edit as in the image.
 |
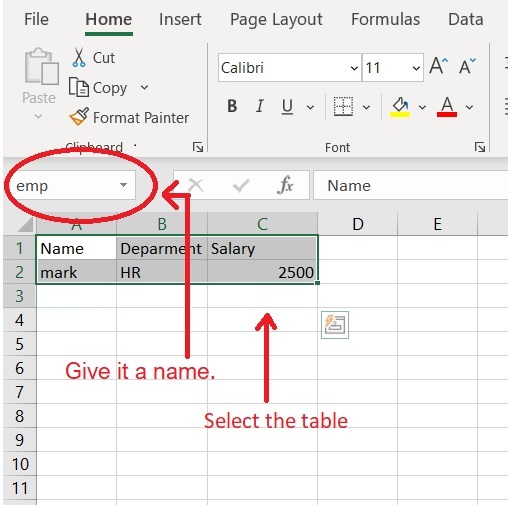
Now in the “Data” sheets, we create a table with “Author Name” header on range K2, then enter any Autor name such as “Albert” as in the image.
 |
Now, we move to “Authors” Sheet and do the following:
1. In Cell B6 write “Select an Author to Edit or Delete”, Color and format it as you want.
2. In Cell H6 write “Authors Form”, Color and format it as you want.
3. Color and format the Range (B6:E19) and the Range (H6:K13) as you want.
4. Create three rectangular shapes as New, Delete, and Save buttons.
5. We need to create a ListBox name it “authors_ListBox1”.
6. Arrange everything as in the image.
 |
CODING:
To copy the list of the Authors we have into the ListBox:
1.1 From the Menu goto Formulas and click on Name Manager
| |
1.2 From the pop-up screen click on New, then write author_list in Name, and =OFFSET(Data!$K$3,,,COUNTA(Data!$K:$K)) in Refers to [as in image]
 |
2.1. Select the ListBox in the Authors sheet.
2.2. Right-click the mouse, and select FormatControl.
2.3. Goto Control Tab, and in Input range write: author_list, and in Cell link write Setting!$F$5 then press OK.
Now the listBox will contain the Authors we have in the Author list in Data Sheep. … [SEE THE IMAGE]
 |
ListBox Code:
Now we will write a three lines of code to take action when we select any things in this box, so select the ListBox, click right-mouse-button, select “Assinge Macro, then the VBA application will start and write the foloing code:
selected_author = Sheets(“Setting”).Range(“F5”).Value + 2
Sheets(“authors”).Range(“j9”).Value = Sheets(“data”).Range(“K” & selected_author)
Sheets(“Setting”).Range(“F6”).Value = “edit”
End Sub
Buttons Codes:
1. While in Authors sheet, select the rectangular shape named “New”, click right-mouse-button, select “Assinge Macro, then the VBA application will start and we will write this code:
Sheets(“authors”).Range(“J9”).ClearContents
Sheets(“Setting”).Range(“F6”).Value = “new”
Sheets(“Authors”).Range(“J9”).Select
End Sub
2. While the VBA application is on, we will write all the codes we need for Edit and Delete buttons and then will assign the macros:
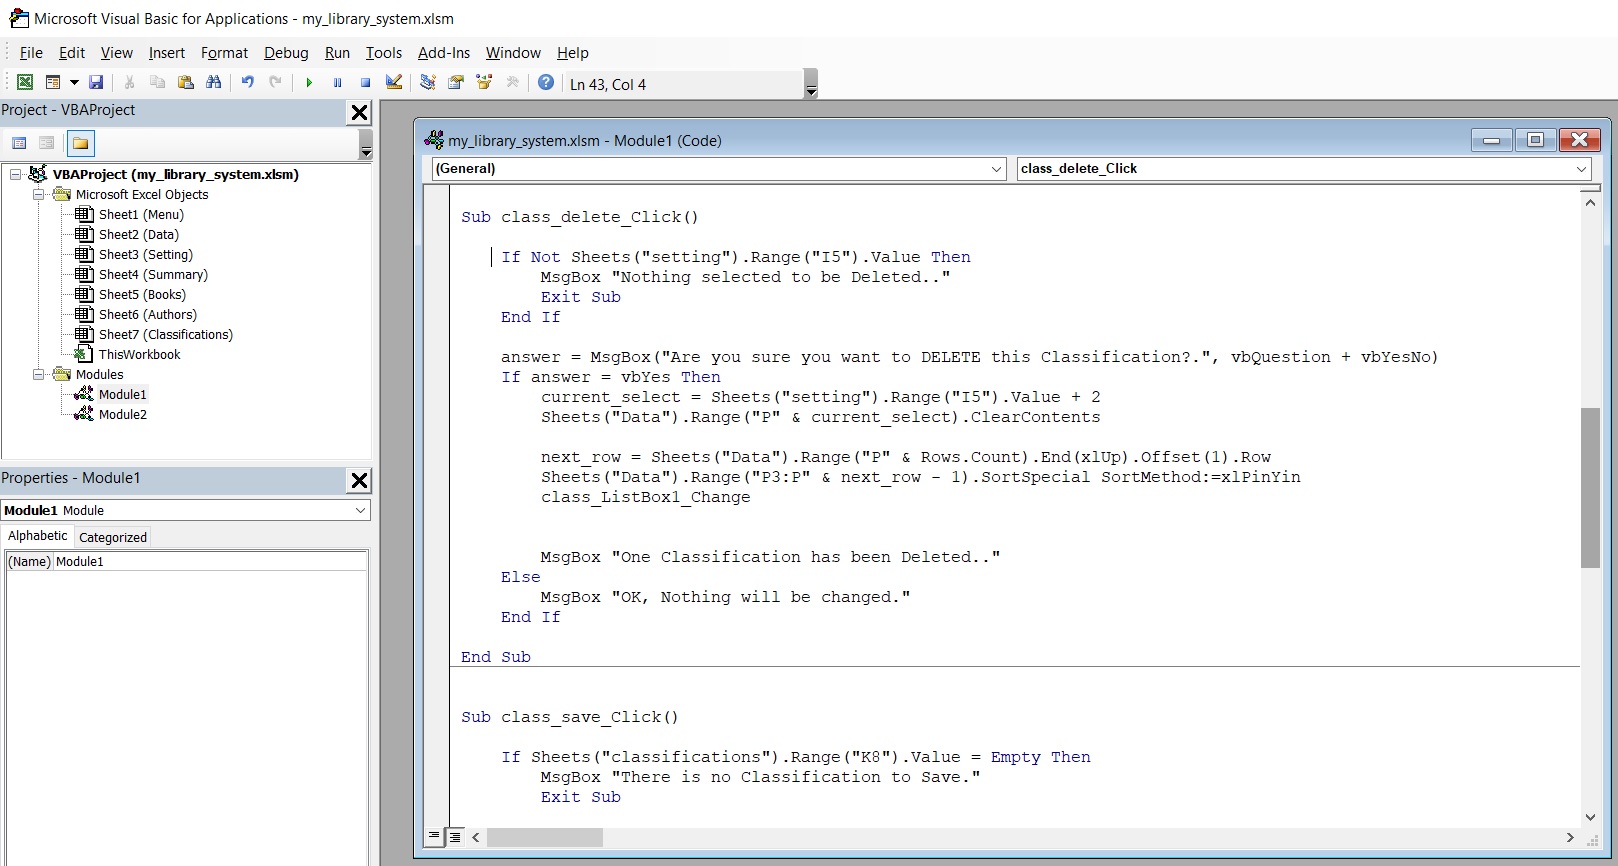
author_delete_Click
If Not Sheets(“setting”).Range(“F5”).Value Then
MsgBox “Nothing selected to be Deleted..”
Exit Sub
End If
answer = MsgBox(“Are you sure you want to DELETE this Author?.”, vbQuestion + vbYesNo)
If answer = vbYes Then
current_select = Sheets(“setting”).Range(“F5”).Value + 2
Sheets(“Data”).Range(“K” & current_select).ClearContents
next_row = Sheets(“Data”).Range(“K” & Rows.Count).End(xlUp).Offset(1).Row
Sheets(“Data”).Range(“K3:K” & next_row – 1).SortSpecial SortMethod:=xlPinYin
authors_ListBox1_Change
MsgBox “One Author has been Deleted..”
Else
MsgBox “OK, Nothing will be changed.”
End If
End Sub
author_save_Click
If Sheets(“authors”).Range(“J9”).Value = Empty Then
MsgBox “There is no Author Name to Save.”
Exit Sub
End If
If Sheets(“Setting”).Range(“F6”).Value = “new” Then
‘ Get next empty row
next_row = Sheets(“Data”).Range(“K” & Rows.Count).End(xlUp).Offset(1).Row
‘ copy the new classification to the data-table
Sheets(“authors”).Range(“j9”) = StrConv(Sheets(“authors”).Range(“J9”), vbProperCase)
Sheets(“Data”).Range(“K” & next_row).Value = Sheets(“Authors”).Range(“J9”)
‘ Empty the form
Sheets(“Authors”).Range(“J9″).ClearContents
MsgBox ” One New Author Name Saved.”
‘ To Sort the classifications
next_row = Sheets(“Data”).Range(“K” & Rows.Count).End(xlUp).Offset(1).Row
Sheets(“Data”).Range(“K3:K” & next_row – 1).SortSpecial SortMethod:=xlPinYin
authors_ListBox1_Change
Exit Sub
End If
If Sheets(“setting”).Range(“F6”).Value = “edit” Then
selected_author = Sheets(“Setting”).Range(“F5”).Value + 2
Sheets(“authors”).Range(“J9”) = StrConv(Sheets(“authors”).Range(“J9”), vbProperCase)
Sheets(“data”).Range(“K” & selected_author) = Sheets(“authors”).Range(“J9″).Value
MsgBox ” One Author Name Changed.”
‘ Sort the Authors Name
next_row = Sheets(“Data”).Range(“K” & Rows.Count).End(xlUp).Offset(1).Row
Sheets(“Data”).Range(“K3:K” & next_row).SortSpecial SortMethod:=xlPinYin
authors_ListBox1_Change
Exit Sub
End If
End Sub
In the Save code we re-sort the data in the ListBox. Here is a part of the code we use to do so:
‘ Sort the Authors Name
next_row = Sheets(“Data”).Range(“K” & Rows.Count).End(xlUp).Offset(1).Row
Sheets(“Data”).Range(“K3:K” & next_row).SortSpecial SortMethod:=xlPinYin
authors_ListBox1_Change
New we can assign the macros we just creates to the buttons we have (Delete and Save).
End of Part-3
Recap this part:
1. We Create an Author list.
2. We Create a form to collect the Author from the user.
3. We Create the Author ListBox.
4. We wrote the VBA code to Save, Delete, and Create New Author also to retrieve the Author into Author ListBox.
:: Library System with Excel ::
| Part 1 | Part 2 | Part 3 | Part 4 | Part 5 |
To Download EXCEL (.xlsm) files Click-Here
 Follow me on Twitter..
By: Ali Radwani
Library System with Excel -P2
Learning :Excel formulas and VBA Cods
Subject: To Develop a Library System with Excel
In last post we create the sheets and work on the Menus.
In this part we will do all the coding needed to enter the classifications and Edit or Delete anyone we select, so first we will go to the “setting” sheet and will write the following: B4:Books, E4:Authors, H4:Classification as in the image.
 |
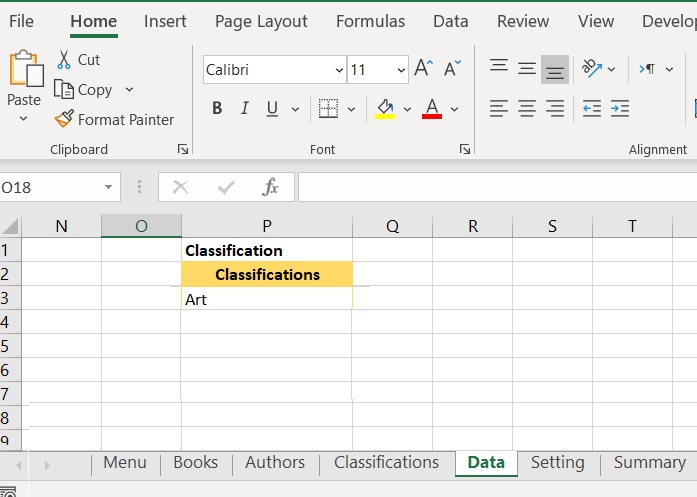
Now in the “Data” sheets, we create a table with “classifications” header on range P2, then enter any classification such as “art” as in image.
 |
Now, we move to “Classification” Sheet and do the following:
1. In Cell B6 write “Select a Classification to Edit or Delete”, Color and format it as you want.
2. In Cell H6 write “Classifications Form”, Color and format it as you want.
3. Color and format the Range (B7:F20) and the Range (H7:M12) as you want.
4. Create three rectangular shape as New, Delete, and Save buttons,
5. We need to create a ListBox name it “class_ListBox1”.
6. Arrange everything as in the image.
 |
CODING:
1. To copy the list of the classification we have into the ListBox:
1.1. Select the ListBox.
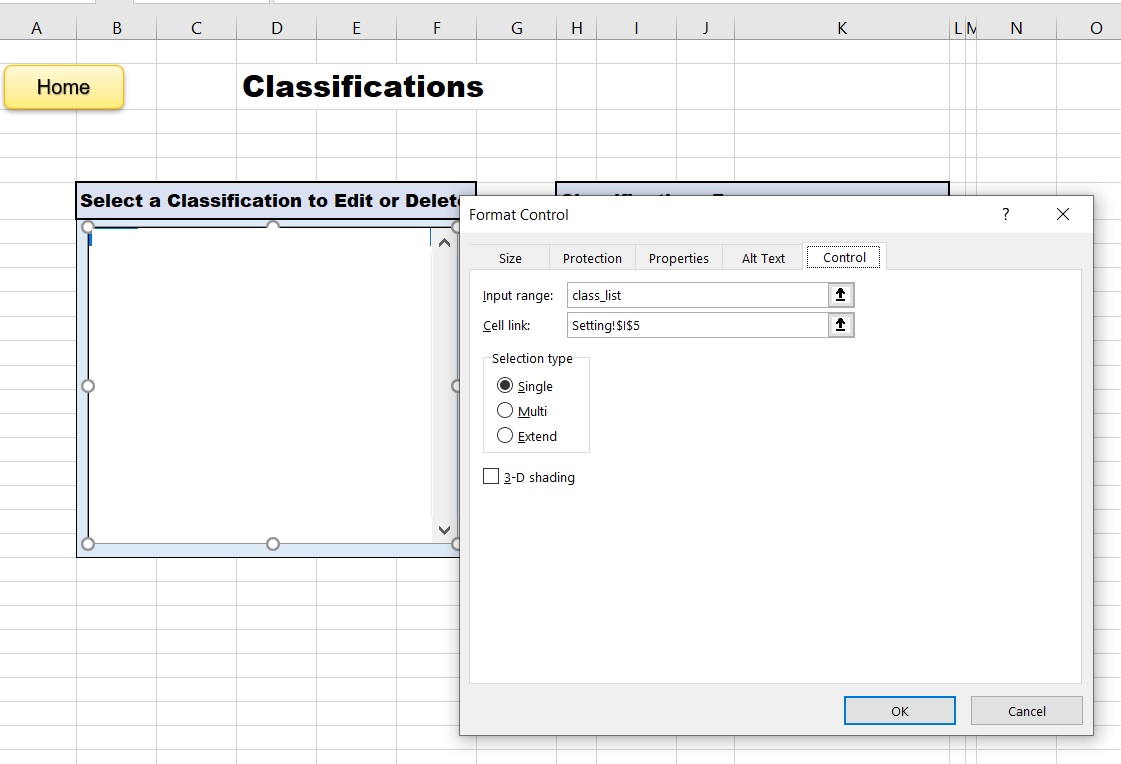
1.2. Right-click the mouse, and select FormatControl.
1.3. Goto Control Tab, and in Input range write: class_list, and in Cell link write setting!$I$5 then press OK.
Now the listBox will contain the Classifications we have in the classification list in Data Sheep. … [SEE THE IMAGE]
 |
ListBox Code: Now we will write a three lines of code to take action when we select any things in this box, so select the ListBox, click right-mouse-button, select “Assinge Macro, then the VBA application will start and write the foloing code:
selected_class = Sheets(“Setting”).Range(“I5”).Value + 2
Sheets(“classifications”).Range(“K8”).Value = Sheets(“data”).Range(“P” & selected_class)
Sheets(“Setting”).Range(“I6”).Value = “edit”
End Sub
Buttons Codes:
1. Select the rectangular shape named “New”, click right-mouse-button, select “Assinge Macro, then the VBA application will start and we
will write this code:
Sheets(“classifications”).Range(“k8”).ClearContents
Sheets(“Setting”).Range(“I6”).Value = “new”
End Sub
2. While the VBA application is on, we will write all the codes we need for Edit and Delete buttons and then will assign the macros:
class_delete_Click
If Not Sheets(“setting”).Range(“I5”).Value Then
End Sub
End If
answer = MsgBox(“Are you sure you want to DELETE this Classification?.”, vbQuestion + vbYesNo)
If answer = vbYes Then
current_select = Sheets(“setting”).Range(“I5”).Value + 2
Sheets(“Data”).Range(“P” & current_select).ClearContents
next_row = Sheets(“Data”).Range(“P” & Rows.Count).End(xlUp).Offset(1).Row
Sheets(“Data”).Range(“P3:P” & next_row – 1).SortSpecial SortMethod:=xlPinYin
class_ListBox1_Change
MsgBox “One Classification has been Deleted..”
Else
MsgBox “OK, Nothing will be changed.”
End If
End Sub
class_save_Click
If Sheets(“classifications”).Range(“K8”).Value = Empty Then
MsgBox “There is no Classification to Save.”
Exit Sub
End If
If Sheets(“Setting”).Range(“I6”).Value = “new” Then
‘ Get next empty row
next_row = Sheets(“Data”).Range(“P” & Rows.Count).End(xlUp).Offset(1).Row
‘ copy the new classification to the data-table
Sheets(“Classifications”).Range(“K8”) = StrConv(Sheets(“Classifications”).Range(“K8”), vbProperCase)
Sheets(“Data”).Range(“P” & next_row).Value = Sheets(“Classifications”).Range(“K8”)
‘ Empty the form
Sheets(“classifications”).Range(“k8″).ClearContents
MsgBox ” One New Classification Saved.”
‘ To Sort the classifications
next_row = Sheets(“Data”).Range(“P” & Rows.Count).End(xlUp).Offset(1).Row
Sheets(“Data”).Range(“P3:P” & next_row – 1).SortSpecial SortMethod:=xlPinYin
class_ListBox1_Change
Exit Sub
End If
If Sheets(“setting”).Range(“I6”).Value = “edit” Then
selected_class = Sheets(“Setting”).Range(“I5”).Value + 2
Sheets(“Classifications”).Range(“K8”) = StrConv(Sheets(“Classifications”).Range(“K8”), vbProperCase)
Sheets(“data”).Range(“P” & selected_class) = Sheets(“classifications”).Range(“K8″).Value
MsgBox ” One Classification Changed.”
‘ Sort the classifications
next_row = Sheets(“Data”).Range(“P” & Rows.Count).End(xlUp).Offset(1).Row
Sheets(“Data”).Range(“P3:P” & next_row).SortSpecial SortMethod:=xlPinYin
class_ListBox1_Change
Exit Sub
End If
End Sub
In the Save code we check if the K8 Cell is empty before we save it, and then we also re-sort the data in the ListBox. Here is a part of the code ..
 |
Recap this part:
1. We Create a classification list.
2. We Create a form to collect the classifications from the user.
3. We Create the classification ListBox.
4. We wrote the VBA code to Save, Delete, and Create New classification also to retrieve the classifications into classification ListBox.
:: Library System with Excel ::
| Part 1 | Part 2 | Part 3 | Part 4 |
To Download EXCEL (.xlsm) files Click-Here
By: Ali Radwani
Library System with Excel -P1
Learning :Excel formulas and VBA Cods
Subject: To Develop a Library System with Excel
Someone asked if we can do the Library Management system using Excel, so in the coming several posts we will try to develop an Excel File to store our Books. So I will stop the CRM Project and will work on Library System, we will use MS-EXCEL and VBA code to create a simple spreadsheet looking after our Books.
To start, do the following:
1. We will create an empty Excel file and call it “my Library System” and save it as “Excel Macro-Enabled Workbook.xlsm”
2. Create 7 Tabs(Sheets), name them as:
Menu, Books, Authors, Classifications, Data, Setting, Summary
In this post (Part-1), we will work on the Menu sheet, I will not concern about the themes and colors or fonts all this is back to each user to do formating as needed. So let’s begin with creating four buttons using the insert – shapes Rectangle: Rounded Corners.
 |
We need to create four Rectangle: Rounded Corners, align them as you want and use any theme color, then give each a Captions as in the coming image..
 |
Now, select the Books Button and with Right-Mouse-button select “Assign Macro” and from the new Assign Macro pop-up screen click on New.
 |
This will launch the VBA Application with an open window to write our code, here is the code that if the user clicks on ‘SAY’: Books-Button the Books Sheet will be selected. In coming image, you will find the codes for all buttons we have in the Menu.
 |
Also, we create a code to take us back to the Menu sheets and we call the button MENU, we will add this Button to all sheets we have.
-
Recap this part:
- 1. We Create an Excel file.
- 2. We Create 7 Sheets and named them.
- 3. We Create Buttons for the Menu Sheet.
- 4. We Create the Home Button.
- 5. We wrote the VBA code so we /the user can navigate thrugh the system.
:: Library System with Excel ::
| Part 1 | Part 2 | Part 3 | Part 4 |
To Download EXCEL (.xlsm) files Click-Here
By: Ali Radwani
Excel Simple CRM System P1
Learning : Excel Simple CRM System
Subject: Create Excel Form, Dynamic Name Range and VBA Code to build a simple CRM system.
In this short project we will learn how to create a simple CRM system and and will build forms to collect needed data and store it in tables.
Case Study:
We want to create a simple CRM system to collect data about our employees such as [Name, Department, Salary], we will keep the system (Forms and codes as simple as we can). In this part, we will work on fomrs and code to collect the Employee data.
First, we will open an Excel file, and will create Three Tabs (Sheets), and will name them [Form, Data, Table]. As in figure 1
As in figure 1  |
Now try to create the formes for Employee and another for Departments (Download the Excel file here).
Then in the Data Sheet starting from A1 create a table as A1: Name, B1: Department, C1: Salary, and in the F1 we will create a table named Department List. As in figure 2
figure 2  |
and enter one row of data as in figure 2. Then we also need to create a Dynamic Name Range, for both employee name and Department List, to do so we:
1. Go to Data Sheet.
2. Select the Employee table that we create.
3. in the “NameBox” just give the table a name as “emp”.
Do the same to the Department List table dep_list, we will use these names later.
 |
Coding: Now we will write the VBA code to make a list of Departments we have. To do so we will select the button of SAVE under the Department Form, Click the Right mouse button, and select Assign Macro, then select New and OK, after that the VBA application will start. We will write this code:
Sub save_new_dep()
‘ Get the next empty row
next_row = Sheets(“Data”).Range(“F” & Rows.Count).End(xlUp).Offset(1).Row
Sheets(“data”).Range(“F” & next_row).Value = Sheets(“form”).Range(“J7”)
Sheets(“form”).Range(“J7”).ClearContents
End Sub
figuer 4 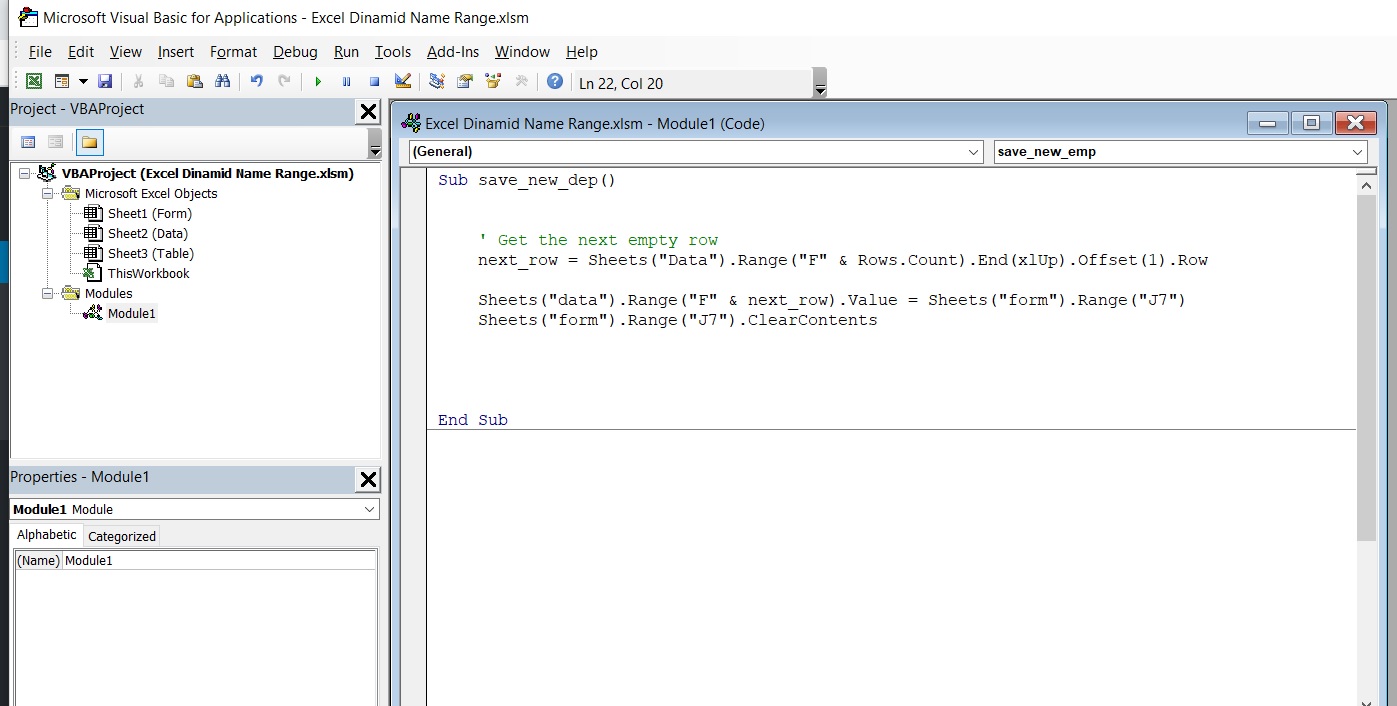 |
In this line
next_row = Sheets(“Data”).Range(“F” & Rows.Count).End(xlUp).Offset(1).Row we will get the next empty row in the department list.
in this line Sheets(“data”).Range(“F” & next_row).Value = Sheets(“form”).Range(“J7”) we will copy the date we just enter as a New Department to the Data Sheet Depatrtment List. Then with Sheets(“form”).Range(“J7”).ClearContents we will clear the content.
So now we can enter some department names: IT, Fin, Economy
We will do the same thing for the Employee Form, so with an open VBA application write the following code. as in figure 5
Sub save_new_emp()
‘ Get the next empty row
next_row = Sheets(“Data”).Range(“A” & Rows.Count).End(xlUp).Offset(1).Row
‘ Copy the Data
Sheets(“data”).Range(“A” & next_row).Value = Sheets(“form”).Range(“D7”)
Sheets(“data”).Range(“B” & next_row).Value = Sheets(“form”).Range(“D8”)
Sheets(“data”).Range(“C” & next_row).Value = Sheets(“form”).Range(“D9”)
‘ Clear the Form
Sheets(“form”).Range(“D7”).ClearContents
Sheets(“form”).Range(“D8”).ClearContents
Sheets(“form”).Range(“D9”).ClearContents
End Sub
figure 5 |
The first line of the code is to get the next empty line in the Employee table, then we will use it to copy the data from the form to the data table. In my form, the Name is in D7, the Department in D8, and the Salary in D9. here is the code line for the name: Sheets(“data”).Range(“A” & next_row).Value = Sheets(“form”).Range(“D7”), then we clear the form as we did with the Department form. In the Employee form (Range”D9″) we need to make it as a DropDown list of all Departments we have so we can select from the list, to do that follow the coming steps ..
1. Select Cell D9.
2. From the Menu Select Data then Data Validation, a popup box will apear as in figure 6, do as shown, here we will use the Dynamic Name range we create “dep_list” as a source. figure 6
figure 6  |
At this point we have two Forms, one for the Department List and one for the Employee (Name, Department, Salary), both forms has SAVE buttons, the Data will be saved in the Data Sheet
To Download Excel files Click-Here
By: Ali Radwani
Another SketcheBook
After my 6th Sketchebooks I start creating sketchebooks for my self, cutting the A4 papers, punch or glue them together then creating the cover and Sketch over it, other sketchbooks are purchased online then again I draw/sketch on it’s cover. Sample of what I made here ..
Sketch Books 12, 13 Here
Sketch Books 22, 23 Here
This one here is my 42nd Sketchebook Cover, I purchased this from AliExpress site, verey nice and small but the papers are very thin and the colors appear on the other side of the page, over all, they are doing the job.

|
More sketches are available in My Sketchbooks Page..
Python: Shares Speculation System – Part 6
Learning : Python, DataBase, SQL, SQlite3
Subject: Plan, Design and Build a Shares Speculation System
Project Card:
Project Name: Shares Speculation System
By: Ali
Date: 2.7.2020
Version: V01-2.7.2020
In Part-5 we wrote the function to submit the Buying Transactions ..[Click to Read] also we wrote the section of showing/displaying the Buying records on the screen. In this part we will continu on same function to write the code to Save Selling Transaction and display them on the screen in Show all Transactions Function.
So First we will writing the code to Save/Submit Selling Transactions. Now let’s start coding ..
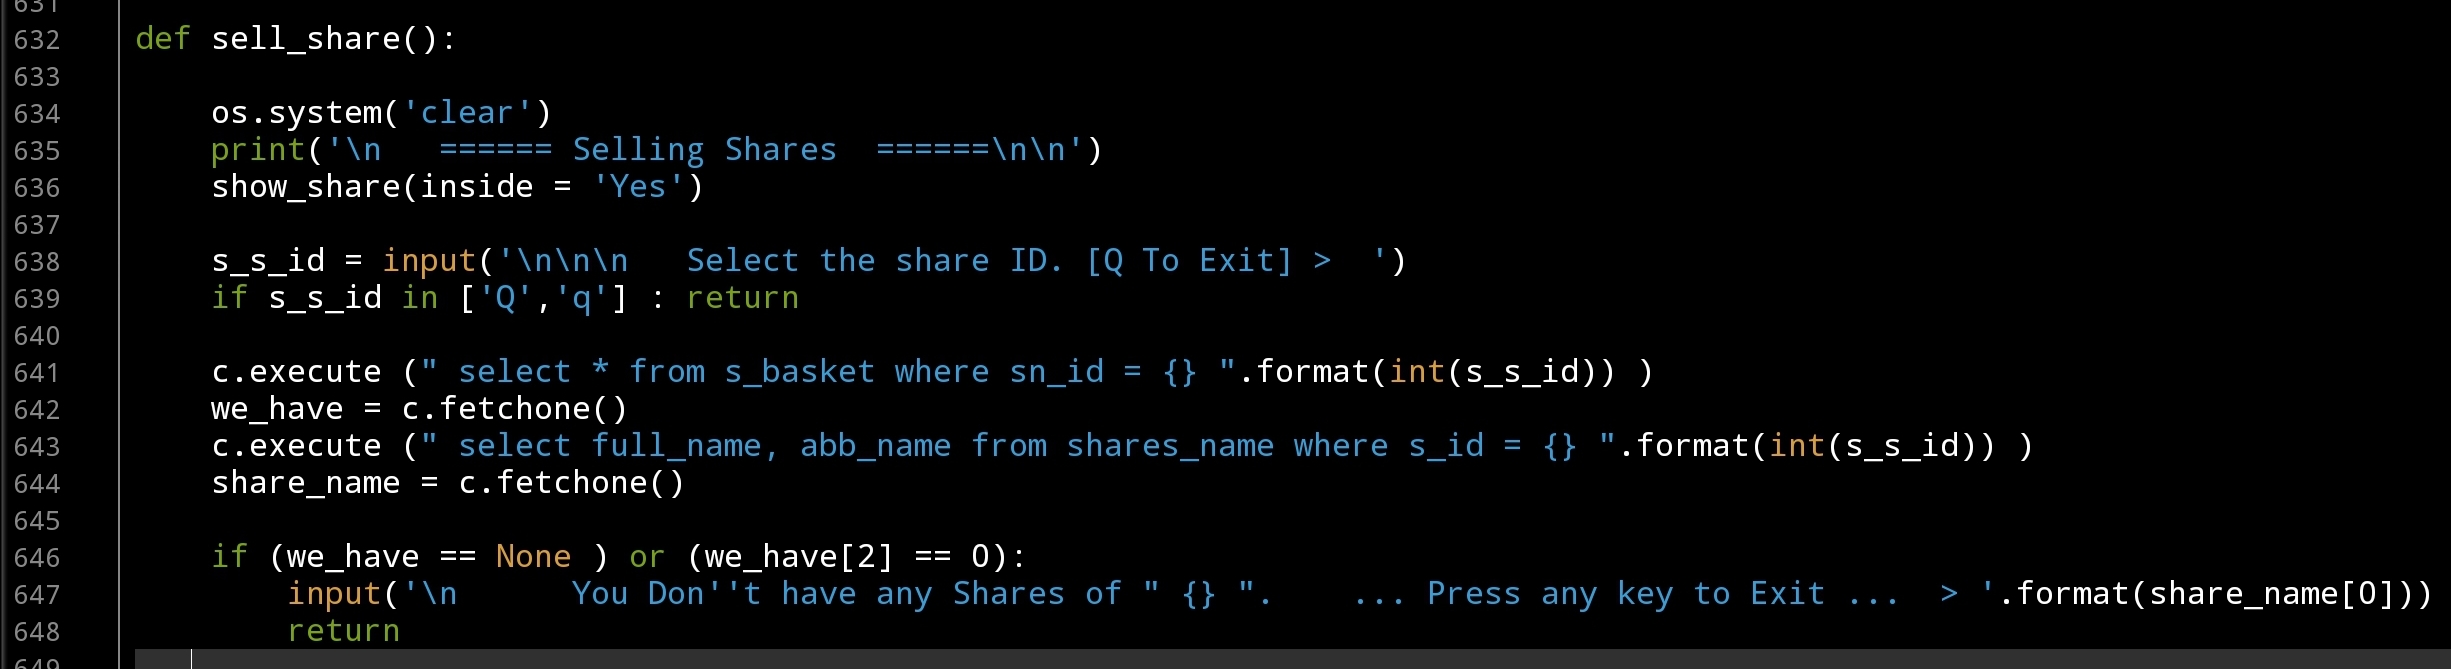
Before we start I want to focus on a one-line If statement that we will use to give the user the ability or the chance to Quit or Exit from the function in any time before saving the Transaction by just entering ‘Q’, here is the code: if s_s_id in [‘Q’,’q’] : return (s_s_id is the user input).
In def sell_share(): function we will display all the Shares Name (by calling show_share() function) on the screen and ask the user to select the ID for the share, then we will Run tow SQL statements to get some data about that share such as it Full Name and the amount of shares we have (from s_basket table), if the return value of the s_basket is None or we Don’t have any shares we can’t do any Sell process so we will Exit. Here is the code ..
 |
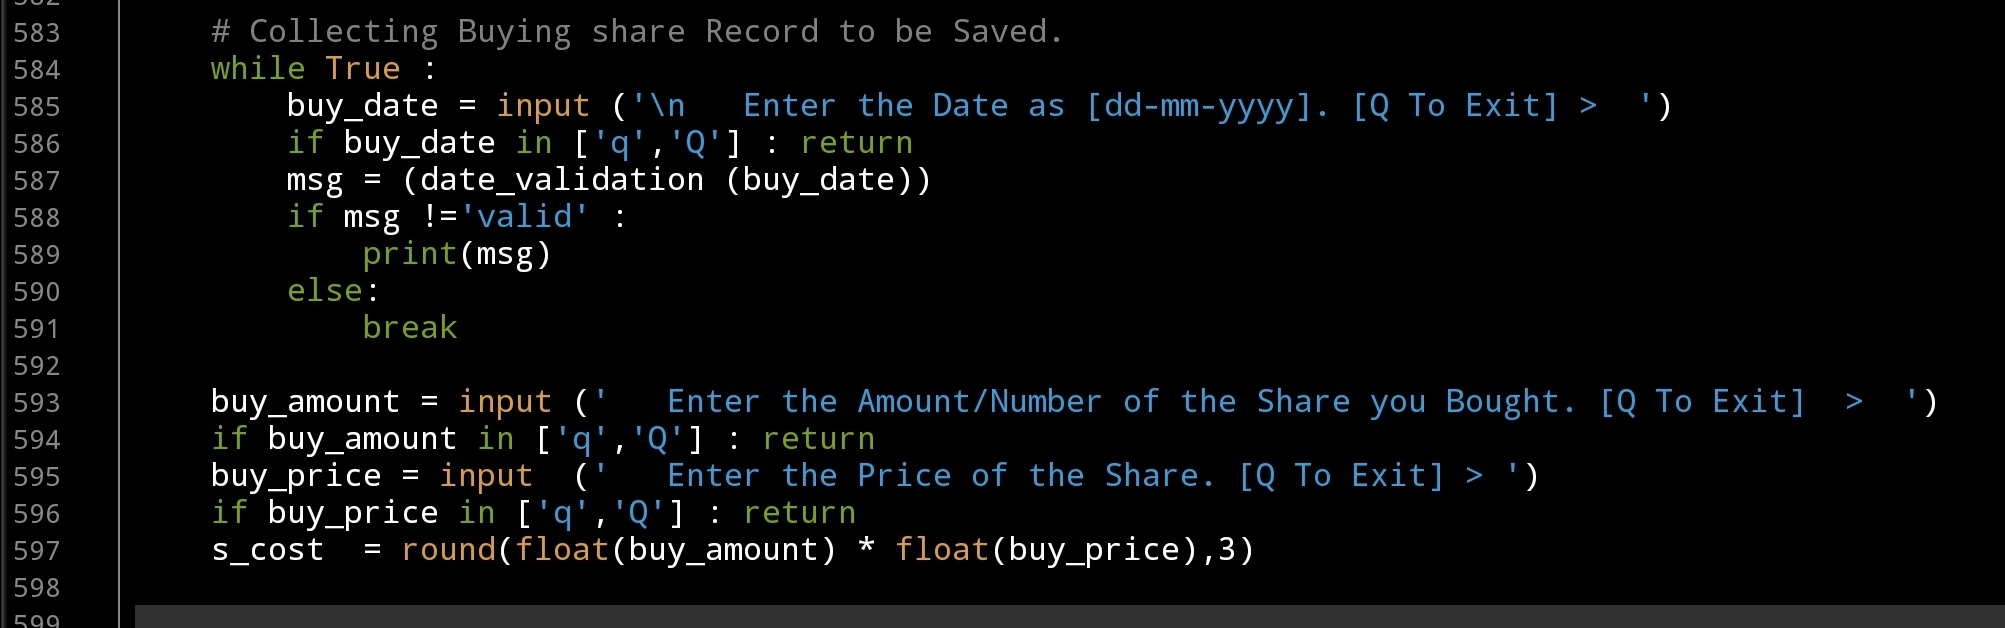
If we have shares, then we will print on the screen to show total amount of shares we have and will ask the user to Enter the new selling share information like the Date, The Amount of Selling and the Price, here is the code ..
 |
After that, we will ask the user to CONFIRM Saving by pressing ‘Y’, and will use the SQL Insert statement to submit the data to the Database, also to update the s_basket table…. Here is the code.
 |
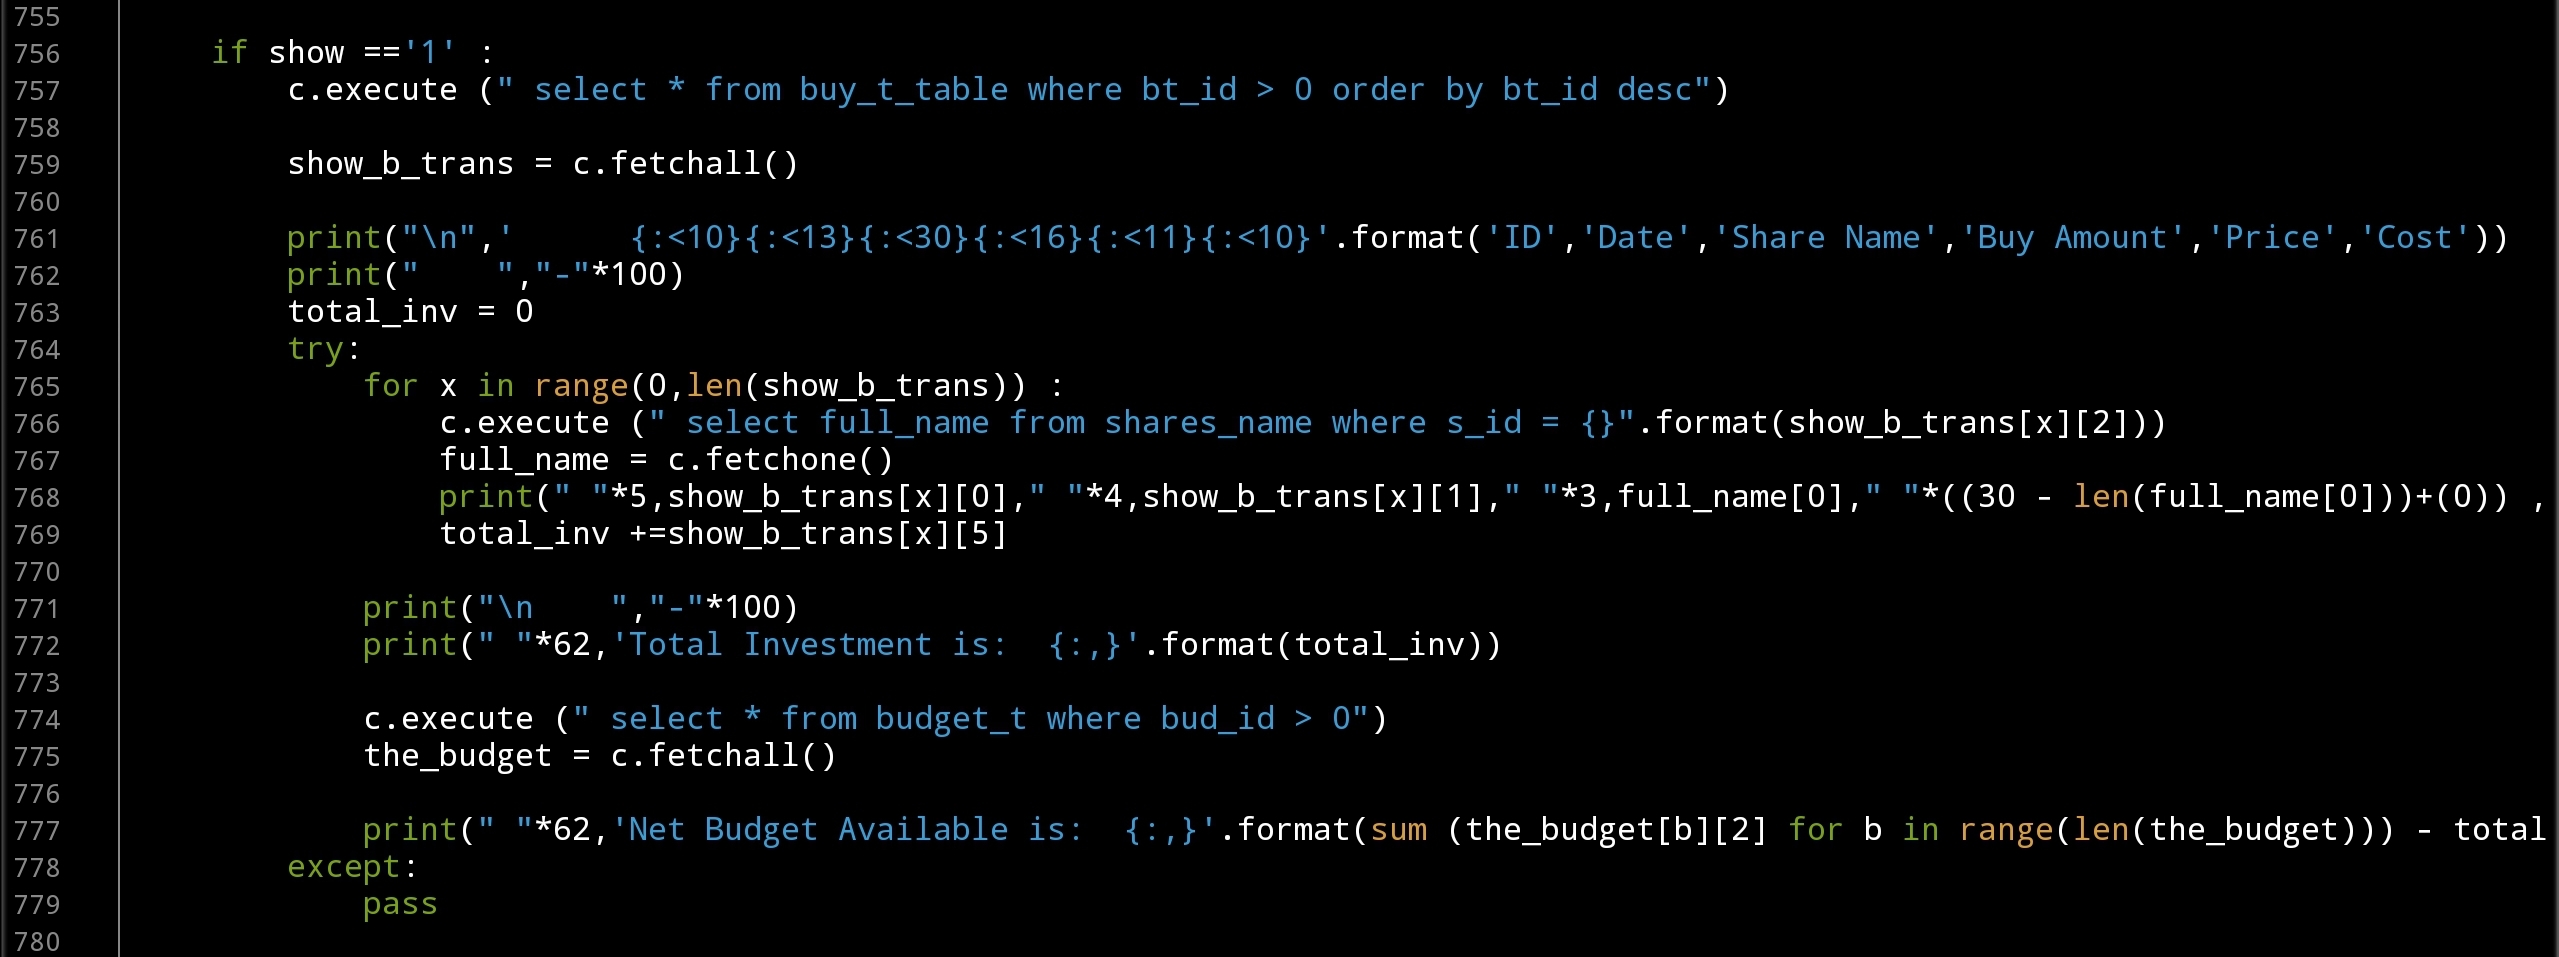
Now we finish the def sell_share(): function and will start to writing the corresponding part to show the Selling Transactions in def show_all_trans ():, in this section of the code as we did to show the Buying Transactions we will RUN an SQL statement to get all selling transaction in the table, we will use the formatting to output the data as a table format. Here is the code
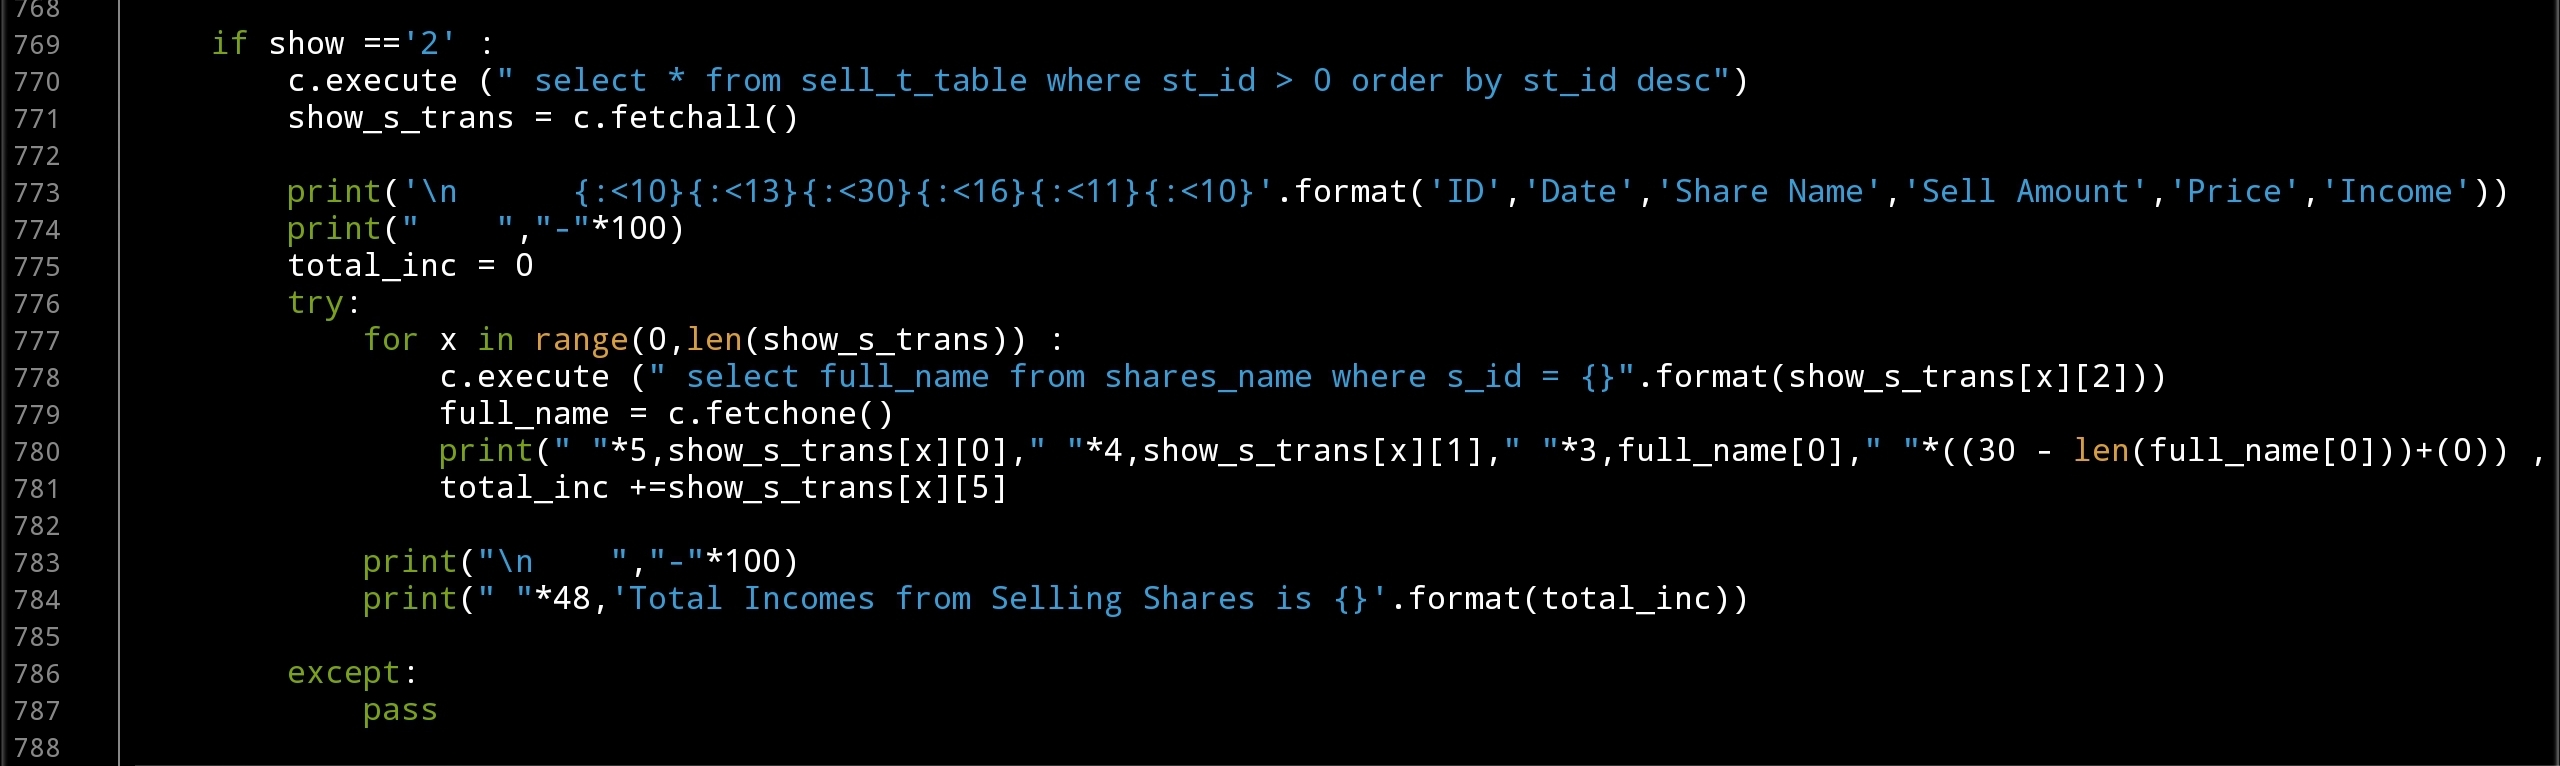 |
Coming Up: In Next part we will Write the Function to Delete Transactions from the System, also will write a code to Show All Transactions Buying and Selling in one Table.
[NOTES]
1. Part-1 has no code file.
2. We are applying some basic Validations on some part of the code, and assuming that the user will not enter a messy data.
3. This Application Purpose for Saving Transactions and NOT for Desetion Making and Dose’t Have any type of AI or ML Model to Predict the Prices and/or Giving Sugestions on Buying or Selling Shares.
:: Shares Speculation System ::
| Part 1 | Part 2 | Part 3 | Part 4 | Part 5 |
| Part 6 |
To Download my Python code (.py) files Click-Here
By: Ali Radwani
Python: Shares Speculation System – Part 5
Learning : Python, DataBase, SQL, SQlite3
Subject: Plan, Design and Build a Shares Speculation System
Project Card:
Project Name: Shares Speculation System
By: Ali
Date: 2.7.2020
Version: V01-2.7.2020
In this part we will talk or say will work on two functions, Buying Transactions and Show All Transactions, both are fill in Transactions Managment. But first we will do some changes in our main codes as following:
1. Add New Table to the DataBase named s_basket using this code:“CREATE TABLE if not exists s_basket (sb_id INTEGER PRIMARY KEY AUTOINCREMENT, sn_id integer, ts_amount float, min_p float, max_p float)” also we will Insert the zero record as: c.execute (“INSERT INTO s_basket (sb_id) VALUES(:sb_id)”,{“sb_id”:0})
2. Changing in Main Menu.
[Important Note]: This application Purpose for Saving Transactions and NOT for Desetion Making and dose’t have any type of AI or ML Model to Predict the Prices and/or Giving Sugestions on Buying or Selling Shares.
Transactions Managment: In our previous parts and codes we published, we used two options in the main menu (Buying Transaction, Selling Transaction) in this part we will change this to have one menu option called Transactions Managment this option will take the user to a sub-menu having some other options as shown:
The Main-Menu Code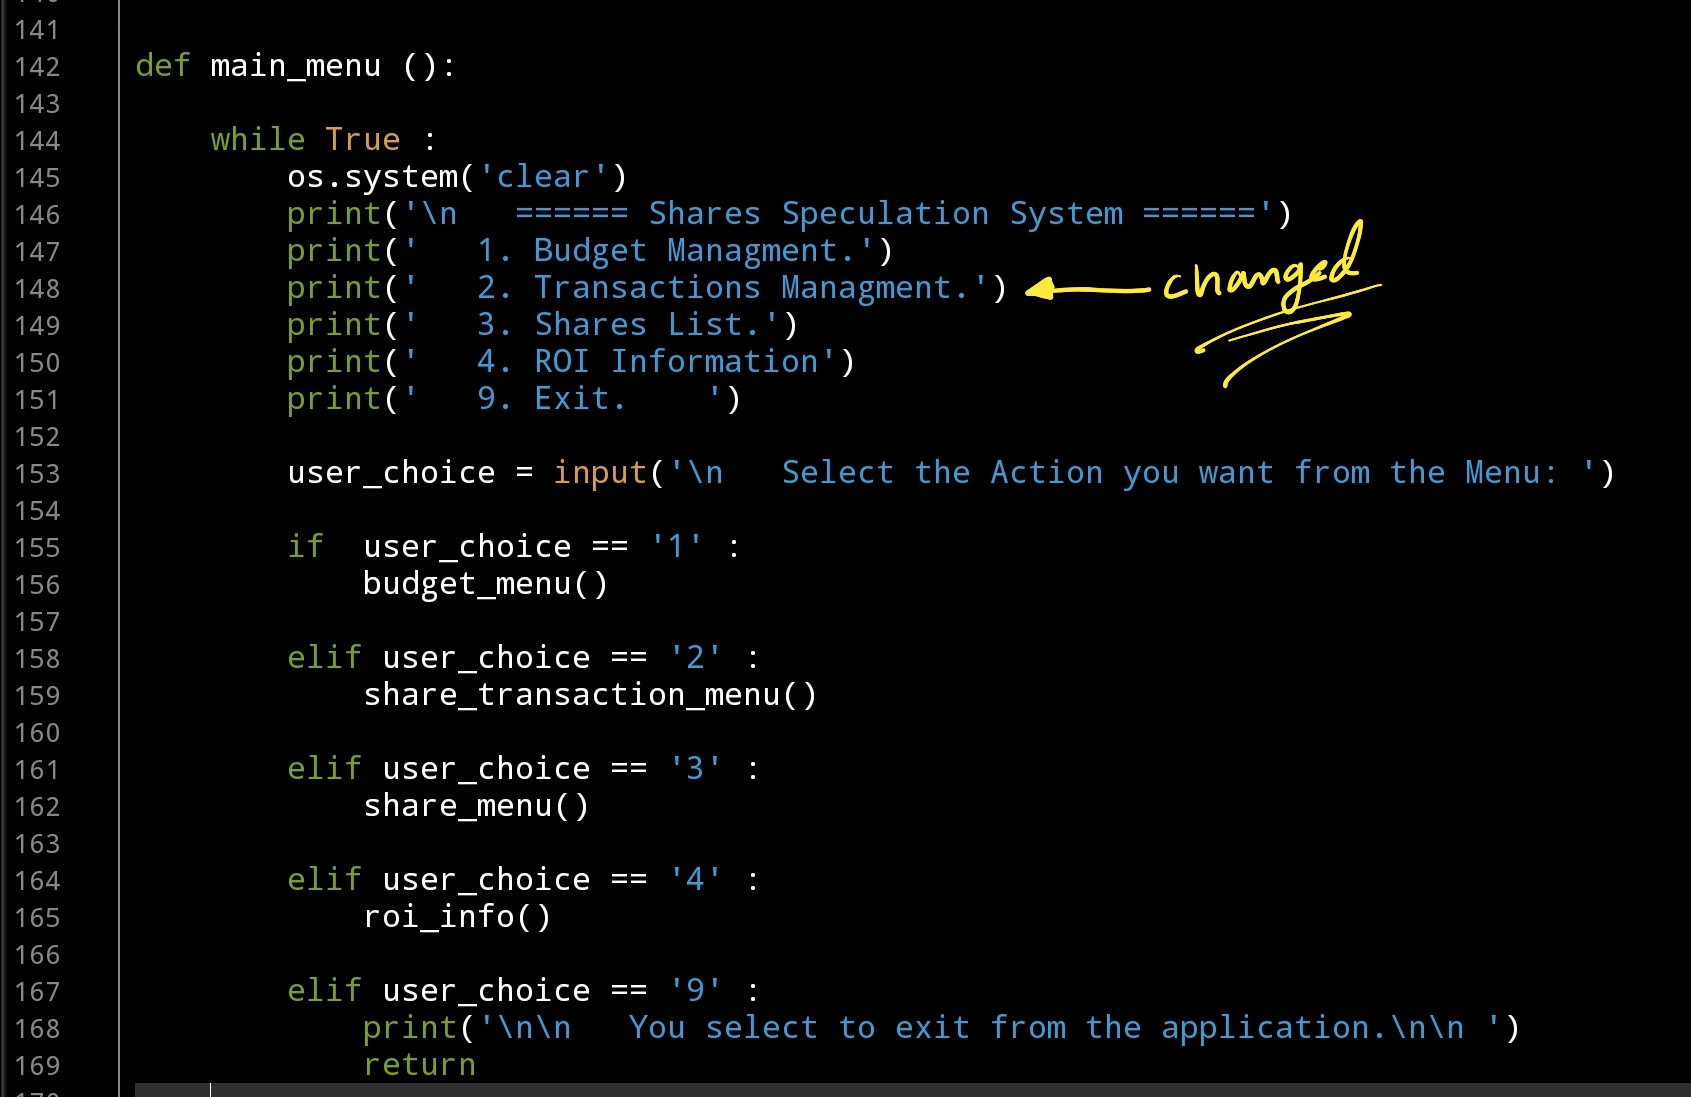 Out-Put 
|
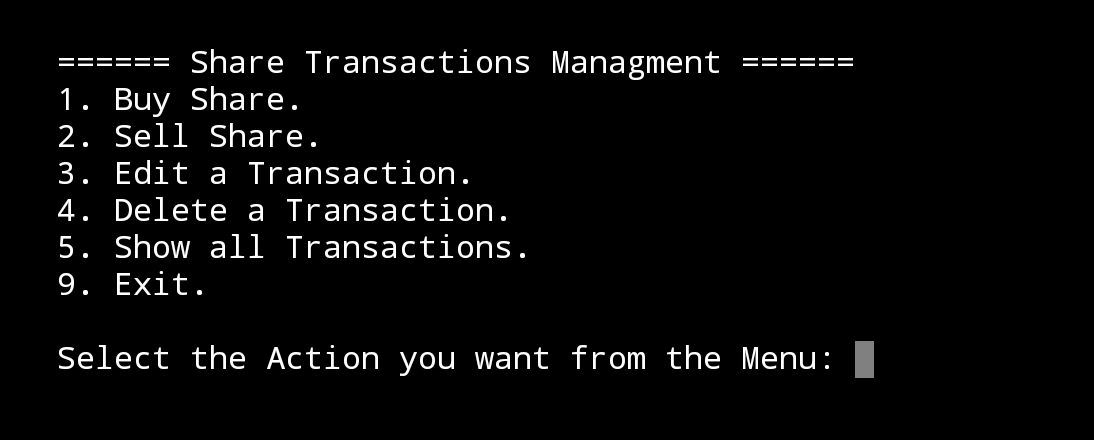
Transaction Managment Menu
Out-put |
Buying Transactions: we will start writing the functions to Insert a Buying Transactions, in this function first we will display a list of Shares we have and the user will select the ID of the share needed, here is the code ..
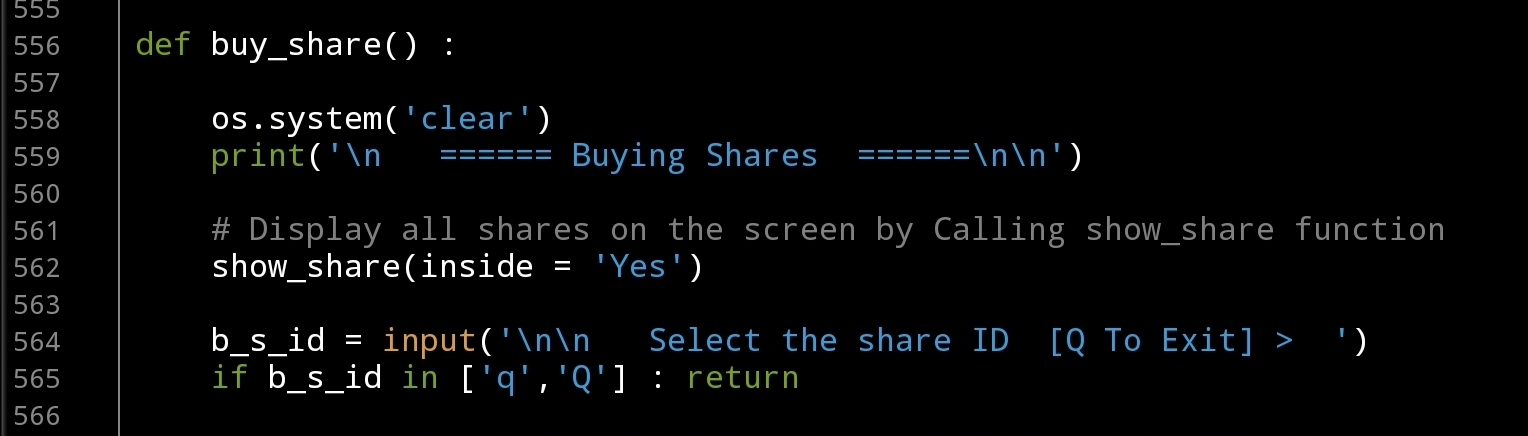 |
Now we will use the ID to get the selected share Full-Name and it’s Abbreviation also the amount of shares we have with the lowest and highest price we bought this share before and will display all this information on the screen. Next step is to collect the buying record information to be saved, so we will ask the user to Enter the Date, Share Amount and the Price. With each Data-Entry line we will give the user the ability to terminate the process by Entering ‘Q’, for the date we will use date_validation function. Here is the code for this section..
 |
After that we are ready to Insert the data into the Database, and update other records. Here is the code..
 |
Now we have saved one Buying record, before we continu with Selling Transactions we will write the Show All Transactions this function will display all the records of Buying Transactions and Selling Transactions. Now we will write the section to display the Buying Transaction records. We will call the function def show_all_trans () and we will ask the user to select “What type of Transaction to Show:”1. Buying Transaction.2. Selling Transaction.3. All Transactions.
then we will display the transactions in a table format. In this part we will write the code for the Buying Transaction. Here is the code ..
 |
We Done in this Part ..
Coming Up: In Next part we will write the Function Save Selling Transactions to our system, also updating the Show
[NOTES]
1. Part-1 has no code file.
2. We are applying some basic Validations on some part of the code, and assuming that the user will not enter a messy data.
3. This Application Purpose for Saving Transactions and NOT for Desetion Making and Dose’t Have any type of AI or ML Model to Predict the Prices and/or Giving Sugestions on Buying or Selling Shares.
:: Shares Speculation System ::
| Part 1 | Part 2 | Part 3 | Part 4 |
| Part5 |
All the Codes in this Post Available here ..
To Download my Python code (.py) files Click-Here
By: Ali Radwani
Python: Shares Speculation System – Part 4
Learning : Python, DataBase, SQL, SQlite3
Subject: Plan, Design and Build a Shares Speculation System
Project Card:
Project Name: Shares Speculation System
By: Ali
Date: 2.7.2020
Version: V01-2.7.2020
Last time we worked on Budgets Managment for our system, now before we start Buying and Selling shares we need to create list of shares name so we can select from it, we have a table called shares_name this Table have the following fields :
s_id: as a PRIMARY KEY.
full_name: To hold the full name of the share.
abb_name: To hold the Abbreviation of a share name.
The Share Managment section will have four main Functions to Add, Edit, Delete and Show shares. .. Let’s start with it’s Main Menu ..
 |
First Function we will work on will be to Add New Share to the system, we will call it def add_share(): , we will ask the user to input the Share Full Name and its Abbreviation. With Abbreviation we will apply the .upper() function to convert the user input to Upper-case, and for the Full Name we will will apply this code [“ “.join([word.capitalize() for word in user-input] to upper case each first character of the Name. The we will check if the Share Name exist in the DataBase If not we will add it.
 # Add New Share
def add_share() :

    os.system('clear')
    print('\n   ====== Add New Share ======\n\n')
    while True :

        abb_name = input("   Enter the Abbreviation Name of the Share.. > ").upper()
        full_name = " ".join([word.capitalize() for word in input('     Enter the Full Name of the Share.. > ').split(" ")])

        c.execute ("select * from shares_name where full_name ='{}' or abb_name = '{}'".format(full_name, abb_name))
        share_exist = c.fetchone ()
        if share_exist[0] > 0 :
            print('\n   It seams that the Share Exist in the Database, Name or Abbreviation CAN NOT be Duplicated.')
            print('   Try another Name. ')
        else :
            c.execute ("INSERT INTO shares_name (full_name , abb_name)  VALUES(:full_name , :abb_name)",{"full_name":full_name, "abb_name":abb_name})
            db_conn.commit()

        if input ('\n   Do you want to Enter another Share Name?.  [Y,N]. >  ')  not in ['Y','y']:
            input ('\n    .... Press any key to  Exit.  ')
            return
After adding shares we want to see them and to make sure if every things are fine, so we will write the show_share function, and it will take one argument as inside with default value = ‘Yes’, if we call the function from inside another function the value will be Yes, otherwise it will be ‘No’. Here is the code ..
 |
Next is Editing Share Name, in this function we will call the show_share (‘Yes’) so the user will select the ID of the Share Name to be Edit, then with each attribute we will ask the user ether to Enter the new Edit of the attribute or to press Enter to keep the exist variable. .. Here is a copy of the code ..
 |
Last Function in this Artical is Delete def delete_share() : again we will call the Shoe function to display all the Shares Name on the screen and let the user to select the one to be Deleted by Entering it’s ID.
 # Delete Function.
def delete_share() :
    os.system('clear')
    print('\n   ====== Delete a Share  ======\n\n')

    print('   Here is a list of Shares we have in the System .. \n')
    show_share('Yes')

    del_share = input('\n\n   Enter the ID for the Share Name you want to Delete. [Q to Exit] >  ')

    if del_share in ['q', 'Q'] :
        input ('\n\n    .... Press any key to  Exit.')
        return
    elif del_share.isnumeric() :
        if (input ('   Are you SURE you want to DELETE Share ID {} ? [Y,N] >  '.format(del_share))) in ['y','Y'] :
            c.execute ("delete from shares_name where s_id ={}".format(int(del_share)))
            db_conn.commit()
            input ('\n    ....One Record DELETED. Press any key to  Exit.')
            return
        else :
            input ('\n    ....Share will NOT be Deleted. Press any key to  Exit.')
            return
    else :
        input ('\n    ....Invalid Inpout. Press any key to  Exit.')
        return
Now we can create or Enter a Budget and Enter the Shares Name we have in our Stock Market and we are ready to write the functions to make the transactions.
Coming Up: In Next part we will write the Function to submit/Save Buying and Selling Transactions to our system.
[NOTES]
1. Part-1 has no code file.
2. We are applying some basic Validations on some part of the code, and assuming that the user will not enter a messy data.
:: Shares Speculation System ::
| Part 1 | Part 2 | Part 3 | Part 4 |
| Part5 |
To Download my Python code (.py) files Click-Here
By: Ali Radwani
Python: Shares Speculation System – Part 2
Learning : Python, DataBase, SQL, SQlite3
Subject: Plan, Design and Build a Shares Speculation System
Project Card:
Project Name: Shares Speculation System
By: Ali
Date: 2.7.2020
Version: V01-2.7.2020
In this part we will set the database connection, create the Tables and Insert the Zero records. So first let’s do the Import and the database connection..
# Database connection

import sqlite3, os

# Create the data-base and name it as Share_S_System.
db_conn = sqlite3.connect ("Share_S_System.db")

# Set the connection.
c = db_conn.cursor()
Now we will write the function to creates the Tables, we have five tables and this could be change during the project.
# Code to create the Tables

def create_tables_() :
    # to create tables.
    sql_share_t =    "CREATE TABLE if not exists shares_name  (s_id INTEGER PRIMARY KEY AUTOINCREMENT, full_name text, abb_name text )"

    sql_buy_t_t =   "CREATE TABLE if not exists buy_t_table (bt_id INTEGER PRIMARY KEY AUTOINCREMENT ,buy_date text, sn_id integer, buy_amount integer, buy_price float, cost float)"

    sql_sell_t_t  = "CREATE TABLE if not exists sell_t_table (st_id INTEGER PRIMARY KEY AUTOINCREMENT, sell_date text, sn_id integer, sell_amount integer, sell_price float, profit float)"

    sql_budget_t  = "CREATE TABLE if not exists budget_t (bud_id INTEGER PRIMARY KEY AUTOINCREMENT, bud_date text, bud_amount float, bud_note text )"

    sql_year_roi =  "CREATE TABLE if not exists year_roi (y_id INTEGER PRIMARY KEY AUTOINCREMENT, bud_amount float, profits float, costs float, roi float, t_buy float, t_sell float )"

    c.execute(sql_share_t)
    db_conn.commit()
    c.execute(sql_buy_t_t)
    db_conn.commit()
    c.execute(sql_sell_t_t)
    db_conn.commit()
    c.execute(sql_budget_t)
    db_conn.commit()
    c.execute(sql_year_roi)
    db_conn.commit()

    input('\n .. Shares Speculation System Tables created.. Press any key .. ')
Next we will Insert a ‘Zero’ records in the Tables, this weill set the ID’s field in each table to ‘0’ so with next records the AUTOINCREMENT will work as it should. here is the code ..

|
Last function in this part will be the Main-Menu of the system. The system will have five Menus each one will have it’s own page and functions to manage it, we will write all the needed functions. Here is the Main-Menu.
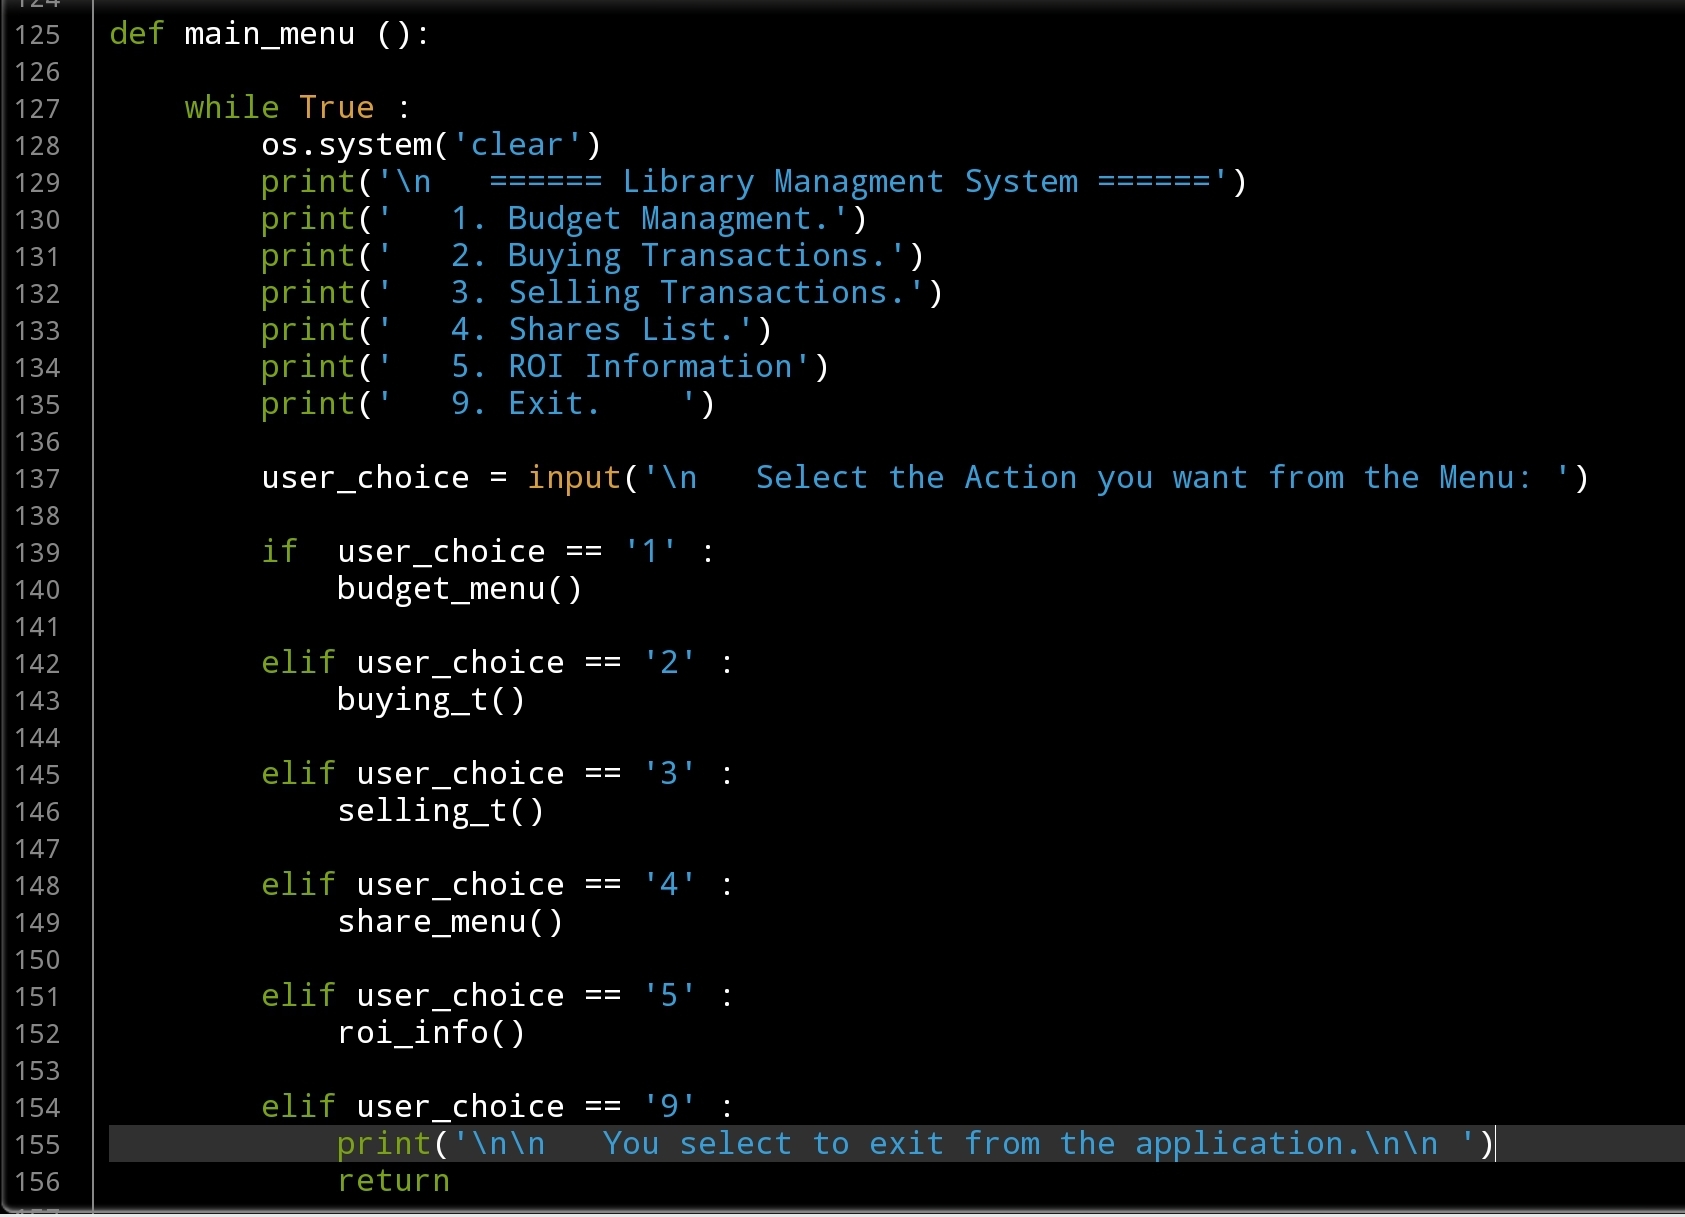 |
Coming Up: In Next part we will write the menu and the functions for the Budget Managment.
[NOTES]
1. Part-1 has no code file.
:: Shares Speculation System ::
| Part 1 | Part 2 | Part 3 | Part 4 |
To Download my Python code (.py) files Click-Here
By: Ali Radwani
Python: Shares Speculation System – P1
Learning : Python, SQL, SQlite,
Subject: Plan, Design and Build a Shares Speculation System (SSS)
Project Card:
Project Name: Shares Speculation System
First Draft on: 26.6.2020
Version: V01-26.6.2020
By: Ali
Brief: In this Project we will work on a Shares Speculation System (SSS) were the user can save transactions regarding his investments in the stock market.
The Project Idea: A person who works on Shares Speculation looking for a System to keep the records for his transactions and calculate the Profits and Return Of Investment ROI ratio based on Daily, Monthly or Yearly tansactions.
Scope of Work: We will use Python to writing the codes and will store the transactions in a DataBase using SQlite3.
System Tabels:
1. Shares_table (shares_name): To contain Shares Full Name and it’s Abbreviation.
2. Buy_Transactions_table (buy_t_table): To hold all buying transactions [Date, Share Name, Amount, Price, cost]
3. Sell_transaction_table (sell_t_table): To hold all selling transactions [Date, Share Name, Amount, Price, profit]
4. Budget_table (budget_t): To hold the budgets of the Shares Speculation [ Date, amount, notes
[Notes: With Budgets we can do two type of Transactions, Adding New budget will increases the Money to be Invested, also the user can withdrawal some amount of the money.]
5. Year_ROI (y_roi): After each year (end of the current year) there will be a function to be RUN and it will calculate the Total Investments, Budgets, Profits, Costs, ROI, Total Buy Transactions, Total Sell Transactions … maybe other all in one table and will store all this as a one line/record in the table.
System Functions:
For each table, we will have three main functions Add, Edit and Delete. Also we will write a Menu to access each Function and some Math/Economics formulas to calculate the Investments, Profits and ROI.
How the System Works:
The idea is, FIRST the user will create a Budget Profile, (Date, Budget Amount). Then each time the user buy or sell shares, the system will add a record saving the Transactions type and detail. If the Transaction is Buying then We will Debit the Transaction Total from the budget we have in the system
and if the transaction type is Selling we will Add the Income to the Budget.
:: Shares Speculation System ::
| Part 1 | Part 2 | Part 3 | Part 4 |
To Download my Python code (.py) files Click-Here
By: Ali Radwani
Taking pictures is not my main daily practices, but when i start playing with my camera, i really enjoy my self.
Thanks for visiting my Space..


