Archive
Python: Coffee Consumption Part-1
Learning : Python, SQlite3, Dataset, Pandas,
Subject: Create Coffee Consumption Application.
[NOTE: To keep the code as simple as we can, We WILL NOT ADD any user input Varevecations. Assuming that our user will Enter the right inputs.]
Last week I post an articale about generating Fake Data-Set about Coffee Consumption, and using that dataset in ML and DeepLearning. [Read the Story]. I’ve got a request from someone asking to build a reall Full Application that can be used in a Coffee Shop and collect/track his Coffee orders (consumption). So here is the application.
Road Map
Brain Storming
In this python project will collent some informatin based on a friend requerment. Our Task is:
- Data Gathering.
- Designing the Database and Tables.
- Writing python Functions to do the Following:
- Create the Main-Menu. [Add, Edit, Delete for main Table]
- Create the Manager Menu. [Add, Edit, Delete for each lookup Tables]
- Create the database and the tables:
- Main: coffee_con.
- Lookup: coffee_name.
- Lookup: coffee_type.
- Lookup: coffee_size.
- Inserting Zero record.
- Inserting Basic Data in all Lookup tables.
- Creating all Functions we need such as:
- Add, Edit, Delete Coffee Names.
- Add, Edit, Delete Coffee Types.
- Add, Edit, Delete Coffee Sizes.
..:: In Part -1 ::..
In this part, we will create a python file, and will write all the functions header [we think we may need] so late we can add the codes inside, of course we may add other functions later [if we miss it here].
So, starting from the Main-Menu, we will have
– Add New Order.
– Edit an Order.
– Delete an Order.
– Show Orders.
[… SETTING …]
– Coffee Names, Type and Size Manager.
– Create the database.
– Back-up Data. (as CSV)
– Exit.Here is just a sample of the code, in this part no much coding of the Functoins, as we said only Functions Names, the full code is available in the Download Page.[ Click Here ]
# Sample of Functions Names in our Application

import os
import sqlite3


def header():
    pass

def create_data_base () :
    pass

def main_menu():
    pass

def new_record():
    pass

def edit_record():
    pass

def delete_record():
    pass

def backup_dataset():
    pass
… The above are just a sample of Functions that we may have in the application, you can download and read the Project file.
What’s Coming: In Part-2 we will do the Follwing:
- Writing the Main Menu Function.
- Creating the DataBase.
- Writing the Function to Create the Tables.
- Inserting the Zero Records.
..:: Have Fun with Coding ::.. 🙂
Part 1 Part 2 Part 3 Part 4 To Download my Python code (.py) files Click-Here
By: Ali Radwani
 Follow me on Twitter..
Python: Sorting Algorithm (1.Quick Sort)
Learning : SQL, Python, sqlite, DataBase
Subject: Testing the SQL Join commands using Python.
Sorting Algorithm is a way to sort a given list of numbers, there are several sorting Algorithm as follow:
Type of Sorting Algorithm
Quick Sort.
Bubble Sort.
Merge Sort.
Insertion Sort.
Selection Sort.
Heap Sort.
Radix Sort.
Bucket Sort.
Here in this post we will write a function to take a given list and sort it then pass it back. We assume the user will enter a serial of numbers, that he want to sort, our function will sort it and print out the original numbers and the sorted one.
Quick Sort Steps of Quick Sorting Algorithm are:
1 – Save the first element of the list as pivot. We will call it as pv .
2 – Define Two variables i and j. We will call them as fc, lc fc will be 0 (first element position in the list) and lc will be the length of the list.(last element position in the list) .
3 – Increment fc until the number in the list in fc position is smaller or equal to pv (the first element).
4 – Decrement lc until the number in the list in lc position smaller than pv.
until list[j] < pivot then stop.
5 – If fc less than lc then we swap the two elements in the location of fc and lc. (SWAP list[fc] and list[lc]).
7 – Exchange the pivot element with list[j] element.
Coding First we will write a sort Menu for the project, we will have tree items to select from, Quick Sort Algorithm – Fast Run and Quick Sort Algorithm – Step By Step This will show sorting details.
 # Main Menu

def main_menu ():
    os.system('clear')

    print('\n\n',' '*5,'******************************')
    print(' '*5,' ***','  Sorting Algorithm ',' '*1,'***')
    print(' '*5,' ***','     Quick Sort     ',' '*1,'***')
    print(' '*5,' ***',' '*22,'***')
    print(' '*5,' ******************************\n\n')

    print(' '*7,'1. Quick Sort Algorithm - Fast Run.')
    print(' '*7,'2. Quick Sort Algorithm - Step By Step.')
    print(' '*7,'9. Exit.')

    user_choice = input('\n   Select your choice.  > ')
    return user_choice
And this is the main code body that will call the menu and check the user selection ..
 # The Main application Body

while True:

    user_select = main_menu()

    if user_select == '1' :
        user_list = create_list()

        fpos = 0  # first position index
        lpos = len(user_list)-1  # last position index

        original_list = user_list
        print('\n   The original List is: ',original_list)

        user_sorted_list = quick_sort(user_list,fpos,lpos)

        print('\n   DONE .. We Finish Sorting .. ')
        print('   The Sorted List is: > ',user_sorted_list)
        input('\n   ...Press any key to continue.  ')

    if user_select == '2' :
        user_list = create_list()

        print('\n   We will show the Quick Sorting Step By Step... \n')
        fpos = 0  # first position index
        lpos = len(user_list)-1  # last position index
        original_list = user_list

        print('\n   The Original List is: ',original_list)
        user_list = quick_sort_details(user_list,fpos,lpos)

        print('\n   DONE .. We Finish Sorting .. ')
        print('   The Sorted List is: > ',user_list)
        input('\n   ...Press any key to continue.  ')

    if user_select == '9' :
        break
Also we will have a Function to take the List of Elements from the user, the user input will be as a string, we will convert it to an integer List and will return it back.. Here is the code ..
 # Create the List

def create_list():
    print('\n   Enter the List Elements separated by SPACE, when Finish just Press Enter.')
    the_list = input('\n   Start Entering the Numbers in the List. >  ')

    # Convert user input to List
    the_list = the_list.split()

    # Convert str list to int list
    the_list = [int(each) for each in the_list]

    return the_list
Now let’s write the Quick_sort function, then we will duplicaet it and add some print statements to show sorting steps. So first the code for Quick Sort Algorithm – Fast Run. Here is the code ..
Screen shot of the Quick Sort Algorithm – Fast Run. |
Running this Function will return the sorted list and display it on the screen, I thought it will be nice if we show the sorting process Step by Step, so I copy the same Function with adding some print-statement in-between .. here is the code and the run-output..
Screen shot of the Quick Sort Algorithm – Detail Run.
|
 |
End of Sorting Algorithm (1.Quick Sort)
To Download my Python code (.py) files Click-Here
By: Ali Radwani
Python: Testing the SQL joines Commands
Learning : SQL Commands, DataBase, Python
Subject: Testing the SQL Join Commands
Introduction In this post we will apply several SQL Join Commands to test them, here are them:
| Left Join: All the Data in the Category |  |
| Right Join: All the Data in the Products |  |
| Inner Join: All the Data that in Both Tables. |  |
| Left Join Only Data in Category Table and NOT in Product Table. |  |
| Right Join:Only data in Product Table and NOT in Category Table. |  |
| Full Outre:All the Records in both Tables |  |
| Full Outre:All the data from the Category Table that are NOT linked to any Product, AND all the data in Product Table that has NO Category. |  |
First: let’s talk about the Tables,we will create two Tables (Category and Products) each will be very simple, the Category will have two fields [c_id, and cat_name],
the Products will have [p_id, pro_name, cat_id]. (cat_id is the foreign key that connicting the two tables). Some test data will be inserted in both Tables so we can demonstrate the SQL Commands. I create a Dictionary storing information/summary about the project named about_the_project the user can read it in run time.
Coding: We will do the fowlloing:
1. Set a Database for the Project.
2. Writing the codes to Create the Tables.
3. Writing the codes to insert some test Data in the Tables.
4. Creating a Menu for the Project.
5. Writing the Functions to Apply the SQL Join commmands.
NOTE: All the code will be avilable in the DOWNLOAD page.
Let’s import some lybraries, we will need this code:
import sqlite3, os
And here is the code to set the data base and create the connection.
# Create the data-base and name it as Share_S_System.
db_conn = sqlite3.connect (“sql_join_test.db”)
# set the connection.
c = db_conn.cursor()
First function is to create the Tables:
 # Function to create the Tables.

def create_tables ():

    # CREATE TABLE:
    category_t = "CREATE TABLE if not exists category_t (c_id INTEGER PRIMARY KEY AUTOINCREMENT, cat_name text)"
    c.execute(category_t)
    db_conn.commit()

    product_t = "CREATE TABLE if not exists product_t (p_id INTEGER PRIMARY KEY AUTOINCREMENT, p_name text, cat_id integer)"
    c.execute(product_t)
    db_conn.commit()
Now we will insert some Test data.
 # Function to insert some Data into the Tables

def insert_sample_data():

    #First we will call the Function to Crete the Table.
    create_tables ()
    print('\n   Category Table has been Created. ')
    print('\n   Product Table has been Created. ')

    # Insert into Category Table
    c.execute ("INSERT INTO category_t (cat_name) VALUES(:cat_name )",{"cat_name":"Mobile Phone"})
    c.execute ("INSERT INTO category_t (cat_name) VALUES(:cat_name )",{"cat_name":"Labtop"})
    c.execute ("INSERT INTO category_t (cat_name) VALUES(:cat_name )",{"cat_name":"Ext. HD"})
    c.execute ("INSERT INTO category_t (cat_name) VALUES(:cat_name )",{"cat_name":"CCTV Camera"})
    db_conn.commit()

    # Insert into Product Table.
    c.execute ("INSERT INTO product_t (p_name, cat_id) VALUES(:p_name, :cat_id )",{"p_name":"Note 9","cat_id":"1"})
    c.execute ("INSERT INTO product_t (p_name, cat_id) VALUES(:p_name, :cat_id )",{"p_name":"iPhone 12 pro","cat_id":"1"})
    c.execute ("INSERT INTO product_t (p_name, cat_id) VALUES(:p_name, :cat_id )",{"p_name":"HP","cat_id":"2"})
    c.execute ("INSERT INTO product_t (p_name, cat_id) VALUES(:p_name, :cat_id )",{"p_name":"Toshiba 1T HD","cat_id":"3"})
    c.execute ("INSERT INTO product_t (p_name, cat_id) VALUES(:p_name, :cat_id )",{"p_name":"iMac","cat_id":None})
    db_conn.commit()

    print('\n   Sample Date Inserted in both tables.\n   Select 9 from the Main Menu to see the Data')

    input('\n      ... Press any key to continue.  > ')
Now, let’s write the function for the Main Menu, it will return the user_choice.. here is the code..
 # Main Menu Function.

def main_menu():
    os.system('clear')
    print("\n==========[ Main Menu ]==========")
    print(' 1. About this Project.')
    print(' 2. All Categories. (Left Join: All in Category Only).')
    print(' 3. All Products. (Right Join: All in Product Only).')
    print(' 4. Only Categories that linked to a Products. (Inner Join: Only if in Ta AND Tb).')
    print(' 5. All Catigories that are NOT linked to a Product. (Left Join: Only in Category AND NOT in Product .')
    print(' 6. All Products that has NO Category. (Right Join: Only in Product AND NOT in Category.')
    print(' 7. All Categories and Products. (Full Outer Join in Both Table)' )
    print(' 8. All Categories that are NOT linked to any Product, and All Products that has NO Categotry. (Full Outer Join NOT in Both Table)')
    print(' 9. Show the Data')
    print(' 11. Setting: Create the Tables and Insert Some Sample Data. Run Only One Time.')
    print(' 99. Exit.')

    user_choice = input("\n Select from the Menu: > ")
    return user_choice
 |
The coming part of the code is calling the functions and running the SQL commands based on the user choice. Here is the Main-code-body..
 # The Main section of the Application..

while True :
    user_select = main_menu()

    if user_select == '1' :
        show_data('cat')

    if user_select == '2' :
        show_data('prod')

    if user_select == '3' :
        os.system('clear')
        print('\n   First: All the Data in Category and Product ')
        show_data('both','inside')
        print("\n==========[ Show Date: INNER JOIN ]==========\n")
        print('   Inner Join: Only the Data that exist in Category AND Product).')
        print('\n   The SQL Statment:\n    select category_t.c_id, product_t.p_name from category_t inner join product_t on category_t.c_id == product_t.cat_id\n\n ')
        c.execute ("select category_t.c_id, category_t.cat_name, product_t.p_name from category_t inner join product_t on category_t.c_id == product_t.cat_id  ")
        innerJ_list = c.fetchall()

        print('   [OUTPUT]:\n       Categories Name      |',' '*2,'Products Name    ')
        for innerJ_data in (innerJ_list):
            print('       ',innerJ_data[1],'.'*(25 - len(str(innerJ_data[1]))),innerJ_data[2])

        print('\n   We can see that the INNER JOIN Command fetched the records of Products that has a Category.\n   iMac Not listed Because it has No Category Data.')
        input('\n\n      ...Press any key to continue.  > ')

   if user_select == '4' :
        os.system('clear')
        print('\n   List of All the Data in Category and Product ')
        show_data('both','inside')
        print("\n==========[ Show Date: LEFT JOIN, Only Data in Categoty Table ]==========\n")
        print('   The SQL Statment:\n     select category_t.c_id, category_t.cat_name, product_t.p_name from category_t\n     left join product_t on category_t.c_id == product_t.cat_id\n     where product_t.cat_id is null\n')
        c.execute ("select category_t.c_id, category_t.cat_name, product_t.p_name from category_t left join product_t on category_t.c_id == product_t.cat_id where product_t.cat_id is null")
        leftJ_list = c.fetchall()
        print('   [OUTPUT]:\n       Categories Name      |',' '*2,'Products Name    ')
        for leftJ_data in (leftJ_list):
            print('         ',leftJ_data[1],'.'*(25 - len(str(leftJ_data[1]))),leftJ_data[2])

        print('\n   We can see that the LEFT JOIN Command fetched all Categories that are not used/linked to/with any Product.\n   CCTV Camera is Not linked. So We can Say: We Do Not have any CCTV Camera Products.')
        input('\n\n      ...Press any key to continue.  > ')

    if user_select == '5' :
    ....
# Just to save the time, i will not post all the code here, you can see all the code and download
# the .py source code from the download page.
Here are some screen shot of the output ..
| The Main Menu
|
| Output Screen for Option 3: Only Categories that linked to a Products. (Inner Join: Only if Data in Category AND Product) 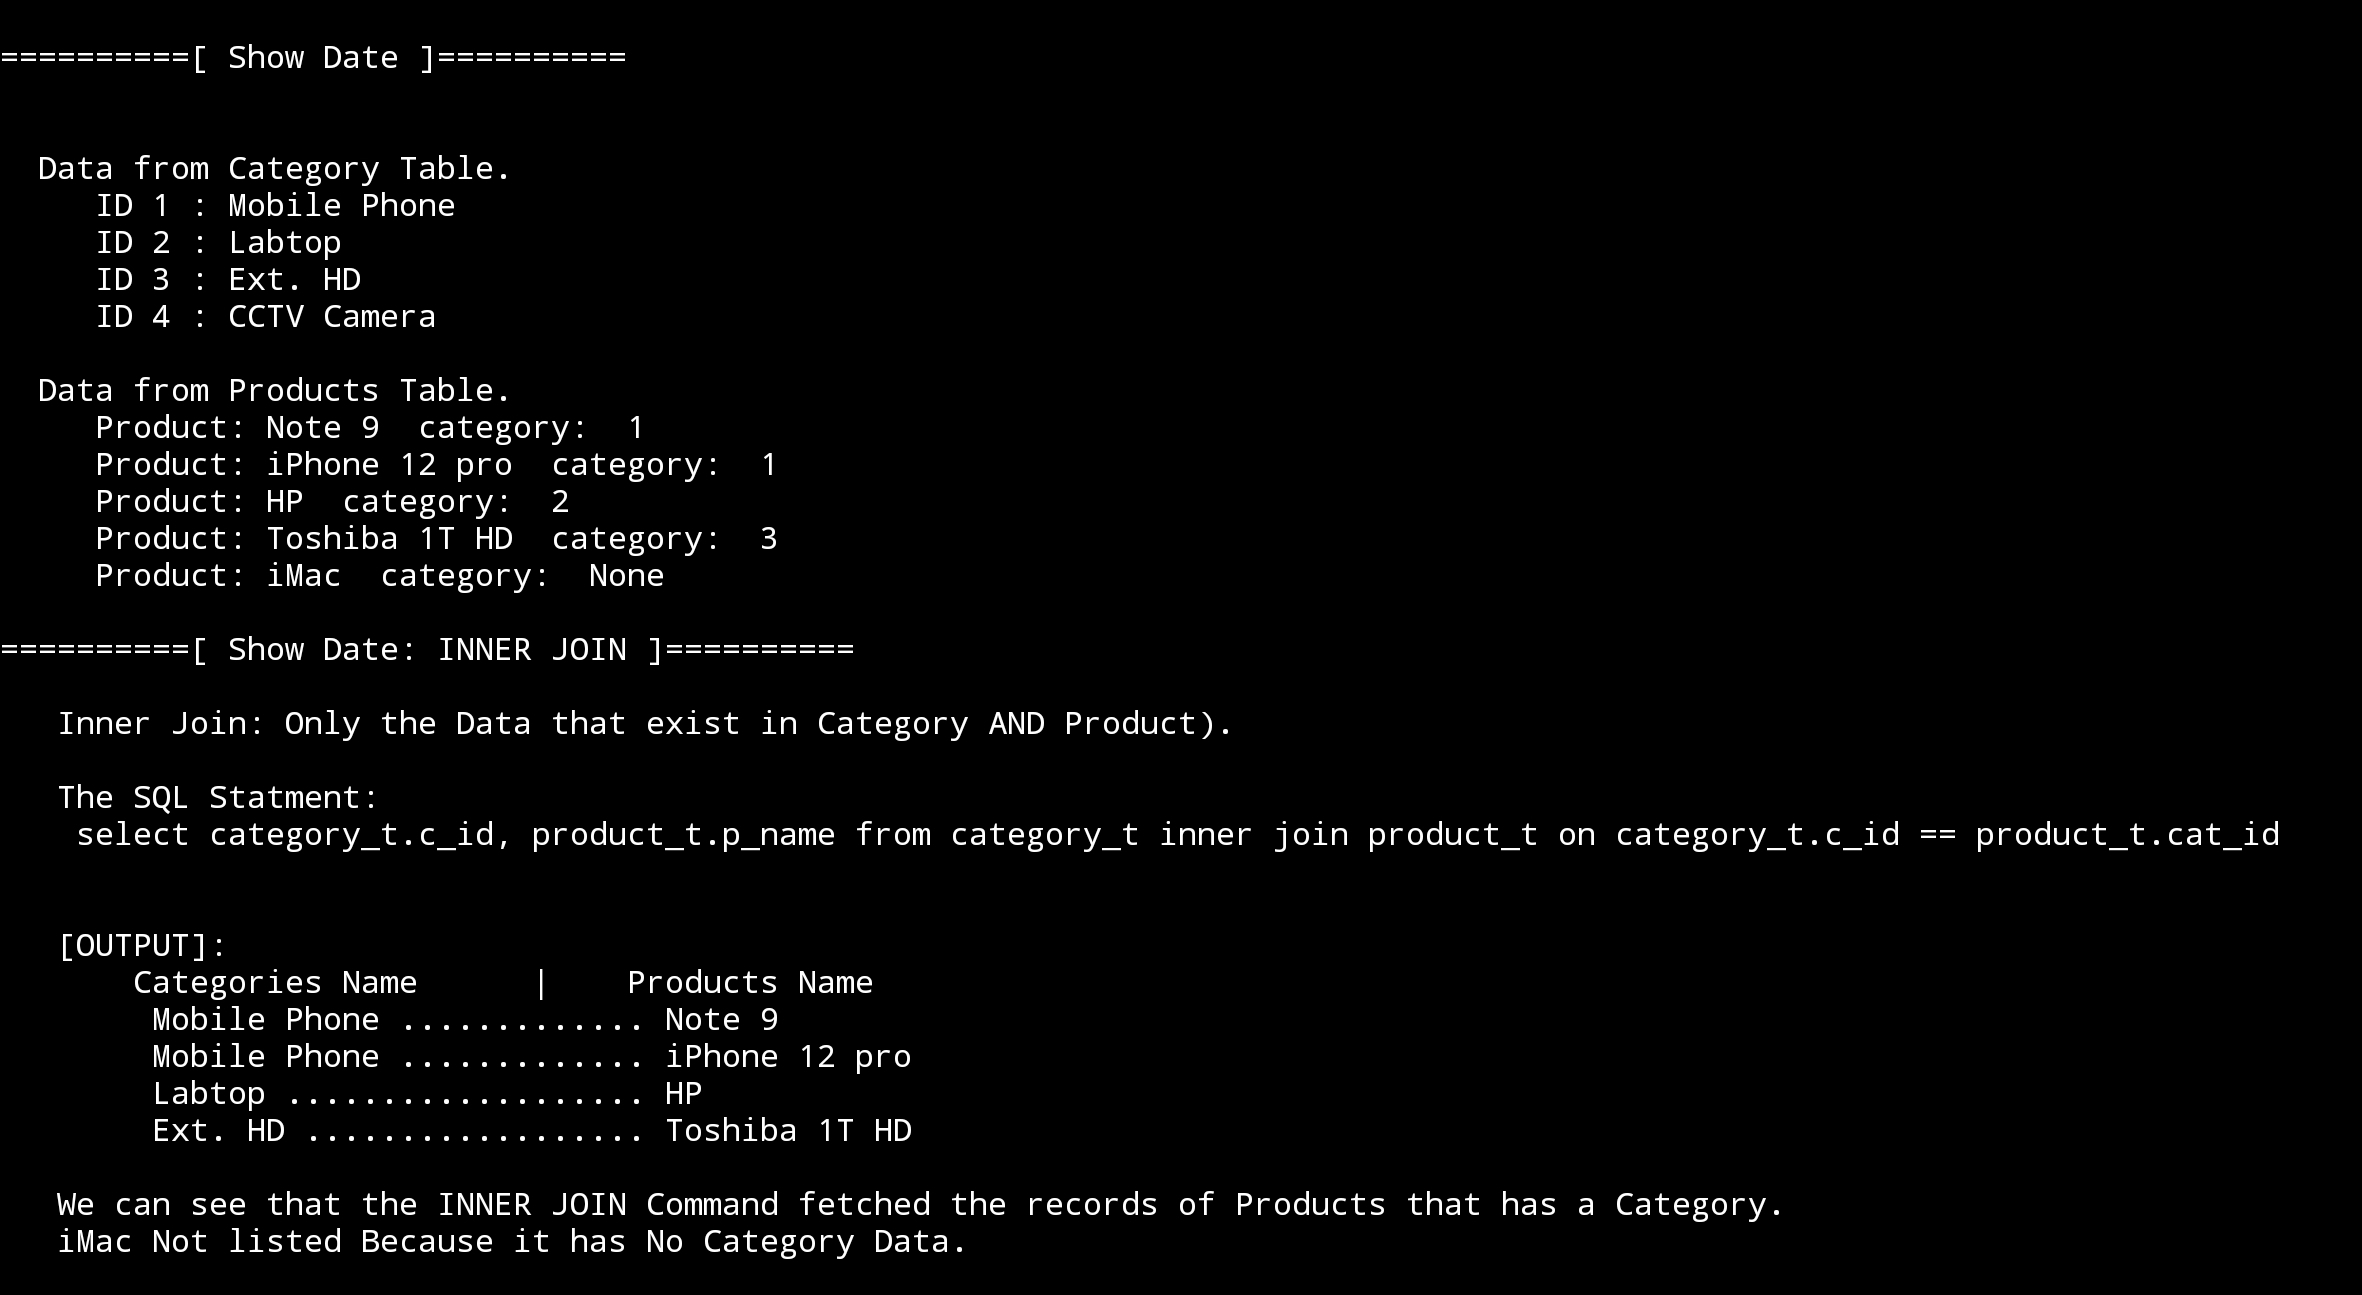 |

End of the Post, and all the code is available to download from the Download page.
To Download my Python code (.py) files Click-Here
By: Ali Radwani
Python: My Orders Tracker P-4
Learning : Pythn, sqlite, Database, SQL
Subject: Create a system to track the orders
In this last part we will write the code to Edit an Order, in editing an order function first we will show all orders and will ask the user to select the one to be EDIT, then we will display that order detail on the screen and ask the user to confirm the action by entering ‘Y’ [our code will handel both y and Y]. We will ask the user about each attribute in the Order details if it need to be change or [Just press Enter to Keep the Current Data], also if the user enter ‘e’ or ‘E’ we will exit from the Editing mode.
Here is the code ..
# Function to Edit an Order

def edit_order():
    os.system('clear')
    print("\n==========[ Edit Orders ]==========")

    show_order('yes')

    edit_order = input('   Select the Order ID to be Edited. [E to Exit] > ')

    if edit_order in ['e','E'] :
        return
    elif not edit_order.isnumeric() :
        input('\n   You need to enter an Order''s ID [Numeric]. .. Press any Key .. ')
        return

    try:

        c.execute ("select * from orders where o_id ={}".format(edit_order))
        order_list = c.fetchone()

        if order_list == [] :
            input('\n   ID {} Not Exsist. .. Press any key to continue.  '.format(edit_order))
            return

        os.system('clear')
        print("\n==========[ Edit Orders ]==========\n")
        print('\n   Details of the Order you select:\n ')

        print(" "*15,"ID: ",order_list[0])
        print(" "*13,"Date: ",order_list[1])
        print(" "*5,"Order Number: ",order_list[2])
        print(" "*12,"Price: ",order_list[4])
        print(" "*9,"Quantity: ",order_list[5])
        print(" "*3,"Shipment Price: ",order_list[6])
        print(" "*7,"Total Cost:  {:.2f}".format((order_list[4]*order_list[5]) + order_list[6]))
        print(" "*6,"Description: ",order_list[3])
        print(" "*12,"Image:",order_list[8])
        print(" "*13,"Link:",order_list[7])

        user_confirm = input("\n\n   You Select to EDIT the above Order, Enter Y to confirm, E to Exit. > ")
        if user_confirm in ['e','E'] :
            input('\n   You entered ''E'' to Exit. Nothing  will be change. Press any key. ')
            return

        if user_confirm in ['y','Y'] :
            #To Edit the order..

            print("#"*57)
            print("##"," "*51,"##")
            print("##   NOTE: Enter E any time to EXIT/Quit."," "*12,"##")
            print("##     OR  JUST Press Enter to keep the Current data."," ##")
            print("##"," "*51,"##")
            print("#"*57,)

            while True :

                new_date = input (f'\n   The current date is: {order_list[1]}, Enter the New date as[dd-mm-yyyy] > ')

                if e_to_exit(new_date) =='e' : return
                if new_date =="" : break   # Break the while loop if the user want to keep the current Date.

                if date_validation (new_date) == 'valid' :
                    break
                else :
                    print(date_validation (new_date))


            new_onum = input (f'\n   The current Order Number is: {order_list[2]}, Enter the New Order Number. [E to Exit]. > ')
            if e_to_exit(new_onum) =='e' : return

            new_qunt = input (f'\n   The current Quantity is: {order_list[5]}, Enter the New Quantity. [E to Exit]. > ')
            if e_to_exit(new_qunt) =='e' : return

            new_price = input (f'\n   The current Price is: {order_list[4]}, Enter the New Price. [E to Exit]. > ')
            if e_to_exit(new_price) =='e' : return

            new_ship_price = input (f'\n   The current shipment Price is: {order_list[6]}, Enter the New Quantity. [E to Exit]. > ')
            if e_to_exit(new_ship_price) =='e' : return

            new_link = input (f'\n   The current link is: {order_list[7]}, Enter the New Link. [E to Exit]. > ')
            if e_to_exit(new_link) =='e' : return

            new_image = input (f'\n   The current Image is: {order_list[8]}, Enter the New Image (path). [E to Exit]. > ')
            if e_to_exit(new_image) =='e' : return


            new_desc = input (f'\n   The current Description is:\n     {order_list[3]}.\n\n      Enter the New Description. [E to Exit]. > ')
            if e_to_exit(new_image) =='e' : return


            # Updating the record in the DataBase.
            if new_date > '' and new_date != "e" :
                c.execute("update orders set order_date = '{}' where o_id = {}".format(new_date,int(order_list[0])))
                db_conn.commit()

            if new_onum > '' and new_onum != "e" :
                c.execute("update orders set order_num = '{}' where o_id = {}".format(new_onum,int(order_list[0])))
                db_conn.commit()

            if new_qunt > '' and new_qunt != "e" :
                c.execute("update orders set order_quantity = '{}' where o_id = {}".format(new_qunt,int(order_list[0])))
                db_conn.commit()

            if new_price > '' and new_price != "e" :
                c.execute("update orders set order_price = '{}' where o_id = {}".format(new_price,int(order_list[0])))
                db_conn.commit()

            if new_ship_price > '' and new_ship_price != "e" :
                c.execute("update orders set order_price = '{}' where o_id = {}".format(new_ship_price,int(order_list[0])))
                db_conn.commit()

            if new_link > '' and new_link != "e" :
                c.execute("update orders set order_link = '{}' where o_id = {}".format(new_link,int(order_list[0])))
                db_conn.commit()

            if new_image > '' and new_image != "e" :
                c.execute("update orders set order_img = '{}' where o_id = {}".format(new_image,int(order_list[0])))
                db_conn.commit()

            if new_desc > '' and new_image != "e" :
                new_desc = " ".join([word.capitalize() for word in new_desc.split(" ")])

                c.execute("update orders set order_desc = '{}' where o_id = {}".format(new_desc,int(order_list[0])))
                db_conn.commit()

            input('\n   One record has been EDITED and Saved... \n      ... Press any key to Continue ...')

        else:
            input('\n      Wrong input ... Press any key to continue ..')

    except:
        pass
[All the System Codes available in Download Page.]
Finish: Now we have an application that will store and retrieve our simple order data.
Enhancement: We can do some enhancement in [link and image] data part to show and display them in better way.
| Part 1 | Part 2 | Part 3 | Part 4 |
To Download my Python code (.py) files Click-Here
By: Ali Radwani
Python: Shares Speculation System – Part 7
Learning : Python, DataBase, SQL, SQlite3
Subject: Plan, Design and Build a Shares Speculation System
Project Card:
Project Name: Shares Speculation System
By: Ali
Date: 2.7.2020
Version: V01-2.7.2020
In this Part we will write the Function to Delete a Transaction from the System, and will write the last part of show_all_Transaction function.
First we will write a Function to Delete a Transaction, we have two types of Transactions “Buying” and “Selling” so the user will select the Transaction Type to delete.
1. Buying Transaction: If the user select to Delete a Buying Transaction, we will call show_all function to display all the Buying Transactions and the ask the user to Enter the ID of the record to be Deleted. Here is the Code ..
| |
Then we will print-out the Selected Transaction Details and ask the user to Confirm the Deleting action by Entering ‘Y’.
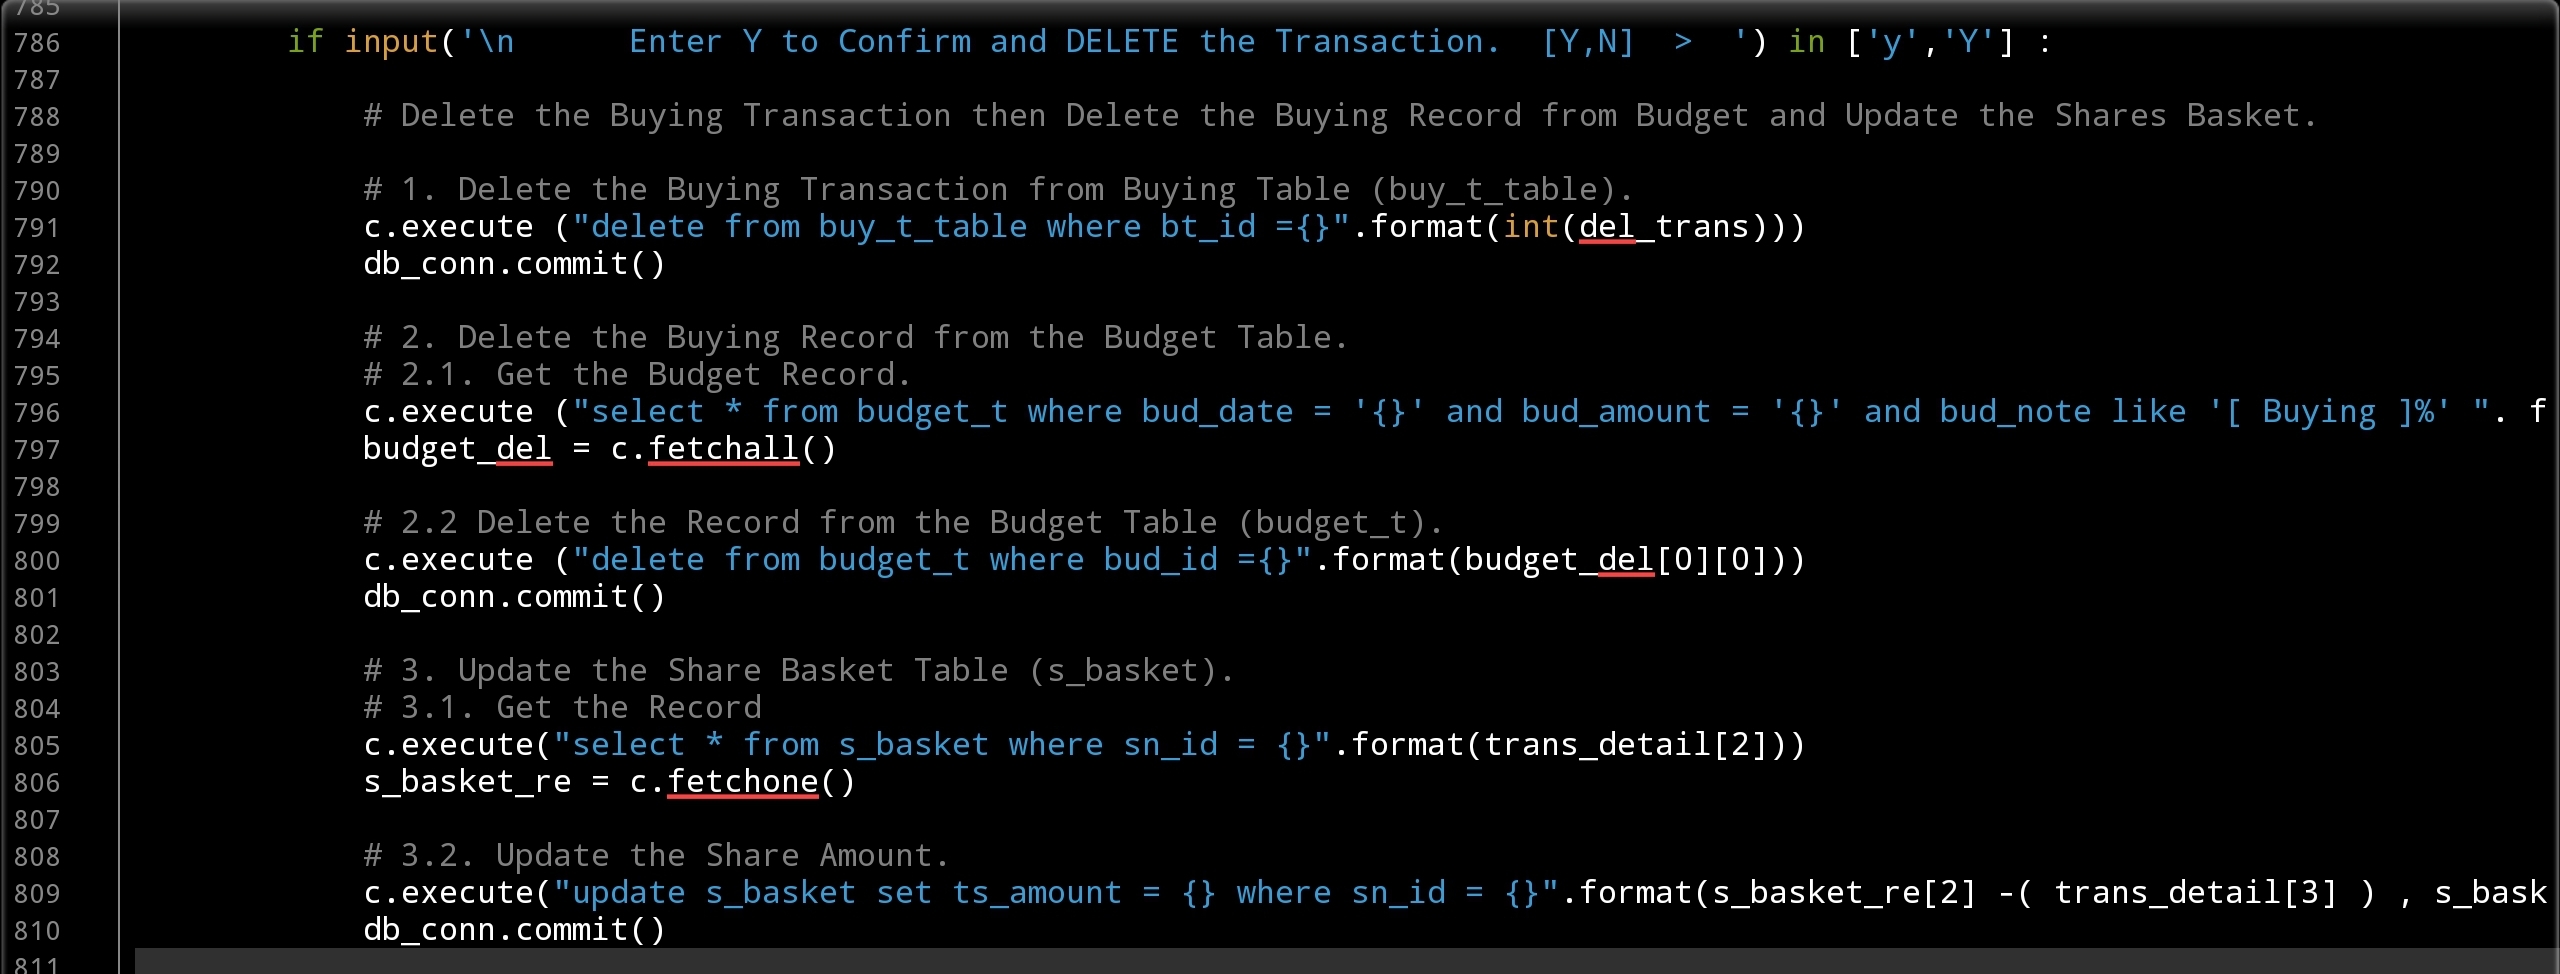
After Confirming we need to perform or to Aplay three parts of code:
1. Deleting the Buying Transaction from Buying Table (buy_t_table).
2. Deleting the Buying Record from the Budget Table.
3. Updating the Share Basket Table (s_basket).
For the “Update the Share Basket Table (s_basket).” we need to Subtract the amount of the shares from the Share Basket.
Here is the code for all three action..
 |
The Same actions will be taken if the user select to Delete a Selling
transaction. So if the user select “2. Selling Transaction:” we will call show_all function to display all the Selling Transactions and the ask the user to Enter the ID of the record to be Deleted and will display the Transaction Details. Here is the Code ..
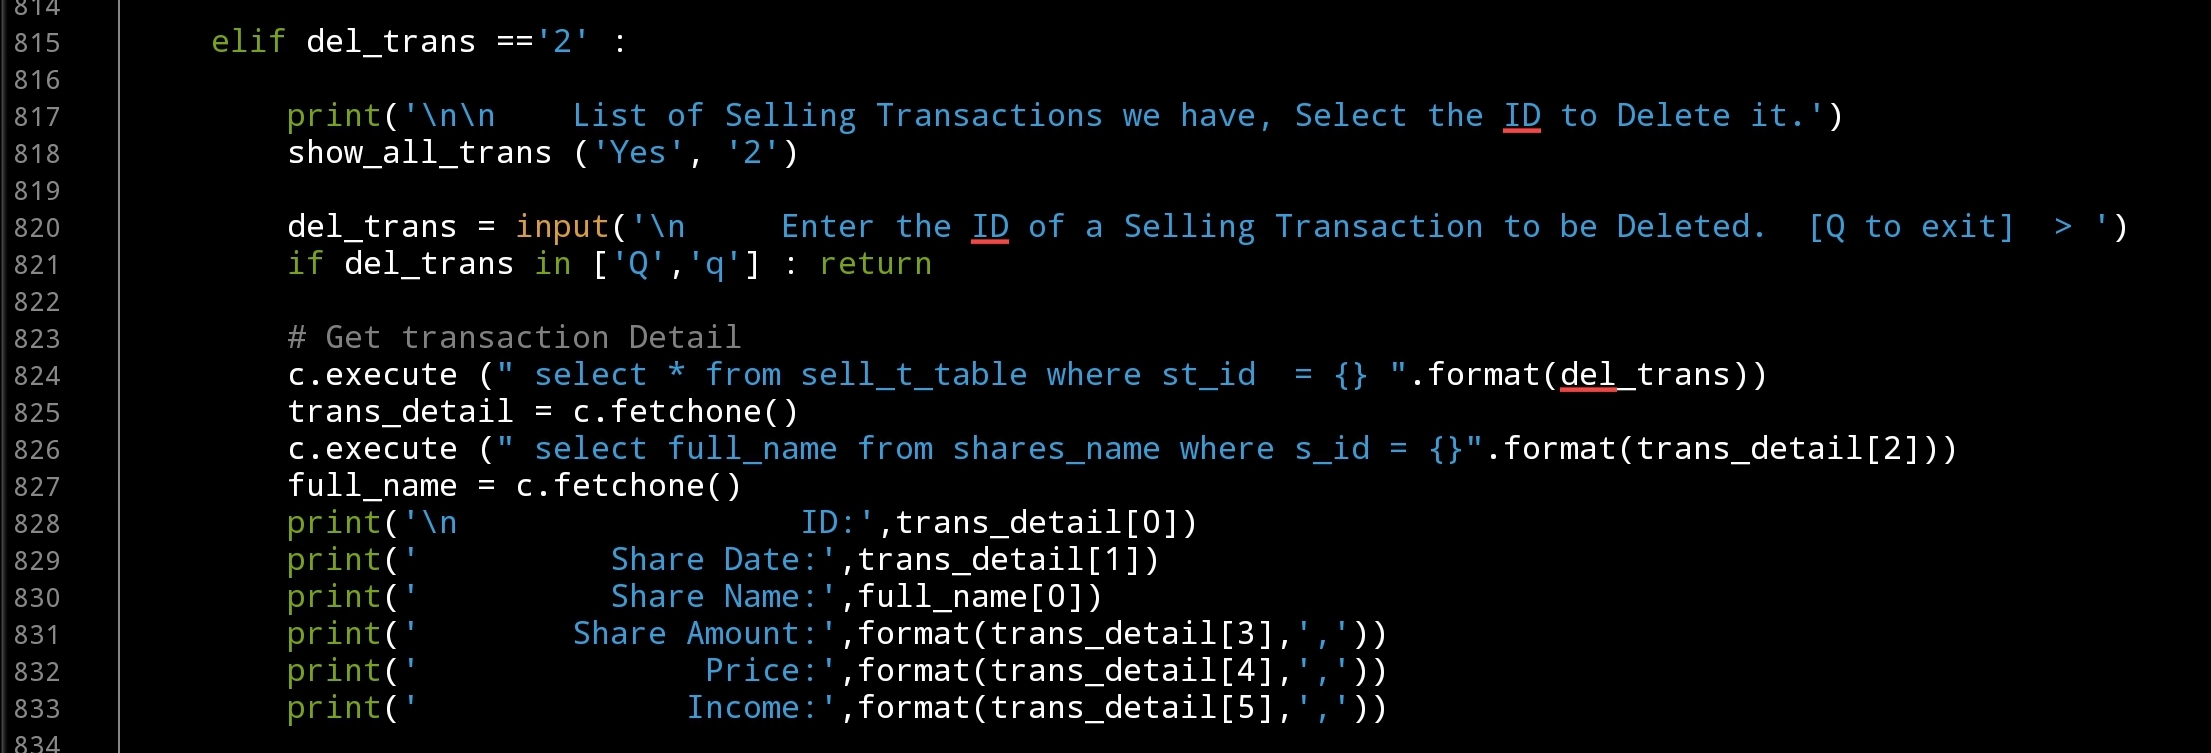 |
And will waite for the user to Confirm the Deleting action, then again three blocks of code will Delete and update records in our system, here are the code ..
 |
Now we finish the def del_trans(): Function to Delete a Buying or Selling Transaction and will work on the last part of def show_all_trans (inside = ‘No’, show=’3′): to Show/Display both Buying and Selling Transactions in one table format. To do so First we will RUN two SQL commands to ‘fetchall’ Buying and Selling Transaction… Here is the code ..
# Get All Sell Transactions Order by id desc
c.execute (" select * from sell_t_table where st_id > 0 order by st_id desc")
show_s_trans = c.fetchall()

# Get All buy Transactions Order by id desc
c.execute (" select * from buy_t_table where bt_id > 0 order by bt_id desc")
show_b_trans = c.fetchall()
Then we print-out the Table header as the following line:
print(“\n”,” “*11,”{:<9}{:<13}{:<30}{:<16}{:<11}{:<15}{}”.format(‘ID’,’Date’,’Share Name’,’SAmount’,’Price’,’Cost’,’Income’))
Then using a For loop we will print-out the transactions in same format of the table header .. Here is the full Code
 |
Last thing we will print the Totals of Investment, Incomes and the Net Profit.
print(" "*73,'Total Investment is: {:,}'.format(total_inv))
print(" "*76,'Total Incomes is: {:,}'.format(total_inc))
print(" "*75,"-"*30,"\n"," "*75,'   Net Profit is: {:,} '.format(total_inc - total_inv))
We Done with this Part ..
Coming Up: In the Next post we will write the Function to Edit a Transaction.
[NOTES]
1. Part-1 has no code file.
2. We are applying some basic Validations on some part of the code, and assuming that the user will not enter a messy data.
3. This Application Purpose for Saving Transactions and NOT for Desetion Making and Dose’t Have any type of AI or ML Model to Predict the Prices and/or Giving Sugestions on Buying or Selling Shares.
:: Shares Speculation System ::
| Part 1 | Part 2 | Part 3 | Part 4 | Part 5 |
| Part 6 | Part 7 | Part 8 |
All the code are available ..
To Download my Python code (.py) files Click-Here
By: Ali Radwani
Python: Shares Speculation System – Part 5
Learning : Python, DataBase, SQL, SQlite3
Subject: Plan, Design and Build a Shares Speculation System
Project Card:
Project Name: Shares Speculation System
By: Ali
Date: 2.7.2020
Version: V01-2.7.2020
In this part we will talk or say will work on two functions, Buying Transactions and Show All Transactions, both are fill in Transactions Managment. But first we will do some changes in our main codes as following:
1. Add New Table to the DataBase named s_basket using this code:“CREATE TABLE if not exists s_basket (sb_id INTEGER PRIMARY KEY AUTOINCREMENT, sn_id integer, ts_amount float, min_p float, max_p float)” also we will Insert the zero record as: c.execute (“INSERT INTO s_basket (sb_id) VALUES(:sb_id)”,{“sb_id”:0})
2. Changing in Main Menu.
[Important Note]: This application Purpose for Saving Transactions and NOT for Desetion Making and dose’t have any type of AI or ML Model to Predict the Prices and/or Giving Sugestions on Buying or Selling Shares.
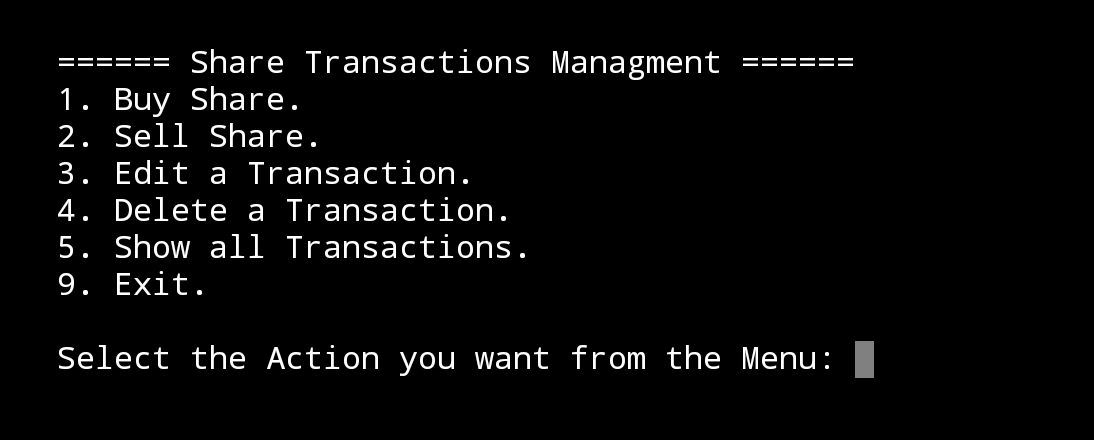
Transactions Managment: In our previous parts and codes we published, we used two options in the main menu (Buying Transaction, Selling Transaction) in this part we will change this to have one menu option called Transactions Managment this option will take the user to a sub-menu having some other options as shown:
The Main-Menu Code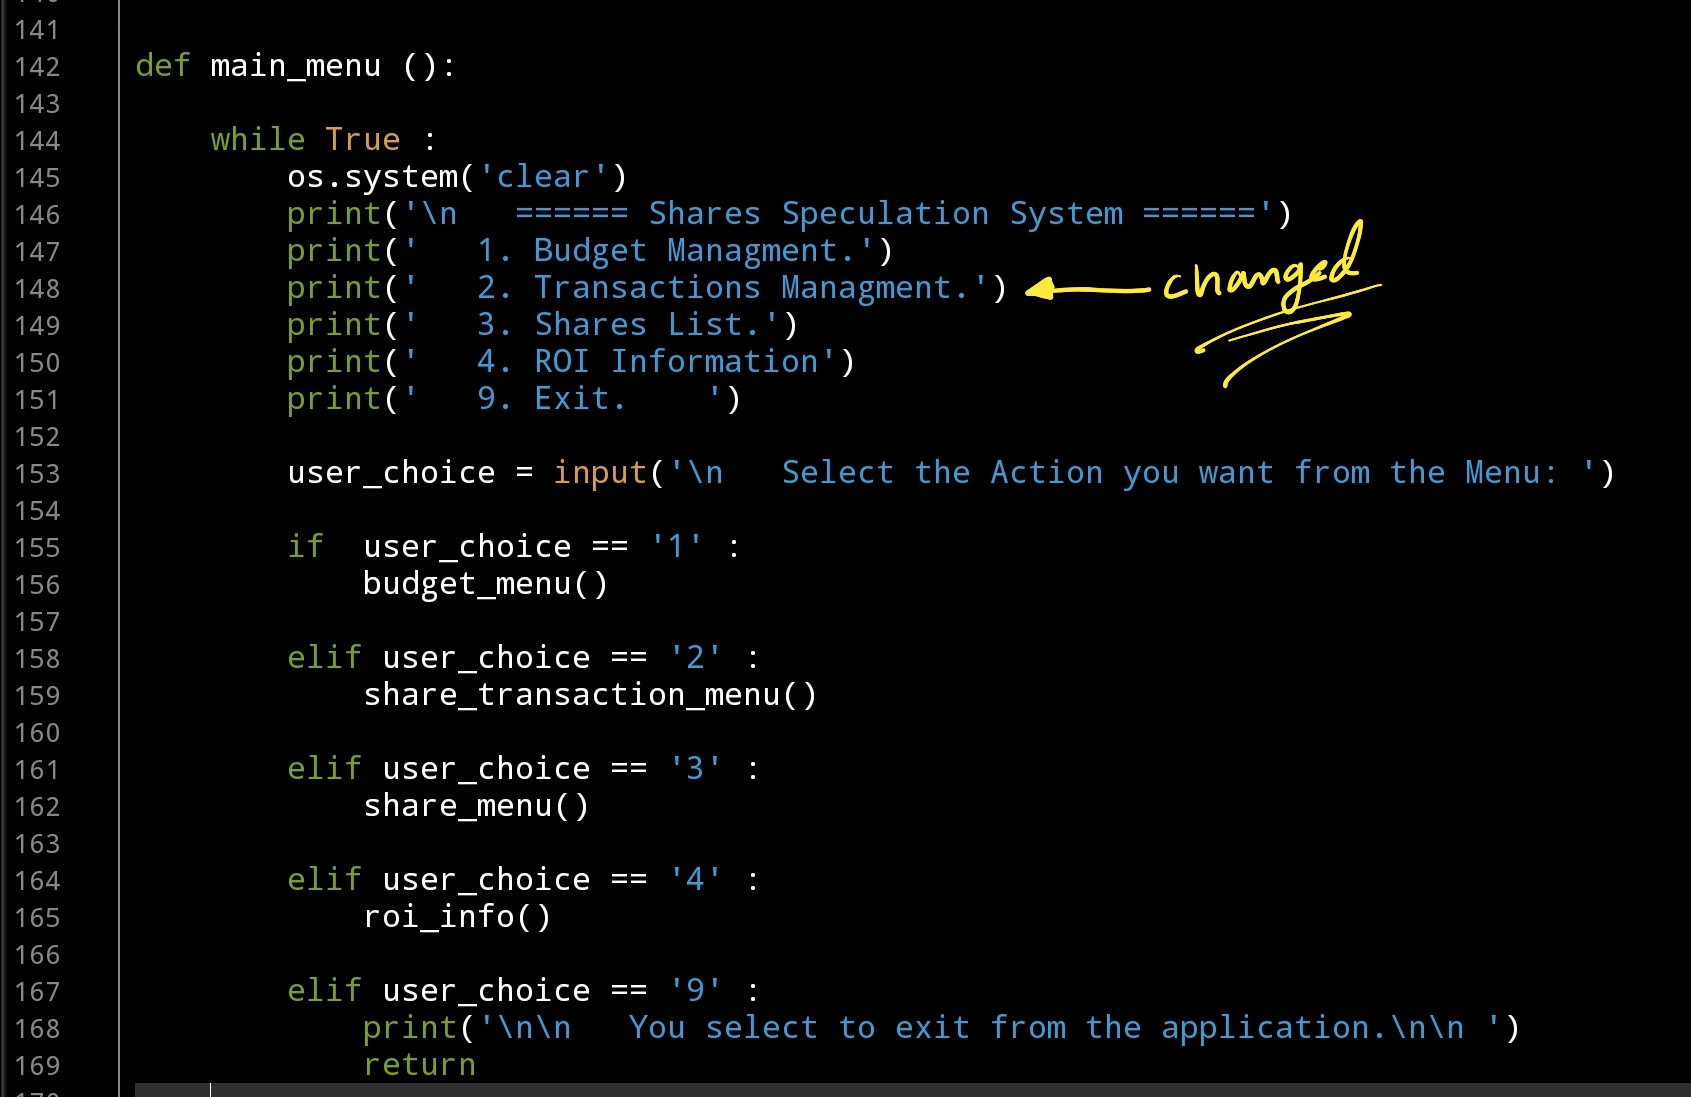 Out-Put 
|
Transaction Managment Menu
Out-put |
Buying Transactions: we will start writing the functions to Insert a Buying Transactions, in this function first we will display a list of Shares we have and the user will select the ID of the share needed, here is the code ..
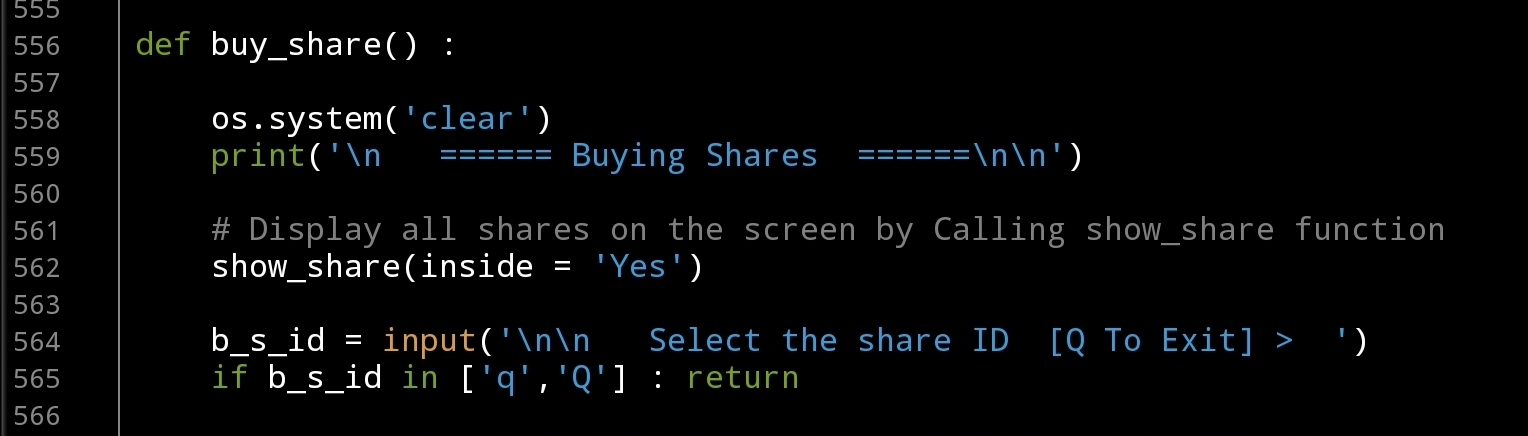 |
Now we will use the ID to get the selected share Full-Name and it’s Abbreviation also the amount of shares we have with the lowest and highest price we bought this share before and will display all this information on the screen. Next step is to collect the buying record information to be saved, so we will ask the user to Enter the Date, Share Amount and the Price. With each Data-Entry line we will give the user the ability to terminate the process by Entering ‘Q’, for the date we will use date_validation function. Here is the code for this section..
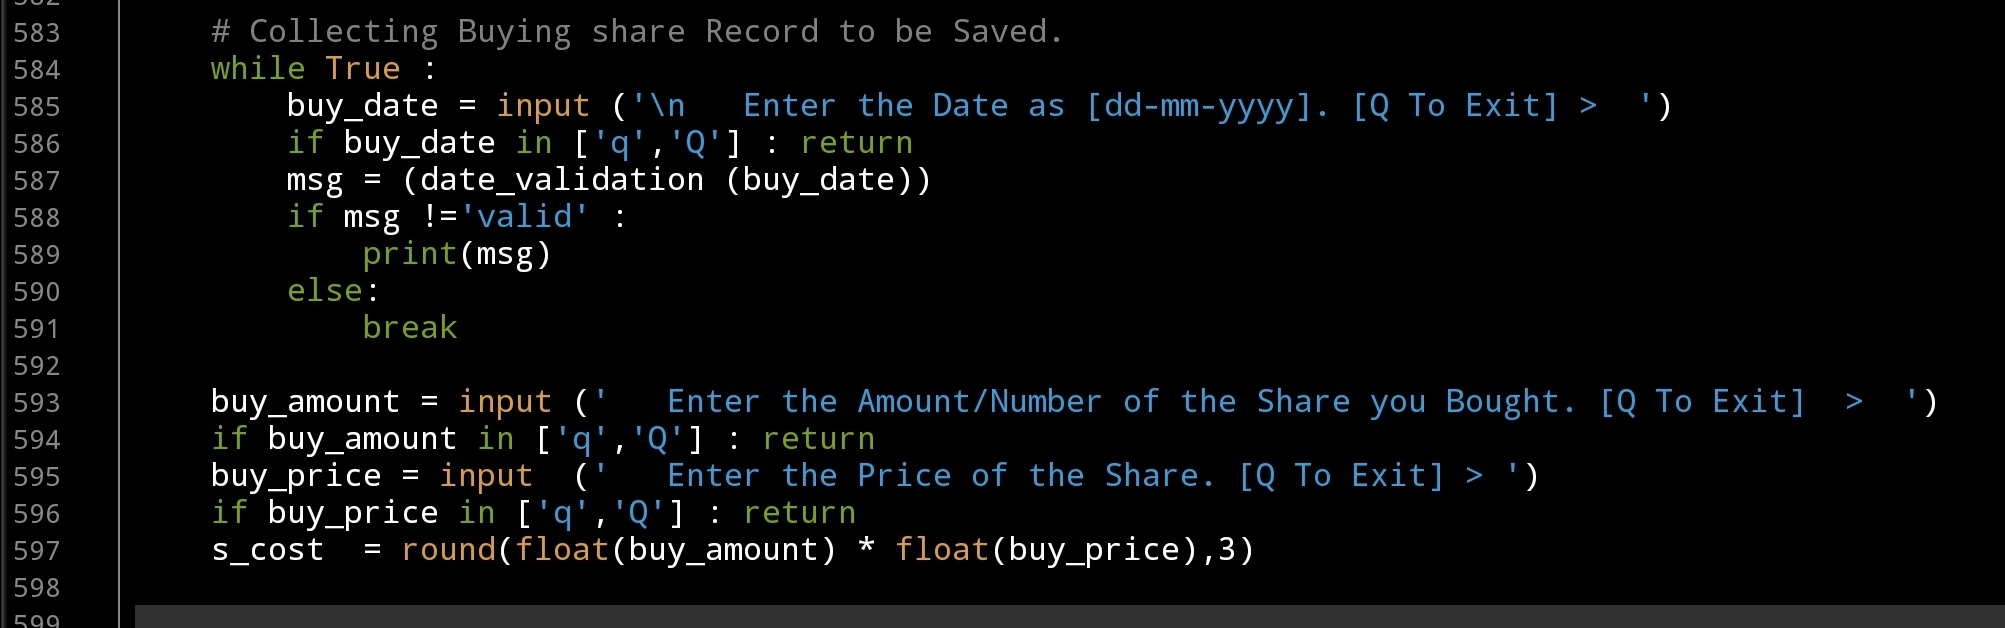 |
After that we are ready to Insert the data into the Database, and update other records. Here is the code..
 |
Now we have saved one Buying record, before we continu with Selling Transactions we will write the Show All Transactions this function will display all the records of Buying Transactions and Selling Transactions. Now we will write the section to display the Buying Transaction records. We will call the function def show_all_trans () and we will ask the user to select “What type of Transaction to Show:”1. Buying Transaction.2. Selling Transaction.3. All Transactions.
then we will display the transactions in a table format. In this part we will write the code for the Buying Transaction. Here is the code ..
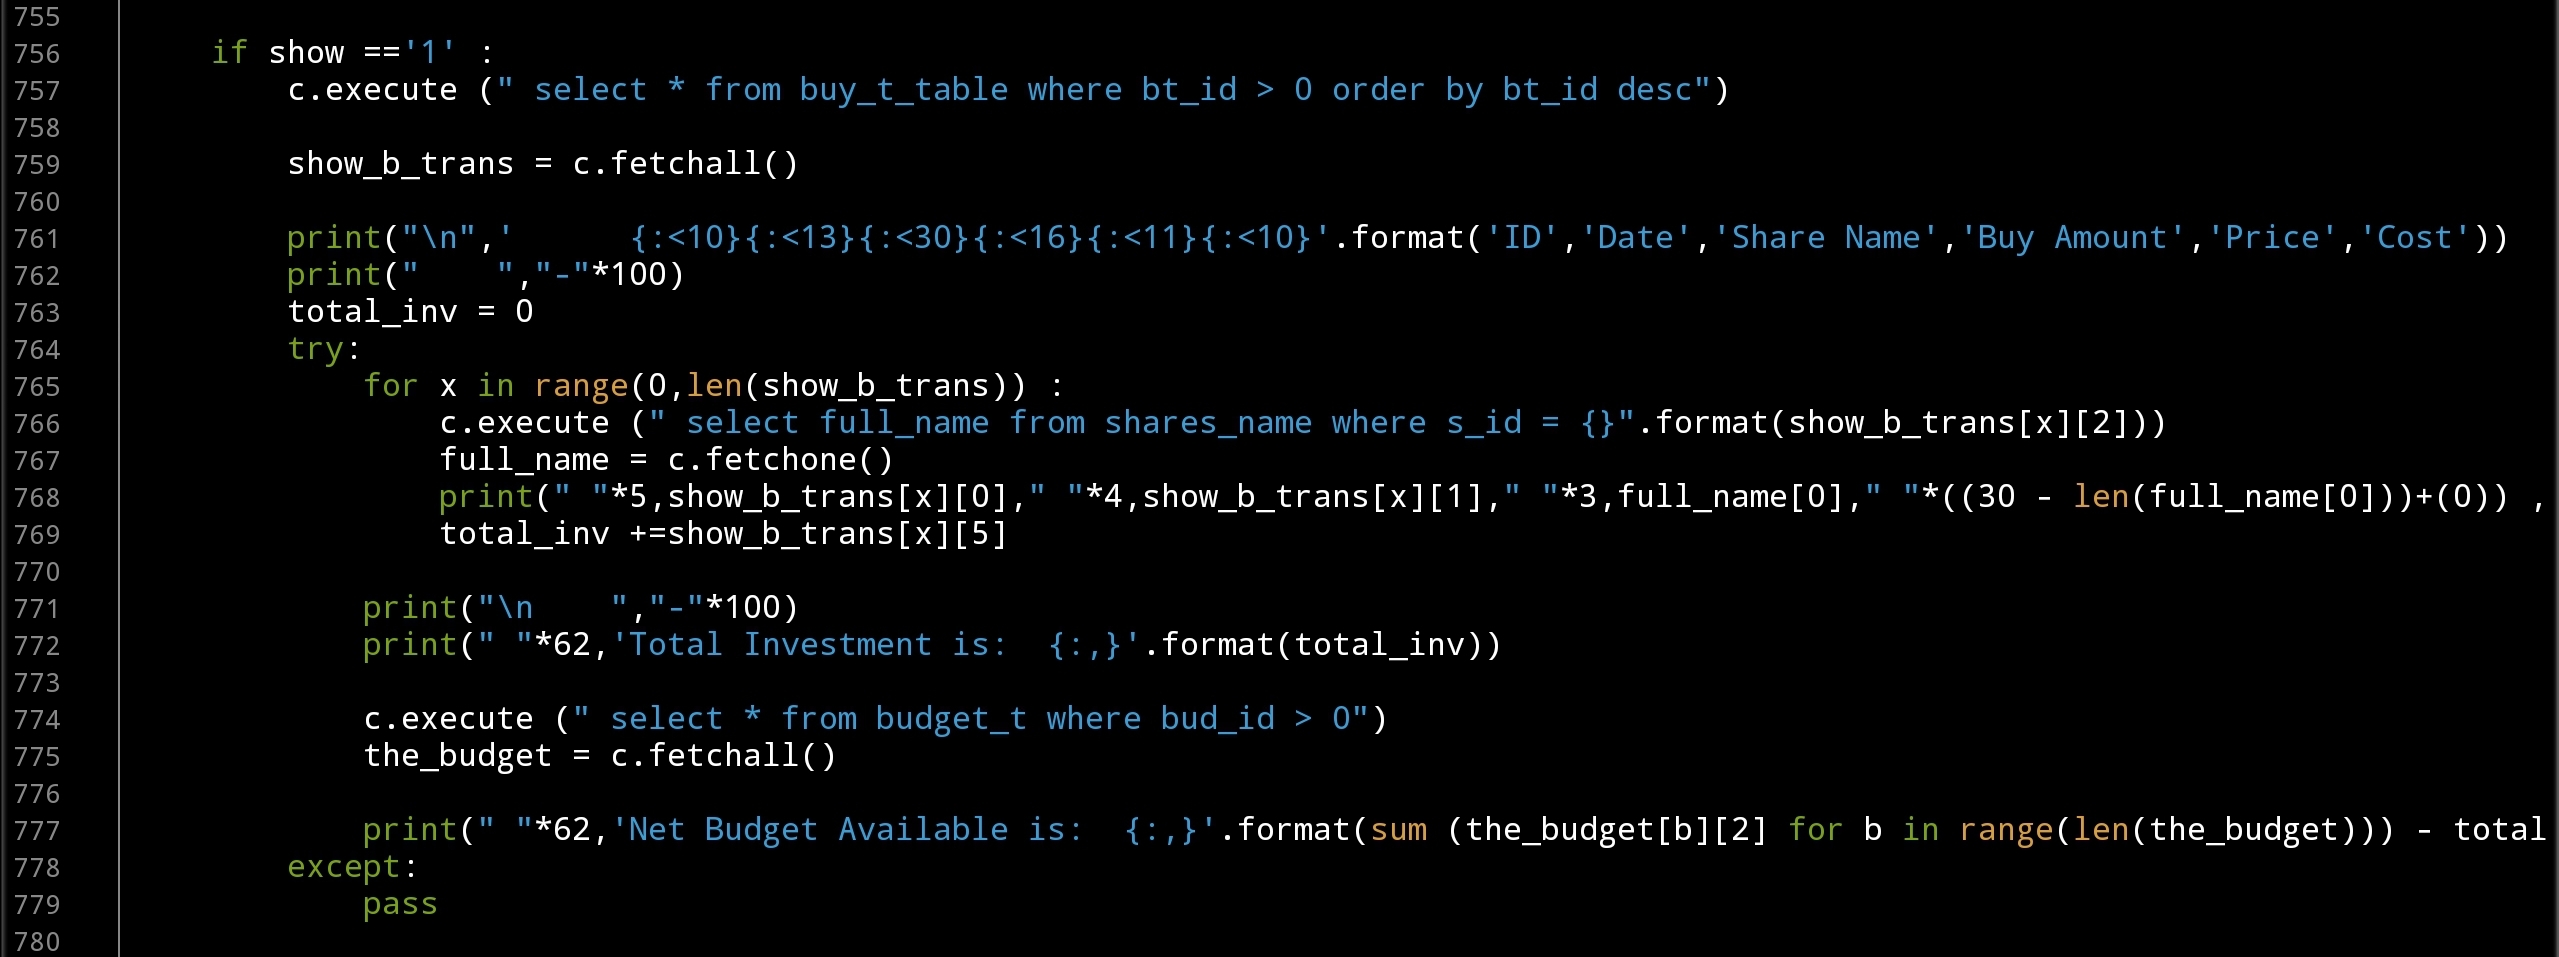 |
We Done in this Part ..
Coming Up: In Next part we will write the Function Save Selling Transactions to our system, also updating the Show
[NOTES]
1. Part-1 has no code file.
2. We are applying some basic Validations on some part of the code, and assuming that the user will not enter a messy data.
3. This Application Purpose for Saving Transactions and NOT for Desetion Making and Dose’t Have any type of AI or ML Model to Predict the Prices and/or Giving Sugestions on Buying or Selling Shares.
:: Shares Speculation System ::
| Part 1 | Part 2 | Part 3 | Part 4 |
| Part5 |
All the Codes in this Post Available here ..
To Download my Python code (.py) files Click-Here
By: Ali Radwani
Python: Shares Speculation System – Part 3
Learning : Python, DataBase, SQL, SQlite3
Subject: Plan, Design and Build a Shares Speculation System
Project Card:
Project Name: Shares Speculation System
By: Ali
Date: 2.7.2020
Version: V01-2.7.2020
In this part we will start writing some codes for our System, we will start with Budget Managment.
Budget: In the Shares Speculation System, and before the user can submit any Buying Transactions the system will check If there is enough money in the Budget Repository, so first we have to Insert a Budget. Therefore, we will start from Budget Managment.
Budget Managment will have five sub-menu as follow:
1. Add New Budget.
2. Withdraw Budget.
3. Edit a Budget.
4. Delete a Budget.
5. Show all Budget.
9. Exit.
So we will start writing the functions for each one.. let’s start with the Budget Menu, we use the while True: loop to keep the Menu until uer_choice == 9 where we return the user to the previous Menu. Here is the code:
 |
Now, lets go through each Function..
Add New Budget: This Function will ask the user to Enter three pieces of information, The Date, The Budget Amount and if the user want to add some Notes such as cheque number or the source of the mouney/fund. For the Date, we want to make sure that the user entry is in the format we want and it is a date, so i wrote a function called date_validation () we will talk about this function later. For the Note part after the user enter the notes we will do (upper-case) for each first character in the text using this code: bud_note = ” “.join([word.capitalize() for word in bud_note.split(” “)]) Here is the full code ..
 # Add New Budget to the system.

def add_budget ():
    os.system('clear')
    print('\n   ====== Add New Budget ======\n\n')
    print('   Enter the Details of the Budget..\n')

    while True :
        bud_date = input ('   Enter the Date as [dd-mm-yyyy].  >  ')
        msg = (date_validation (bud_date))
        if msg !='valid' :
            print(msg)
        else:
            break
    bud_amount = input ('   Enter the Budget Amount.  >  ')
    bud_note = input ('   Enter any Notes if you want. [Hint: Cheque No.] >  ')
    bud_note = " ".join([word.capitalize() for word in bud_note.split(" ")])
    c.execute ("INSERT INTO budget_t (bud_date ,bud_amount, bud_note)  VALUES(:bud_date ,:bud_amount, :bud_note)",{"bud_date":bud_date ,"bud_amount":float(bud_amount), "bud_note":bud_note})
    db_conn.commit()

    input('\n\n        ... Press any Key to Exit')
For the Budget Date we want the date to be in certain format, so we wrote a function that will take the user_input and check it’s format then return a message back, the message will be ‘Valid’ if the date format is correct, otherwise the message will give a hint if format error as:
Date Not Valid “Bad Year” or Date Not Valid “Bad Month” or Date Not Valid “Bad Day”. Here is the code for the Date Validation Function ..
 |
Next we will write a function so we can withdraw some amount of money from the Budget, Why?? If we assume we start our Shares Speculation with 100,000$ and after several Buying and Selling we gain say 50,000$ as Profits, and we want to use this cash the [50,000$] to buy something; therefore we need to subtract / withdraw from the system. Here is the code to do this and the system will add [ WITHDRAW ] to the Note field.
 # To withdraw form the Budget


def sub_budget ():
    os.system('clear')
    print('\n   ====== Withdraw from Budget ======\n\n')
    print('   Enter the Details of Withdraw Amount..\n')
    while True :
        bud_date = input ('   Enter the Date as [dd-mm-yyyy].  >  ')
        msg = (date_validation (bud_date))
        if msg !='valid' :
            print(msg)
        else:
            break

    bud_amount = input ('   Enter the Withdraw Amount.  >  ')
    if int(bud_amount) > 0 :
        bud_amount = int(bud_amount) * (-1)
    bud_note = input ('   Enter any Notes if you want. [Hint: Cheque No.] >  ')
    bud_note = "[ WITHDRAW ], " + bud_note
    bud_note = " ".join([word.capitalize() for word in bud_note.split(" ")])
    c.execute ("INSERT INTO budget_t (bud_date ,bud_amount, bud_note)  VALUES(:bud_date ,:bud_amount, :bud_note)",{"bud_date":bud_date ,"bud_amount":bud_amount, "bud_note": bud_note})
    db_conn.commit()

    input('\n\n        ... Press any Ket to Exit')
Now, in both Edit and Delete function we need to show the Budgets we have so the user will select the one for processing. So we will write the code to show Budgets in the system and we will present it as a Table. Here is the code ..
 # To show the Budget Table

def show_budget (inside='No'):
    if inside =='No' :
        os.system('clear')
        print('\n   ====== Show Budgets ======\n\n')
        print('   List of Budgets ..\n')
    c.execute ("select * from budget_t where bud_id >0")
    budgets = c.fetchall()
    print('      {:<10}{:<13}{:<16}{}'.format('ID','Date','Amount','Note'))
    print("    ","-"*70)
    try:
        for x in range(0,len(budgets)) :
           print("      {:<8}{:<14}{:,}{:0")
        budget_amount = c.fetchone()
        print('\n\n    The Total Amount Budgets in the Account is : {:,} '.format(budget_amount[0]))

        input('\n   ... Press any key to Exit')
 |
So we have another two Functions [Edit, Delete] to go, the easyer one is Deleting Budget. In Delete function we will display a table with all Budgets we have in the system and the user will enter the ID of the Budget to be Deleted, we will ask the user to confirm the action then if CONFIRMED the Budget will be Delete. .. Here is the code ..
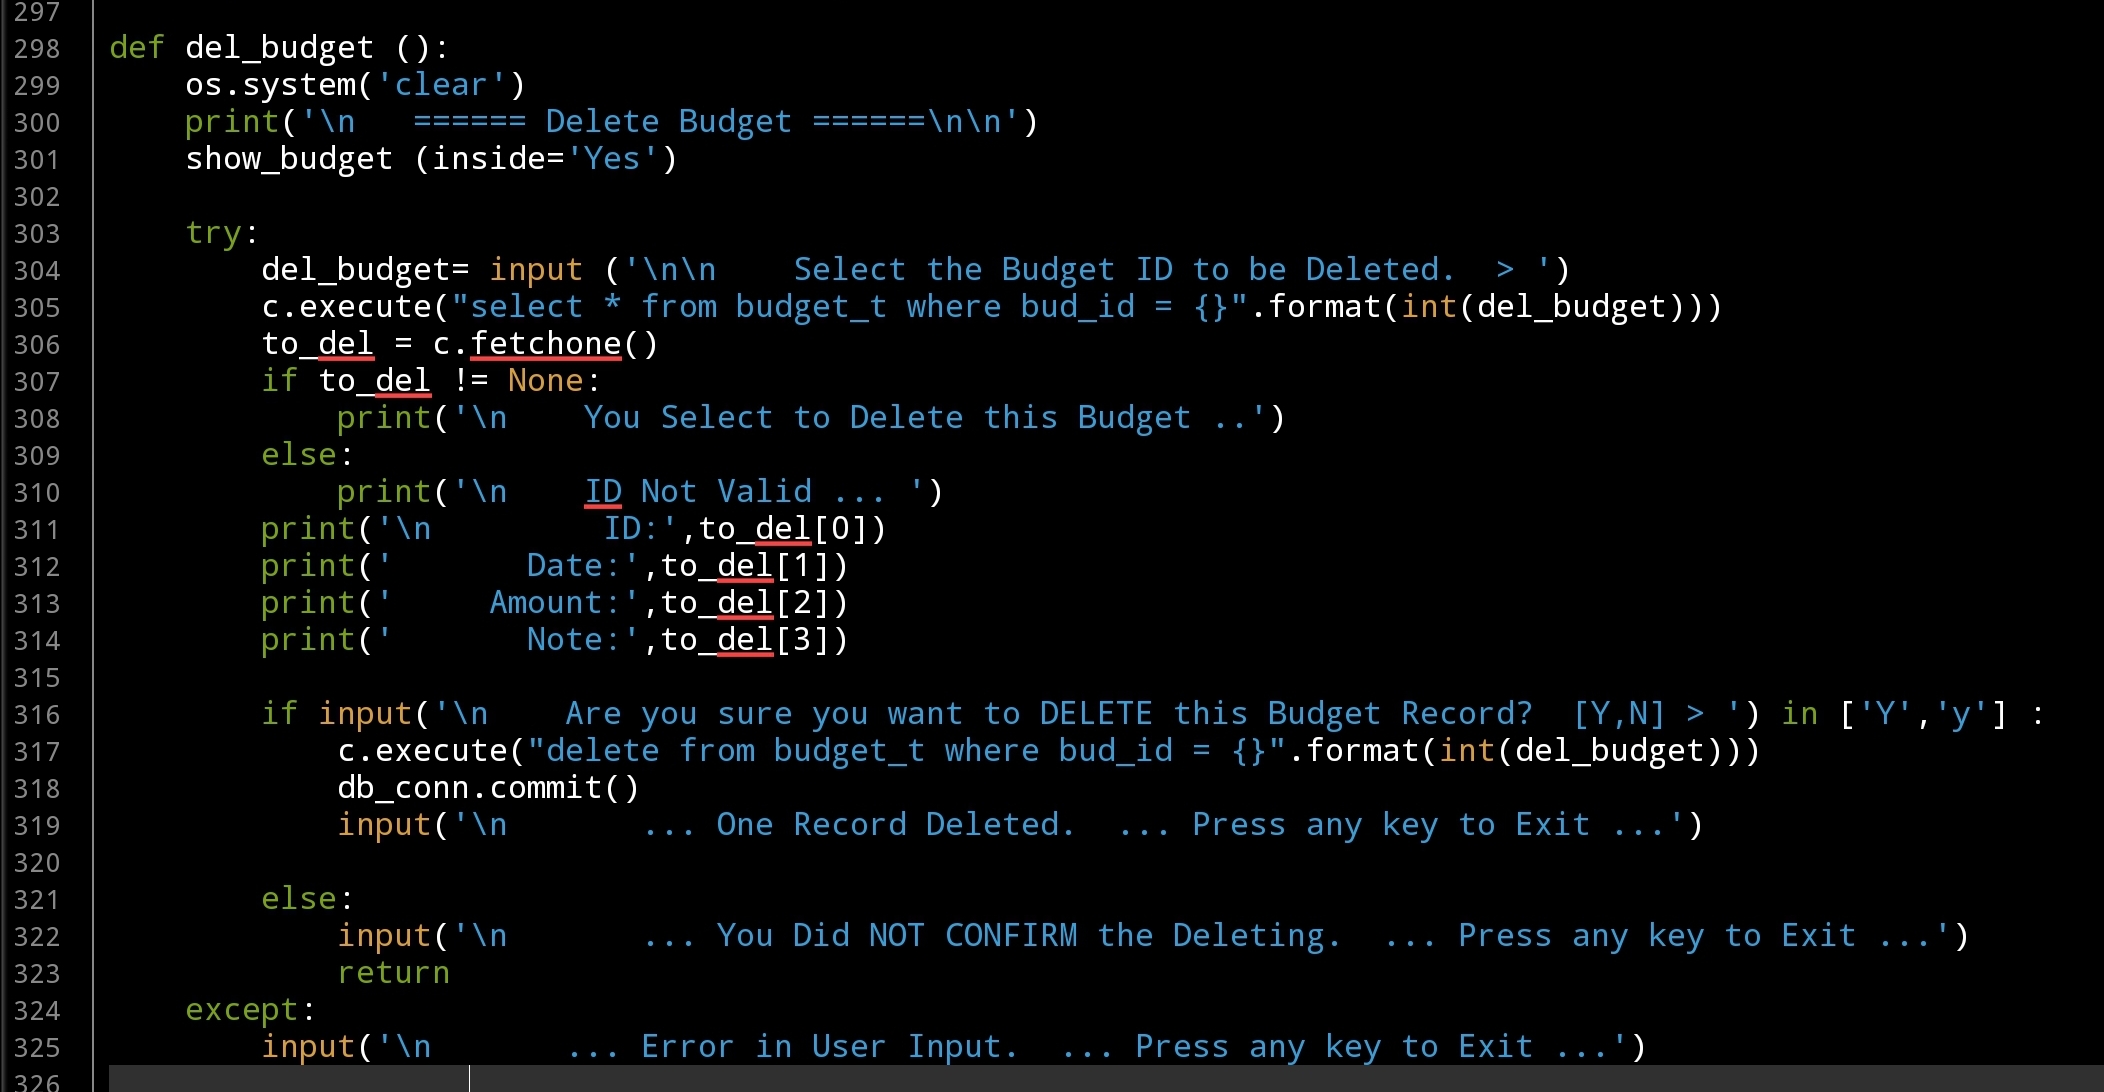 |
Last function in this part is to Edit a Budget that we have in the system, to do this we first will display all Budgets we have and the user will Enter the ID of the one to be Edited, we will go through it’s attributes asking the user to Edit or just Press enter to skip and keep the current value. For the Date we will call the date_validation() after user input, and for the Note we will check the Amount if it is Negative we will add “[ WITHDRAW ]” in the beginning of the Note line.
 # Edit Budget Function

def edit_budget ():
    os.system('clear')
    print('\n   ====== Edit Budget ======\n\n')
    show_budget (inside='Yes')
    try:
        edit_budget = input ('\n\n    Select the Budget ID to Edit.  > ')
        c.execute ("select * from budget_t where bud_id ={}".format(int(edit_budget)))
        e_budget = c.fetchone()
        if e_budget != None:
            print('\n    You Select to Edit this Budget ..')
        else:
            print('\n    ID Not Valid ... ')

        print('\n       ID: ',e_budget[0])
        print('     Date: ',e_budget[1])
        print('   Amount:  {:,}'.format(e_budget[2]))
        print('     Note: ',e_budget[3])

        print('\n\n   Edit Each Attribute OR Press Enter to Skip.. \n')

        while True :
            new_b_date = input('   Enter the New Date as [dd-mm-yyyy]. > ')
            if new_b_date >"" :
                msg = (date_validation (new_b_date))
                if msg !='valid' :
                    print(msg)
                else:
                    c.execute("update budget_t set bud_date = '{}' where bud_id = {}".format(new_b_date,int(e_budget[0])))
                    db_conn.commit()
                    break
            elif new_b_date =="" :break

        new_b_amount = input('   Enter the New Amount > ')
        if new_b_amount > "" :
            if input ('\n   You want to change the Budget Amount From {:,}  To {:,}. CONFIRM [Y,N] > '.format(float(e_budget[2]),float(new_b_amount))) in ['Y','y'] :
                c.execute("update budget_t set bud_amount = '{}' where bud_id = {}".format(float(new_b_amount),int(e_budget[0])))
                db_conn.commit()
        else:
            print('   Budget Amount Not changed..\n')

        new_b_note = input('\n   Enter the New Note: > ')
        if new_b_note > "" :
            new_b_note = " ".join([word.capitalize() for word in new_b_note.split(" ")])
            if (e_budget[3])[0] =='[' and int(new_b_amount) < 0 :
                new_b_note = "[ WITHDRAW ], " + new_b_note

            c.execute("update budget_t set bud_note = '{}' where bud_id = {}".format(new_b_note,int(e_budget[0])))
            db_conn.commit()

        input('\n   ... DONE ...  Press any key to Exit')
    except:
        input('\n       ... Error in User Input.  ... Press any key to Exit ...')
Coming Up: In Next part we will write the menu and the functions for the Shares Managment.
[NOTES]
1. Part-1 has no code file.
:: Shares Speculation System ::
| Part 1 | Part 2 | Part 3 | Part 4 |
To Download my Python code (.py) files Click-Here
By: Ali Radwani
Python: Cooking App P-8
Learning : Python, Data-Base, SQlite
Subject: Writing a Cooking Application
RECIPES MENU: Show Recipe During writing all functions of the application I notes that my “Show Recipe” need to be updated, so in this post we will do some changes on “def show_all_rec(opt)” function.
First, we will change the if opt ==”name” to list all the Recipes Name with ID’s and ask the user to Enter a Recipe ID to show its information.
Here is the code ..
 # Changes on show_all_rec(opt) - if opt =="name"

if opt =="name" :
        #First we will list down all Recipes Names.
        c.execute("select r_id,r_name from recipes where r_id > 0")
        for each_r_name in c.fetchall():
            print(' ID:',each_r_name[0], ' Name:',each_r_name[1])

        get_rec_id = input ('\n Enter the Recipe ID you want to read: ')
        # Get the Recipe information based on ID.
        c.execute("select * from recipes where r_id ={}".format(get_rec_id))
        for each_basic in c.fetchall():
            print('\n  ID: ',each_basic[0])
            print('  Name: ',each_basic[1])
            print('  Date: ',each_basic[2])
            print('  Type: ',each_basic[3])
            print('  Other: ',each_basic[4])

            print('\n  The Recipe Ingredients: ')
            # Get all Recipe Ingredients.
            get_sql = '''
                    select
                        i_name

                    from
                    ingredients_list

                    INNER JOIN rec_ingredient ON ingredients_list.i_l_id = rec_ingredient.i_l_id
                    where rec_ingredient.r_id = {}

                    '''
            c.execute(get_sql.format(each_basic[0]))

            st = 1
            for each in c.fetchall():
                print('  ',st,': ',each[0])
                st = st + 1

            print('\n\n  Cooking Steps: ')
            # Get the Cooking Steps.
            c.execute("select * from recipes_steps where recipes_steps.r_id = {}".format(each_basic[0]))
            st = 1
            for each in c.fetchall():
                print('\n    Step-',st,': ',each[2])
                st = st + 1

            print('\n ---------------------------------------------')
Here is the out-put screen :
First we have the Menus, we select 1,1,1 to get “Show Recipe By Name”  |
Here is the List of All Recipes and we will enter the ID of the one we want to see.  |
Here is the Recipes Information.  |
Notes That 1. We don’t have any Ingredient (we did not add any) so in coming post we will develop the Edit function to add some Ingredient and change/Update the Recipe Information. 2. We are not using any Validations, so if we enter any dummy data for Date the system will accept it. 3. We are not using any (avoiding Error code) such as Try…except.
To Download my Python code (.py) files Click-Here
By: Ali Radwani
Python: Cooking App P-3
Learning : Python, Data-Base, SQlite
Subject: Writing a Cooking Application
Over View: In last post (Part-2) we wrote the codes for Main-Menu and other sub-Menus, today in this post we will work on “Setting Menu”. Setting Menu has three items:
1. Create the needed Tables. [To create all tables we need in the database]
2. Drop Tables. [If any things goes wrong then we can Drop (Delete) a Table (or more) ]
3. Insert Dummy Data. [To Insert ONE Record in the tables. (Record 0)]
First thing we need to create a database and set a connection to it, also we will import the [sqlite3 and os], to do so we will write this code:
  import sqlite3, os

  # Create the data-base & name it.
  db_conn = sqlite3.connect ("cooking.db")

   # set the connection.
  c = db_conn.cursor()

|
Now we need to write three Functions for the Setting Menu, we will start with Table creation code and here I am posting the Data-Base Tables Diagram ..
Click to Enlarge
|
 # Function to Create the Tables


def create_tables_() :    # to create tables.

    sql_recipes = "CREATE TABLE if not exists recipes (r_id INTEGER PRIMARY KEY AUTOINCREMENT, r_name text, r_date text, r_type text, r_details text, r_tags text )"

    sql_photo = "CREATE TABLE if not exists photo (p_id  PRIMARY KEY AUTOINCREMENT ,r_id integer , p_name text)"

    sql_ingredients_list = "CREATE TABLE if not exists ingredients_list (i_l_id PRIMARY KEY AUTOINCREMENT, i_name text )"

    sql_rec_ingredient ="CREATE TABLE if not exists rec_ingredient (ing_id INTEGER PRIMARY KEY AUTOINCREMENT, i_l_id integer, r_id integer)"

    c.execute(sql_recipes)
    db_conn.commit()

    c.execute(sql_photo)
    db_conn.commit()

    c.execute(sql_ingredients_list)
    db_conn.commit()

    c.execute(sql_rec_ingredient)
    db_conn.commit()

    input('\n   .. Cooking  Tables created..  Press any key .. ')
So now if we call this function “create_tables_() “, Tables will be created. Another function in the Setting Menu is Drop a Table, as we mention above we need this function in case we need to Delete a Table and create it again, in this function first we will list all the tables in the database and ask the user to Enter the Table need to be delete. Here is the code behind this function:
 # Drop a Table.

def drop_table():

    try:
        # First we will print-out the list of Tables.
        c.execute("SELECT name FROM sqlite_master  WHERE type = 'table'")
        db_tables =[]
        for each in c.fetchall() :
            for t in each :
                db_tables.append(t)
        print('\n  Table List .. ')
        for x in range (len(db_tables)) :
            print((x+1),db_tables[x])
        t = int(input('\n  Enter the number next to Table you want to Drop:  '))
        c.execute("DROP TABLE {}".format(db_tables[t-1]))
        db_conn.commit()
        print('\n ... One Table been Dropped')

    except:
        print('\n  No Tables with this name .. ')

    input('\n  . . . Press any key  . . ')

|
Last code to write in this post is to Insert One-Record in the tables, the reason of doing this manually (Hard-Coded) is that we have some “Primary key AUTOINCREMENT” fields in our tables, and to make it AUTOINCREMENT there MUST be a number first so we will enter the ZERO record (0).
 # Function to Insert the Zero Record

def insert_rec_0():

    c.execute ("INSERT INTO recipes (r_id) VALUES(:r_id)",{"r_id":0})

    c.execute ("INSERT INTO ingredients_list (i_l_id) VALUES(:i_l_id)",{"i_l_id":0})

    c.execute ("INSERT INTO rec_ingredient (ing_id) VALUES(:ing_id)",{"ing_id":0})

    c.execute ("INSERT INTO photo (p_id) VALUES(:p_id)",{"p_id":0})

    db_conn.commit()

    input('\n ...Dummy records been Inserted ....  Press any key  .. ')
In Next post we will write the codes for the functions in the “INGREDIENT MENU” to Add, Delete and Edit Ingredient List.
To Download my Python code (.py) files Click-Here
By: Ali Radwani
Python: SQlite Project – P2
Learning : Python and Sqlite3
Subject: Sqlite3, Database functions ” Employee App” P2
In Part1 of this project (Click to Read) we create the database and set the connection, also we create an Employee table with very basic fields and also we wrote a dummy_data() function to Insert some records into the table. And to make the application usable we wrote the Main-Men function and we test it with selecting to display the records that we have.
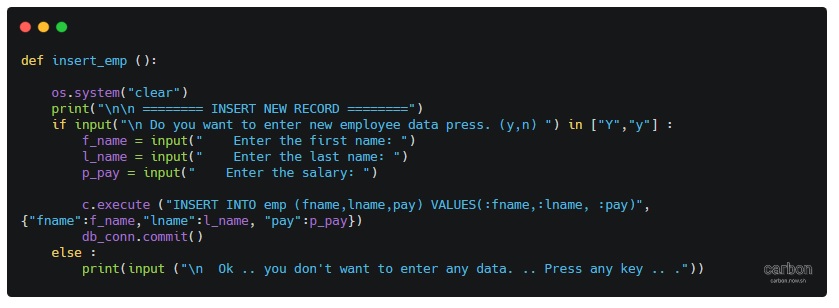
Today we will write other functions from our Menu. INSERT NEW EMPLOYEE: To Insert new employee we will ask the user to input or to fill the fields we have in our table such as First Name, Last Name and the Salary. .Let’s see the code ..
 # Insert Function

def insert_emp ():

    os.system("clear")
    print("\n\n ======== INSERT NEW RECORD ========")
    if input("\n Do you want to enter new employee data press. (y,n) ") in ["Y","y"] :
        f_name = input("    Enter the first name: ")
        l_name = input("    Enter the last name: ")
        p_pay = input("    Enter the salary: ")

        c.execute ("INSERT INTO emp (fname,lname,pay) VALUES(:fname,:lname, :pay)",{"fname":f_name,"lname":l_name, "pay":p_pay})
        db_conn.commit()
        print(input ("\n  One record has been Inserted. .. Press any key .. ."))
    else :
        print(input ("\n  Ok .. you don't want to enter any data. .. Press any key .. ."))

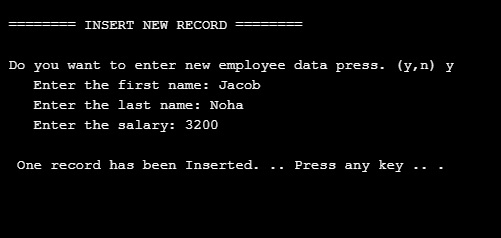
So, if we select to Insert a new Employee and we Enter First name as : Jacob Last Name as: Noha also we we set the salary to 3200 and press Enter, as in this page ..
|
Then if we select to show all data we have in the database, we can see the new record added..

|
DELETE AN EMPLOYEE: To Delete or remove an employee from the database, First we will print-out all the records on the screen and ask the user to enter the ID_ number of the employee he want to delete. As shown here ..
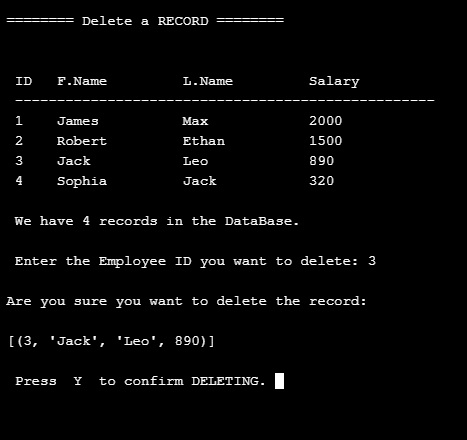
|
In the above example we select ID number 3 to be deleted and press enter, the system will show the record and ask to confirm the deletion and wait for ‘Y’ to be pressed, then the record will be deleted.
..Here is the code..

|
In this post we cover the INSERT AND DELETE of the records from the database, in the next post we will cover the SEARCH AND EDIT Functions also some search conditions like salary range and group-by command.
To Download my Python code (.py) files Click-Here
By: Ali Radwani
Taking pictures is not my main daily practices, but when i start playing with my camera, i really enjoy my self.
Thanks for visiting my Space..


