Archive
Python: Coffee Consumption – P7
Learning : Python, SQlite3, Dataset, Pandas,
Subject: Create Coffee Consumption Application.
[NOTE: To keep the code as simple as we can, We WILL NOT ADD any user input Varevecations. Assuming that our user will Enter the right inputs.]
[ IF THE IS FIRST TIME DOWNLOADING THE CODE FILE, SELECT OPTION 7 FROM MAIN-MENU TO CREATE THE DATABASE]
In this part (Part-7) of Coffee Consumption App, we will write a Function to display all Records in the data-base in a table on the screen.
Beginning with formating the table header, we will have the following columns: record Id, Date_time, Coffee_name, Coffee_type, coffee_size, customer_Gender and Rank. Here is the code..
print(‘ ‘*6,’ID’,’ ‘*5,’ Date & Time’,’ ‘*3,’ Coffee Name’,’ ‘*4,’Type’,’ ‘*9,’Size’,’ ‘*4,’ Gender’,’ ‘*4,’ Rank’)
print(‘ ‘*4,’-‘*90)
Next we will execute an SQLITE command to fetch all the records. Here is the commands..
c.execute (f”select * from coffee_con where c_id > 1 “)
dataset = c.fetchall()
Also we will using the lookup tables to get the names using the id keys in the coffee_name, coffee_type, coffee_size columns.
Now, Using the for loop to access all the records and print them on the screen. Here is apart of the code ..
print(‘ ‘*6,'{}’.format(data_id),end=””)
print(‘ ‘*(10 – 5),'{}’.format(data_date),end=””)
print(‘ ‘*(21 – 16),'{}’.format(data_name[0]),end=””)
print(‘ ‘*(14 – len(data_name[0])),'{}’.format(data_type[0]),end=””)
print(‘ ‘*(13 – len(data_type[0])),'{}’.format(data_size[0]),end=””)
print(‘ ‘*(13 – len(data_size[0])),'{}’.format(data_sex),end=””)
print(‘ ‘*(12 – 1),'{}’.format(data_rank))
Here is a screen shot of the code..
 |
OutPut Screen 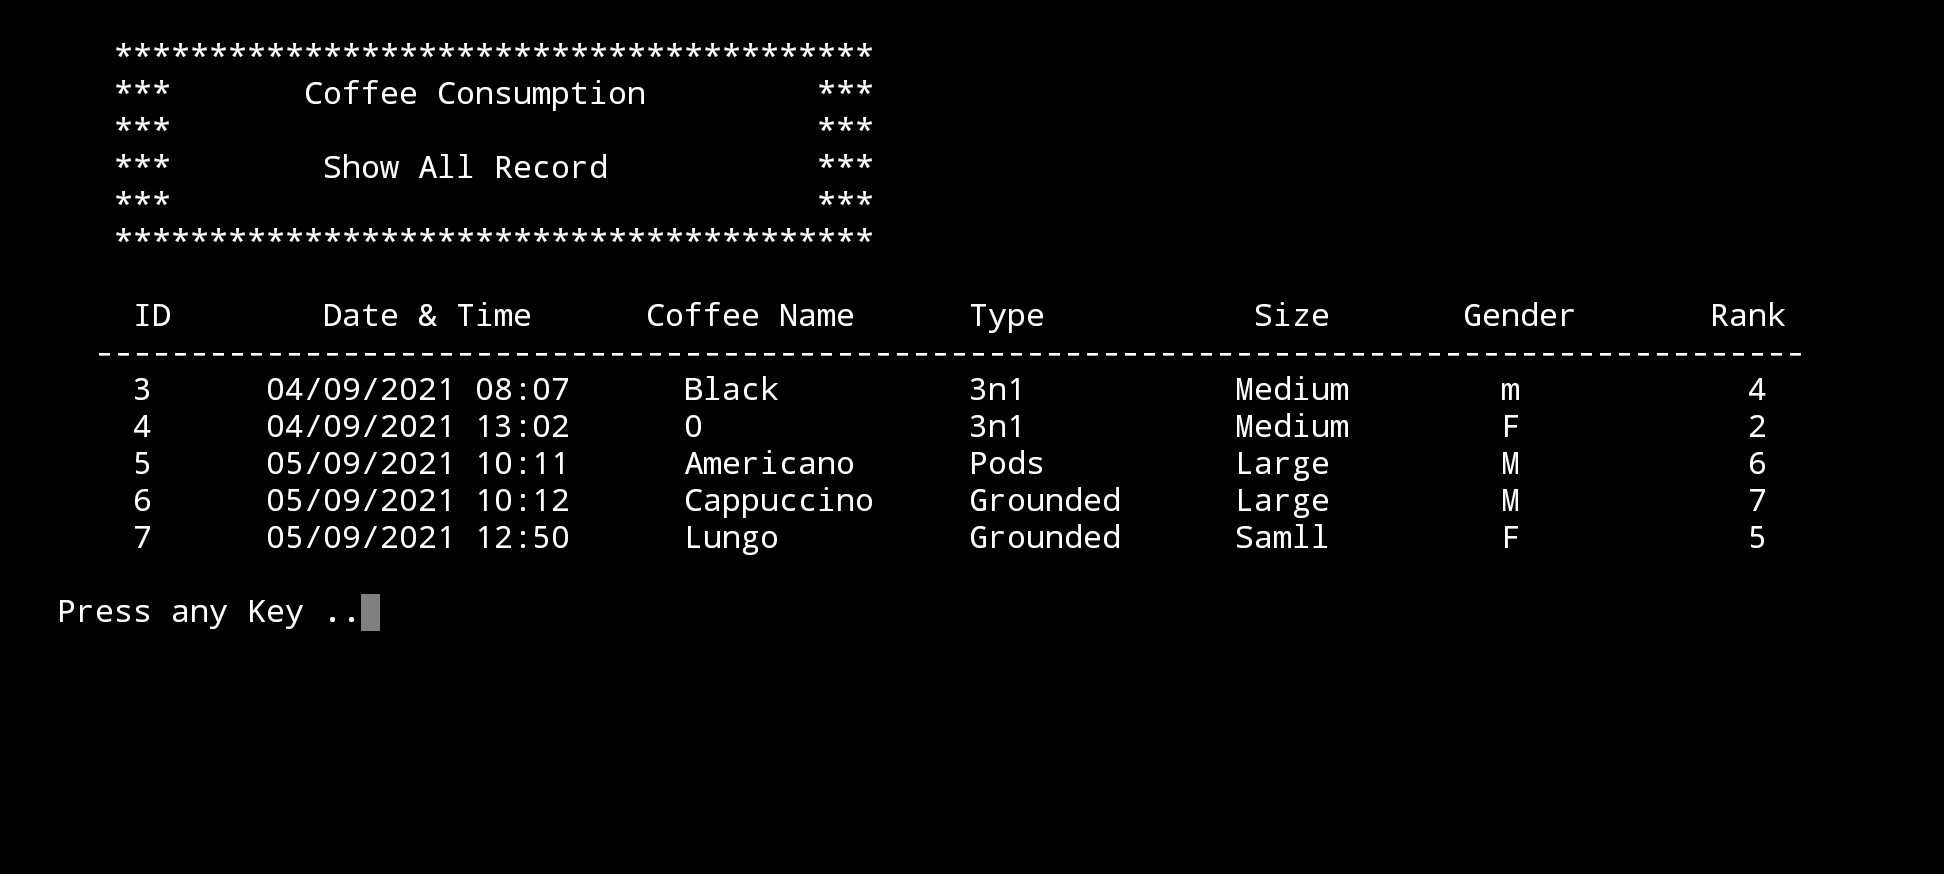 |
What’s Coming: In Part-8 we will write the Function to Edit the records on the Main Data-Base.
..:: Have Fun with Coding ::.. 🙂
| Part 1 | Part 2 | Part 3 | Part 4 | Part 5 |
| Part 6 | Part 7 | Part – | Part – | Part – |
To Download my Python code (.py) files Click-Here
 Follow me on Twitter..
By: Ali Radwani
Python: Random Pixel Color
Learning : Python, Math
Subject: Random Coloring Pixels
[NOTE: To keep the code as simple as we can, We WILL NOT ADD any user input Varevecations. Assuming that our user will Enter the right inputs.]
Last week I start reading and studying about “Image Processing”, in some point I was reading about converting an image to Array of numbers, and re-converting that Array back to an Image, at that moment popped into my mind what if we just generate an Array with random numbers and then show it as an Image.
In this article we will write a first simple Function to generate a random numbers presenting the three main color Red, Blue and Green; then storing the numbers in an Array then using matplotlib library to display the Image.
Our Tools: In this post we will use the following:
1. Jupyter-NoteBook.
2. numpy.
3. random.
4. matplotlib.
5. PIL or Pillow.
Coding I am user Jupyter NoteBook on samsung Tab S4. First we will do all imports we need as:
from PIL import Image
import numpy as np, matplotlib.pyplot as plt
import random
%matplotlib inline
Now, we will write a Function called rand_color, we will run a nested for loop to generate the Row and Column (width and height) and in/for each row we will generate thee numbers of colors range(0,255) as one pixel and storing them in an array, then we display the Array using:
Image.fromarray and plt.imshow(). Here is the Code ..

|
Run No.1 |
Run No.2 |
Run No.3 |
Run No.4 |
The above is just 25×25 image with random color pixels, this is the first function using default random, in coming posts we will use some Math variables [such: log,sin], constants [such: pi, golden ratio] to see if we can get a pattern from random.
..:: Have Fun with Coding ::.. 🙂
To Download my Python code (.py) files Click-Here
By: Ali Radwani
Python Sorting Algorithm – Heap Sorting -P5
Learning : Python, Math, Algorithm
Subject: Sorting Algorithm, Heap Sort P5
[NOTE: To keep the code as simple as we can, We WILL NOT ADD any user input Varevecations. Assuming that our user will Enter the right inputs.]
In Last Parts (2, 3 and 4) we wort the Following Functions:
- Sections Header.
- Main Menu Function.
- Entering/Creating the Array.
- Print-Out or to Display the Array.
- Check If Array in Max-Heap.
- Convert Array to Max-Heap.
- Add Node to Max-Heap.
- Delete a Node from a Max-Heap.
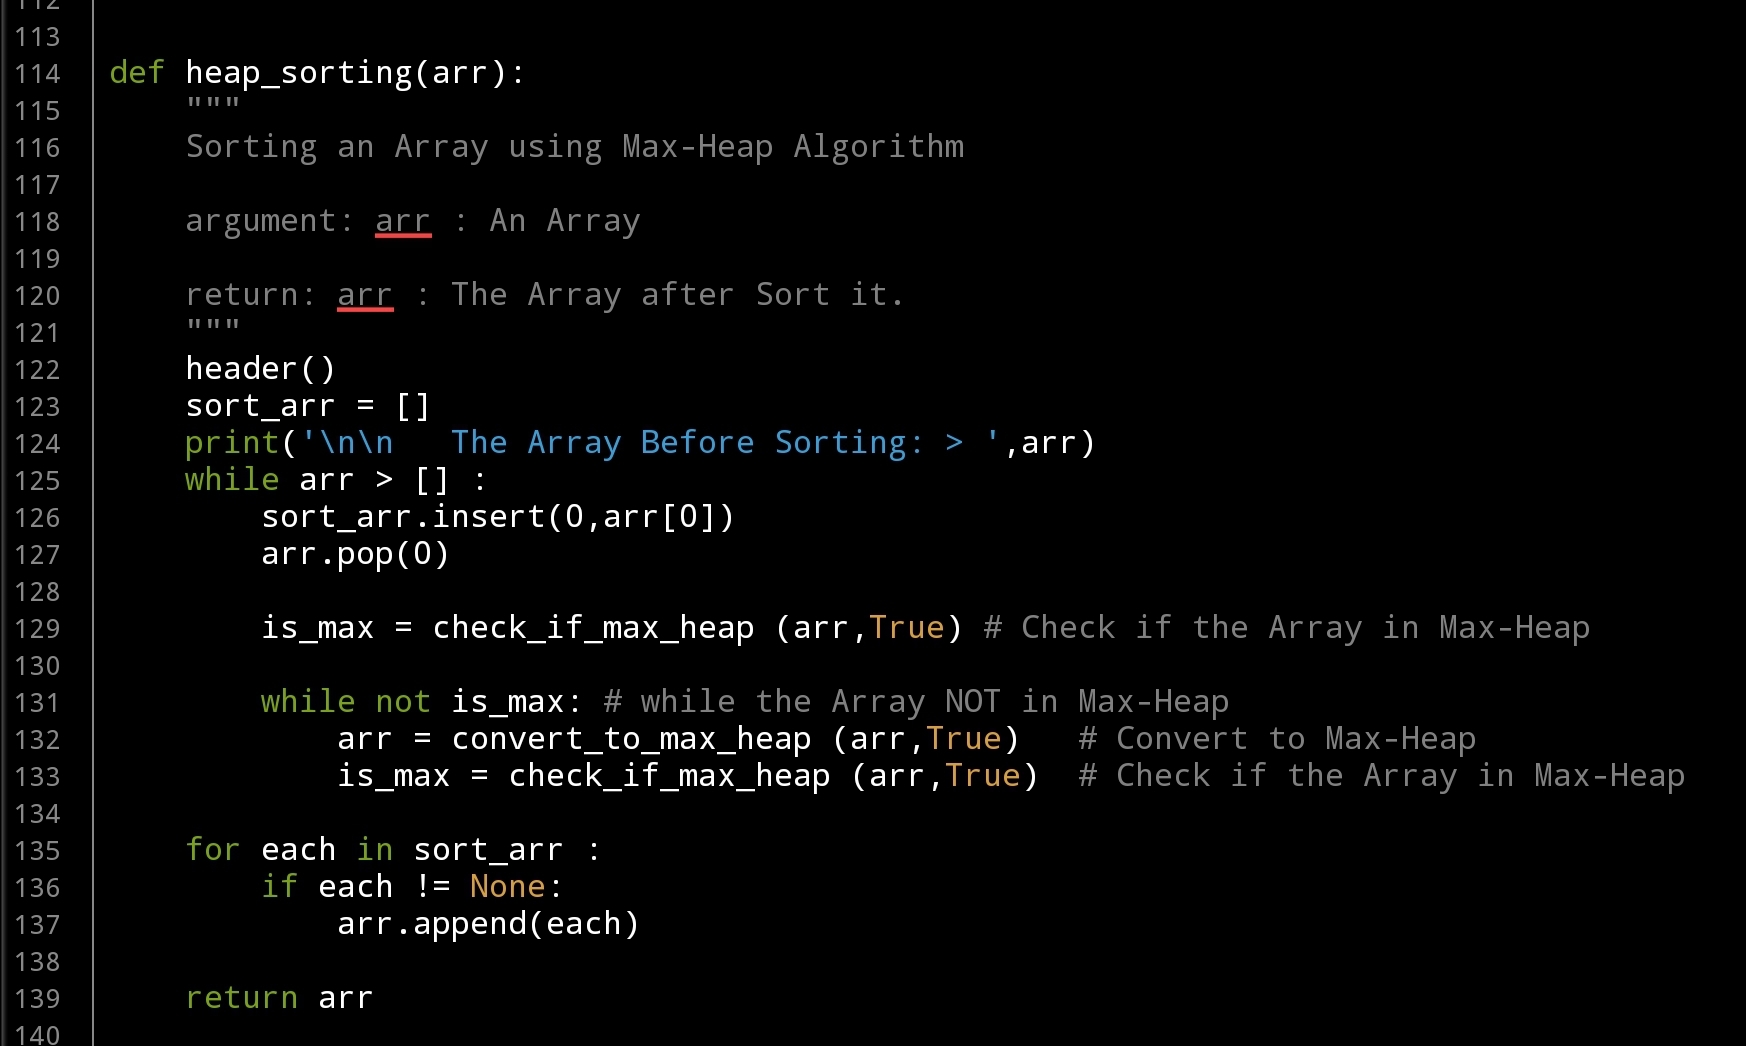
In this last part-5 we will write the last main Function to aplay the Heap Sorting Algorithm.
Scope of Work: Deleting a Node from a Max-Heap Array is the main function in sorting an Array using Max-Heap Algorithm, the Deleting is always from the Root Node, So if we delete the most top Node [Root] (and store it in index[0] in a temp_array) then we move the Last Node to it’s position and by doing that we miss the Max-Heap state of the Array, so we convert the array to a Max-heap, then we Delete the Root again until we delete all the elements in the Array.. Here the Algorithm:
Assuming we have a Max-Heap Array:
1. Delete the Root Element, and Store it in index[0] in Temp_array.
2. Move the Last Element in the Array to index[0].
3. If the Array not in Max-Heap then Convert it to a Max-Heap.
4. Repeat Steps 1 to 3 Until length of Array is 0.
In our list of Functions up, we have the three Functions we Need to complete/apply a Max-Heap Sorting:
We Delete a Node using def delete_node(arr,inside): then in a while loop we call both def check_if_max_heap (arr,inside): and def convert_to_max_heap (arr,inside): so let’s see the code..
 |
We finish Max-Heap Sorting Algorithm, ..
..:: Have Fun with Coding ::.. 🙂
To Download my Python code (.py) files Click-Here
By: Ali Radwani
Python Sorting Algorithm – Heap Sorting -P3
Learning : Python, Math, Algorithm
Subject: Sorting Algorithm, Heap Sort P2
[NOTE: To keep the code as simple as we can, We WILL NOT ADD any user input Varevecations. Assuming that our user will Enter the right inputs.]
First let’s just remember that in Part-1 we wort the Following Functions:
- Main Menu Function.
- Entering/Creating the Array.
- Print-Out or to Display the Array.
- Sections Header.
In this Part-3 we will cover another Two important Functions that we need to talk about in our mission to understand the Heap Sorting Algorithm.
First Function
Check If The Array is in Max Heap: After the user Giveing/Entering the Array [Selecting Option 1 in the Menu] we need to Examen/Check if it is in a Max-Heap, to do so we will call the Function def check_if_max_heap(arr, inside): the Function will take Two arguments:
arr : The Array.
inside: Boolean Flag showing are we calling the Function from within another Function or Not.
Scope of Work: We will check and compare each Node [starting from last node in the leaves] with it’s Parent using this formula parent_index = ((child_index-1)//2) to get the parent index, then comparing the Values of the Child and Parent, If the Child is GRATER Than his Parent we SWAP them. Then going to the Next Child and so-on until the Root-Node. .. Here is the Code ..

|
for each print statement I am using this code if not inside : then print ..
Example: if not inside : print(‘\n The Array is a Max-Heap Array.’)
So if the inside = True then the print code will not work, that’s mean we are calling the Function from inside another function and we just want the return value, the return here will be a boolean True/False as is_max [if the array is in Max-Heap].
Second Function
Convert to Max-Heap: In this Function we will convert a given Array to a Max-Heap Array. The way this Function is working is by checking/Examining all the Childs starting from the Leaves, and if any Child is Grater than his Parent we do a SWAP. After we Finish, we will call the Function def check_if_max_heap(arr, inside): to check if the Array is in Max-Heap, If NOT we will call the convert Function and so-on until we get the is_max = True from the def check_if_max_heap(arr, inside):. Both Functions def check_if_max_heap(arr, inside): and def convert_to_max_heap (arr,inside): will be run in a while loop until def check_if_max_heap(arr, inside): will return True. .. Here is the code for def convert_to_max_heap (arr,inside):

|
And here is the while loop to keep Examining the Array until fully converted to a Max-Heap Array.
 # While loop in Option 3 from the Main-Menu, In the main body code..

    while not is_max:
             arr = convert_to_max_heap (arr,True)
             is_max = check_if_max_heap (arr,True)
We will stop here in this part. In Part-4 we will Add new Node to the Array, and Delete a Node from the Array.
..:: Have Fun with Coding ::.. 🙂
To Download my Python code (.py) files Click-Here
By: Ali Radwani
Flowers in my lens..6
Another beautiful flower in taken by Galaxy Note 9. Setup on a table with a coffee Mug. Follow me on Twitter @h_ta3kees

Another sketch challenge: The House
This week sketch challenge @1hour1sketch is to Draw a Red House, so here is my sketch using pencil, black Pen and watercolour. More Sketches on my Sketch page .. also follow me on Twitter @h_ta3kees

Python: Data Visualization Part-1
Learning : python, pygal, Data Visualization, Bar Chart
Subject: Data visualization using pygal library
pygal is a Data Visualization library in python to help us showing our Data as a graph. In coming several posts we will discover and learn how to use the pygal library in simple and easy configuration and style.
First we need to install pygal packeg, to do so write this:
pip install pygal
Now we need some Data to show, in this leson I am using aGalaxy Tab S4, so all the codes will be tested and applyed on trinket.io website [trinket.io alow us to use pygal package online so we don’t need to install it on our divice]
Type of Chart:
pygal has several types of charts that we can use, here we will list them all then in coming posts will use each one with simple data. So what we have:
Line, Bar, Histogram, XY, Pie, Radar, Box, Dot, Funnel, SolidGauge, Gauge, Pyramid, Treemap, Maps
Some of those charts has a sub-types such as in Bar char we have: Basic, Stacked and Horizontal. Also for each chart we can add a title and labels and we can use some styles.
So let’s start ..
First we will go for the Bar chart, and we have three sub-types as Basic, Stacked and Horizontal.
First chart: Bar chart:
In this part we will demonstrate the Bar Chart, it has three sub-types as Basic, Stacked and Horizontal.
We assume that our data is the Males and Female ages on first marage, the data will be as dictionary (later we will see how to customize each bar)
 # Basic Bar Chart using pygal

import pygal
bar_chart = pygal.Bar() # To create a bar graph object
bar_chart.add('Females', [22,25,18,35,33,18])
bar_chart.add('Males', [30,20,23,31,39,44])

bar_chart.title = "Males and Females First Marage Age"
bar_chart.x_labels=(range(1,6))

bar_chart.render()
Sample code for Basic bar chart |
Another sub-type in Bar chart is Horizontal-Bar, it is semelar to the Basic but as if fliped 90 degree. Here is the code ..
 # Horizontal Bar Chart using pygal

import pygal

# HorizontalBar()
HBar = pygal.HorizontalBar()
HBar.add('Females', [22,25,18,35,33,18])
HBar.add('Males', [30,20,23,31,39,44])

HBar.title = "Males and Females First Marage Age"

HBar.x_labels=(range(1,6))

HBar.render()
Sample code for Horizontal Bar chart |
Last sub-type in Bar chart is Stacked Bar were all data of each element will be in one bar. Here is the code and example..
 # Stacked Bar Chart using pygal

import pygal
# StackedBar()
stackedbar = pygal.StackedBar()
stackedbar.add('Females', [22,25,18,35,33,18])
stackedbar.add('Males', [30,20,23,31,39,44])
stackedbar.x_labels=(range(1,0))
stackedbar.title = "Males and Females First Marage Age"

stackedbar.render()
If we say we have another data-set as “age in First-Divorces” and we want to add this set to the Stacked Bar chart, then we first will create the data-set as:
stackedbar.add(‘Divorses’, [35,22,45,33,40,38])
and we will arrange the code line to be at top,middle or bottom of the bar. Here is the code..
Sample code for stacke Bar chart with Divorce data
|
Next we will talk about Line chart.
:: Data Visualization using pygal ::
| Part-1Bar-Chart | Part-2 | Part-3 | Part-4 |
By: Ali Radwani
To The Freedom

Python: Shares Speculation System – Part 4
Learning : Python, DataBase, SQL, SQlite3
Subject: Plan, Design and Build a Shares Speculation System
Project Card:
Project Name: Shares Speculation System
By: Ali
Date: 2.7.2020
Version: V01-2.7.2020
Last time we worked on Budgets Managment for our system, now before we start Buying and Selling shares we need to create list of shares name so we can select from it, we have a table called shares_name this Table have the following fields :
s_id: as a PRIMARY KEY.
full_name: To hold the full name of the share.
abb_name: To hold the Abbreviation of a share name.
The Share Managment section will have four main Functions to Add, Edit, Delete and Show shares. .. Let’s start with it’s Main Menu ..
 |
First Function we will work on will be to Add New Share to the system, we will call it def add_share(): , we will ask the user to input the Share Full Name and its Abbreviation. With Abbreviation we will apply the .upper() function to convert the user input to Upper-case, and for the Full Name we will will apply this code [“ “.join([word.capitalize() for word in user-input] to upper case each first character of the Name. The we will check if the Share Name exist in the DataBase If not we will add it.
 # Add New Share
def add_share() :

    os.system('clear')
    print('\n   ====== Add New Share ======\n\n')
    while True :

        abb_name = input("   Enter the Abbreviation Name of the Share.. > ").upper()
        full_name = " ".join([word.capitalize() for word in input('     Enter the Full Name of the Share.. > ').split(" ")])

        c.execute ("select * from shares_name where full_name ='{}' or abb_name = '{}'".format(full_name, abb_name))
        share_exist = c.fetchone ()
        if share_exist[0] > 0 :
            print('\n   It seams that the Share Exist in the Database, Name or Abbreviation CAN NOT be Duplicated.')
            print('   Try another Name. ')
        else :
            c.execute ("INSERT INTO shares_name (full_name , abb_name)  VALUES(:full_name , :abb_name)",{"full_name":full_name, "abb_name":abb_name})
            db_conn.commit()

        if input ('\n   Do you want to Enter another Share Name?.  [Y,N]. >  ')  not in ['Y','y']:
            input ('\n    .... Press any key to  Exit.  ')
            return
After adding shares we want to see them and to make sure if every things are fine, so we will write the show_share function, and it will take one argument as inside with default value = ‘Yes’, if we call the function from inside another function the value will be Yes, otherwise it will be ‘No’. Here is the code ..
 |
Next is Editing Share Name, in this function we will call the show_share (‘Yes’) so the user will select the ID of the Share Name to be Edit, then with each attribute we will ask the user ether to Enter the new Edit of the attribute or to press Enter to keep the exist variable. .. Here is a copy of the code ..
 |
Last Function in this Artical is Delete def delete_share() : again we will call the Shoe function to display all the Shares Name on the screen and let the user to select the one to be Deleted by Entering it’s ID.
 # Delete Function.
def delete_share() :
    os.system('clear')
    print('\n   ====== Delete a Share  ======\n\n')

    print('   Here is a list of Shares we have in the System .. \n')
    show_share('Yes')

    del_share = input('\n\n   Enter the ID for the Share Name you want to Delete. [Q to Exit] >  ')

    if del_share in ['q', 'Q'] :
        input ('\n\n    .... Press any key to  Exit.')
        return
    elif del_share.isnumeric() :
        if (input ('   Are you SURE you want to DELETE Share ID {} ? [Y,N] >  '.format(del_share))) in ['y','Y'] :
            c.execute ("delete from shares_name where s_id ={}".format(int(del_share)))
            db_conn.commit()
            input ('\n    ....One Record DELETED. Press any key to  Exit.')
            return
        else :
            input ('\n    ....Share will NOT be Deleted. Press any key to  Exit.')
            return
    else :
        input ('\n    ....Invalid Inpout. Press any key to  Exit.')
        return
Now we can create or Enter a Budget and Enter the Shares Name we have in our Stock Market and we are ready to write the functions to make the transactions.
Coming Up: In Next part we will write the Function to submit/Save Buying and Selling Transactions to our system.
[NOTES]
1. Part-1 has no code file.
2. We are applying some basic Validations on some part of the code, and assuming that the user will not enter a messy data.
:: Shares Speculation System ::
| Part 1 | Part 2 | Part 3 | Part 4 |
| Part5 |
To Download my Python code (.py) files Click-Here
By: Ali Radwani
Python: Shares Speculation System – Part 3
Learning : Python, DataBase, SQL, SQlite3
Subject: Plan, Design and Build a Shares Speculation System
Project Card:
Project Name: Shares Speculation System
By: Ali
Date: 2.7.2020
Version: V01-2.7.2020
In this part we will start writing some codes for our System, we will start with Budget Managment.
Budget: In the Shares Speculation System, and before the user can submit any Buying Transactions the system will check If there is enough money in the Budget Repository, so first we have to Insert a Budget. Therefore, we will start from Budget Managment.
Budget Managment will have five sub-menu as follow:
1. Add New Budget.
2. Withdraw Budget.
3. Edit a Budget.
4. Delete a Budget.
5. Show all Budget.
9. Exit.
So we will start writing the functions for each one.. let’s start with the Budget Menu, we use the while True: loop to keep the Menu until uer_choice == 9 where we return the user to the previous Menu. Here is the code:
 |
Now, lets go through each Function..
Add New Budget: This Function will ask the user to Enter three pieces of information, The Date, The Budget Amount and if the user want to add some Notes such as cheque number or the source of the mouney/fund. For the Date, we want to make sure that the user entry is in the format we want and it is a date, so i wrote a function called date_validation () we will talk about this function later. For the Note part after the user enter the notes we will do (upper-case) for each first character in the text using this code: bud_note = ” “.join([word.capitalize() for word in bud_note.split(” “)]) Here is the full code ..
 # Add New Budget to the system.

def add_budget ():
    os.system('clear')
    print('\n   ====== Add New Budget ======\n\n')
    print('   Enter the Details of the Budget..\n')

    while True :
        bud_date = input ('   Enter the Date as [dd-mm-yyyy].  >  ')
        msg = (date_validation (bud_date))
        if msg !='valid' :
            print(msg)
        else:
            break
    bud_amount = input ('   Enter the Budget Amount.  >  ')
    bud_note = input ('   Enter any Notes if you want. [Hint: Cheque No.] >  ')
    bud_note = " ".join([word.capitalize() for word in bud_note.split(" ")])
    c.execute ("INSERT INTO budget_t (bud_date ,bud_amount, bud_note)  VALUES(:bud_date ,:bud_amount, :bud_note)",{"bud_date":bud_date ,"bud_amount":float(bud_amount), "bud_note":bud_note})
    db_conn.commit()

    input('\n\n        ... Press any Key to Exit')
For the Budget Date we want the date to be in certain format, so we wrote a function that will take the user_input and check it’s format then return a message back, the message will be ‘Valid’ if the date format is correct, otherwise the message will give a hint if format error as:
Date Not Valid “Bad Year” or Date Not Valid “Bad Month” or Date Not Valid “Bad Day”. Here is the code for the Date Validation Function ..
 |
Next we will write a function so we can withdraw some amount of money from the Budget, Why?? If we assume we start our Shares Speculation with 100,000$ and after several Buying and Selling we gain say 50,000$ as Profits, and we want to use this cash the [50,000$] to buy something; therefore we need to subtract / withdraw from the system. Here is the code to do this and the system will add [ WITHDRAW ] to the Note field.
 # To withdraw form the Budget


def sub_budget ():
    os.system('clear')
    print('\n   ====== Withdraw from Budget ======\n\n')
    print('   Enter the Details of Withdraw Amount..\n')
    while True :
        bud_date = input ('   Enter the Date as [dd-mm-yyyy].  >  ')
        msg = (date_validation (bud_date))
        if msg !='valid' :
            print(msg)
        else:
            break

    bud_amount = input ('   Enter the Withdraw Amount.  >  ')
    if int(bud_amount) > 0 :
        bud_amount = int(bud_amount) * (-1)
    bud_note = input ('   Enter any Notes if you want. [Hint: Cheque No.] >  ')
    bud_note = "[ WITHDRAW ], " + bud_note
    bud_note = " ".join([word.capitalize() for word in bud_note.split(" ")])
    c.execute ("INSERT INTO budget_t (bud_date ,bud_amount, bud_note)  VALUES(:bud_date ,:bud_amount, :bud_note)",{"bud_date":bud_date ,"bud_amount":bud_amount, "bud_note": bud_note})
    db_conn.commit()

    input('\n\n        ... Press any Ket to Exit')
Now, in both Edit and Delete function we need to show the Budgets we have so the user will select the one for processing. So we will write the code to show Budgets in the system and we will present it as a Table. Here is the code ..
 # To show the Budget Table

def show_budget (inside='No'):
    if inside =='No' :
        os.system('clear')
        print('\n   ====== Show Budgets ======\n\n')
        print('   List of Budgets ..\n')
    c.execute ("select * from budget_t where bud_id >0")
    budgets = c.fetchall()
    print('      {:<10}{:<13}{:<16}{}'.format('ID','Date','Amount','Note'))
    print("    ","-"*70)
    try:
        for x in range(0,len(budgets)) :
           print("      {:<8}{:<14}{:,}{:0")
        budget_amount = c.fetchone()
        print('\n\n    The Total Amount Budgets in the Account is : {:,} '.format(budget_amount[0]))

        input('\n   ... Press any key to Exit')
 |
So we have another two Functions [Edit, Delete] to go, the easyer one is Deleting Budget. In Delete function we will display a table with all Budgets we have in the system and the user will enter the ID of the Budget to be Deleted, we will ask the user to confirm the action then if CONFIRMED the Budget will be Delete. .. Here is the code ..
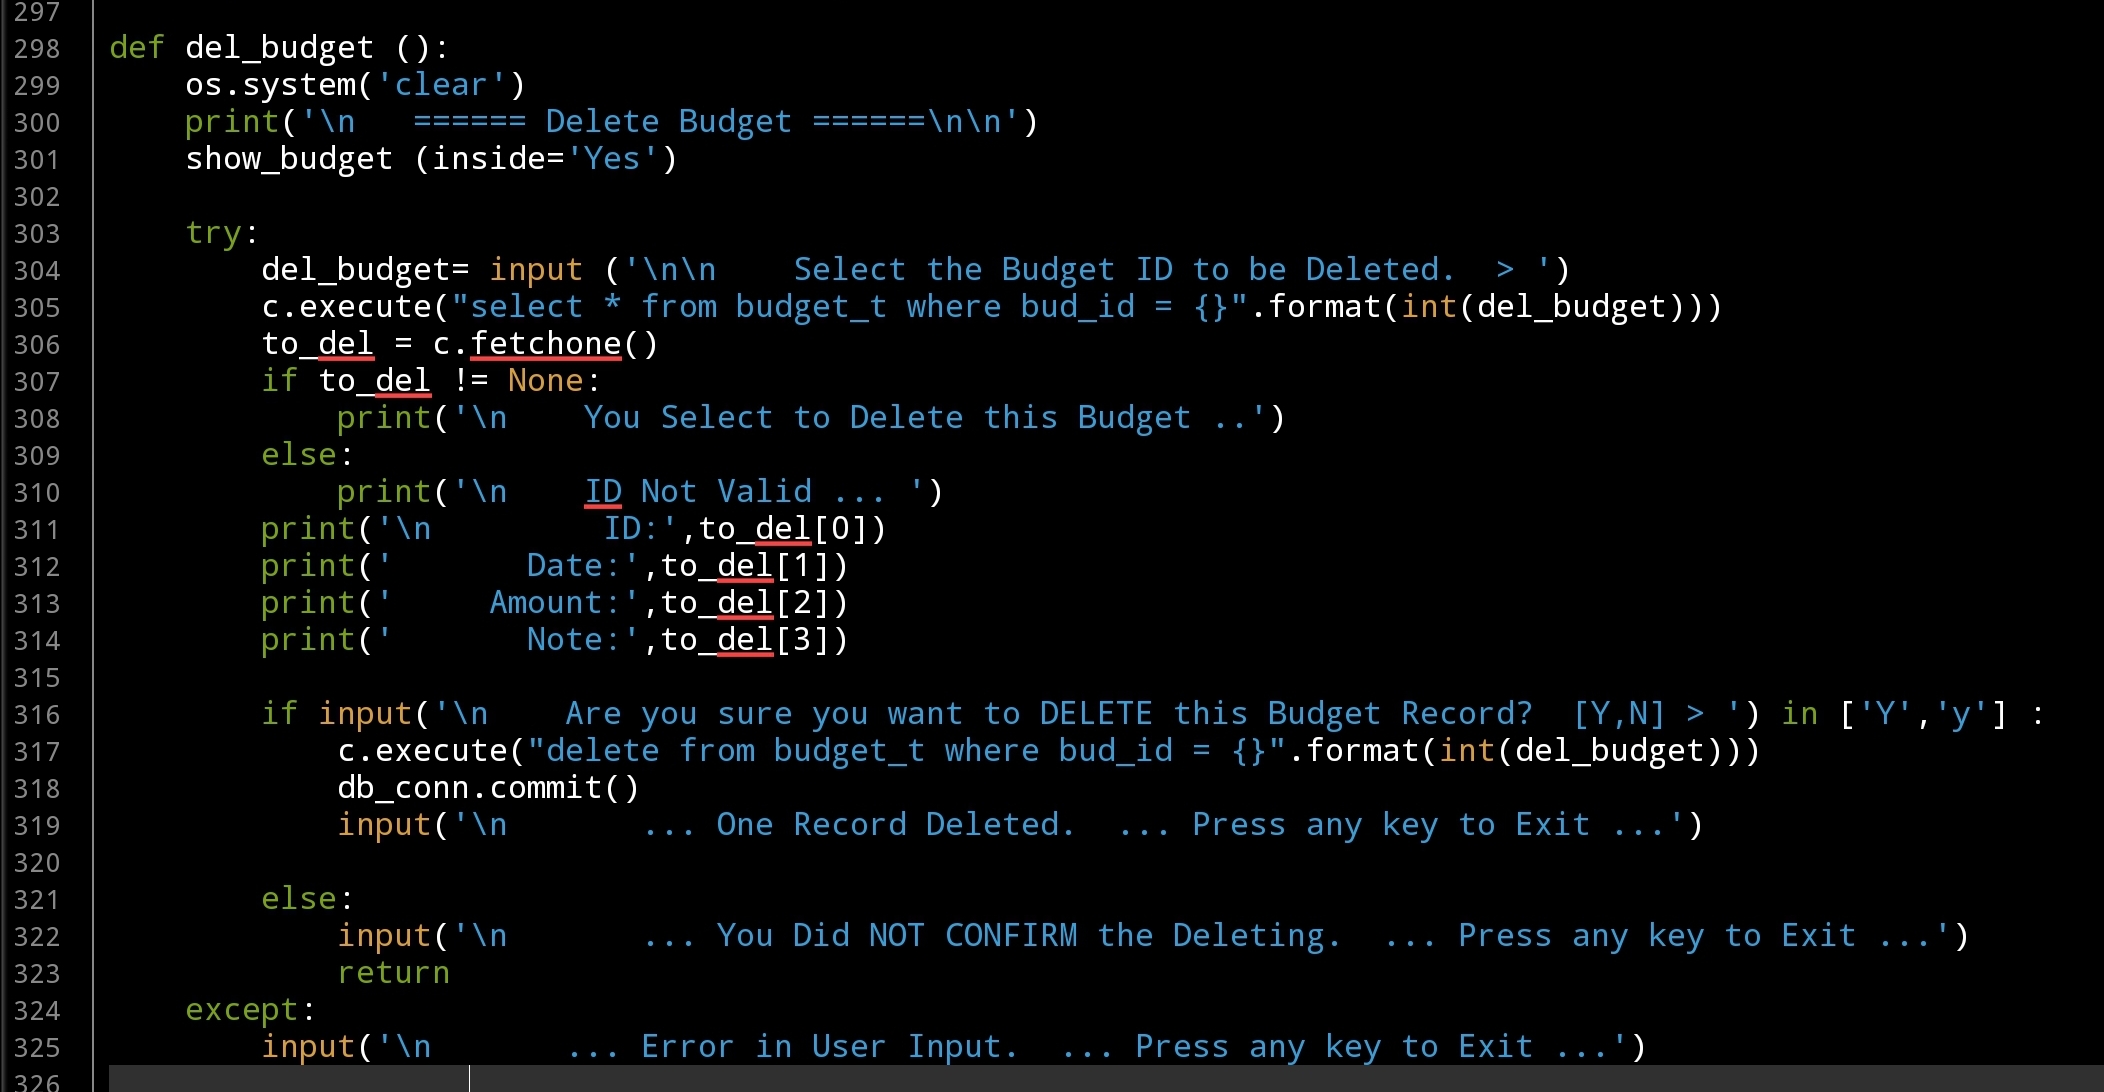 |
Last function in this part is to Edit a Budget that we have in the system, to do this we first will display all Budgets we have and the user will Enter the ID of the one to be Edited, we will go through it’s attributes asking the user to Edit or just Press enter to skip and keep the current value. For the Date we will call the date_validation() after user input, and for the Note we will check the Amount if it is Negative we will add “[ WITHDRAW ]” in the beginning of the Note line.
 # Edit Budget Function

def edit_budget ():
    os.system('clear')
    print('\n   ====== Edit Budget ======\n\n')
    show_budget (inside='Yes')
    try:
        edit_budget = input ('\n\n    Select the Budget ID to Edit.  > ')
        c.execute ("select * from budget_t where bud_id ={}".format(int(edit_budget)))
        e_budget = c.fetchone()
        if e_budget != None:
            print('\n    You Select to Edit this Budget ..')
        else:
            print('\n    ID Not Valid ... ')

        print('\n       ID: ',e_budget[0])
        print('     Date: ',e_budget[1])
        print('   Amount:  {:,}'.format(e_budget[2]))
        print('     Note: ',e_budget[3])

        print('\n\n   Edit Each Attribute OR Press Enter to Skip.. \n')

        while True :
            new_b_date = input('   Enter the New Date as [dd-mm-yyyy]. > ')
            if new_b_date >"" :
                msg = (date_validation (new_b_date))
                if msg !='valid' :
                    print(msg)
                else:
                    c.execute("update budget_t set bud_date = '{}' where bud_id = {}".format(new_b_date,int(e_budget[0])))
                    db_conn.commit()
                    break
            elif new_b_date =="" :break

        new_b_amount = input('   Enter the New Amount > ')
        if new_b_amount > "" :
            if input ('\n   You want to change the Budget Amount From {:,}  To {:,}. CONFIRM [Y,N] > '.format(float(e_budget[2]),float(new_b_amount))) in ['Y','y'] :
                c.execute("update budget_t set bud_amount = '{}' where bud_id = {}".format(float(new_b_amount),int(e_budget[0])))
                db_conn.commit()
        else:
            print('   Budget Amount Not changed..\n')

        new_b_note = input('\n   Enter the New Note: > ')
        if new_b_note > "" :
            new_b_note = " ".join([word.capitalize() for word in new_b_note.split(" ")])
            if (e_budget[3])[0] =='[' and int(new_b_amount) < 0 :
                new_b_note = "[ WITHDRAW ], " + new_b_note

            c.execute("update budget_t set bud_note = '{}' where bud_id = {}".format(new_b_note,int(e_budget[0])))
            db_conn.commit()

        input('\n   ... DONE ...  Press any key to Exit')
    except:
        input('\n       ... Error in User Input.  ... Press any key to Exit ...')
Coming Up: In Next part we will write the menu and the functions for the Shares Managment.
[NOTES]
1. Part-1 has no code file.
:: Shares Speculation System ::
| Part 1 | Part 2 | Part 3 | Part 4 |
To Download my Python code (.py) files Click-Here
By: Ali Radwani
Taking pictures is not my main daily practices, but when i start playing with my camera, i really enjoy my self.
Thanks for visiting my Space..


