Archive
ARDUINO: 2Pin Push Button and Speed Delay
Learning : Arduino, Circuit, coding
Subject: Controlling LED Delay by Push-Button
[NOTE: We are working on Electronic Devices, Voltage, Resistors and other Electronic Parts that may Become HOT due to un-stable current or Wrong Wire Connections.. PLEASE BE CAUTIOUS AND TAKE SAFETY NEEDED PROCEDURES.]
In many ARDUINO Project we codes that have Delay commands, such as in LED Blinking circuits. The delay use numbers, 1000mSec is 1sec, Example in LED blinking projects there must be a delay for some time [1000mSec is 1Sec] between LED-Hight and LED-Low commands. Usually we use a variable to save a delay amount, we can change the amount during code run-time if certain condition accurred.
In this post, we will learn how we can use a 2Pin Push Button to control the speed/Delay of a blinking LED using a code when the Button pressed.
The Case: Say we have a one LED that’s blinks (turns On and Off) with Delay time = 800 (mSec), we want to Press the Button to make it Blink Faseter, and each time we Press it blinks faster and faster, say each press will reduce the amount by 100mSec unit, and if the delay reach less than 60mSec, then it will jump to 800mSec again.
What we Need:
- Arduino UNO or Arduino Nano.
- 1 Breadbord.
- 1 LED. [i will use a red one]
- 1 2Pin Push Button.
- 1 Resistor 300 ohm.
- Some Jumper wires.
Connections:
- Connect Pin-1 in PushButton to ARDUINO Pin 8.
- Connect Pin-2 in PushButton to ARDUINO Pin 5V.
- Connect ARDUINO Pin-13 to a resistor Pin-1.
- Connect the LED Anode(+) Pin to the Resistor Pin-2.
- Connect the LED Cathode(-) Pin to ARDUINO GND Pin
You will have something like this ..
 |
Code Consept:
The LED will start blinking in 800msec (start_delay), then we want to press the Push Button and with each press the delay must decreases by certain amount (delay_reduce_s_1 = 100mSec), then if the delay time is less than 100mSec the decrease amount will be as (delay_reduce_s_2 = 10mSec) with each press, also if the delay is below min_delay = 60mSec the delay we re-set to start_delay.
Run-Time:
The LED will start blinking in 800mSec, then we Press the Push-Button (First Press) the delay will be 700mSec, and with each Pressed the delay will decreases 100mSec, when the delay reach less than 100mSec [from 800mSec to 100mSec after 8 presses] then it will start to reduces 10mSec with each Press. If the current delay is less than min_delay it will reset to 800mSec again.
GIF speeded-up to save space.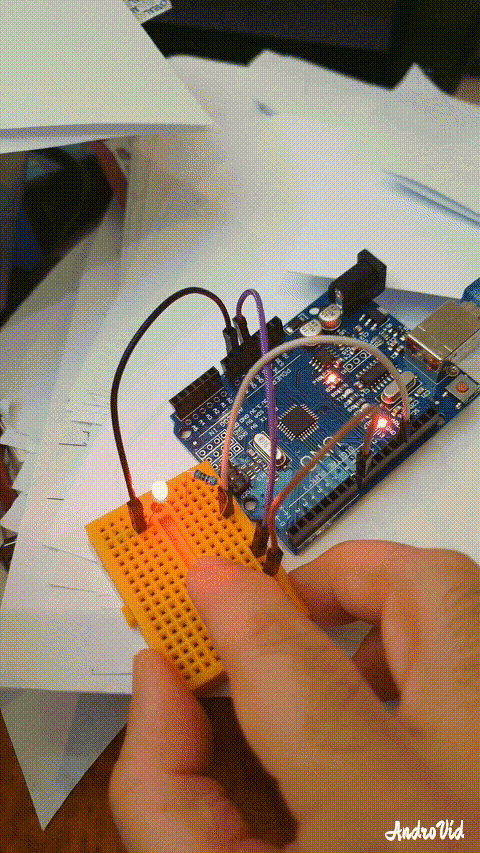 |
:: ARDUINO PROJECTS LIST ::
[ Click Here to See all ARDUINO Projects ]
To Download the ARDUINO Project [Code and Diagram] files Click-Here
 Follow me on Twitter..
By: Ali Radwani
Arduino Project: LED Fade-off in 60sec using BC547
Learning : Circutes
Subject: LED Fade-off in 60sec using BC547
[NOTE: We are working on Electronic Devices, Voltage, Resistors and other Electronic Parts that may Become HOT due to un-stable current or Wrong Wire Connections.. PLEASE BE CAUTIOUS AND TAKE SAFETY NEEDED PROCEDURES.]
In most Projects here i am using ARDUINO, but in this Project we will use a Transistor BC547 to make an LED Fade-off.
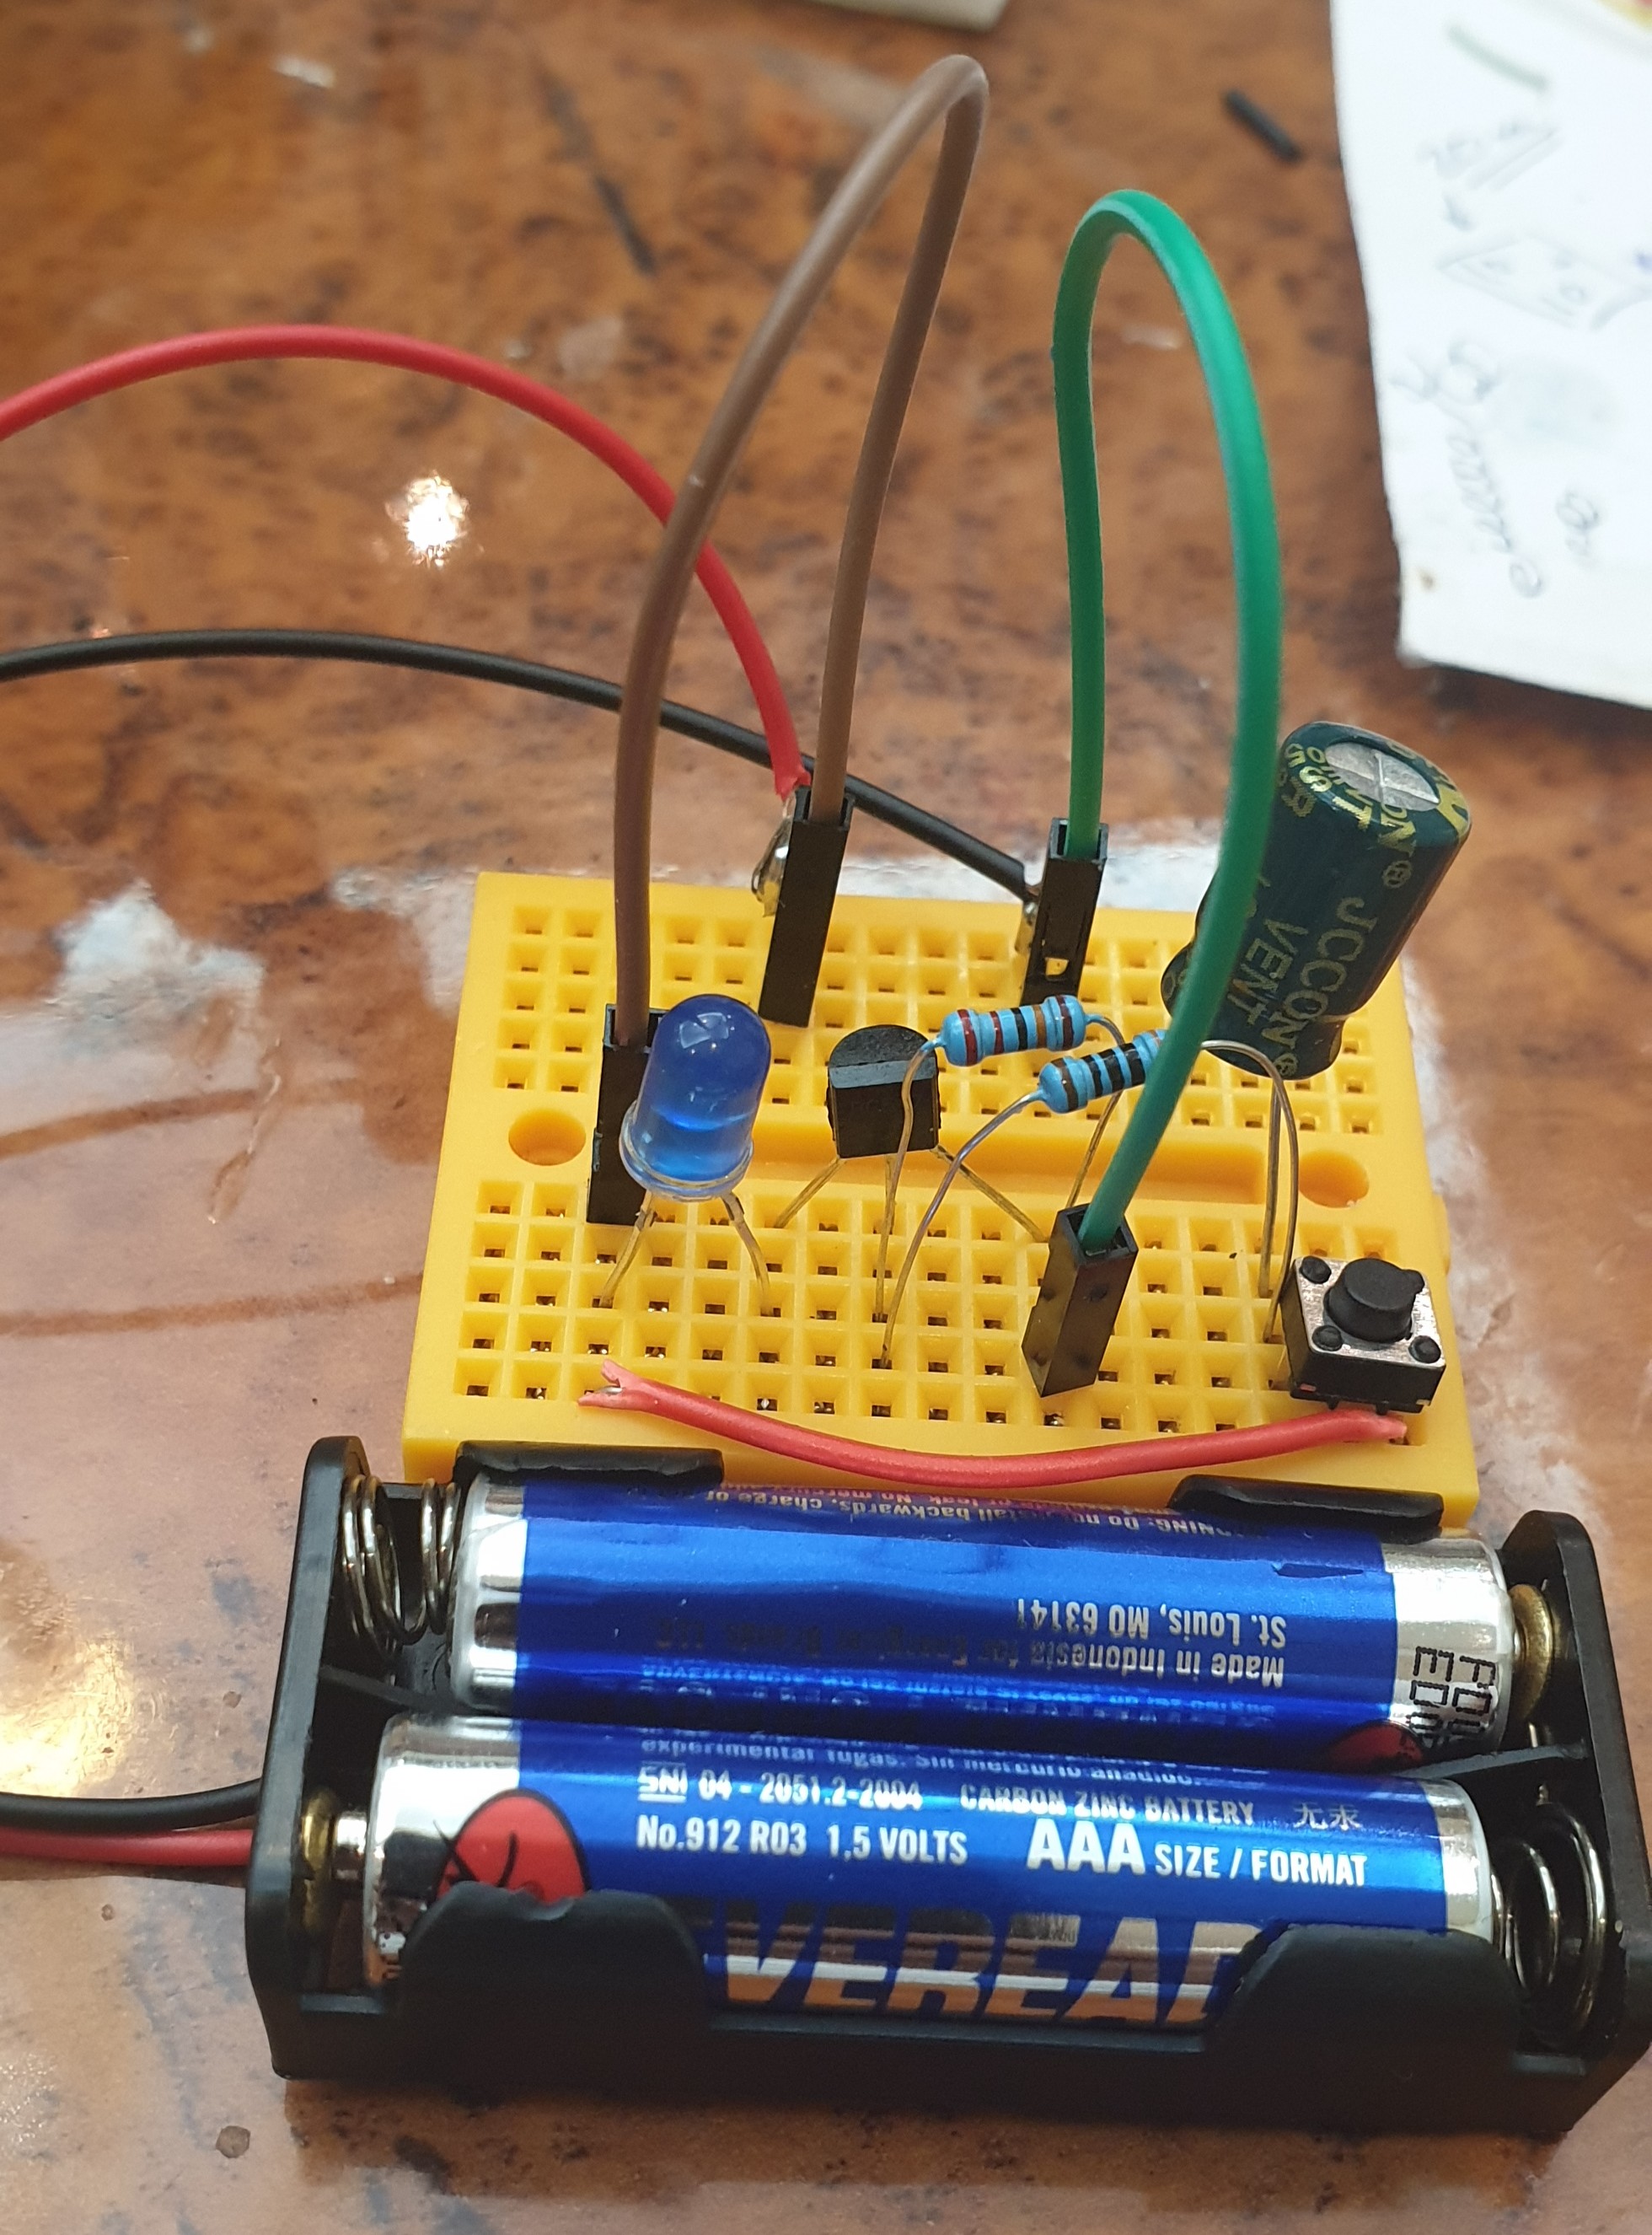
What we Need In this Project we will use the Following:
- 1 LED.
- 1 BC547 Transistor.
- BreadBoard
- 2 300 ohm Resistors.
- 1 Capacitor.
- 1 2pin push button.
- Some Jumper wires.
- 3V Battery.
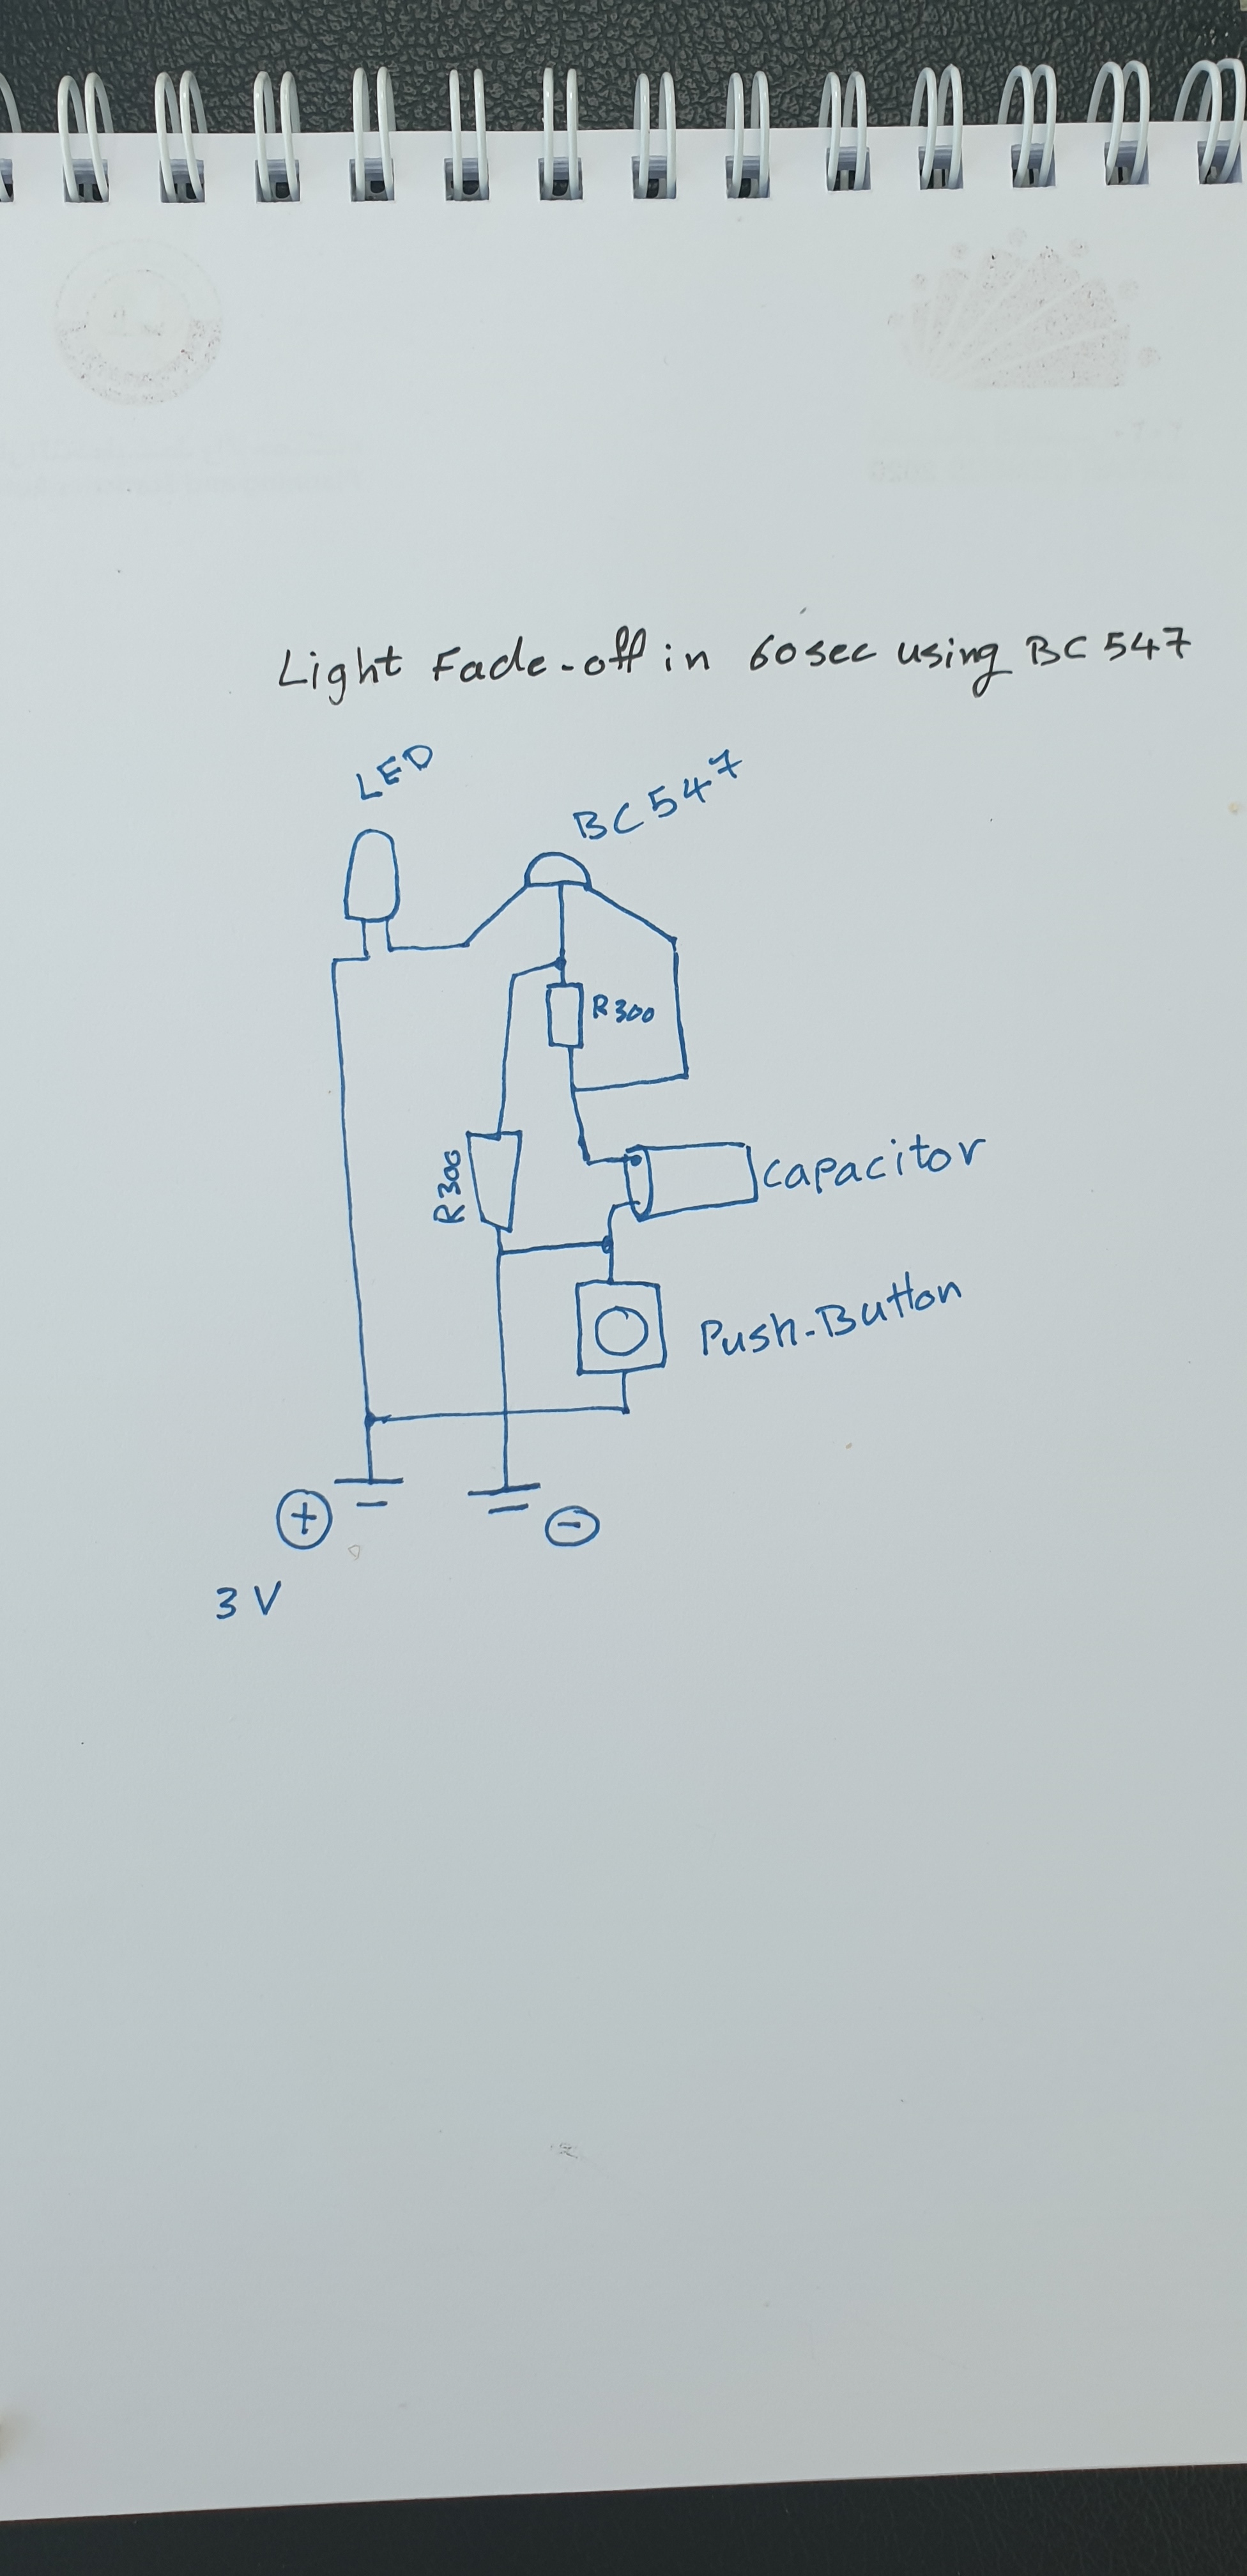
Connections:
The BC547 has three legs,
Collector
Base
Emitter
So, Starting From BC547 Base will be connected to Resistor 1, and Resistor 2 [in Parallel], Resistor1 will connect to the Capacitor Anode(+), Capacitor Anode(+) also will be connected to the BC547 Emitter.
Capacitor Cathode(-) will be connected to pin1 Push-Button, also Capacitor Cathode(-) is connected to the Resistor 2.
Resistor 2 will be connected to the Battery (-)
BC547 Collector will be connected to LED Cathode(-), LED Anode(+) will be connected to the Battery(+). And the Push-Button Pin2 will be connected to Battery(+).
Here is the diagram:
 |
 |
Push the Button Now if we Push the Button, the LED will Go NO, and start Fading-out (OFF), I start a stop-watch it count almost 60Sec. Here is a speed-up RUN video.
Speed-up Video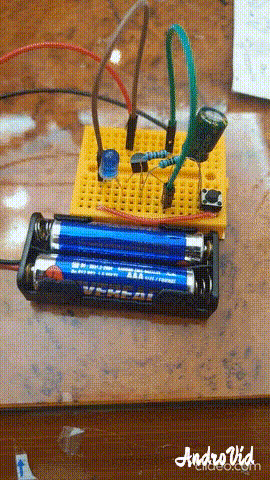 |
:: ARDUINO PROJECTS LIST ::
[ Click Here to See all ARDUINO Projects ]
To Download the ARDUINO Project [Code and Diagram] files {No Code in this Project}
By: Ali Radwani
Python Project: Properties Maintenance System P10
Subject: Writing a Full Application for Properties Maintenance System [Property: Delete a Record]
Learning : Python, Math, SQL, Logeic
[NOTE: To keep the code as simple as we can, We WILL NOT ADD any user input Varevecations. Assuming that our user will Enter the right inputs.]
In this part we will write the Following:
1. Writing the Maintenance Request Menu.
2. Writing the Functions header for Four Functions:
- Add a Maintenance Request.
- Edit a Maintenance Request.
- Delete a Maintenance Request.
- Show Maintenance Requests.
3. Writing the code for the first Function: Add a Maintenance Request.
4. Writing the code to Validate the Date.[The code will be coped in from my Archive]
First: Maintenance Request Menu: We will use our standard template in all application we write it, so here is the code ..

|
And here is the header of each Functions:
def add_maintenance_request() :
pass
def edit_maintenance_request() :
pass
def delete_maintenance_request() :
pass
def show_maintenance_request(inside) :
pass
First Function: def add_maintenance_request() : In this Function we will ask the user to select the ID of the Property that need Maintenance also to select the ID of Maintenance Job requered. If the Maintenance Job is Not Available in the List, then the user MUST go first to add it in the system, then come back and select it. During this Function coding we will use two Functions we have in this application [check_availability and show_lookup_data] also we will use the [Date Validation] Function we have develop some time ago [Click to Read the Post Ver.2019] {Updated Ver. used in this code.}
Here is a sample code for Selecting the Maintenance Job Requiered.
 # Selecting the Maintenance Job Requiered

 print('\n\t Select an Item from the List for the Maintenance Job Requiered:\n')
        show_lookup_data('Yes' ,'main_job_list_t', 'ml_id')
        main_j_id = input ('\n\t Enter the ID of the Maintenance Job. [E to Exit] > ')
        if main_j_id in ['e','E'] :
            input('\n\t You Select to Exit from the Function.. Press any Key .. ')
            return
        if	(check_availability('main_job_list_t', 'ml_id', int(main_j_id)) == None ) :
            input('\n\t The ID is NOT Available. Press any Key .. ')
            return
After collecting all information from the user, we will Insert/Add the data into the database using this SQL Statement..
# Add to the DataBase.
c.execute (“INSERT INTO maint_request_t (p_id , maint_for, date_time, job_s_id, notes) VALUES(:p_id , :maint_for, :date_time, :job_s_id, :notes)”,{“p_id”:mainte_req_id , “maint_for”:main_j_id, “date_time”:main_date, “job_s_id”:job_st_id, “notes”:the_note})
db_conn.commit()
Now we have the ability to add a Maintenance Request to our system.
NOTE: If you Download this Part you MUST Run the Option 82 (82. Delete the Data-Base and Start Again.) from the Main Menu to do the following Updates:
- Updates some attributes in the database level.
## Highly recommended ##
In Part-11 In the Next Part, we will write a function to show all Maintenance Request in the system.
:: PMS Parts ::
| Part 1 | Part 2 | Part 3 | Part 4 |
| Part 5 | Part 6 | Part 7 | Part 8 |
| Part 9 | Part 10 | Part 11 | Part 12 |
..:: Have Fun with Coding ::.. 🙂
To Download my Python code (.py) files Click-Here
By: Ali Radwani
Python Project: Properties Maintenance System P9
Subject: Writing a Full Application for Properties Maintenance System [Property: Delete a Record]
Learning : Python, Math, SQL, Logeic
[NOTE: To keep the code as simple as we can, We WILL NOT ADD any user input Varevecations. Assuming that our user will Enter the right inputs.]
In this part we will write a Function to Edit a record on the database, first we will call the def show_property(inside) to display all the records on the screen and ask the user to Select [enter] the ID of the Property to be Edited. Next we will Display the Record again on the screen and ask the user to Confirm the Editing by entering [Y] and any things else will be as [Don’t Edit]. Here is the code ..

|
Next we will ask the user about each attributes in the system, so the user will enter the new data (update the current one) or just press enter to keep the existed data. Here is a part of the code ..
 |
After That we will check on each user input for the attributes, if the user change/Edit the data [did not press enter] then we run an SQL command to alter the database. Here are part of the code we use ..
 |
Now we have an updated record, so we will show a message to inform the user that the records been updated.
NOTE: If you Download this Part you MUST Run the Option 82 (82. Delete the Data-Base and Start Again.) from the Main Menu to do the following Updates:
- Updates some attributes in the Database Level.
## Highly Recommended ##
In Part-10 the Next Part, we will add the Function to Backup our data .
:: PMS Parts ::
| Part 1 | Part 2 | Part 3 | Part 4 |
| Part 5 | Part 6 | Part 7 | Part 8 |
| Part 9 | Part 10 | Part 11 | Part 12 |
..:: Have Fun with Coding ::.. 🙂
To Download my Python code (.py) files Click-Here
By: Ali Radwani
Arduino: IDE and Coding
Learning : Arduino Projects, Arduino Coding, Electronic Circutes
Subject: First Application, Light the LED
[NOTE: We are working on Electronic Devices, Voltage, Resistors and other Electronic Parts that may Become HOT due to un-stable current or Wrong Wire Connections.. PLEASE BE CAUTIOUS AND TAKE SAFETY NEEDED PROCEDURES.]
IDE: IDE is the place or the editor that we can write the code in. Arduino has one that can be Downloaded from [ www.arduino.cc] then from the menu > Software.
Coding: The coding rules and best practes:
- Essentially consist of Two Main Functions: void setup() and void loop().
- Each Code line MUST end with Semicolon ;
- Code block Must be between two Curly-Brackets { }
- Declaration: if we have variavbles we need to declare them before we use them. Best-Practice: we put them at the top of our code page.Sample: int x ; int y = 50; const int t = 250
- Our Functions: Best-Practice: Put them between the void setup() and void loop(). SAMPLE: void led_on ( ){ digitalWrite(12, HIGH);}
- To put a comments in the code we use double front-slash // use it for one line comments. Best-Practice: Use comments to describe your codes and Functions.
- To Comments several lines we use /* /* all the lines between it will be as comments.*/
- IF Statment: if (int x > 10) { your code }
- For-loop: for(int x = 0; x < 5; x++) { your code }
So, I think this is the most important things we have to know to start coding our Arduino. With each practice and project we will work on we will describe coding-lines and commends we use.
I am not sure if i will continue in this way or say “New Learning Curve”, The Coding and Commanding an Electronic-Bord to Work as my Application says .. THIS PART WAS WHAT LIT THE FUSE IN MY BRAIN.
:: ARDUINO PROJECTS LIST ::
| 3 | First Project: Coming Soon.. |
| 2 | Code Editor, coding Blocks, learn Coding |
| 1 | Arduino, The Story, Components, Parts and What we will Do? |
To Download the ARDUINO Project [Code and Diagram] files Click-Here
By: Ali Radwani
Python Project: Properties Maintenance System P8
Subject: Writing a Full Application for Properties Maintenance System [Property: Delete a Record]
Learning : Python, Math, SQL, Logeic
[NOTE: To keep the code as simple as we can, We WILL NOT ADD any user input Varevecations. Assuming that our user will Enter the right inputs.]
In this part we will write a Function to Delete a record from the database, first we will call the def show_property(inside) to display all the records on the screen and ask the user to Select [enter] the ID of the Property to be Deleted. Next we will Display the Record again on the screen and ask the user to Confirm the Deleting by entering [Y] and any things else will be as [Don’t Delete]. Here is the code ..
 |
.. End of Part 8 ..
NOTE: If you Download this Part you MUST Run the Option 82 (82. Delete the Data-Base and Start Again.) from the Main Menu to do the following Updates:
- Update the properties_t Table (Adding the number of BathRooms)
- Update on create_tables Function.
- Update on insert_zero_records Function.
If you did this in last part (6) then you don’t need to do it again
In Part-9 In the Next Part, we will write the Function to Edit a record of a selected Property.
:: PMS Parts ::
| Part 1 | Part 2 | Part 3 | Part 4 |
| Part 5 | Part 6 | Part 7 | Part 8 |
..:: Have Fun with Coding ::.. 🙂
To Download my Python code (.py) files Click-Here
By: Ali Radwani
Arduino Projects: The Story
Learning : Arduino, Arduino Coding, Electronic Circutes
Subject: The Story and Orders
[NOTE: We are working on Electronic Devices, Voltage, Resistors and other Electronic Parts that may Become HOT due to un-stable current or Wrong Wire Connections.. PLEASE BE CAUTIOUS AND TAKE SAFETY NEEDED PROCEDURES.]
The Story: Last month i was searching the net for something, Someway, Some projects make my Kids love Math and Science Subjects, I went through several pages … then I fond classes teaching the young students how to build simple circuits, using Led’s and 9V Batteries.. I start reading more in this subject then I found the ARDUINO Chip, were the students can write a code to switch on/off some LED’s. This thing Triggered the Passion of learning and trying new things. So I spend two/three days reading about it, and decide to give it a try.
What I Need: This is my first time reading about Electrical Circuits, I have some ides, but I Don’t have any Equepments to start. So from there I start submitting orders to buy things that I will need, i got the list from tutorial youtube. Here is the list of my orders:
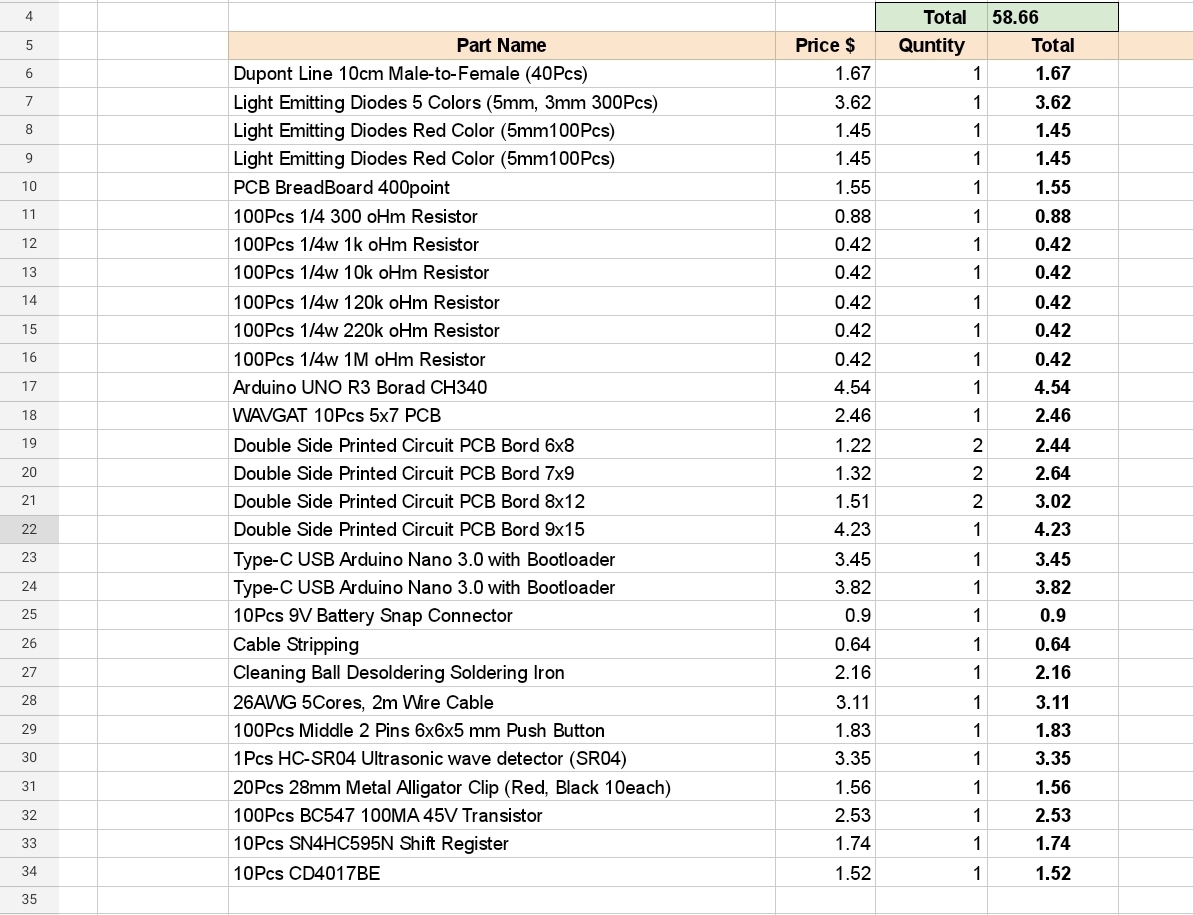 |
I am not sure if i will continue in this way or say “New Learning Curve”, The Coding and Commanding an Electronic-Bord to Work as my Application says .. THIS PART WAS WHAT LIT THE FUSE IN MY BRAIN.
.. NEXT POST .. In Next post I will write about ARDUINO [simple information as far I know 🙂 ] How it Works, and Firs simple Project [without coding].
:: ARDUINO PROJECTS LIST ::
| 2 | Code Editor, coding Blocks, learn Coding |
| 1 | Arduino, The Story, Components, Parts and What we will Do? |
To Download the ARDUINO Project [Code and Diagram] files Click-Here
By: Ali Radwani
Python Project: Properties Maintenance System P7
Subject: Writing a Full Application for Properties Maintenance System [Property: Showing the Records in Main property Table]
Learning : Python, Math, SQL, Logeic
[NOTE: To keep the code as simple as we can, We WILL NOT ADD any user input Varevecations. Assuming that our user will Enter the right inputs.]
After adding Records to the Main Property Table, we need to display the records on the screen. So now in this part (Part -7) we will write a function to display all the records. The Function name will be def show_property() the function is not taking any attribute and is Not returning any things. First we will print-out the Table-Header then we will run an [SQL: select * from table-name] command to fetch all the records, then will [for loop] and test-format to print all the records on the screen. Here is the Code ..
 |
After i display the records, I notes that the Address-Column needs more than one row (in some cases), and it miss the line formating, so I wrote a function and call it def warp_text(tex,warp_on,nl_space) the function takes three arguments, the test: it the text/string you want to print.warp_on: is a number of character before the new-line.nl_space: is the number of white-character in the new-line.
Here is the Code ..
 # Function to warp

def warp_text(tex,worp_on,nl_space) :
    c = 0

    for t in range (len(tex)) :
        print(tex[t],end="")
        c += 1
        if c == worp_on :
            print('\n', ' '*nl_space, end="")
            c = 0
Check all the codes in the Download Page..
End of Part 7
NOTE: If you Download this Part you MUST Run the Option 82 (82. Delete the Data-Base and Start Again.) from the Main Menu to do the following Updates:
- Update the properties_t Table (Adding the number of BathRooms)
- Update on create_tables Function.
- Update on insert_zero_records Function.
If you did this in last part (6) then you don’t need to do it again
In Part-8 In the Next Part, after adding and showing the records we will write the Function to Delete a record from the Table.
:: PMS Parts ::
| Part 1 | Part 2 | Part 3 | Part 4 |
| Part 5 | Part 6 | Part 7 | Part 8 |
..:: Have Fun with Coding ::.. 🙂
To Download my Python code (.py) files Click-Here
By: Ali Radwani
Park-Side: Nikon S9900 shot – 18
Subject: Photo with Nikon S9900
This Shot: This is a shot across my car window next to the Kids School, a photo of a tree in a park. I am using Nikon S9900.
…Click Image to Enlarge… Camera in Hand, F: 4.8, ISO: 125, Shutter: 1/1250s, Focal-Point: 13mm Camera in Hand, F: 4.8, ISO: 125, Shutter: 1/1250s, Focal-Point: 13mm
|
::.. To see all my Nikon S9900 Photos Click-Here
::.. To see all my Nikon D7100 Photos Click-Here
::.. To see all my Nikon D90 Photos Click-Here
By: Ali Radwani
Python Project: Properties Maintenance System P6
Subject: Writing a Full Application for Properties Maintenance System [Add New Property Functions]
Learning : Python, Math, SQL, Logeic
[NOTE: To keep the code as simple as we can, We WILL NOT ADD any user input Varevecations. Assuming that our user will Enter the right inputs.]
This is Part-6 of an Application to Manage Properties Maintenance in this part we will writ a Function to Add New Property to our System.
Add New Property:
This May be the longest Function in our system, we will ask the user to Enter the Data for a New Property and then saving it to the DataBase.
Simple Validation: In this Function we will do a very simple check on the user inputs, and will keep this as simple as we can so the code will not be long. Sample on this Validation will be if the user enter [E or e] we will exit the process and stop the Function.
Code Part Sample: In asking the user to select the property Type were we are using a look-up table for the Property Types, we will use the Function def get_lookup_values(tname,t_id,key_id): were we passing the table-name, the ID column name and the ID of the data we want to retrieve. Another code part we may see is checking the user input of the p_type_id (MUST BE NUMERIC)
if (p_type_id.isalpha()):
input(‘\n You Must Enter a Numeric Value. Press any key to Try Again .. > ‘). Also we can see the part of the code that will make sure that the user did not enter the [E to Exit] (if the user enter E we will display a message then will return to the Menu-Page)p_bedrooms = input(‘\n Enter the Number of Bedrooms in the Property. [E to Exit] > ‘)
if p_bedrooms in [‘e’,’E’] :
input (‘\n You Select to Exit .. Press any Key. >’)
return
Saving the Record:
After the user Enter all the data we need we will display it on the screen and asking for a confirmation to Save the record, If the user Enter [Y] as Yes, we will use the “INSERT INTO properties_t …” SQL command to save the Record to the dataBase.
Here is a screen-shot of the all code of the Function,
 |
NOTE: If you Download this Part you MUST Run the Option 82 (82. Delete the Data-Base and Start Again.) from the Main Menu to do the following Updates:
- Update the properties_t Table (Adding the number of BathRooms)
- Update on create_tables Function.
- Update on insert_zero_records Function.
In Part-7 In the Next Part we will write the Function to Display/Show all the Records of the Main-Property-Table on the screen.
:: PMS Parts ::
| Part 1 | Part 2 | Part 3 | Part 4 |
| Part 5 | Part 6 | Part 7 | Part 8 |
..:: Have Fun with Coding ::.. 🙂
To Download my Python code (.py) files Click-Here
By: Ali Radwani
Taking pictures is not my main daily practices, but when i start playing with my camera, i really enjoy my self.
Thanks for visiting my Space..


