Archive
Nikon S9900 shot – 23
Subject: The West-Bay by Nikon S9900
This Shot: In most of the days I am taking the Nikon S9900 camera with me in the car, just to use it and to have photos with it. This is a shot through the car window while driving to work using on hand to hold the camera, in the background we can see the Towers of the West-Bay area, and in the foreground is a Mosque; and I am waiting for a traffic lights to be Green. The original shot was in color and I change it to B/W and crope it before uploaded. I am using Nikon S9900.
…Click Image to Enlarge…  |
| Camera in Hand, F: 5, ISO: 125, Shutter: 1/2000s, Focal-Point: 11mm |
Here is the Original Shot .. 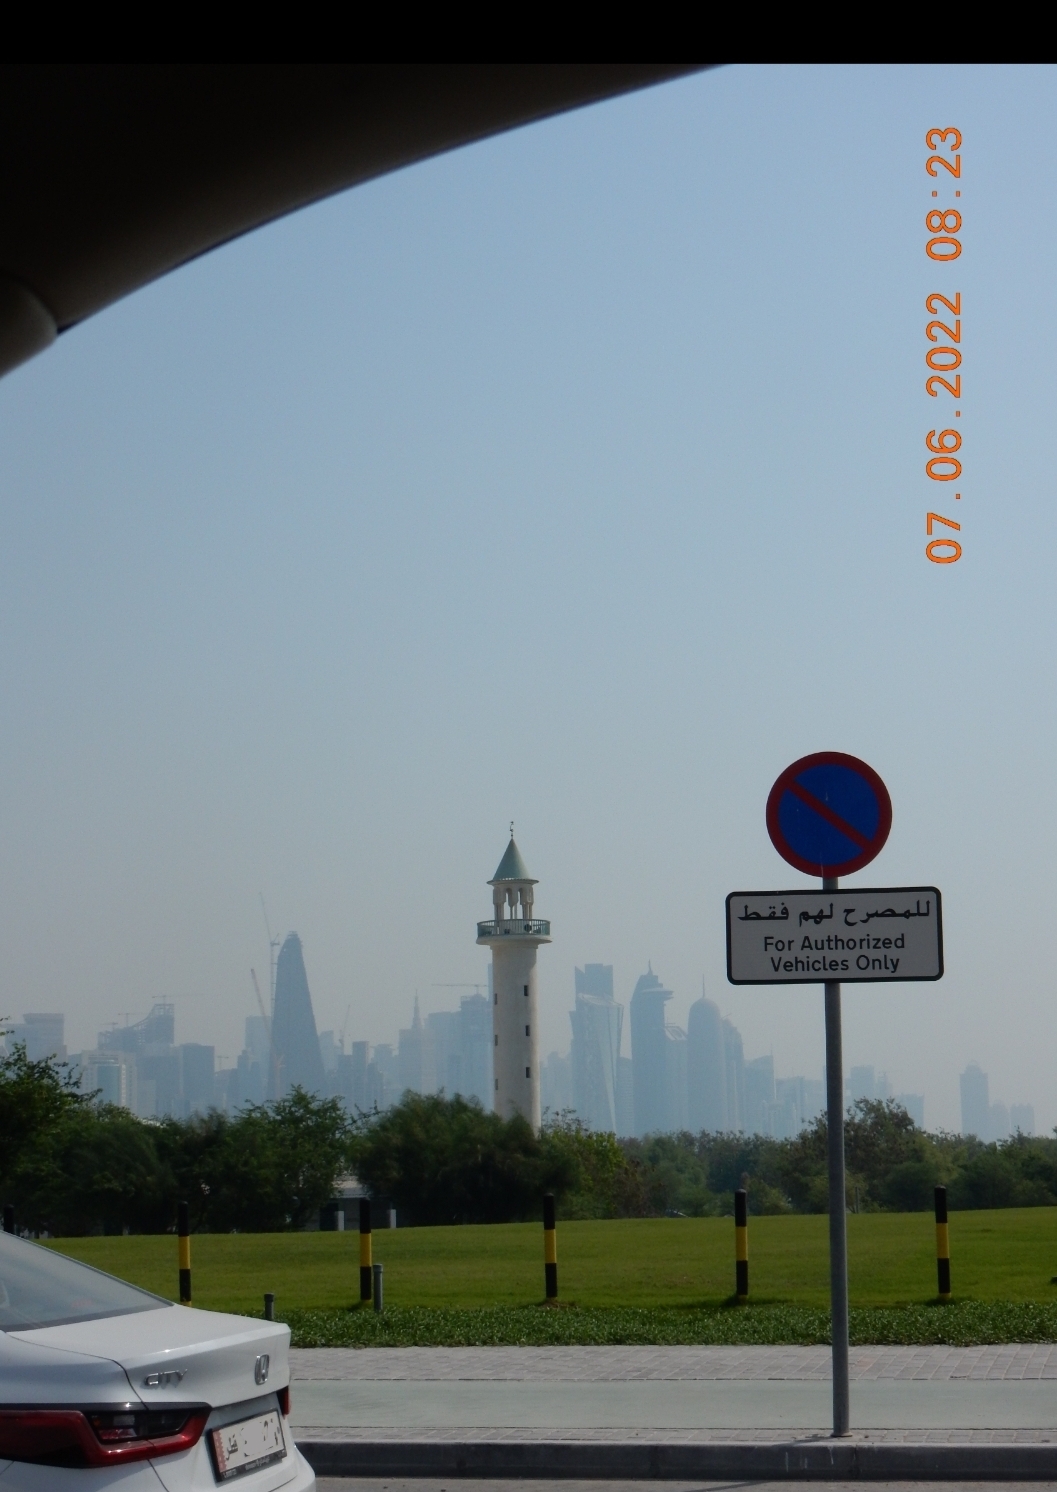 |
::.. To see all my Nikon S9900 Photos Click-Here
::.. To see all my Nikon D7100 Photos Click-Here
::.. To see all my Nikon D90 Photos Click-Here
 Follow me on Twitter..
By: Ali Radwani
Nikon S9900 shot – 20
Subject: Flower at Nikon S9900 lens
This Shot: Not sure about the name of this flower, but it grow up in my garden and i use to Trim them. using Nikon S9900.
…Click Image to Enlarge… Camera in Hand, F:4.2, ISO:125, Shutter: 1/60S, Focal-Point:8mm Camera in Hand, F:4.2, ISO:125, Shutter: 1/60S, Focal-Point:8mm
|
::.. To see all my Nikon S9900 Photos Click-Here
::.. To see all my Nikon D7100 Photos Click-Here
::.. To see all my Nikon D90 Photos Click-Here
By: Ali Radwani
Nikon S9900 Shot # 19
Subject: Mosques in Qatar using Nikon S9900
This Shot: Another shot for a Mosque, i was 10 or 15 meter away, camera in hand, set to take B/W shot almost at ground level.. Using Nikon S9900.
…Click Image to Enlarge… |
| Camera in Hand, F:4.2, ISO:125, Shutter:1/2000s, Focal-Point: 5mm |
::.. To see all my Nikon S9900 Photos Click-Here
::.. To see all my Nikon D7100 Photos Click-Here
::.. To see all my Nikon D90 Photos Click-Here
By: Ali Radwani
Arduino: NOT-Gate Circuit
Learning : Electronic NOT-Gate Circuit
Subject: To Build a NOT-Gate Circuit using BC547 Transistor
[NOTE: We are working on Electronic Devices, Voltage, Resistors and other Electronic Parts that may Become HOT due to un-stable current or Wrong Wire Connections.. PLEASE BE CAUTIOUS AND TAKE SAFETY NEEDED PROCEDURES.]
In this Project we will use the BC547 Transistor to build a NOT-Gate circuit, so we will Not use the ADRUINO board.
What we Need
- 1 2Pin Push-Button.
- 1 LED
- 3 Resistors.
- 1 BC547 Transistor.
- 1 BreadBoard. [I am using a small 5x7cm]
- Some Jumper Wires.
Connections
- Connect the BC547 BasePin to a Resistor Pin1, Then the Pin2 of the Transistor to the Push-Button Pin1.
- Connect the Push-Button Pin2 to Another Transistor Pin1, Then the Pin2 of the Transistor to BC547 CollectorPin, AND to the Battery(+).
- Connect the third Transistor Pin1 to BC547 CollectorPin, and the Pin2 of the transistor to LED(+) Pin.
- Connect the BC547 EmitterPin to the LED(-) Pin by Jumper-wire.
- Connect the LED(-) Pin to the Battery(-).
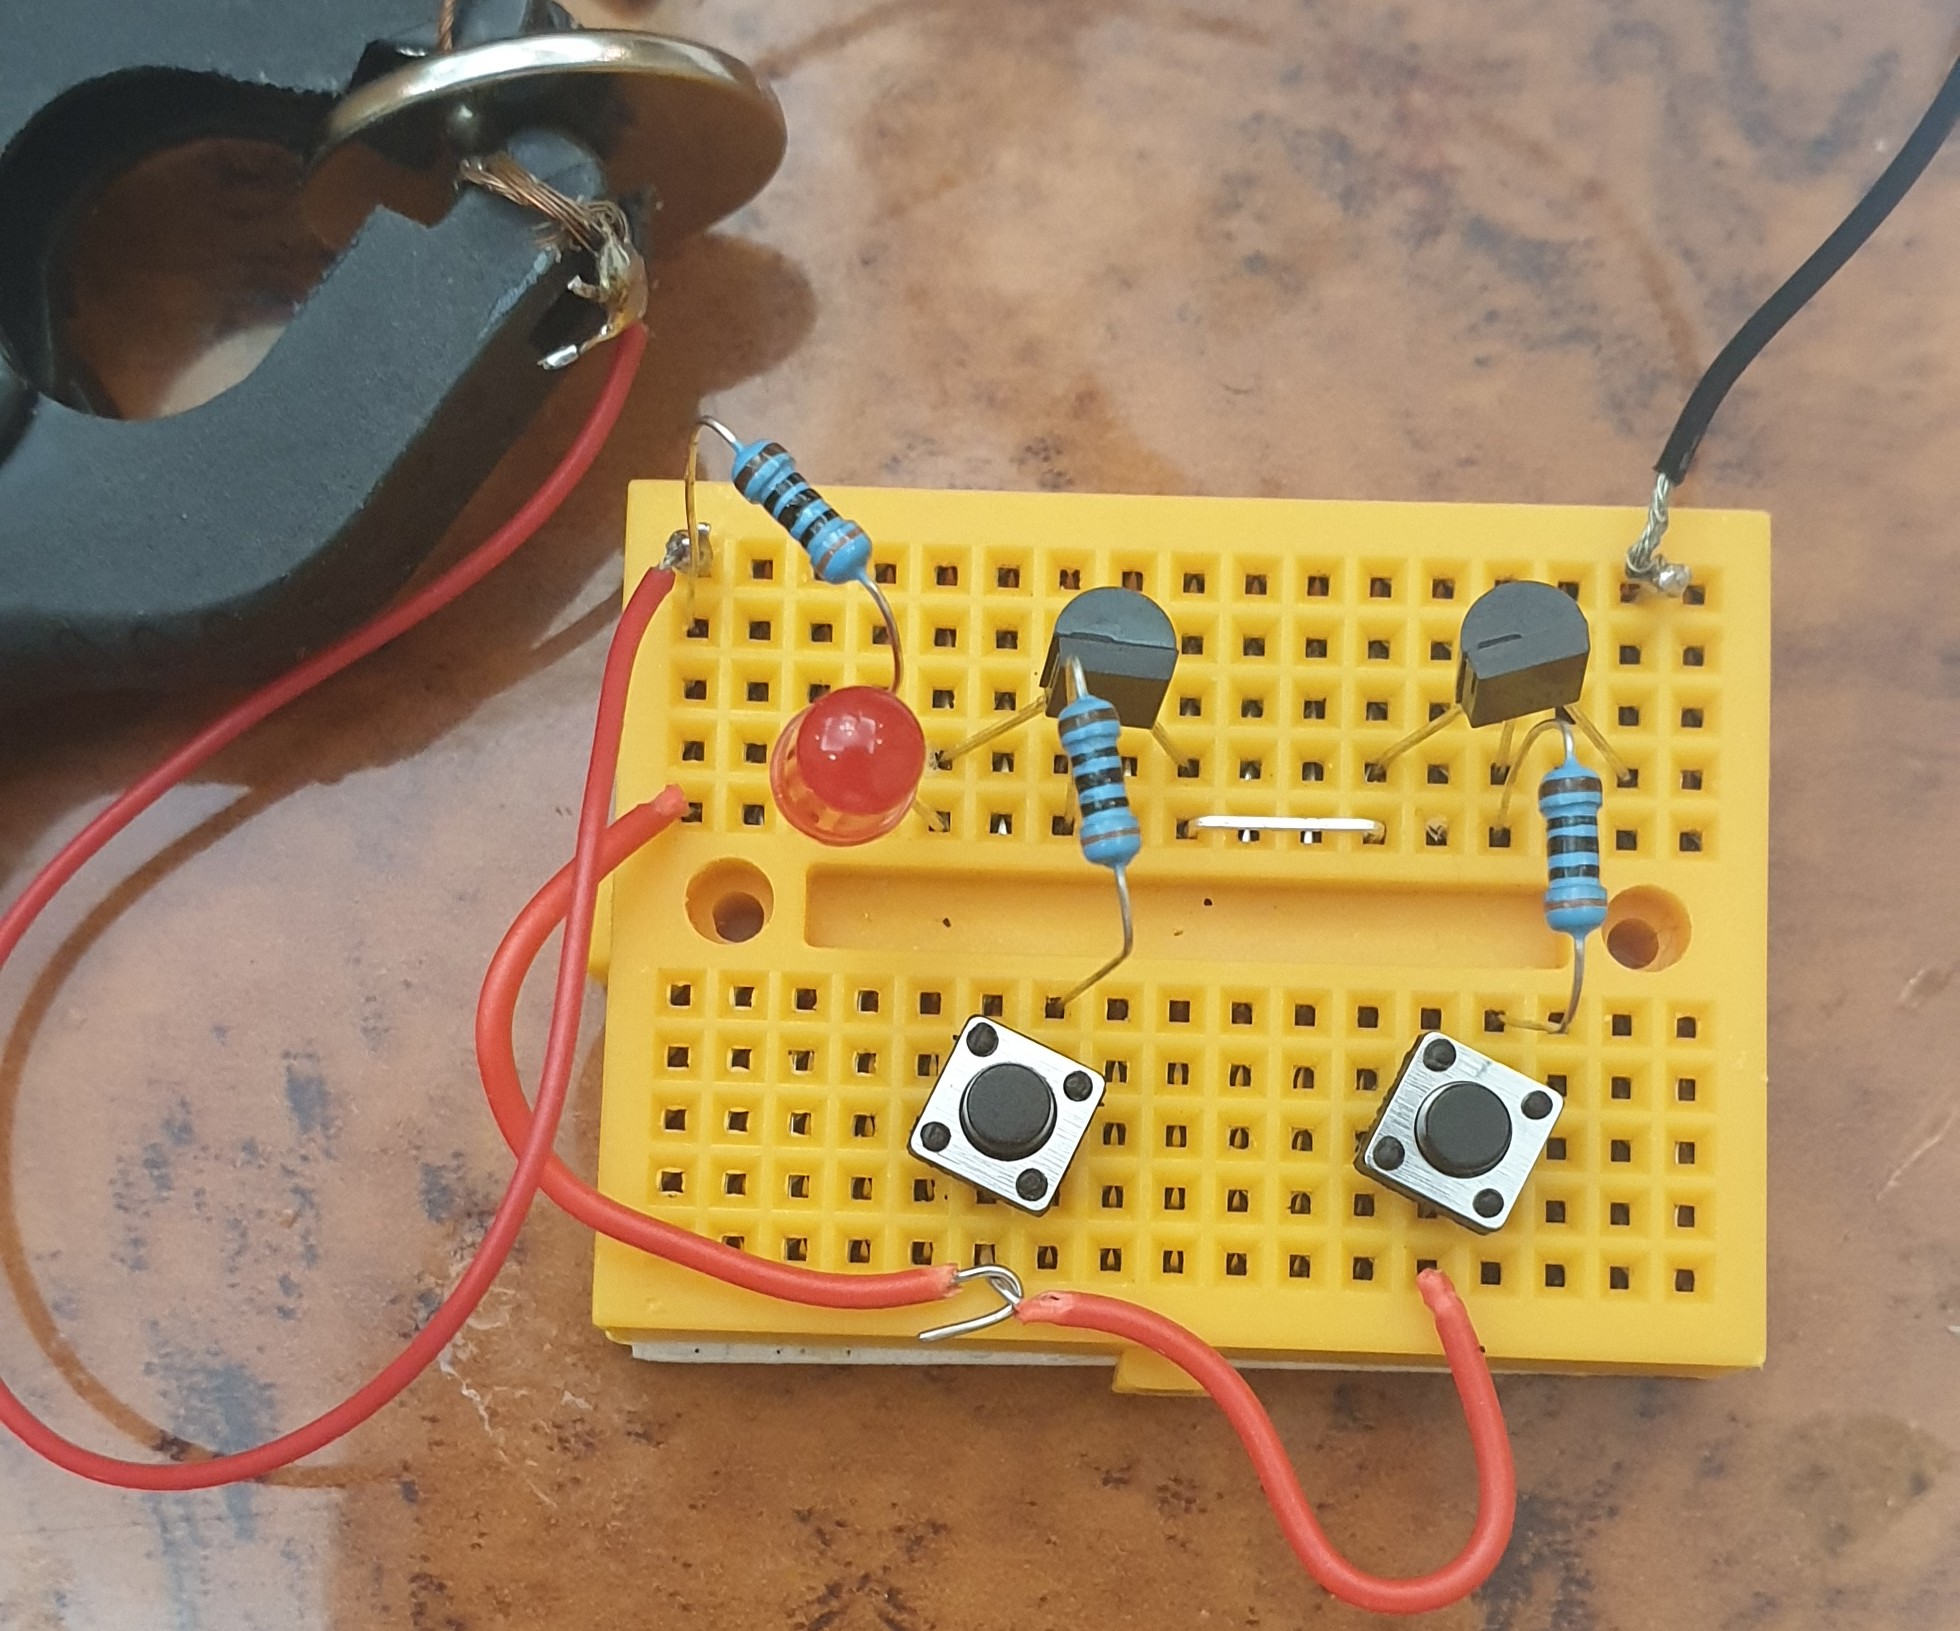
Here is the Circuit on the Breadboard |
Run-Time
Since this is a NOT-Gare Circuit then once we connect the Power we can see the LED turns ON, Now if we Press the button and keep pressing, the circuit will be in connecting phase and the LED will tune Off.
Here is a GIF clip of Running Time. |
:: ARDUINO PROJECTS LIST ::
[ Click Here to See all ARDUINO Projects ]
By: Ali Radwani
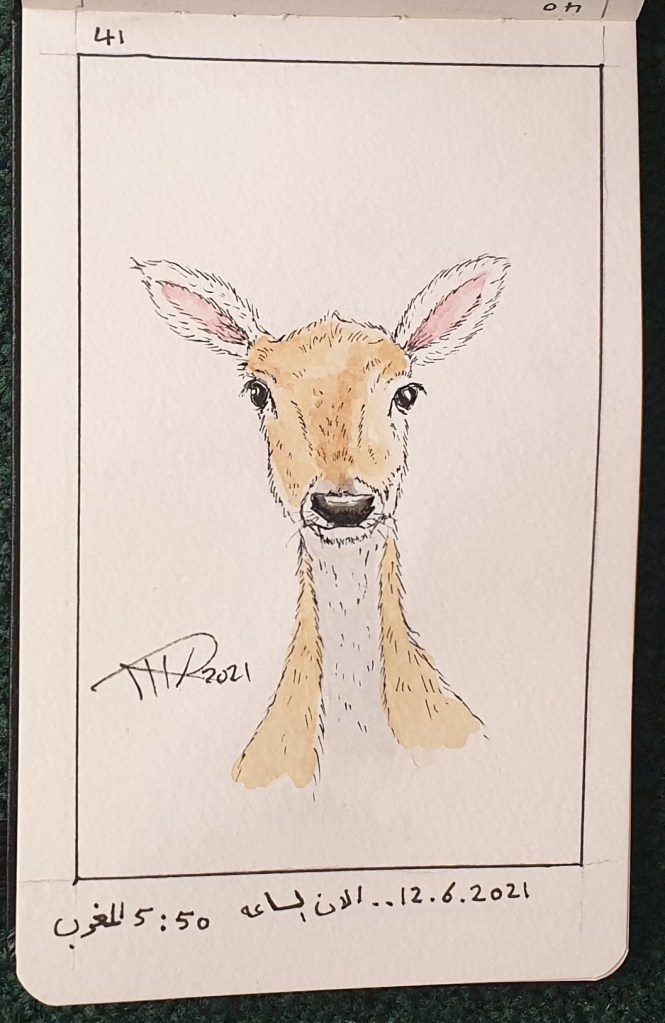
Daily Sketch: A Dear Face
This is one of my colored sketch back to June 2021 at lockdown time. For Colored sketchbook I am not in Daily based sketch, but trying to keep challenging my self.
Arduino: AND-Gate Circuit
Learning : Electronic AND-Gate Circuit
Subject: To Build an AND-Gate Circuit using BC547 Transistor
[NOTE: We are working on Electronic Devices, Voltage, Resistors and other Electronic Parts that may Become HOT due to un-stable current or Wrong Wire Connections.. PLEASE BE CAUTIOUS AND TAKE SAFETY NEEDED PROCEDURES.]
In this Project we will use the BC547 Transistor to build an AND-Gate Circuit on a breadboard, so we will Not use the ADRUINO board.
What we Need
- 2 2Pin Push-Button.
- 1 LED
- 3 Resistors.
- 2 BC547 Transistor.
- 1 BreadBoard. [I am using a small 5x7cm]
- Some Jumper Wires.
- 3V Battery
Connections
- Connect Both BC547 to the BreadBoard.
- Connect Emitter of the First (left) One to the Collector of the second One (Right one). [Use Jumper Wire]
- Connect TWO Push-Buttons to the BreadBoard.
- Connect between each BasePin of the BC547 and Pin1 of each Push-Button using a Resistor1&2 [Pin1 of PushButton1 to Pin1 of Resistor1, Pin2 on the Resistor1 to BasePin of BC547.]
- Connect Pin2 of Push-Button1 to the Pin2 of the Push-Button2.
- Connect the Push-Button2 Pin2 to a Resistor3 Pin1
- Connect the Resistor3 Pin2 to the LED(+)Pin.
- Connect the LED(-)Pin to the First BC547 CollectorPin
- Connect the Battery (+) to the Resistor3 pin2, and Connect the Battery (-) to the Emitter Pin of Second BC547.
 |
 |
Run-Time
The Logic of the AND-Gate is if the BOTH Button are Pressed in same time the circuit will close and the LED turn On.
Here is a GIF clip of Running Time. |
:: ARDUINO PROJECTS LIST ::
[ Click Here to See all ARDUINO Projects ]
By: Ali Radwani
Daily Sketch: The Tiger
Using a new pocket size sketch book, pincel and water-color; it is a quite challenge to mix colors on a thin paper. Here is another Daily Sketch challenge “The Tiger “. The paper is observing the water and in some places the paper get damaged.
Here is the sketch..

LED Fade-Off from Prototype to Gadget
Learning about : Circutes, Capasitor, Push-Button
Subject: LED Fade-off apply it on a PCB Board.
[NOTE: We are working on Electronic Devices, Voltage, Resistors and other Electronic Parts that may Become HOT due to un-stable current or Wrong Wire Connections.. PLEASE BE CAUTIOUS AND TAKE SAFETY NEEDED PROCEDURES.]
In one of my previous Post [Read Here] I did some connection on a breadboard using BC547 and a Capacitor to make an LED Fade-off in 60sec after pushing a button. In this post we will convert that circuit a simpler circuit doing the same thing from a breadboard to a PCB to be as a Gadget.
What we Need: Here is a list of what we will use:
- 1 LED (I will use a yellow one)
- 1 PCB Board 5x7cm.
- 1 1000uF 6.3v Capacitor.
- 1 Resistor 300 ohm.
- 1 2pin Push Button.
- 1 CR2032 Lithium Cell 3V Battery.
Connection: All the connections will be on a 5x7cm PCB Board, I use a thin steel wire to create a strap to hold the Battery, and:
- Connect the Negative (-) Battery to Pin1 of the Push Button.
- Pin2 of the Push Button will be connected to the Negative (-) pin of the Capacitor.
- Connect the 300ohm Resistor Between (+) Pin of the Capacitor and the (+) Pin of the LED.
- The Negative(-) Pin of the LED will be connected to the Pin2 of the Push Button.
Here is all connections on a small breadboard.
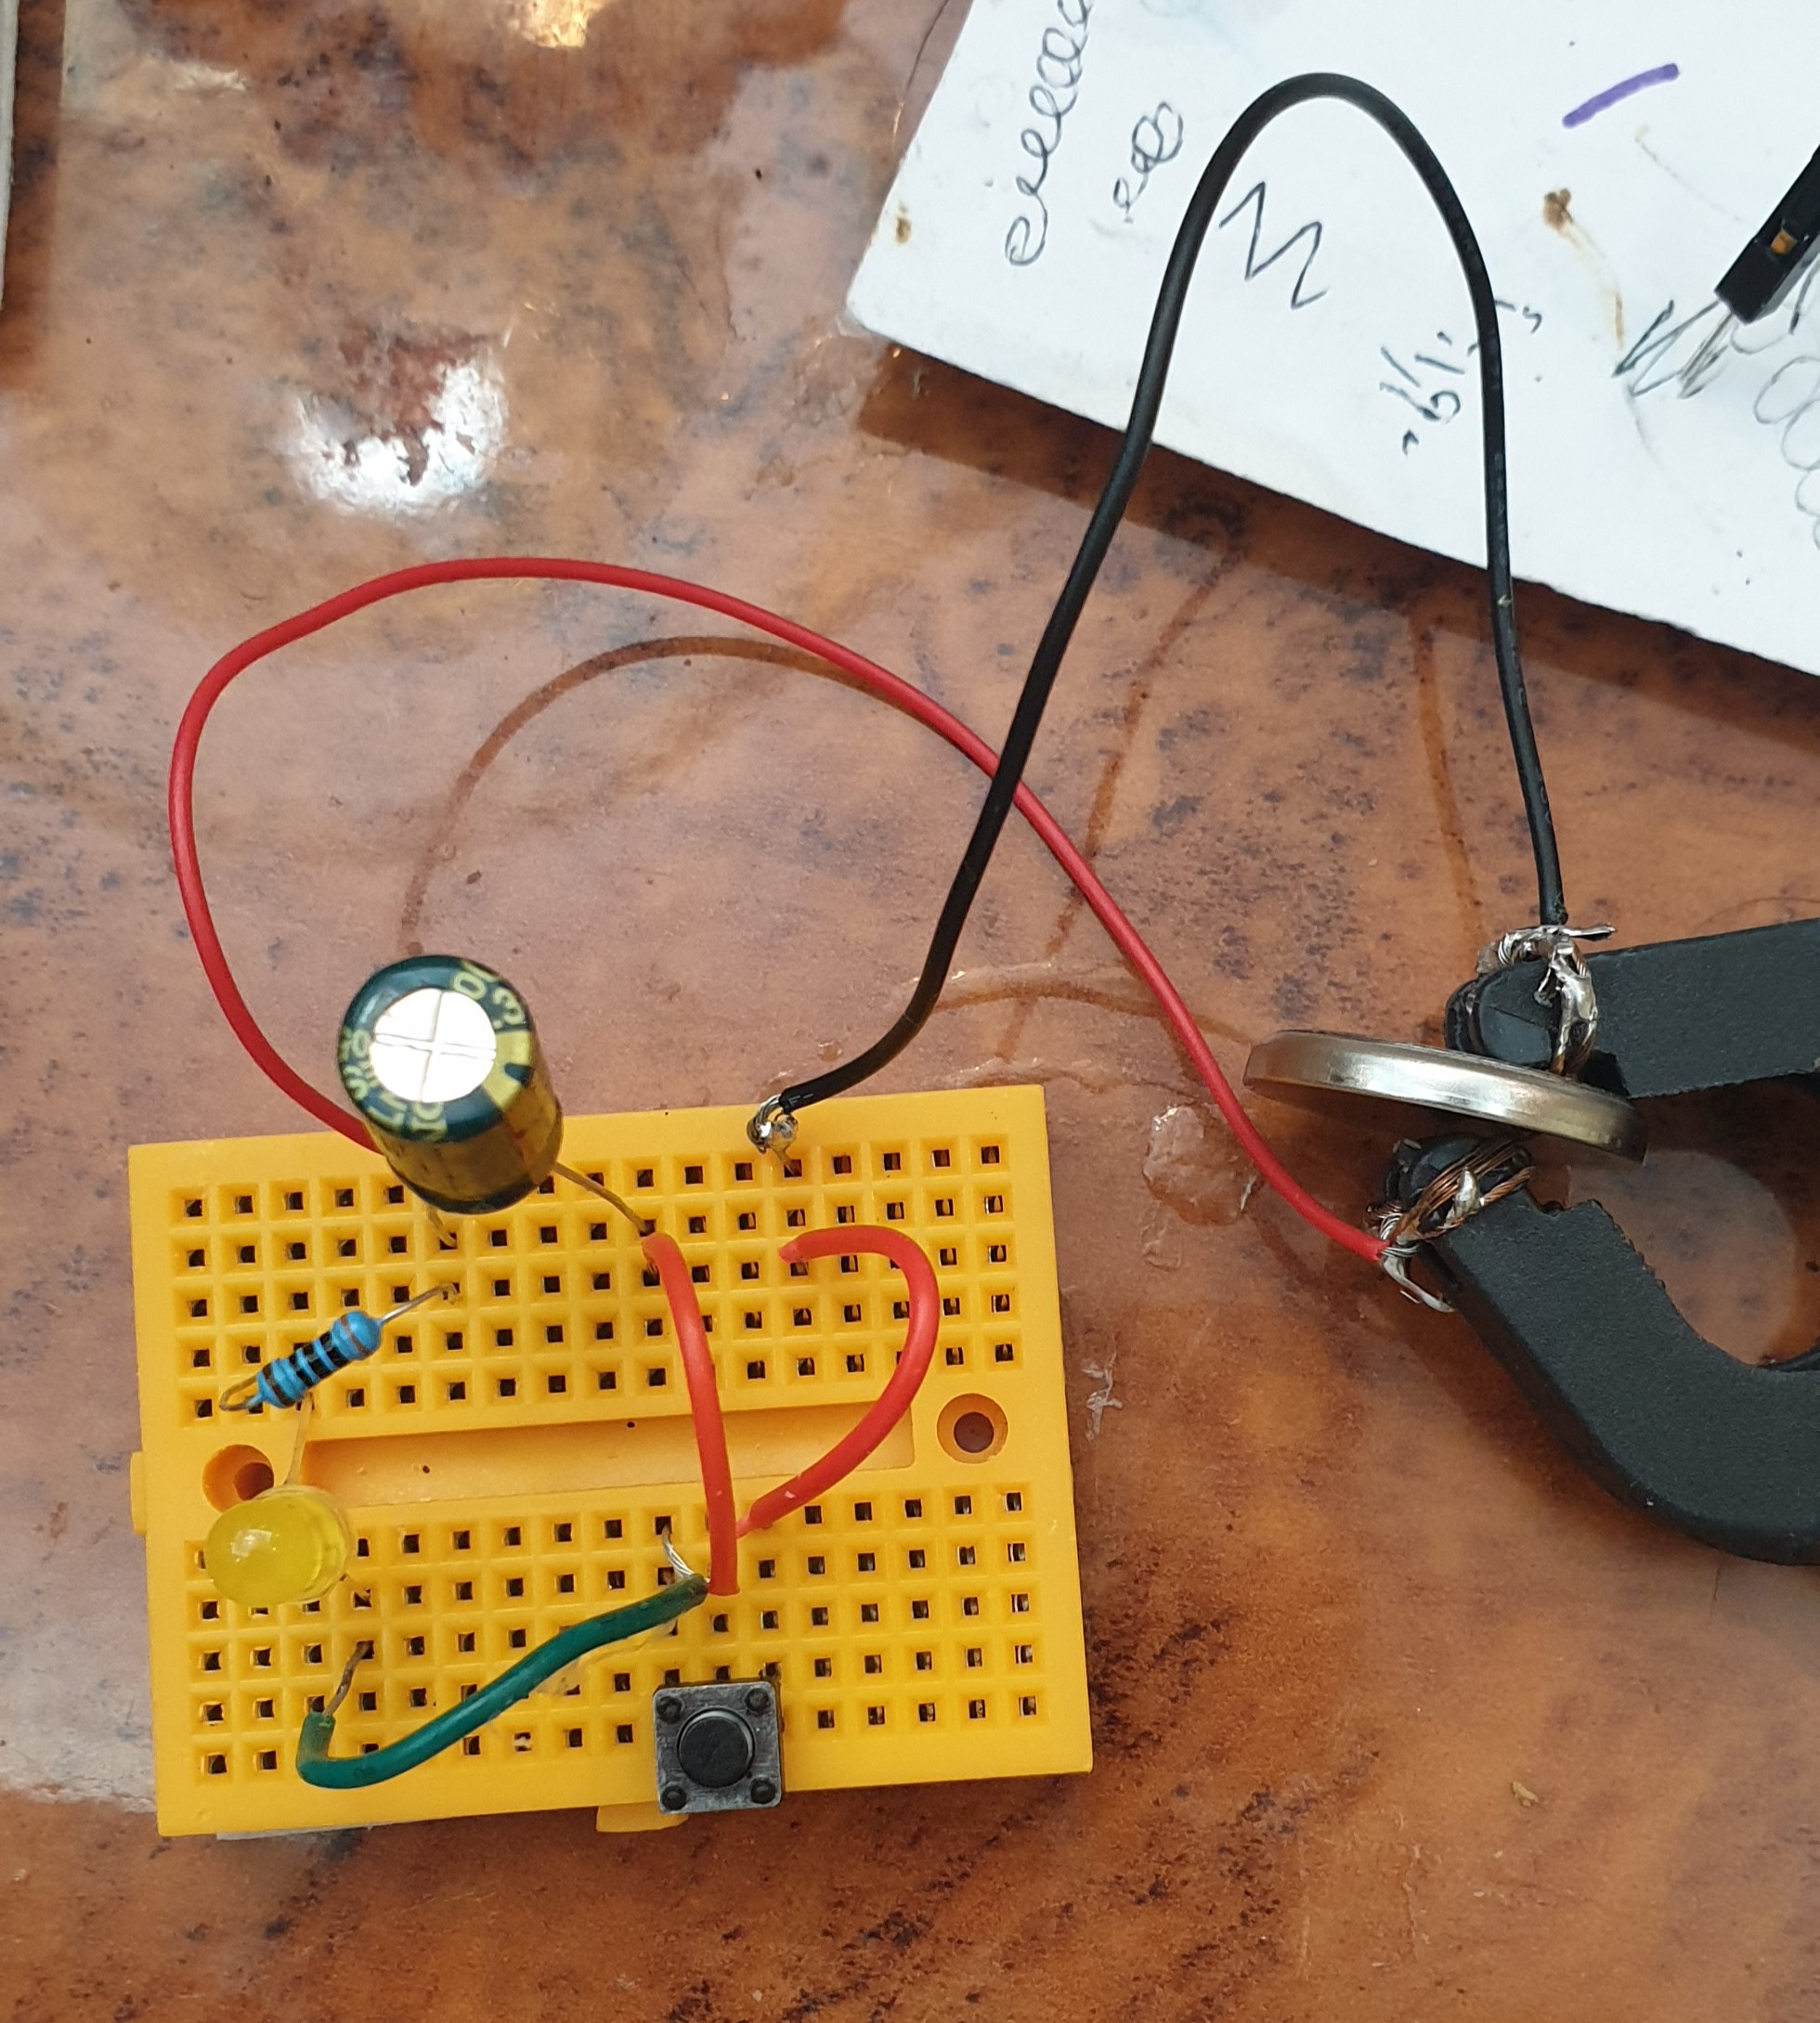 |
Here I copy the circuit on a small 5x7cm PCB.
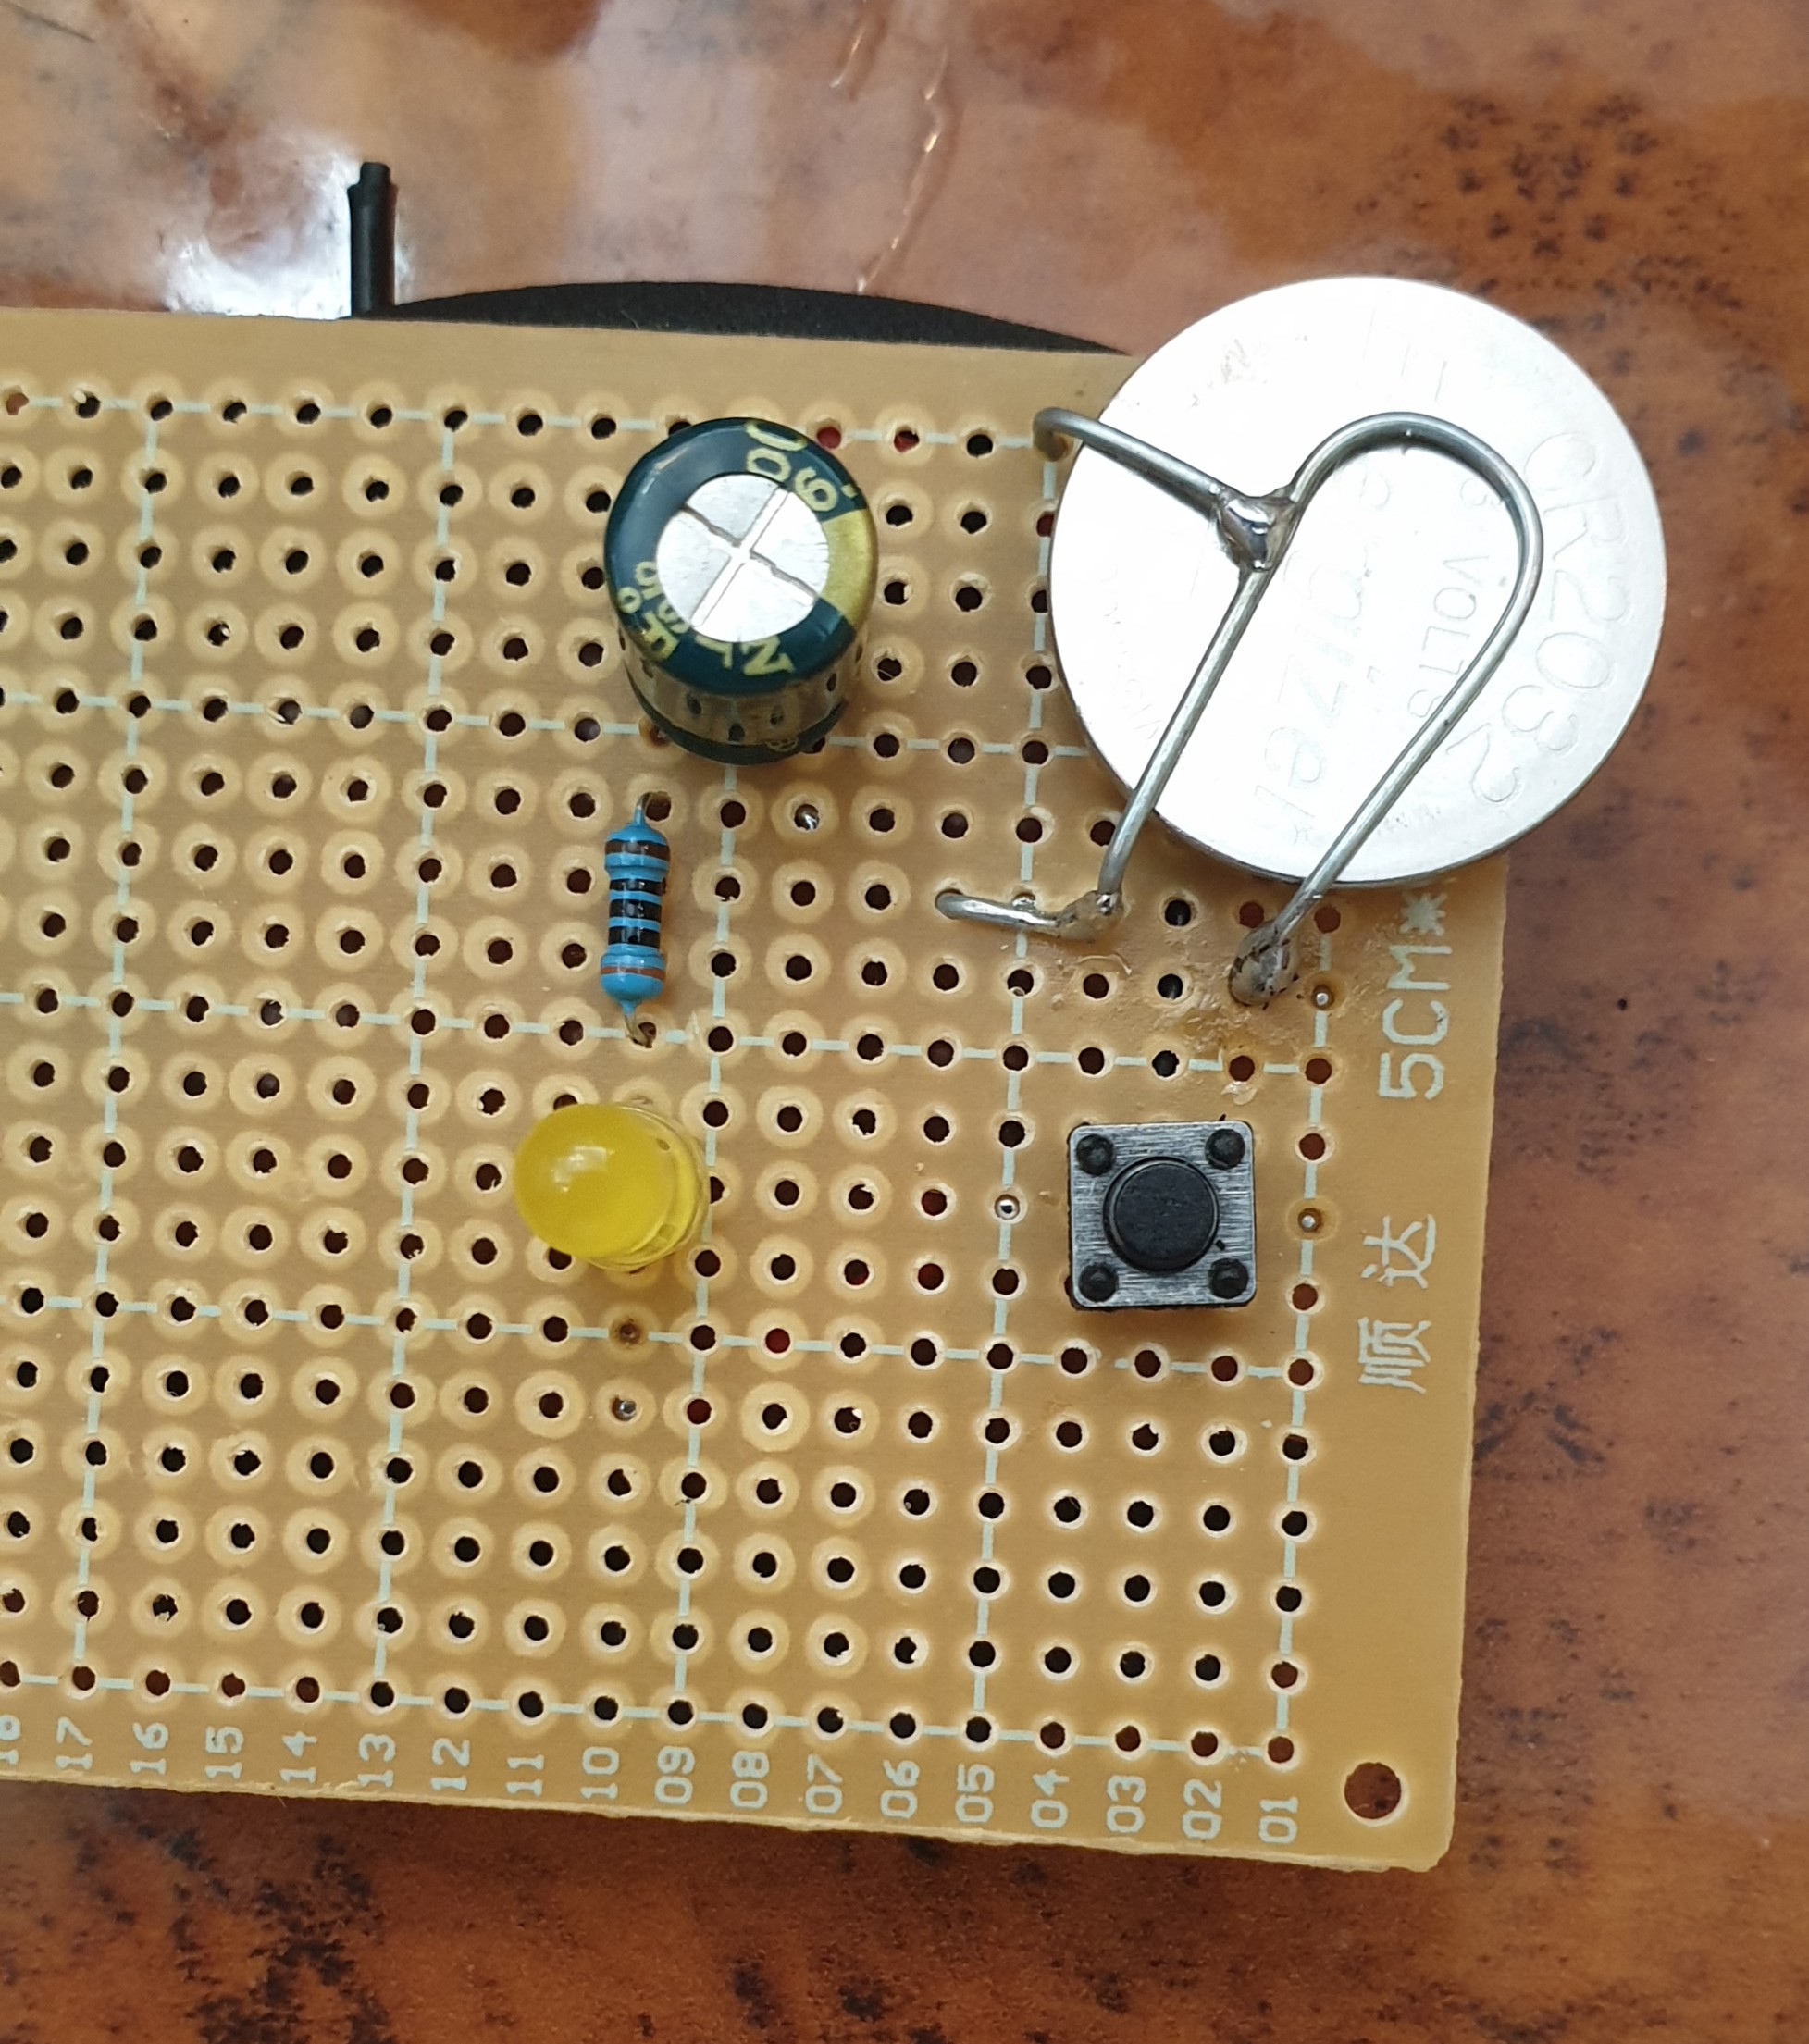 |
Back side Connections.
 |
Finslly, I cut the PCB to a smaller size and Label it.
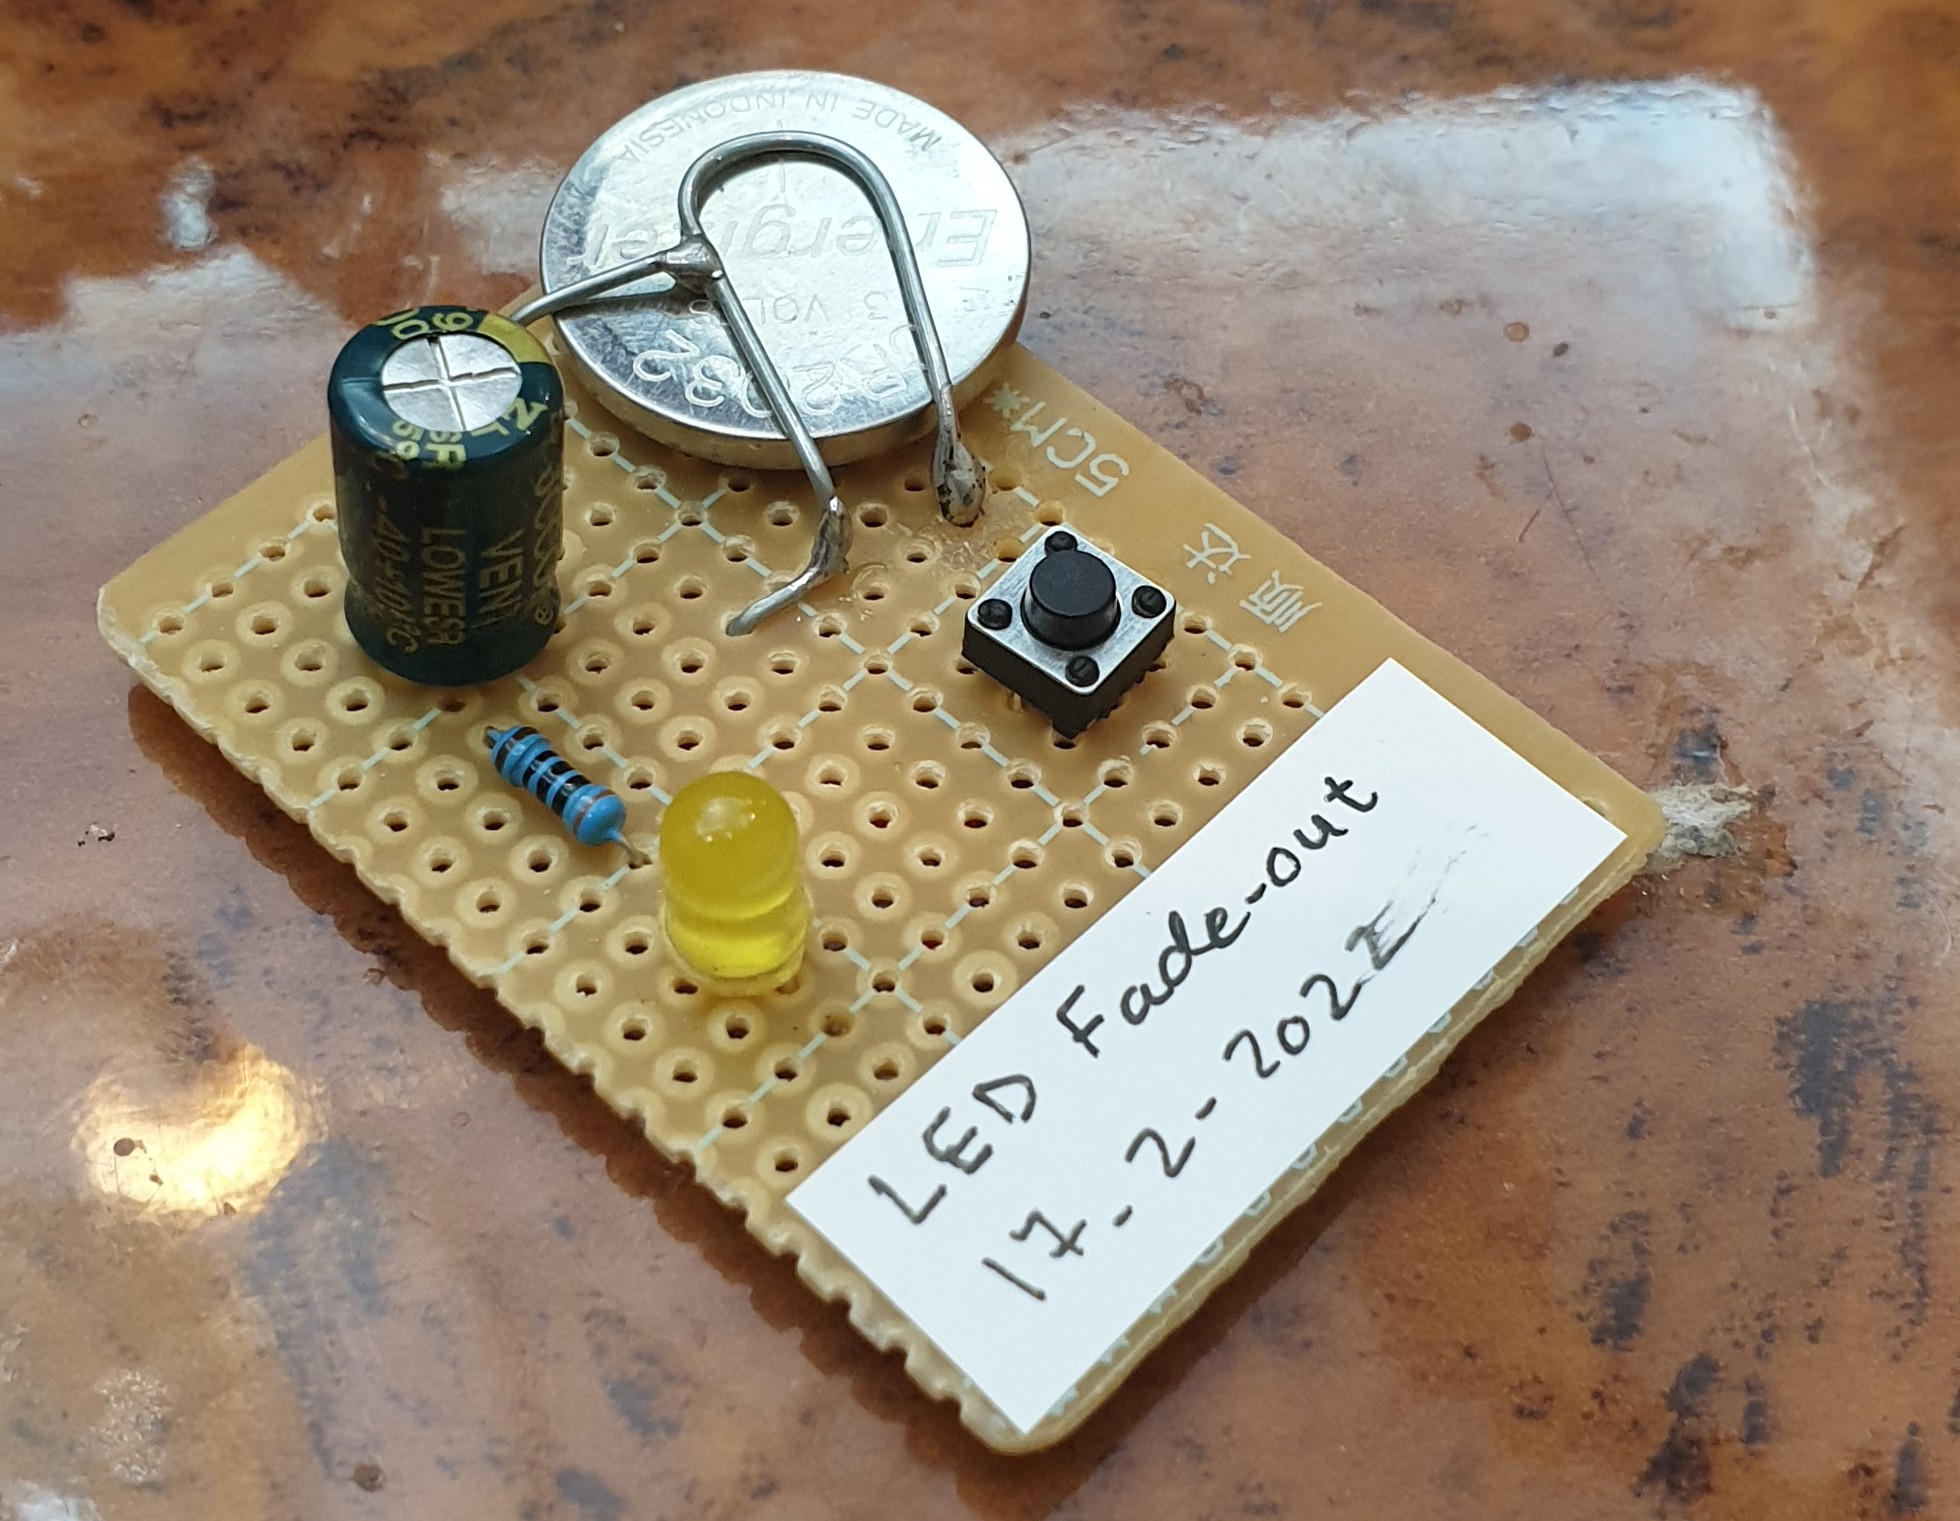 |
Now once we Push the Button the LED Turns On and Start Fading-Out. [you may need to give 5-10sec to charge the Capacitor before seeing the Fading Effect]
:: ARDUINO PROJECTS LIST ::
[ Click Here to See all ARDUINO Projects ]
To Download the ARDUINO Project [Code and Diagram] files {No Code in this Project}
By: Ali Radwani
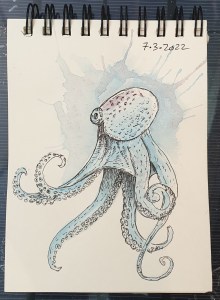
Daily Sketch Challenge: Octopus
Away from coding and reading here I am finding myself sketching some lines and dots to be an Octopus.
I am using a new pocket size sketch book, but it seems that the paper is not good for water-colos, it is quite challenge to mix colors. But at the end I will use every page of it. 🙂
Here is the sketch..
Arduino: Morse Code Blinking
Learning : ARDUINO, Morse-Code, Electronic Circuit
Subject: LED to Blink Morse Code
[NOTE: We are working on Electronic Devices, Voltage, Resistors and other Electronic Parts that may Become HOT due to un-stable current or Wrong Wire Connections.. PLEASE BE CAUTIOUS AND TAKE SAFETY NEEDED PROCEDURES.]
Some days ago I just went through some pages of Morse-Code. Then I got an idea to write a code for the ARDUINO to blink an LED for some letters.
Morse Code: In a basic and easy way, Morse code is a Dots (.) and Dashs (-) to present alphabet characters. So A = .- ; B = -… ; C = -.-. and so on (Morse code table in Wikipedia)
Morse Code Rules:
if we assume a unit is U, then :
- 1. A Dot is 1U.
- 2. A Dash is 3U.
- 3. A Space between a part of the same letter is 1U.
- 4. A Space between letters is 3U.
- 5. A Space between words is 7U.
In our project here, the Unite U will be the Delay in Arduino, so the LED will be High for 1U to represent a Dot (.) and will be High for 3U to represent the Dash (-).
What we will Need: I will use a Breadboard, ARDUINO Nano , One Red LED, One 300 ohm Resitro, Jumper Wire.
- A BreadBoard.
- ARDUINO Nano.
- 1 Red LED.
- 1 Resistor [I will Use 300 ohm]
- Some Jumper Wire.
Connection:
- The ARDUINO Nano will be on the Breadboard
- Connect D13 on Nano to Column 11 on the Breadboard using Jumper-wire.
- Connect the Resistor on Column 11 and Column 6 on the Breadboard.
- Connect the LED Anode (+) pin on the Column 6 on the Breadboard.
- Connect the LED Cathode (-) pin to the Column 4 on the Breadboard.
- Connect the Column 4 on the Breadboard to the Cathode Row on the Breadboard using Jumper-wire.
- Connect the Column 17 on the Breadboard (Nano GND pin) to Cathode Row on Breadboard using Jumper-wire.
- Connect the Column 19 on the Breadboard (Nano 5V pin) to the Anode Row on Breadboard using Jumper-wire.
Image of the Connected Breadboard. |
The Coding: First we need to define the Dots and Dashs for each Alphbets, in this example I will do only three carecters for my Name A L I, I will create an array of 0 and 1, 0 is a dot, 1 is a dash, here is the code:
int A [ ] = {0,1} ; // 0 = dot (1U), 1 = dash (3U)
int L [ ] = {0,1,0,0} ;
int I [ ] = {0,0} ;
Here is declearing the Unite, u as Delay time:
int u = 170 ; // 1U = 170 delay.
and here is the Arduino pin I will use:
int ledpin = 13 ;
in the void setup, we will only write one line to set the pinMode(ledpin, OUTPUT)
then I create a function to read the letter array-content
 // CODE: Function to read the letters contents.

void letter(int c [], byte s)
{
      if (c[s] == 0)   // dot
        {morse1(ledpin, 1) ;}
      if (c[s] == 1)   // dash
        {morse1(ledpin, 3) ;}
}
In this code, I will let the LED to Blink in Morse code saying “ALI” [My Name 🙂 ]. You may add the Morse code in the Application and making the LED to send you message. Code Available in Download Page.
RUN TIME.. |
:: ARDUINO PROJECTS LIST ::
[ Click Here to See all ARDUINO Projects ]
To Download the ARDUINO Project [Code and Diagram] files Click-Here
By: Ali Radwani
Taking pictures is not my main daily practices, but when i start playing with my camera, i really enjoy my self.
Thanks for visiting my Space..


