Archive
python: Fake Data-set
Learning : Python to generate fake data-set
Subject: About Fake data library
Most of the time when we working on a project, we need to test our procedures and functions with some data. In most cases we need just dummy data such as dates, names, address .. and so-on.
Last week, I was reading on the net and i fond an article about generating fake data using a library in PHP (PHP is a Computer Programming Language) so I start to find if we have one in Python! and the answer is YES there is a library that we can import called ‘Fake’. I start to work on it and discover it. This post is about the Fake Data-set Library.
The library called ‘Faker’ and we need to install it in our python environment, i use : pip install Faker to install it. In it’s documentation we can use some properties like : name, city, date, job .. and others. So if we want to generate a fake name we write this:
# Using lib:fake to generate fake name

print(fake.name())
[Output]: Victoria Campbell
Here is a screen-shot from Jupyter notbook screen.

|
To generate more than one name we can use for loop as:
# Using lib:fake to generate (X) fake name

for x in range (10) :
    print(fake.name())
[Output]: Jared Hawkins
Michael Reid
Ricky Brown
Mary Tyler
Kristy Dudley
Karen Cain
Jennifer Underwood
Desiree Jensen
Carla Rivera
Brandon Cooper
Other properties that we can use are :address, company, job, country, date_time and many other, and with all this we can create a data-set full of fake data.
So if we want to create a fake data-set contain:
Name, Date-of-birth, Company, Job, Country as one person data we will use it like this:
# Using lib:fake to generate (X) person fake data
# Data-set contain: Name, Date-of-birth, Company, Job, Country
p_count = 1
for x in range (p_count):
    print('Name:',fake.name())
    print('DOB:',fake.date())
    print('Company:',fake.company())
    print('Job:',fake.job())
    print('country:',fake.country())


[Output]:
Name: Crystal Mcconnell
DOB: 2002-09-30
Company: Bailey LLC
Job: Insurance underwriter
country: Pakistan

|
Now if we want to store the person data in a dictionary type variable and use it later, we can do this as following:
# Using lib:fake to generate (X) person fake data and store it in a dictionary
people_d ={}
p_count = 5
for x in range (p_count):
    ID = x
    people_d[ID]={'name':fake.name(),'date':fake.date(),'company':fake.company(),'job':fake.job(),'country':fake.country()}

# To print-out the people_d data-set.
for x in people_d :
    print(people_d[x])
Just in case we want a complicated ID we can use a random function (8-dig) integer, or combining two fake numbers such as (fake.zipcode() and fake.postcode()) just to make sure that we will not have a duplicate ID.
Using fake library will help a lot, and it has many attributes and properties that can be inserted in a data-set. For more information on this document you may read it here: Fake Library
To Download my Python code (.py) files Click-Here
 Follow me on Twitter..
By: Ali Radwani
Python: Machine Learning – Part 1
Learning :Python and Machine Learning
Subject: Requirements, Sample and Implementation
Machine Learning: I will not go through definitions and uses of ML, I think there is a lot of other posts that may be more informative than whatever i will write. In this post I will write about my experience and learning carve to learn and implement ML model and test my own data.
The Story: Two, three days ago I start to read and watch videos about Machine Learning, I fond the “scklearn” site, from there I create the first ML to test an Iris data-set and then I wrote a function to generate data (my own random data) and test it with sklearn ML model.
Let’s start ..
Requirements:
1. Library to Import: To work with sklearn models and other functions that we will use, we need to import coming libraries:
import os # I will use it to clear the terminal.
import random # I will use it to generate my data-set.
import numpy as np
import bunch # To create data-set as object
from sklearn import datasets
from sklearn import svm
from sklearn import tree
from sklearn.model_selection import train_test_split as tts
2. Data-set: In my learning steps I use one of sklearn data-set named ” Iris” it store information about a flower called ‘Iris’. To use sklear ML Model on other data-sets, I create several functions to generate random data that can be passed into the ML, I will cover this part later in another post.
First we will see what is the Iris dataset, this part of information is copied from sklearn site.
::Iris dataset description ::
dataset type: Classification
contain: 3 classes, 50 Samples per class (Total of 150 sample)
4 Dimensionality
Features: real, positive
The data is Dictionary-like object, the interesting attributes are:
‘data’: the data to learn.
‘target’: the classification labels.
‘target_names’: the meaning of the labels.
‘feature_names’: the meaning of the features.
‘DESCR’: the full description of the dataset.
‘filename’: the physical location of iris csv.
Note: This part helps me to write me data-set generating function, that’s why we import the Bunch library to add lists to a data-set so it will appear as an object data-set, so the same code we use for Iris data-set will work fine with our data-set. In another post I will cover I will load the data from csv file and discover how to create a such file..
Start Writing the code parts: After I wrote the code and toned it, I create several functions to be called with other data-set and not hard-code any names in iris data-set. This way we can load other data-set in easy way.
The Code
 # import libraries

import numpy as np
from sklearn import datasets
#from sklearn import svm
from sklearn import tree
from sklearn.model_selection import train_test_split as tts
import random, bunch
Next step we will load the iris dataset into a variable called “the_data”
 # loading the iris dataset.

the_data = datasets.load_iris()
From the above section “Iris dataset description” we fond that the data is stored in data, and the classification labels stored in target, so now we will store the data and the target in another two variables.
 # load the data into all_data, and target in all_labels.
all_data= the_data.data
all_labels = the_data.target
We will create an object called ‘clf’ and will use the Decision Tree Classifier from sklearn.
 #  create Decision Tree Classifier

clf = tree.DecisionTreeClassifier()
In Machine Learning programs, we need some data for training and another set of data for testing before we pass the original data or before we deploy our code for real data. The sklearn providing a way or say function to split a given data into two parts test and train. To do this part and to split the dataset into training and test I create a function that we will call and pass data and label set to it and it will return the following : train_data, test_data, train_labels, test_labels.
 #  Function to split a data-set into training and testing data.

def get_test_train_data(data,labels):

  train_data, test_data, train_labels, test_labels = tts(data,labels,test_size = 0.1)
  return train_feats, test_feats, train_labels, test_labels
After splitting the data we will have four list or say data-sets, we will pass the train_data and the train_labels to the train_me() function, I create this function so we can pass the train_data, train_labels and it will call the (clf.fit) from sklearn. By finishing this part we have trained our ML Model and is ready to test a sample data. But first let’s see the train_me() function.
 #  Function train_me() will pass the train_data to sklearn Model.

def train_me(train_data1,train_labels1):
  clf.fit(train_data1,train_labels1)
  print('\n The Model been trained. ')
As we just say, now we have a trained Model and ready for testing. To test the data set we will use the clf.predict function in sklearn, this should return a prediction labels list as the ML Model think that is right. To check if the predictions of the Model is correct or not also to have the percentage of correct answers we will count and compare the prediction labels with the actual labels in the test_data that we have. Here is the code for get_prediction()
 #  get_prediction() to predict the data labels.

def get_prediction(new_data_set,test_labels2,accu):

  print('\n This is the prediction labels of the data.\n')

  # calling prediction function clf.predict
  prediction = clf.predict(new_data_set)
  print('\n prediction labels are : ',prediction,len(prediction))

  # print the Accuracy
  if accu == 't' :
    cot = 0
    for i in range (len(prediction)) :
      print(prediction[i] , new_data_set[i],test_labels2[i])
      if [prediction[i]] == test_labels2[i]:
        cot = cot + 1
    print('\ncount :',cot)
    print('\n The Accuracy:',(cot/len(prediction))*100,'%')
The accuracy value determine if we can use the model in a real life or tray to use other model. In the real data scenario, we need to pass ‘False’ flag for accu, because we can’t cross check the predicted result with any data, we can try to check manually for some result.
End of part 1: by now, we have all functions that we can use with our data-set, in coming images of the code and run-time screen we can see that we have a very high accuracy level so we can use our own data-set, and this will be in the coming post.

|
Result screen shot after running the Iris dataset showing high accuracy level.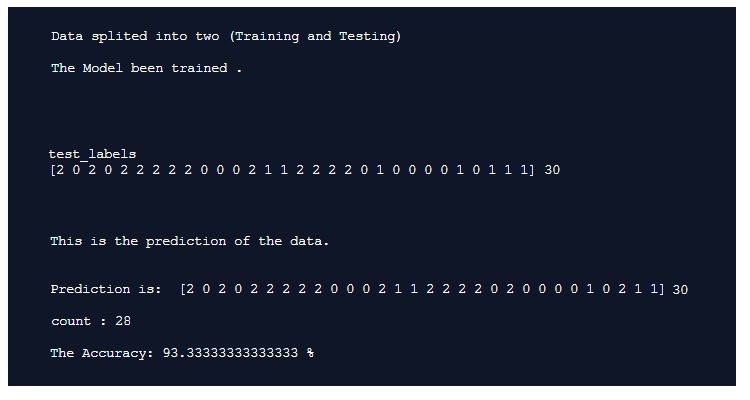
|
To Download my Python code (.py) files Click-Here
Python and Lindenmayer System – P3
Learning : Lindenmayer System P3
Subject: Drawing Fractal Tree using Python L-System
In the first two parts of the L-System posts (Read Here: P1, P2) we talk and draw some geometric shapes and patterns. Here in this part 3 we will cover only the Fractal Tree and looking for other functions that we may write to add leaves and flowers on the tree.
Assuming that we have the Pattern generating function and l-system drawing function from part one, I will write the rules and attributes to draw the tree and see what we may get.
So, first tree will have:
# L-System Rule to draw ‘Fractal Tree’
# Rule: F: F[+F]F[-F]F
# Angle: 25
# Start With: F
# Iteration : 4
and the output will be this:

|
If we need to add some flowers on the tree, then we need to do two things, first one is to write a function to draw a flower, then we need to add a variable to our rule that will generate a flower position in the pattern. First let’s write a flower function. We will assume that we may want just to draw a small circles on the tree, or we may want to draw a full open flower, a simple flower will consist of 4 Petals and a Stamen, so our flower drawing function will draw 4 circles to present the Petals and one middle circle as the Stamen. We will give the function a variable to determine if we want to draw a full flower or just a circle, also the size and color of the flowers.
Here is the code ..
font = 516E92
commint = #8C8C8C
Header here
# Functin to draw Flower
def d_flower () :
if random.randint (1,1) == 1 :
# if full_flower = ‘y’ the function will draw a full flower,
# if full_flower = ‘n’ the function will draw only a circle
full_flower = ‘y’
t.penup()
x1 = t.xcor()
y1 = t.ycor()
f_size = 2
offset = 3
deg = 90
if full_flower == ‘y’ :
t.color(‘#FAB0F4’)
t.fillcolor(‘#FAB0F4’)
t.goto(x1,y1)
t.setheading(15)
for x in range (0,4) : # To draw a 4-Petals
t.pendown()
t.begin_fill()
t.circle(f_size)
t.end_fill()
t.penup()
t.right(deg)
t.forward(offset)
t.setheading(15)
t.goto(x1,y1 – offset * 2 + 2)
t.pendown() # To draw a white Stamen
t.color(‘#FFFFF’)
t.fillcolor(‘#FFFFFF’)
t.begin_fill()
t.circle(f_size)
t.end_fill()
t.penup()
else: # To draw a circle as close flower
t.pendown()
t.color(‘#FB392C’)
t.end_fill()
t.circle(f_size)
t.end_fill()
t.penup()
t.color(‘black’)
Then we need to add some code to our rule and we will use variable ‘o’ to draw the flowers, also I will add a random number selecting to generate the flowers density. Here is the code for it ..
In the code the random function will pick a number between (1-5) if it is a 3 then the flower will be drawn. More density make it (1-2), less density (1-20)
|
And here is the output if we run the l-System using this rule: Rule: F: F[+F]F[-F]Fo

|
Using the concepts, here is some samples with another Fractal Tree and flowers.
Another Fractal Tree without any Flowers.
|
Fractal Tree with closed Pink Flowers.
|
Fractal Tree with closed Red Flowers.
|
Fractal Tree with open pink Flowers.
|
To Download my Python code (.py) files Click-Here
My Fitbit Data
Solving My Fitbit data Problem
Subject: VBA code to combine Fitbit excel files into one
I purchase a Fitbit Alta HR in 2017, and since then I wear it and never take it off unless for charging. Fitbit Alta HR is a very nice slim device, but unfortunately there was no way to upload my previous data from my old device to my Fitbit, this was not the only issue with Fitbit data, now; after three years still we can’t download Fitbit data in one file, if you want to do this (each time) you need to send a request to Fitbit team and they will prepare the file for you!! Instead, Fitbit site allow you to download your data as month by month, in my case I will have almost 32 files.
Solving the Problem: After downloading the excel files and look at them, I decide to write a code to help me combine all the current 32 files and any coming once into one data file. First I start thinking to use Python to do this task, but after second thought I will use the Excel file and VBA macro coding to do it.
Here in coming paragraph I will post about the general idea and some codes that i use.
General Idea: I will use same structure of Fitbit file and name it as “fitbit_All_data_ali”, in this file we will create new tab and name it Main. In the Main tab we will create several buttons using excel developer tools and will write the macro VBA code for each task we need to operate.
Tabs in our file: Main: Contain buttons and summary about my data.
Body, Food, Sleep, Activities and Food Log. Food Log tab will store the data such as calories, fibers, fat and so-on., all those tabs will be filled with a copied data from each Fitbit data file.
Here are some VBA codes that I use and what it’s purpose .
| Code: ‘ Get current path. the_path = Application.ActiveWorkbook.Path |
The path on the current excel file. |
| Code: the_All_Data_file = ThisWorkbook.Name |
Get current excel file name |
| Code: Workbooks.Open Filename:=thepath + my_source_Filename |
Open a file |
| Code: Windows(my_source_Filename).Activate Sheets(“Foods”).Select Range(“A2:B31”).Select Selection.Copy |
Goto fitbit file, goto food sheet, select the data copy it. |
| Code: Application.CutCopyMode = False Workbooks(my_source_Filename).Close SaveChanges:=False |
Close an open excel file. |
| Code: Range(“A3”).Select Selection.EntireRow.Insert , CopyOrigin:=xlFormatFromLeftOrAbove |
To insert a black Row |
| Code: sname = ActiveSheet.Name |
Get current sheet name |
| Code: Function go_next_sheet() As String ‘ This code will go to next sheet if there is one, if not will return ‘last’ On Error Resume Next If sht.Next.Visible xlSheetVisible Then Set sht = sht.Next sht.Next.Activate End Function |
if there is no more tabs or sheets, function will return “last” |
Final Results: After i run the code, I have an Excel file contain all my Fitbit data in one place. Mission Accomplished
To Download my Python code (.py) files Click-Here
Python: Orders Manager P2
Orders Managment System
Subject: Main Menu and creation of the data file – P2
First thing we will talk about the menu, in this post we will cover the Main Menu and the user choice. Also we will add some validation.
Main Menu: Here is a list of what we will have in the main menu with some descriptions for each choice.
Load File: We will name the file as “orders_data.csv” so once we start the application the system will check if the file exist or not, if Yes then the application will load it automatically as DataFrame (df) if not thats mean you are running the app for the first time, so we will go through file creating process.
Show Data: In this option we will have another sub menu page having:
1. Show all data.
2. Show sample data.
3. Show last 5 records.
Sort: Here we will have sorting as columns that we have, the user will select a column.
Search: We can here search for an order by Date, Price, Quantity or details, also we will do groping for the data.
Missing Data: To show us how many missing data we have so we can fill them.
Add New Order: To add new order to the system.
Edit a Record: To Edit/change a record.
Delete a Record: To delete a record from the DataFrame.
Save: To save what ever you do to the DataFrame.
The Main Menu
def the_menu ():
print(‘\n ::—–{ The menu }—-::’)
print(‘1. Create New csv File’)
print(‘2. Show Data’)
print(‘3. Sort.’)
print(‘4. Search.’)
print(‘5. Missing Data’)
print(‘6. Add New Record.’)
print(‘7. Edit a record.’)
print(‘8. Delete a Record.’)
print(’9. Save the File.’)
return input(‘\n Select from the menu (”q” to quit): ‘)
Main while loop: In the application body we will use a while loop to control the user input and run the function he select. Unlike what we did In the zoo managment system, we will add a validation on the user input as:
Validation:
1. If the user enter any thing else than numbers (1 to 9) or ([q – Q] for quit) nothing will happen.
2. If the user select (q to quit) then we will ask if he want to save before Exit.
Here is the code …
Main while loop
# calling the menu
user_enter = the_menu()
”’
Validation: If the user enter any thing else than numbers
or (q for quit) nothing will happen.
”’
while user_enter !=’q’ or ‘Q’ :
if user_enter in [‘q’,’Q’] :
print(‘\n You select to Exit the application.’)
save_it = input(‘\n Do your want to save your work/changes [y or n] ? ‘)
if save_it in [‘y’,’Y’]:
save_the_df (df)
break
elif user_enter not in [‘1′,’2′,’3′,’4′,’5′,’6′,’7′,’8′,’9’] :
user_enter = the_menu()
else:
user_choice(user_enter)
user_enter = the_menu()
Here is a screen shot for the code..

|
In this post we cover the Main Menu and the main while loop we need to call the functions, in the coming post we will create the data file and Adding new record.
Python: Orders Manager P1
Orders Managment System
Subject: Outlines – P1
In last several posts we develop a Zoo Managment System [Click to Read]. We try to use our skills in python and pandas to work with DataFrame and developing easy app that reading and writeing a csv file. We will use the same principle and re-use most of it’s functions to write our new coming system.
The Story: I don’t think that there is any person using the web without using at least one of the online shopping sites, personally; I am using three sites. In coming posts we will work on Orders Managment System (OMS) to track our orders.
General Enhancement In the Zoo application we did not use any validation or try … Exceptions blocks, but this time we will use a range of validations over the user input starting from the menu until asking if the user want to save shange before he Quit. Using validations will make the code (or make it looks like) complicated, so I will use lots of comments to describe some codes.
Validation Example ..
In our Date entry, we will inform the user that we want the date as DD-MM-YYYY , then if the user enter any thing not logic (not a date) or say he enter “3/8-2019” our validation will convert that to “03-08-2019”.
OMS Outline: In this application our goal is to practices on data validation so we will develop a system to store our orders data and apply the validation on it, I will use aliexpress orders information to build the csv file. As far as i know, aliexpress site is not providing any tool to export a file that contain your orders detail so we will do this just to keep a history records of our orders.
File Structuer: The file will have 8 columns here is a short description of each column:
order_no: A serial number that will increment automatically, we will consider this to be a primary key of the table.
order_id: This is the order id generated by aliexpress site, we will enter it as it is.
order_date: To hold the orders date, the date will be in DD-MM-YYYY format.
order_detail: Short description of the order, even you write it in your words or copy paste it from your order page.
item_price: The price in US$
ship_price: Shipment amount in US$
quantity: The Quantity of the items.
item_url: The URL of the item page.
Coming Post We will start from next post to write the main menu, and the first function to create a csv file and insert the first row.
Taking pictures is not my main daily practices, but when i start playing with my camera, i really enjoy my self.
Thanks for visiting my Space..


