Archive
Python: Coffee Consumption – P3
Learning : Python, SQlite3, Dataset, Pandas,
Subject: Create Coffee Consumption Application.
[NOTE: To keep the code as simple as we can, We WILL NOT ADD any user input Varevecations. Assuming that our user will Enter the right inputs.]
[ IF THE IS FIRST TIME DOWNLOADING THE CODE FILE, SELECT OPTION 7 FROM MAIN-MENU TO CREATE THE DATABASE. ]
In this part (Part-3) of Coffee Consumption App, we will fill in some code into selected Functions. We will do the following:
- Create Function: Show list.
- Create Function: is_available.
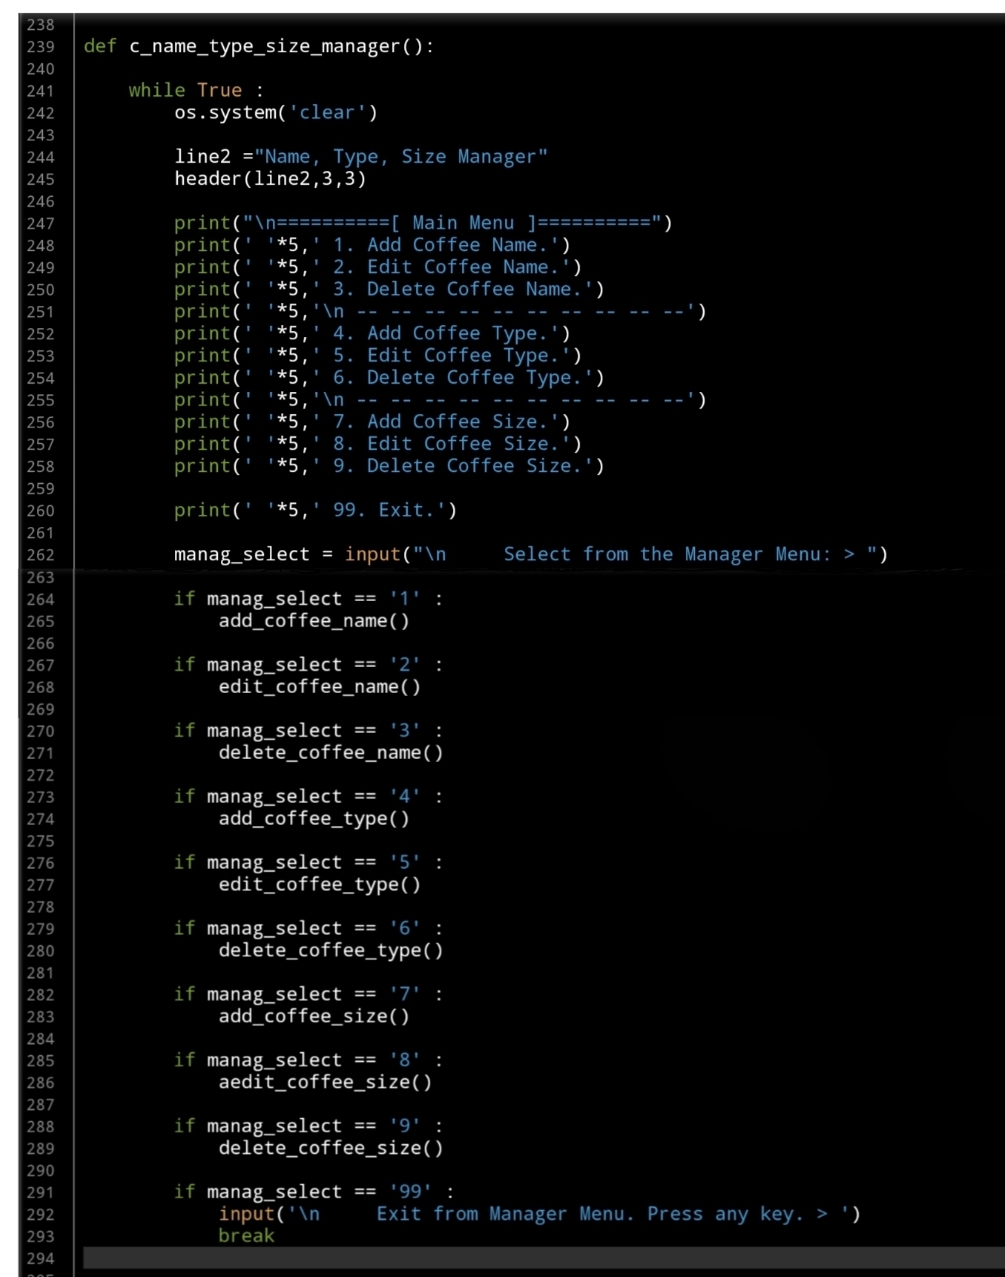
- Create Function: Manager Menu.
- Create Manager Coffee Name Functions: Add, Edit, Delete
So, let’s start with writing the Manager Menu Function and a while loop to take the user selection and trigger the corresponding Function… Here is the Code ..
 |
We have two functions to help us in this application, one of them called def show_list(dt,d_id) is to Display the Data we have in the Lookup Tables based on the user selection function. The Function will take two arguments:
dt: data-table (Coffee Name, Coffee Type, Coffee Size)
d_id: id column name, and returning nothing.
Fisrt, let’s look at this Function:
 |
The second Function will be used to check if the user selection is available in the database, we will call it def is_available (dt, d_id, check_id) this Function is to check if the passed ID available in the data-set or not. The Function will take three Arguments as:
dt: Data-Table, d_id : Name of id column, check_id : The id we want to search for, and it will Return the data-set. After return, if dataset is empty that’s mean selected id is not available.
Now let’s see the function code..
 |
Now we will start writing first three functions to manage the Coffee Name, and will start with Adding New Coffee Name to the lookup Table.
In coming code first we will call the header then show_list(‘coffee_name’,’cn_id’) passing Table Name:’coffee_name’ and id column:’cn_id’ to display the Coffee Names we have on the sccreen. Then we will ask the user to enter the New Name to be added to the database. Here is the Full code..
 |
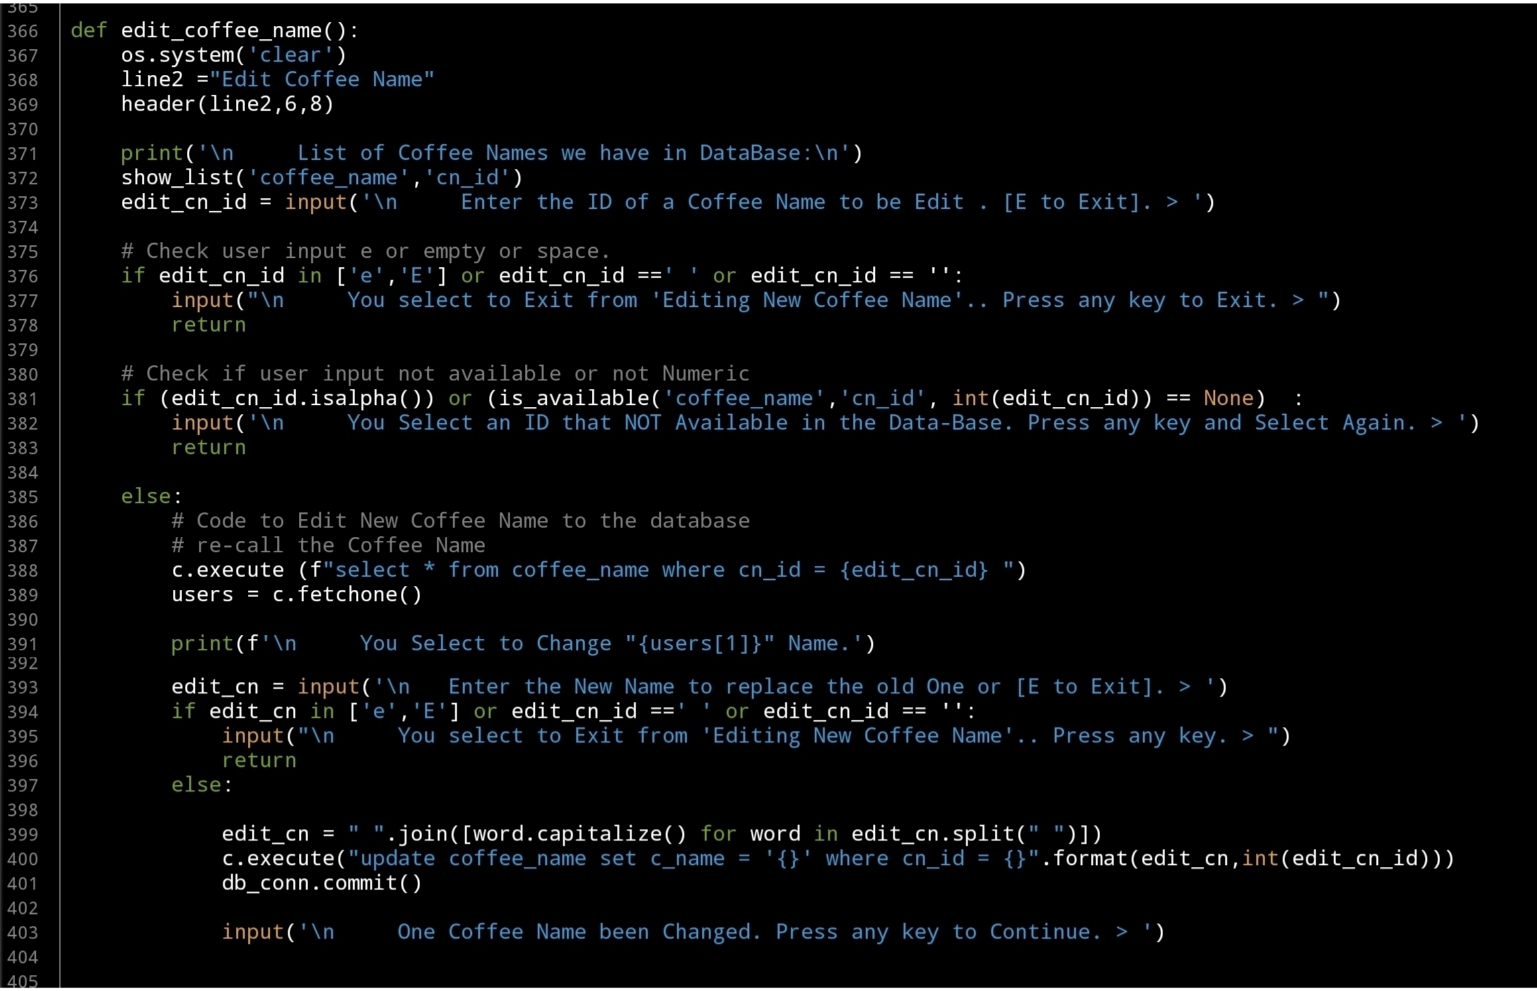
Next we will write the Edit Function, and again after the header and show_list(‘coffee_name’,’cn_id’) we will ask the user to enter the ID of the Coffee Name to be change, here we will do a simple validation on user input. After that we will update the record that the user select. Here is the code..
 |
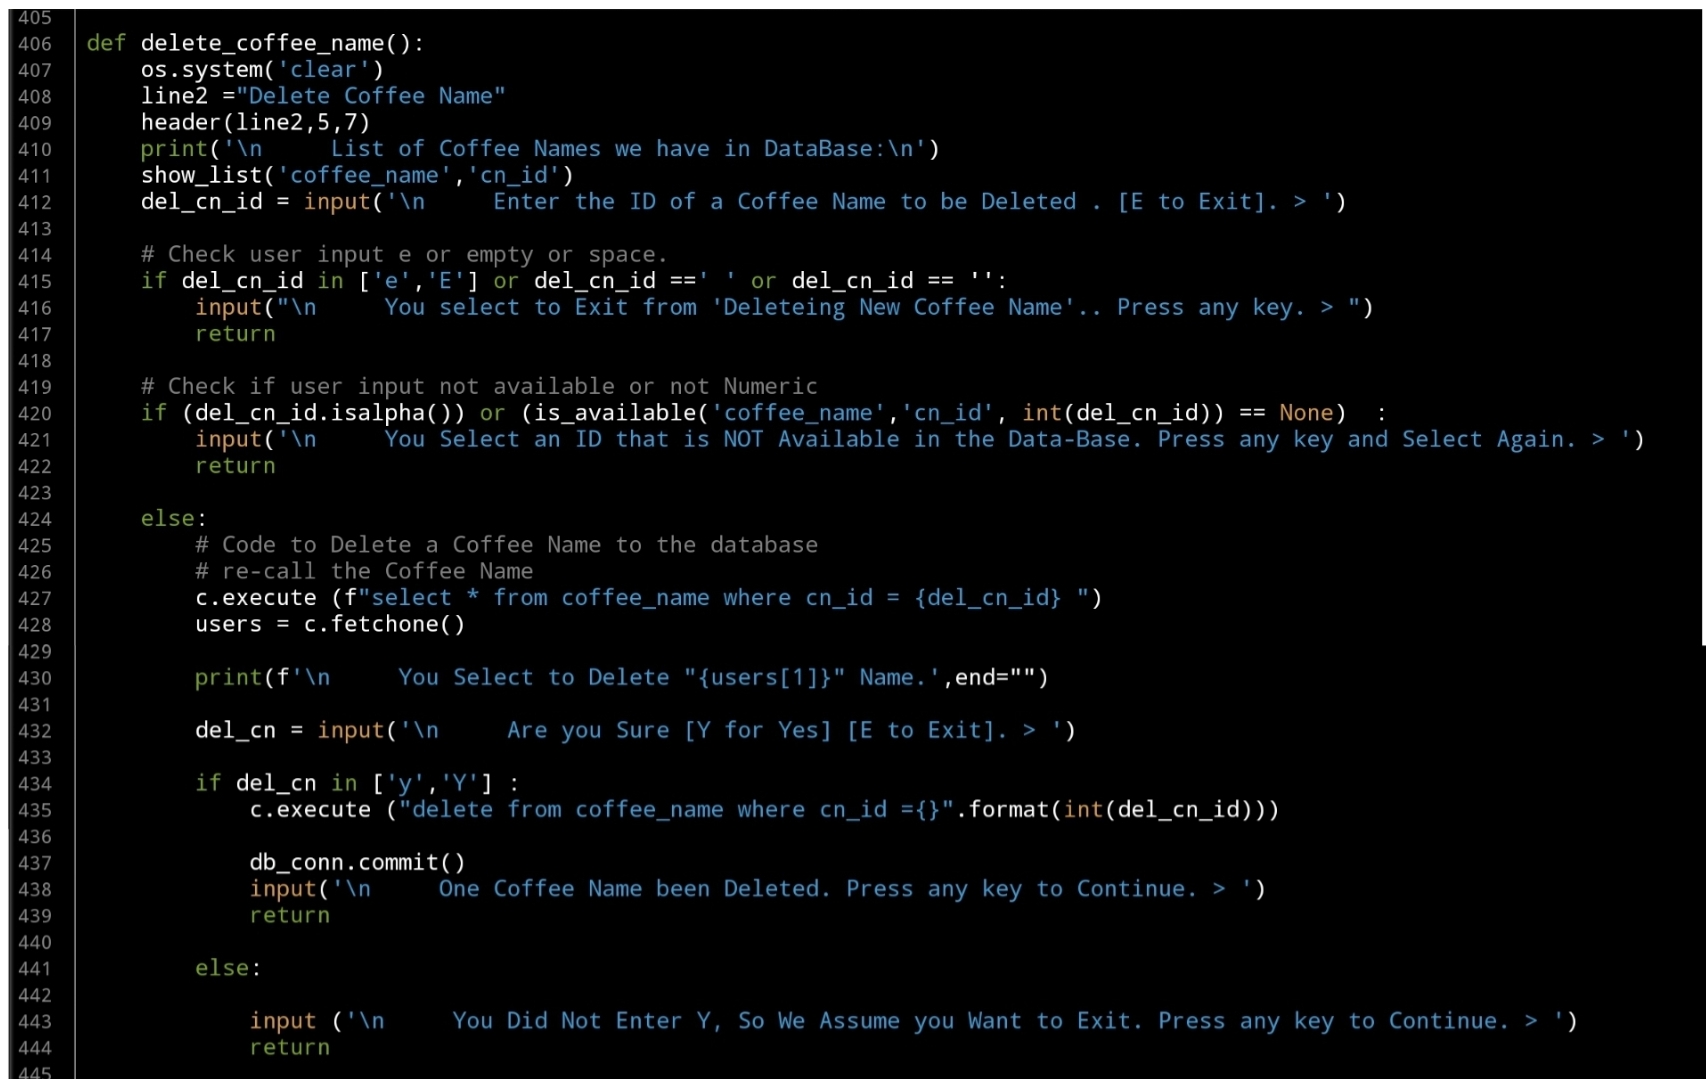
Last Function in this part is to Delete a selected Coffee Name by selection it’s ID, as in the Edit Fnction, the user will select an Id, we will check the availability the will execute the Delete command. Here is the code..
 |
What’s Coming: In Part-4 we will do the Follwing:
Writing three Function to Manage the Coffee Type, Functions are: Add New Coffee Type, Edit Coffee Type and Delete a Coffee Type.
..:: Have Fun with Coding ::.. 🙂
| Part 1 | Part 2 | Part 3 | Part 4 | Part 5 |
| Part 6 | Part – | Part – | Part – | Part – |
To Download my Python code (.py) files Click-Here
 Follow me on Twitter..
By: Ali Radwani
Python: Coffee Consumption – P2
Learning : Python, SQlite3, Dataset, Pandas,
Subject: Create Coffee Consumption Application.
[NOTE: To keep the code as simple as we can, We WILL NOT ADD any user input Varevecations. Assuming that our user will Enter the right inputs.]
In this part (Part-2) of Coffee Consumption App, we will fill in some code into selected Functions. We will do the following:
- Calling the Main-Menu Function.
- Create header function.
- Create the DataBase.
- Create the Tables.
- Insert the Zero records.
- Insert data into Lookups Table.
So, let’s start with writing the main application body and calling the Main-Menu to trigger a Function based on the user selection. This section will be a calling the main_menu() in a while loop .. here is the code ..
# Main application body

while True :
    user_select = main_menu()

    if user_select == '1' :
        new_data()

    if user_select == '2' :
        edit_record()

    if user_select == '3' :
        delete_record()

    if user_select == '4' :
        #delete_record()
        pass

    if user_select == '6' :
        c_name_type_size_manager()

    if user_select == '7' :
        create_data_base()

    if user_select == '99' :
        input('\n\n   Thank you for using this Appliation. Press Enter.. > ')
        break
If we run the application now, we will see the main-menu but nothing will work because we still did not write any real Functions in the application.
Tables and Zero records:
Now we will write tha function to create the Tables and inserting the Zero record in each of them. All the codes will be in a function called: def create_data_base () : here are the name of the tables we will create:
coffee_con
coffee_name
coffee_type
coffee_size
and here is the full code in the function, in first part we will create the tables, second part will insert the zero record, last we will insert data in the lookup tables (coffee_name, coffee_type and coffee_size)
# def create_data_base ()

def create_data_base () :
    os.system('clear')

    line2 ="Create Data Base"
    header(line2,3,11)

    print('\n     All the data in the Data-Base will be removed, and can''t be retrieved. ')

    if input('\n     Press [Y] to Continue, anything else will Stop and Exite.  > ') not in ['y','Y'] :
        input('\n     You Select to stop and Exit. Press any Key .. >  ')
        return

    # Part 1: CREATE TABLE:
    sql_coffee_con_t = "CREATE TABLE if not exists coffee_con (c_id INTEGER PRIMARY KEY AUTOINCREMENT, date_t,cn_id int, ct_id int, cs_id int, sex text, rank int )"
    sql_coffee_name_t = "CREATE TABLE if not exists coffee_name (cn_id INTEGER PRIMARY KEY AUTOINCREMENT, c_name text )"
    sql_coffee_type_t = "CREATE TABLE if not exists coffee_type (ct_id INTEGER PRIMARY KEY AUTOINCREMENT, c_type text )"
    sql_coffee_size_t = "CREATE TABLE if not exists coffee_size (cs_id INTEGER PRIMARY KEY AUTOINCREMENT, c_size text )"


    # Execute the commands
    c.execute(sql_coffee_con_t)
    db_conn.commit()
    c.execute(sql_coffee_name_t)
    db_conn.commit()
    c.execute(sql_coffee_type_t)
    db_conn.commit()
    c.execute(sql_coffee_size_t)
    db_conn.commit()


    # Part 2: Inserting ZERO records.
    c.execute ("INSERT INTO coffee_con (date_t , cn_id, ct_id, cs_id, sex, rank) VALUES(:date_t , :cn_id, :ct_id, :cs_id, :sex, :rank)",{'date_t':'0' ,'cn_id' :0,'ct_id' :0,'cs_id' :0,'sex' :'0','rank' :0})
    db_conn.commit()
    c.execute ("INSERT INTO coffee_name (c_name) VALUES(:c_name )",{"c_name":'0'})
    db_conn.commit()
    c.execute ("INSERT INTO coffee_type (c_type) VALUES(:c_type )",{"c_type":'0'})
    db_conn.commit()
    c.execute ("INSERT INTO coffee_size (c_size) VALUES(:c_size )",{"c_size":'0'})
    db_conn.commit()


    # Part 3: Inserting Basic Information
    coffee_Name_list = ['Black','Latte','Espresso','Americano','Cappuccino','Mocha',
                     'Lungo', 'Flat white', 'Irish', 'Macchiato','Ristretto','Iced coffee']

    coffeeType_list = ['3n1' ,'Pods','Grounded']

    coffeeSize_list = ['Samll', 'Medium', 'Large', 'Venti']

    for each in coffeeName_list:
        c.execute ("INSERT INTO coffee_name (c_name) VALUES(:c_name )",{"c_name":each})
        db_conn.commit()

    for each in coffeeType_list:
        c.execute ("INSERT INTO coffee_type (c_type) VALUES(:c_type )",{"c_type":each})
        db_conn.commit()

    for each in coffeeSize_list:
        c.execute ("INSERT INTO coffee_size (c_size) VALUES(:c_size )",{"c_size":each})
        db_conn.commit()

    input('\n\n     Data-Base Created, Basic Information Inserted. press any key to continue. > ')
[ The Full Code is Available in Download Page. ]
Last Function in this part is the header, it’s just a Title that will bee displayed in a box at the top of each page. Here is the code ..
# Header of the Application

def header(line2,b_l2,a_l2):
    os.system('clear')
    # The Project Name.
    line_1 = "Coffee Consumption"
    stars = 40
    print('\n',' '*4,'*'*stars)
    print(' '*5,'***',' '*5,line_1,' '*7,'***')
    print(' '*5,'***',' '*(stars - 8),'***')
    print(' '*5,'***',' '*b_l2,line2,' '*a_l2,'***')
    print(' '*5,'***',' '*(stars - 8),'***')
    print(' '*5,'*'* stars,'\n')
What’s Coming: In Part-3 we will do the Follwing:
- Writing a function show_list.
- Writing the function to Add New Coffee Name.
- Writing the function to Edit a Coffee Name.
- Writing the function to Delete a Coffee Name.
..:: Have Fun with Coding ::.. 🙂
| Part 1 | Part 2 | Part 3 | Part 4 | Part 5 |
| Part 6 | Part – | Part – | Part – | Part – |
To Download my Python code (.py) files Click-Here
By: Ali Radwani
Python: Coffee Consumption Part-1
Learning : Python, SQlite3, Dataset, Pandas,
Subject: Create Coffee Consumption Application.
[NOTE: To keep the code as simple as we can, We WILL NOT ADD any user input Varevecations. Assuming that our user will Enter the right inputs.]
Last week I post an articale about generating Fake Data-Set about Coffee Consumption, and using that dataset in ML and DeepLearning. [Read the Story]. I’ve got a request from someone asking to build a reall Full Application that can be used in a Coffee Shop and collect/track his Coffee orders (consumption). So here is the application.
Road Map
Brain Storming
In this python project will collent some informatin based on a friend requerment. Our Task is:
- Data Gathering.
- Designing the Database and Tables.
- Writing python Functions to do the Following:
- Create the Main-Menu. [Add, Edit, Delete for main Table]
- Create the Manager Menu. [Add, Edit, Delete for each lookup Tables]
- Create the database and the tables:
- Main: coffee_con.
- Lookup: coffee_name.
- Lookup: coffee_type.
- Lookup: coffee_size.
- Inserting Zero record.
- Inserting Basic Data in all Lookup tables.
- Creating all Functions we need such as:
- Add, Edit, Delete Coffee Names.
- Add, Edit, Delete Coffee Types.
- Add, Edit, Delete Coffee Sizes.
..:: In Part -1 ::..
In this part, we will create a python file, and will write all the functions header [we think we may need] so late we can add the codes inside, of course we may add other functions later [if we miss it here].
So, starting from the Main-Menu, we will have
– Add New Order.
– Edit an Order.
– Delete an Order.
– Show Orders.
[… SETTING …]
– Coffee Names, Type and Size Manager.
– Create the database.
– Back-up Data. (as CSV)
– Exit.Here is just a sample of the code, in this part no much coding of the Functoins, as we said only Functions Names, the full code is available in the Download Page.[ Click Here ]
# Sample of Functions Names in our Application

import os
import sqlite3


def header():
    pass

def create_data_base () :
    pass

def main_menu():
    pass

def new_record():
    pass

def edit_record():
    pass

def delete_record():
    pass

def backup_dataset():
    pass
… The above are just a sample of Functions that we may have in the application, you can download and read the Project file.
What’s Coming: In Part-2 we will do the Follwing:
- Writing the Main Menu Function.
- Creating the DataBase.
- Writing the Function to Create the Tables.
- Inserting the Zero Records.
..:: Have Fun with Coding ::.. 🙂
Part 1 Part 2 Part 3 Part 4 To Download my Python code (.py) files Click-Here
By: Ali Radwani
Python: Generate your Data-Set
Learning : Python, pandas, function
Subject: Generate your CSV dataset using python
[NOTE: To keep the code as simple as we can, We WILL NOT ADD any user input Varevecations. Assuming that our user will Enter the right inputs.]
The Story: last week i was reading about Data Cleaning, Deep Learning and Machine Learning, and for all we need some data to play with and testing our code. There are several sites providing a free (to certain limits) Data-set. But while i was working, it just come to my mind Why not to write a code to generate some Fake data-set.
Before I start: The main question was “What is the subject of the data” or Data about What? This is the main question that will guide us to write our code, and tha answer was very..very fast 🙂 .. at that moment I was holding my Coffee Mug, and just jump to my mind, Data about Coffee … Coffee Consumption. So we are taking the data of Coffee Consumption from a Coffee-Shop, the coffee-shop is collecting the following data: Date-Time (of the order), Coffee-Name, Coffee-Type, Coffee-size, Sex, Rank. Here is in more details..
Dat-Time: Date and Time of Order, Date format: dd-mm-yyyy, the Time format: hh:mm (24h)
Coffee-Name: Such as: [black, latte, espresso, americano, cappuccino, mocha, lungo, flat white, irish, macchiato,ristretto, iced coffee]
Coffee-Type: 3n1 , pods, grounded
Coffee Size: samll, medium, large, venti
Sex: The person how order it male, female
Rank: if the customer drink the coffee in the shop, will ask for a ranks (1,10) 1:bad, 10:Grate
Scope of Work: We will write several functions to generate random data for each attribute we have, saving the data into a list, then combining all the lists in a pandas dataframe df and save the data_set df to a csv file. Later on we can re-call the file using pandas command df.read_csv(file_name) and manipulate the data.
.::.. Coding ..::.
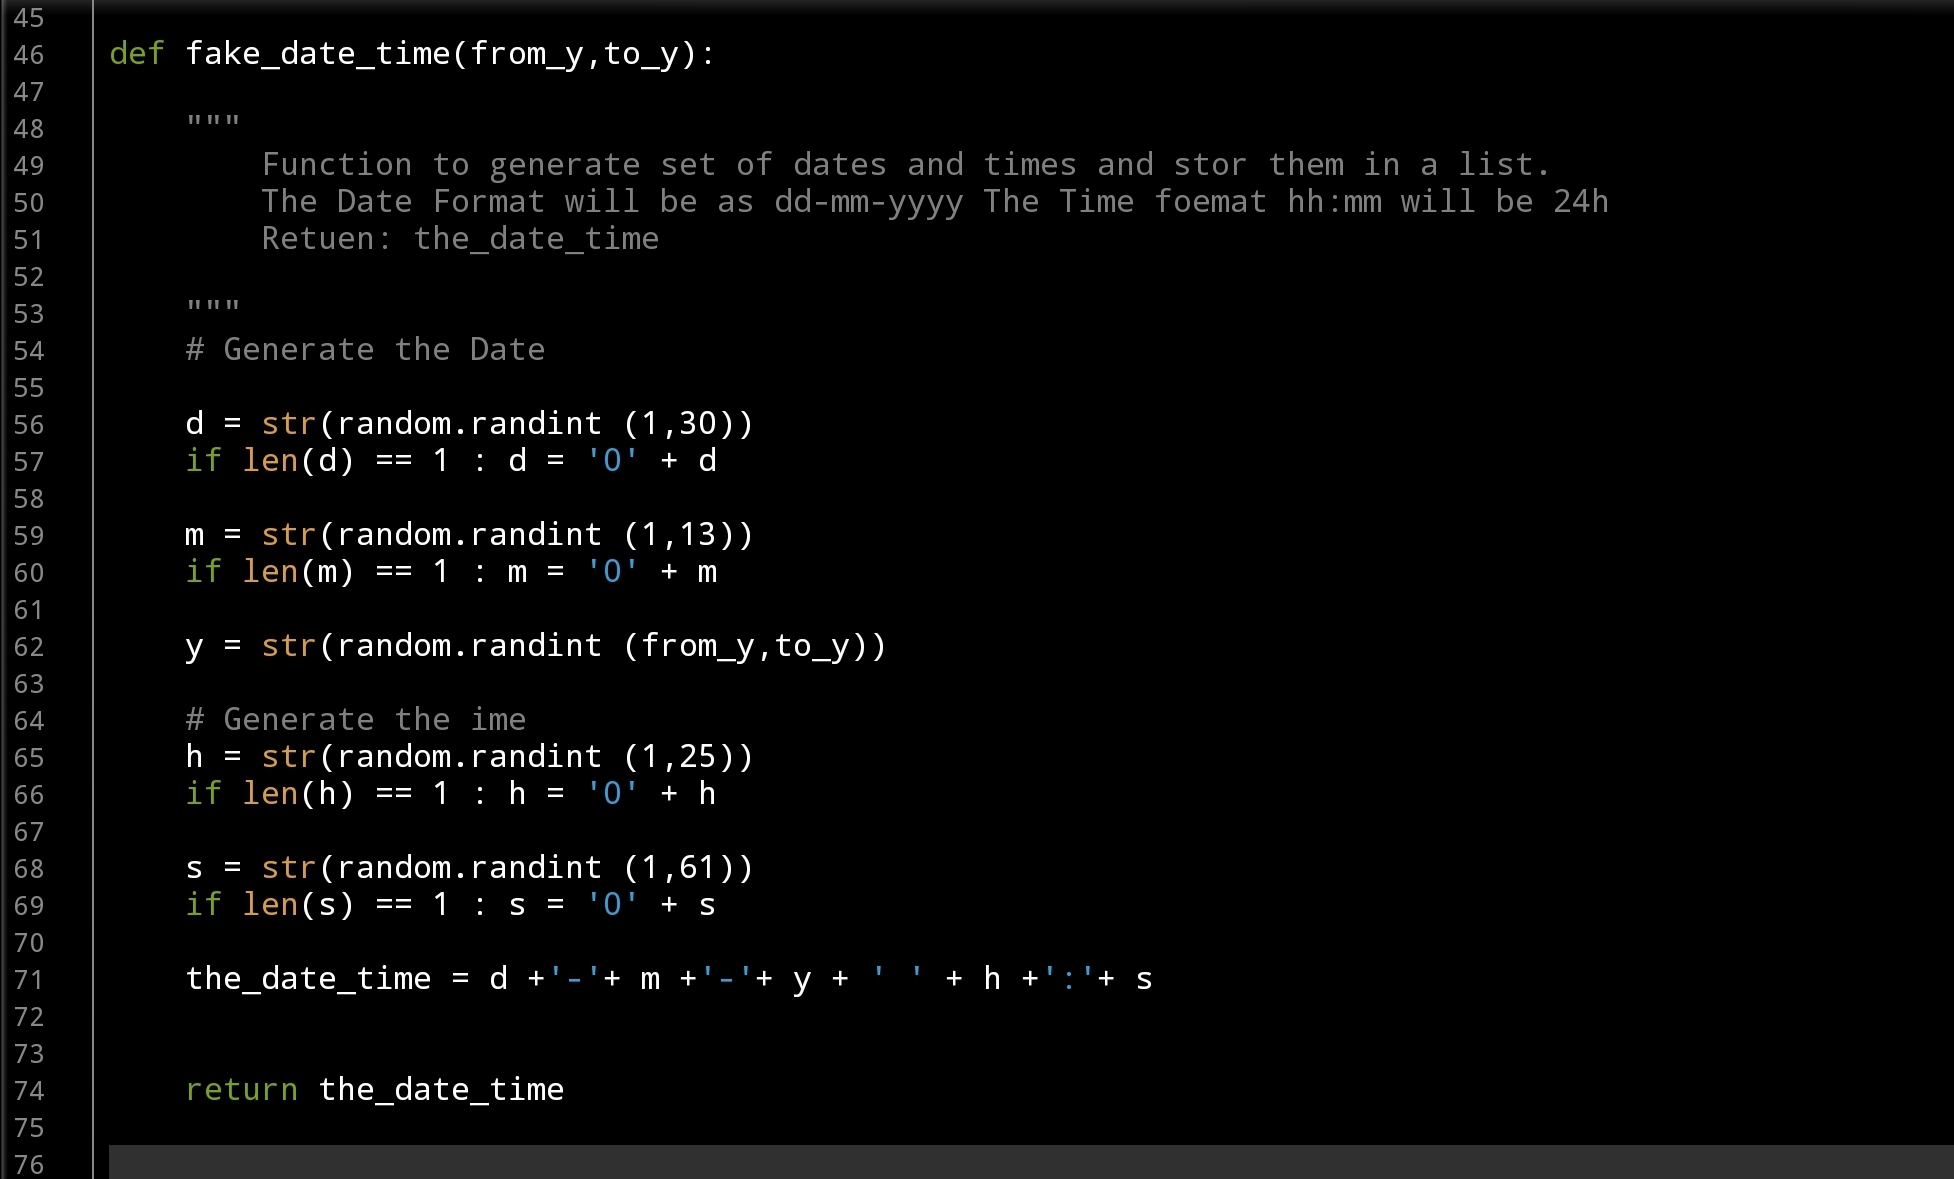
Let’s start with Date-Time Function: def fake_date_time(from_y,to_y): In this function we will use a random.randint() to generate numbers for day’s, months and years, also for hours and minites. The function will take two arguments from_y, to_y and will return a string like this: dd-mm-yyyy hh:mm … here is the code ..
 |
Now,Coffee Name: def fake_coffee_name() : for Coffee Name I create a list of Coffee Names (from the net) and use random.choice(coffee_name_list) to select one from the list. this function is a one-line code .. here it is ..
 # fake_coffee_name() function

def fake_coffee_name() :
    """
        Function to randomly select one from the list.

        Return coffee_name

     """

    coffee_name_list = ['black', 'latte', 'espresso', 'americano', 'cappuccino',
                         'mocha', 'lungo', 'flat white', 'irish', 'macchiato', 'ristretto',
                         'iced coffee'
                         ]
    return random.choice(coffee_name_list)
Here are another two Functions def fake_coffee_type(): and def fake_coffee_size(): Both are using the random.choice to select from a list.. here is the code ..
] |
More over, in out dataset we need another two variables sex and rank, both are simple and we don’t need to put them in separate function, we will call the random.choice(‘f’,’m’) to select between Male and Female, and random.randint (1,11) to select a Rank between (1 and 10). Here is the main part of the application, we will use a for loop and append all the returns from the function’s in a list (a list for each attribute) after that we will combine all the list in a dataset using pandas command. Here is the code..
 # Main body of the application

# empty lists of the columns
d_d =[]
cn_d =[]
ct_d =[]
cs_d =[]
s_d =[]
r_d = []

number_of_rows = 1000

for x in range(1,number_of_rows):
    d_d.append(fake_date_time(2000,2022))
    cn_d.append(fake_coffee_name())
    ct_d.append(fake_coffee_type())
    cs_d.append(fake_coffee_size())
    s_d.append(random.choice(['f','m']))
    r_d.append(random.randint (1,11))


the_data ={'date_time':d_d, 'c_name':cn_d, 'c_type':ct_d, 'c_size':cs_d, 'sex':s_d, 'rank':r_d }

df = pd.DataFrame (the_data)

# to create a CSV file and save the data in it.
file_name = 'coffee_consumption_v1.csv'
df.to_csv(file_name, index=False)

print(f'\n\n    The data been generated, a file named: {file_name} saved')
Now we have a file called: coffee_consumption_v1.csv saved in the same directory of the .py code file. Here is a sample of the data.
 |
We will stop here, and we will do another post to apply pandas commands over the dataset.
..:: Have Fun with Coding ::.. 🙂
To Download my Python code (.py) files Click-HereAlso the Date-Set coffee_consumption_v1 file (.csv) files is available in the same page.
By: Ali Radwani
Python: Random Pixel Color – P2
Learning : Python, Math
Subject: Random Coloring Pixels
[NOTE: To keep the code as simple as we can, We WILL NOT ADD any user input Varevecations. Assuming that our user will Enter the right inputs.]
Our last post about Random Pixel Color, we generate a Numpy Array of Row, Coloum and color then we Plot it on the screen [Read the Post Here], now in this post we will use some Math consepts to try if we can get some patterns out of ramdom Function.
Our Tools: In this post we will use the following:
1. Jupyter-NoteBook.
2. numpy.
3. random.
4. matplotlib.
5. PIL or Pillow.
In this version we will use “Fibonacci Sequence” Fibonacci Sequence is the sum of the two preceding ones, starting from 0 and 1 such as [1, 1, 2, 3, 5, 8, 13 … n], in our code we will have three variables:
cw: canvas width,
ch: canvas hight,
offset: the offset will be the value that will reset the Fibonacci Sequence to 1.
So, if we run the application, we will generate three numbers that will present the colors R,G,B (Will be Generated ONE time) then for each pixcel in (cw*ch) we will calculate a v as Fibonacci Sequence from fs1 =1, fs2 = 1 here is the code:
v = fs1 + fs2
fs1,fs2 = fs2, v
this value v will be added to the colors r,g,b (on each pixcel) untill the v is grater the the offset numbre that we pass to the Function. If v > offset then we will re-set the fs1 = 1, fs2 = 1,.. Here is the Code ..

|
Run No.1 |
Run No.2 |
Run No.3 |
Run No.4 |
The above is just 25×25 and i change the offset, feel free to download the code and change the numbers .. see what you will get …
..:: Have Fun with Coding ::.. 🙂
To Download my Python code (.py) files Click-Here
By: Ali Radwani
Python: Random Pixel Color
Learning : Python, Math
Subject: Random Coloring Pixels
[NOTE: To keep the code as simple as we can, We WILL NOT ADD any user input Varevecations. Assuming that our user will Enter the right inputs.]
Last week I start reading and studying about “Image Processing”, in some point I was reading about converting an image to Array of numbers, and re-converting that Array back to an Image, at that moment popped into my mind what if we just generate an Array with random numbers and then show it as an Image.
In this article we will write a first simple Function to generate a random numbers presenting the three main color Red, Blue and Green; then storing the numbers in an Array then using matplotlib library to display the Image.
Our Tools: In this post we will use the following:
1. Jupyter-NoteBook.
2. numpy.
3. random.
4. matplotlib.
5. PIL or Pillow.
Coding I am user Jupyter NoteBook on samsung Tab S4. First we will do all imports we need as:
from PIL import Image
import numpy as np, matplotlib.pyplot as plt
import random
%matplotlib inline
Now, we will write a Function called rand_color, we will run a nested for loop to generate the Row and Column (width and height) and in/for each row we will generate thee numbers of colors range(0,255) as one pixel and storing them in an array, then we display the Array using:
Image.fromarray and plt.imshow(). Here is the Code ..

|
Run No.1 |
Run No.2 |
Run No.3 |
Run No.4 |
The above is just 25×25 image with random color pixels, this is the first function using default random, in coming posts we will use some Math variables [such: log,sin], constants [such: pi, golden ratio] to see if we can get a pattern from random.
..:: Have Fun with Coding ::.. 🙂
To Download my Python code (.py) files Click-Here
By: Ali Radwani
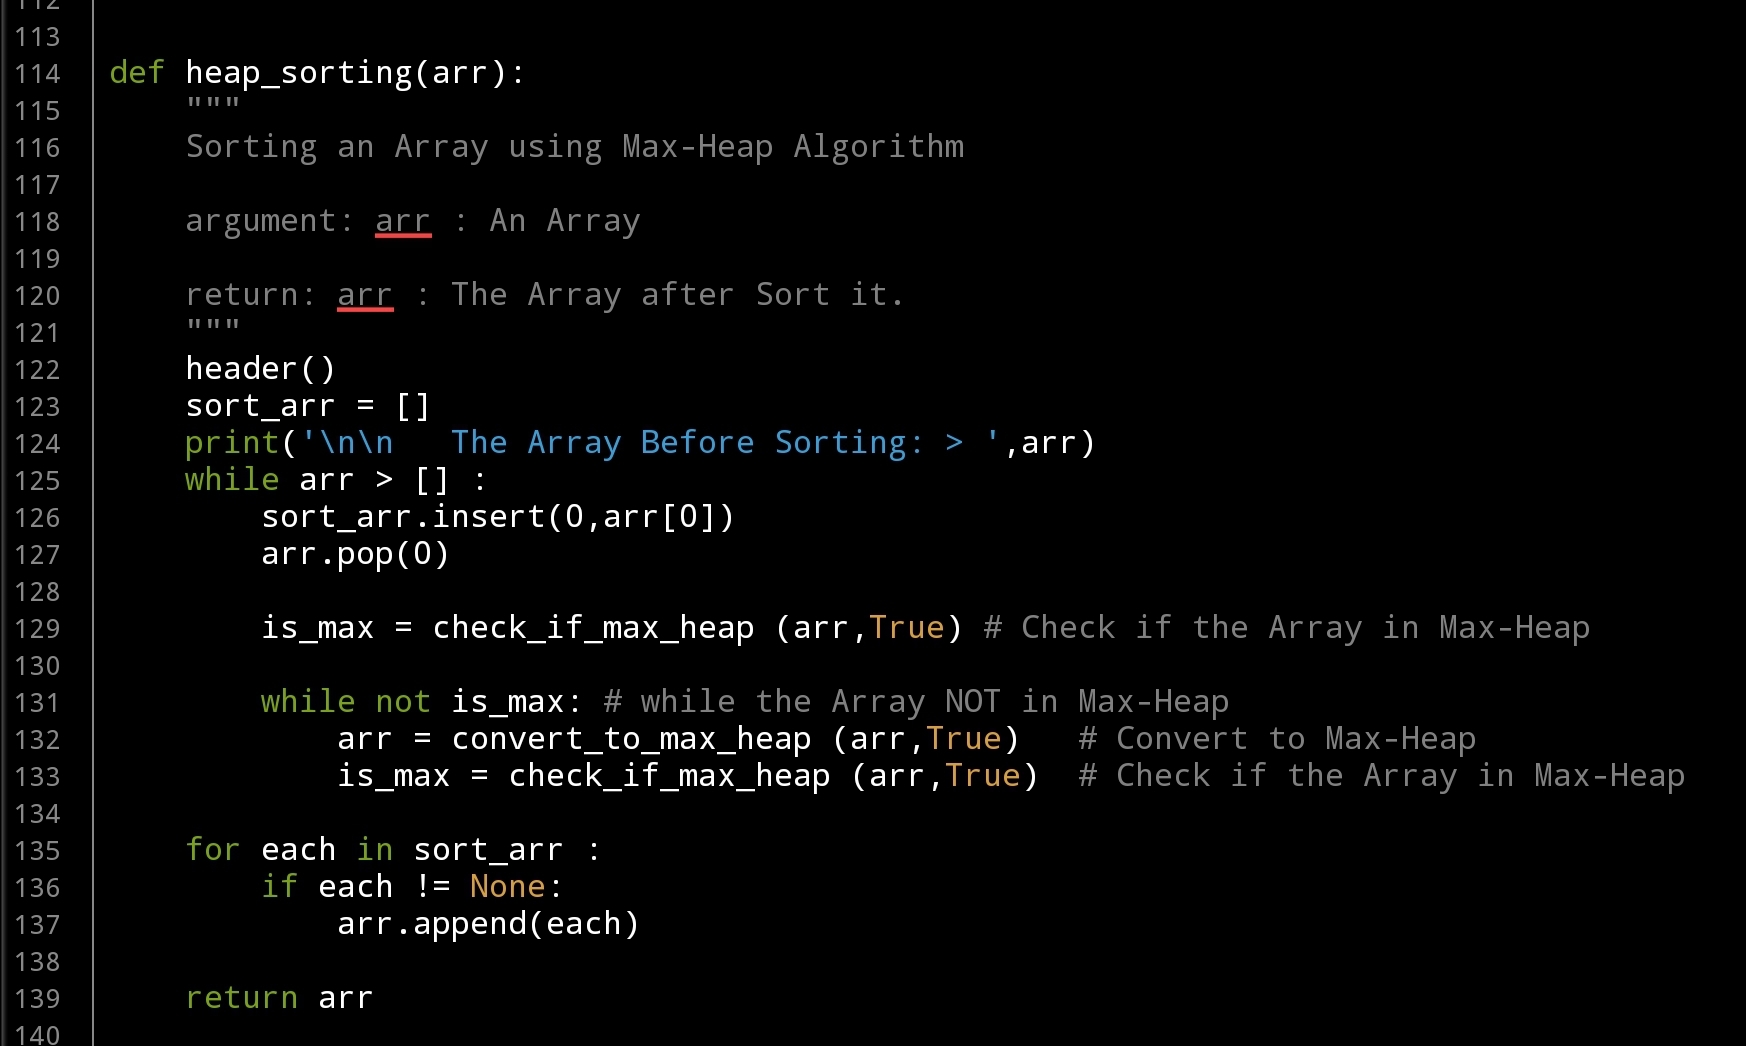
Python Sorting Algorithm – Heap Sorting -P5
Learning : Python, Math, Algorithm
Subject: Sorting Algorithm, Heap Sort P5
[NOTE: To keep the code as simple as we can, We WILL NOT ADD any user input Varevecations. Assuming that our user will Enter the right inputs.]
In Last Parts (2, 3 and 4) we wort the Following Functions:
- Sections Header.
- Main Menu Function.
- Entering/Creating the Array.
- Print-Out or to Display the Array.
- Check If Array in Max-Heap.
- Convert Array to Max-Heap.
- Add Node to Max-Heap.
- Delete a Node from a Max-Heap.
In this last part-5 we will write the last main Function to aplay the Heap Sorting Algorithm.
Scope of Work: Deleting a Node from a Max-Heap Array is the main function in sorting an Array using Max-Heap Algorithm, the Deleting is always from the Root Node, So if we delete the most top Node [Root] (and store it in index[0] in a temp_array) then we move the Last Node to it’s position and by doing that we miss the Max-Heap state of the Array, so we convert the array to a Max-heap, then we Delete the Root again until we delete all the elements in the Array.. Here the Algorithm:
Assuming we have a Max-Heap Array:
1. Delete the Root Element, and Store it in index[0] in Temp_array.
2. Move the Last Element in the Array to index[0].
3. If the Array not in Max-Heap then Convert it to a Max-Heap.
4. Repeat Steps 1 to 3 Until length of Array is 0.
In our list of Functions up, we have the three Functions we Need to complete/apply a Max-Heap Sorting:
We Delete a Node using def delete_node(arr,inside): then in a while loop we call both def check_if_max_heap (arr,inside): and def convert_to_max_heap (arr,inside): so let’s see the code..
 |
We finish Max-Heap Sorting Algorithm, ..
..:: Have Fun with Coding ::.. 🙂
To Download my Python code (.py) files Click-Here
By: Ali Radwani
Python Sorting Algorithm – Heap Sorting -P4
Learning : Python, Math, Algorithm
Subject: Sorting Algorithm, Heap Sort P2
[NOTE: To keep the code as simple as we can, We WILL NOT ADD any user input Varevecations. Assuming that our user will Enter the right inputs.]
In Last Parts (2 & 3) we wort the Following Functions:
- Sections Header.
- Main Menu Function.
- Entering/Creating the Array.
- Print-Out or to Display the Array.
- Check If Array in Max-Heap.
- Convert Array to Max-Heap.
In this Part-4 we will cover another Two important Functions that we need to talk about in our mission to understand the Heap Sorting Algorithm. In a Max-Heap Array we may need to Add new Node to the Array and we may need to Delete a Node. Also I just add Item No.7 style=”color:#2662ee;”>print(‘ ‘*5,’ 7. Start Heap Sorting.’) to the main-menu so we can do Heap Sorting to a given Array.
Starting with Add New Node, Simply we Add the Node to the end of the Array using arrat.append(new_node) then we need to Check If still the Array in Max-Heap If NOT, We MUST Convert it to a Max-Heap.
Scope of Work Ask the user to Enter the New Node Value, Add The Node to the End of the Array, in While Loop Call convert_to_max_heap (arr,True), check_if_max_heap (arr,True) as following:
while not is_max:
arr = convert_to_max_heap (arr,True)
is_max = check_if_max_heap (arr,True)
this will keep check and convert the Array to Max-Heap. Here is the Full code and run screen ..
 |
 |
Now we will write a Function to Delete a Node from the Max-Heap Array. Deleting a Node is just by removing the first node in the Array (Array[0]), then moving the last element in the Array to it’s position, by doing this we may not having a Max-Heap Array any-more, so we need to convert the array to a Max-Heap. In our application here, we will have a while loop and calling the functions (check_if_max_heap and convert_to_max_heap) until we have the Array in a Max-Heap. Here is the code ..
 |
We will stop here in this part. In Part-5 we will Sort any Array using the Max-Heap Sort Algorithm.
..:: Have Fun with Coding ::.. 🙂
To Download my Python code (.py) files Click-Here
By: Ali Radwani
Python Sorting Algorithm – Heap Sorting -P3
Learning : Python, Math, Algorithm
Subject: Sorting Algorithm, Heap Sort P2
[NOTE: To keep the code as simple as we can, We WILL NOT ADD any user input Varevecations. Assuming that our user will Enter the right inputs.]
First let’s just remember that in Part-1 we wort the Following Functions:
- Main Menu Function.
- Entering/Creating the Array.
- Print-Out or to Display the Array.
- Sections Header.
In this Part-3 we will cover another Two important Functions that we need to talk about in our mission to understand the Heap Sorting Algorithm.
First Function
Check If The Array is in Max Heap: After the user Giveing/Entering the Array [Selecting Option 1 in the Menu] we need to Examen/Check if it is in a Max-Heap, to do so we will call the Function def check_if_max_heap(arr, inside): the Function will take Two arguments:
arr : The Array.
inside: Boolean Flag showing are we calling the Function from within another Function or Not.
Scope of Work: We will check and compare each Node [starting from last node in the leaves] with it’s Parent using this formula parent_index = ((child_index-1)//2) to get the parent index, then comparing the Values of the Child and Parent, If the Child is GRATER Than his Parent we SWAP them. Then going to the Next Child and so-on until the Root-Node. .. Here is the Code ..

|
for each print statement I am using this code if not inside : then print ..
Example: if not inside : print(‘\n The Array is a Max-Heap Array.’)
So if the inside = True then the print code will not work, that’s mean we are calling the Function from inside another function and we just want the return value, the return here will be a boolean True/False as is_max [if the array is in Max-Heap].
Second Function
Convert to Max-Heap: In this Function we will convert a given Array to a Max-Heap Array. The way this Function is working is by checking/Examining all the Childs starting from the Leaves, and if any Child is Grater than his Parent we do a SWAP. After we Finish, we will call the Function def check_if_max_heap(arr, inside): to check if the Array is in Max-Heap, If NOT we will call the convert Function and so-on until we get the is_max = True from the def check_if_max_heap(arr, inside):. Both Functions def check_if_max_heap(arr, inside): and def convert_to_max_heap (arr,inside): will be run in a while loop until def check_if_max_heap(arr, inside): will return True. .. Here is the code for def convert_to_max_heap (arr,inside):

|
And here is the while loop to keep Examining the Array until fully converted to a Max-Heap Array.
 # While loop in Option 3 from the Main-Menu, In the main body code..

    while not is_max:
             arr = convert_to_max_heap (arr,True)
             is_max = check_if_max_heap (arr,True)
We will stop here in this part. In Part-4 we will Add new Node to the Array, and Delete a Node from the Array.
..:: Have Fun with Coding ::.. 🙂
To Download my Python code (.py) files Click-Here
By: Ali Radwani
Python Sorting Algorithm – Heap Sorting -P2
Learning : Python, Math, Algorithm
Subject: Sorting Algorithm, Heap Sort P2
[NOTE: To keep the code as simple as we can, We WILL NOT ADD any user input Varevecations. Assuming that our user will Enter the right inputs.]
In this post we will start writing some codes for the Heap Sorting application, we will start with the following Functions:
- Main Menu Function.
- Entering/Creating the Array.
- Print-Out or to Display the Array.
- Sections Header.
So First: We will start with the Main_menu Function and will return user_choice also the main application body.. Here is the code ..
 # Main Menu function and the main application body..


def main_menu():
    os.system('clear')
    header()
    print("\n\n"," "*4,"==============[ Main Menu ]==============\n")
    print(' '*5,' 1. Enter the Binary Tree as an Array.')
    print(' '*5,' 2. Print out the Binary Tree. {Text Mode}')
    print(' '*5,' 3. Check if it is a Max Heap.')
    print(' '*5,' 4. Convert an Array (Binary Tree) to a Max-Heap.')
    print(' '*5,' 5. Add New Node to the Binary Tree.')
    print(' '*5,' 6. Delete a Node From the Binary Tree.')
    print(' '*5,' 9. Exit.')

    user_choice = input("\n Select from the Menu: > ")

    return user_choice


# This is the Main application body.
while True :

    user_select = main_menu()

    if user_select == '1' :
        print(' Enter the Binary Tree as a Array.')
        arr = create_array_node_b_node()

    if user_select == '2' :
        try:
            print_bt_text (arr)
        except :
            input('\n   You Must First Enter/Create the Array... Press any key then Select Option 1. > ')

    if user_select == '3' :
        print(' Check if the Array is a Max Heap.')


    if user_select == '4' :
        print(' Convert an Array (Binary Tree) to a Max-Heap.')


    if user_select == '5' :
        print(' Add New Node to the Binary Tree.')
        #add_node(arr)

    if user_select == '6' :
        print(' Delete a Node from the Binary Tree.')
        #delete_node(arr)

    if user_select == '9' :
        print('\n\n   Thank you for using this Appliation. ')
        input('\n         Press any key .. ')
        break
Next we will write the function def create_array_node_b_node() in this function the user will start to enter the nodes in the Heap Tree starting from the Root and level-by-level. With every/each Node if the user just press Enter the Node will be as None,then will ask the user if there is any more nodes in the level and if the user answer with [N] then we will complete the level with None. Also in starting of each level we will ask the user if there is any more Nodes remain in the level.
Here is the code ..

|
In the last Function in this part, we will print-out the Heap-Array as text of Parents and Childs. Here is the code ..
 # Function to print-out the Heap-Array Tree

def print_bt_text (arr):
    """
        Function will Write/Print-out the Tree as Text Showing the Parents and the Childs.

        Arguments: The Array as arr

        return None
    """
    os.system('clear')
    header()
    print("\n\n==========[ Print out the Binary Tree. {Text Mode} ]==========\n\n")

    print('   The array we Have is: ',arr)

    for x in range (0,len(arr)):
        print(' ')
        if arr[x] != None :

            try:  # For left childs
                l_child = 2 * x + 1

                if arr[l_child] != None :
                    print(f'   Parent Node ({arr[x]}) has a Left Child ({arr[l_child]})',end="")

                elif arr[l_child] == None:
                    print(f'   Parent Node ({arr[x]}) has NO Left Child',end="")
            except:
                pass

            try:   # For right Childs
                r_child = 2 * x + 2

                if (arr[l_child] == None) and (arr[r_child] != None) :
                    print(f' But it Has a Right Child ({arr[r_child]}).')

                elif (arr[l_child] != None) and (arr[r_child] != None) :

                    print(f' and a Right Child ({arr[r_child]})')

                elif (arr[r_child] == None):
                    print(f' and Has NO Rigth Child.')
            except:
                pass

    input('   DONE ... Here is a Print out of the Heap Tree Array in {Text Mode}')
We will stop here in this part and will do more Functions in Part 3
..:: Have Fun with Coding ::.. 🙂
To Download my Python code (.py) files Click-Here
By: Ali Radwani
Taking pictures is not my main daily practices, but when i start playing with my camera, i really enjoy my self.
Thanks for visiting my Space..


