Archive
Python: Cooking App P-3
Learning : Python, Data-Base, SQlite
Subject: Writing a Cooking Application
Over View: In last post (Part-2) we wrote the codes for Main-Menu and other sub-Menus, today in this post we will work on “Setting Menu”. Setting Menu has three items:
1. Create the needed Tables. [To create all tables we need in the database]
2. Drop Tables. [If any things goes wrong then we can Drop (Delete) a Table (or more) ]
3. Insert Dummy Data. [To Insert ONE Record in the tables. (Record 0)]
First thing we need to create a database and set a connection to it, also we will import the [sqlite3 and os], to do so we will write this code:
  import sqlite3, os

  # Create the data-base & name it.
  db_conn = sqlite3.connect ("cooking.db")

   # set the connection.
  c = db_conn.cursor()

|
Now we need to write three Functions for the Setting Menu, we will start with Table creation code and here I am posting the Data-Base Tables Diagram ..
Click to Enlarge
|
 # Function to Create the Tables


def create_tables_() :    # to create tables.

    sql_recipes = "CREATE TABLE if not exists recipes (r_id INTEGER PRIMARY KEY AUTOINCREMENT, r_name text, r_date text, r_type text, r_details text, r_tags text )"

    sql_photo = "CREATE TABLE if not exists photo (p_id  PRIMARY KEY AUTOINCREMENT ,r_id integer , p_name text)"

    sql_ingredients_list = "CREATE TABLE if not exists ingredients_list (i_l_id PRIMARY KEY AUTOINCREMENT, i_name text )"

    sql_rec_ingredient ="CREATE TABLE if not exists rec_ingredient (ing_id INTEGER PRIMARY KEY AUTOINCREMENT, i_l_id integer, r_id integer)"

    c.execute(sql_recipes)
    db_conn.commit()

    c.execute(sql_photo)
    db_conn.commit()

    c.execute(sql_ingredients_list)
    db_conn.commit()

    c.execute(sql_rec_ingredient)
    db_conn.commit()

    input('\n   .. Cooking  Tables created..  Press any key .. ')
So now if we call this function “create_tables_() “, Tables will be created. Another function in the Setting Menu is Drop a Table, as we mention above we need this function in case we need to Delete a Table and create it again, in this function first we will list all the tables in the database and ask the user to Enter the Table need to be delete. Here is the code behind this function:
 # Drop a Table.

def drop_table():

    try:
        # First we will print-out the list of Tables.
        c.execute("SELECT name FROM sqlite_master  WHERE type = 'table'")
        db_tables =[]
        for each in c.fetchall() :
            for t in each :
                db_tables.append(t)
        print('\n  Table List .. ')
        for x in range (len(db_tables)) :
            print((x+1),db_tables[x])
        t = int(input('\n  Enter the number next to Table you want to Drop:  '))
        c.execute("DROP TABLE {}".format(db_tables[t-1]))
        db_conn.commit()
        print('\n ... One Table been Dropped')

    except:
        print('\n  No Tables with this name .. ')

    input('\n  . . . Press any key  . . ')

|
Last code to write in this post is to Insert One-Record in the tables, the reason of doing this manually (Hard-Coded) is that we have some “Primary key AUTOINCREMENT” fields in our tables, and to make it AUTOINCREMENT there MUST be a number first so we will enter the ZERO record (0).
 # Function to Insert the Zero Record

def insert_rec_0():

    c.execute ("INSERT INTO recipes (r_id) VALUES(:r_id)",{"r_id":0})

    c.execute ("INSERT INTO ingredients_list (i_l_id) VALUES(:i_l_id)",{"i_l_id":0})

    c.execute ("INSERT INTO rec_ingredient (ing_id) VALUES(:ing_id)",{"ing_id":0})

    c.execute ("INSERT INTO photo (p_id) VALUES(:p_id)",{"p_id":0})

    db_conn.commit()

    input('\n ...Dummy records been Inserted ....  Press any key  .. ')
In Next post we will write the codes for the functions in the “INGREDIENT MENU” to Add, Delete and Edit Ingredient List.
To Download my Python code (.py) files Click-Here
 Follow me on Twitter..
By: Ali Radwani
Python: Cooking App P-2
Learning : Python, Data-Base, SQlite
Subject: Writing a Cooking Application
Over view: In Part-1 (Click to Read) we list down the Main-Menus and sub-menus of some options, here we will start writing the codes of each menu. We will start from the Main-Menu.
Now with each menu from the last post, we will see the code and the run-time screen.
[ MAIN MENU ]
1. Add New Meal.
2. Ingredients Manager [will have a sub menu]
3. Add New.
4. Show Recipes.(Meals) [will have a sub menu]
5. Recipes Information.) [ number or Recipes by date, number on tags, number of Ingredients .. ]
6. Data-Base Information.
7. Setting. [will have a sub menu]
9. Exit.
 # Main Menu Code

def main_menu():
    while True :
        os.system("clear")
        print('\n ===========[ MAIN MENU ]=============')
        print(' --------------------------------------')
        print('  1. Add New Meal.')
        print('  2. Ingredients Manager')
        print('  3. Add New')
        print('  4. Show Recipes.')
        print('  5. Recipes Information.')
        print('  6. DataBase Information.')
        print('  7. Setting')
        print('  9. Exit.')

        uinput = input('\n Select the required action:  ')
        if uinput == '1' :
            pass
        elif uinput =='2' :
            ingredient_menu()
        elif uinput =='3' :
            show_recipes ()
        elif uinput =='4' :
            pass
        elif uinput =='5' :
            pass
        elif uinput == '6' :
            pass
       elif uinput == '7' :
            setting_menu()

        elif uinput == '9' :
            return
        else:
            print('\n  You need to select from the menu..')
 |

|
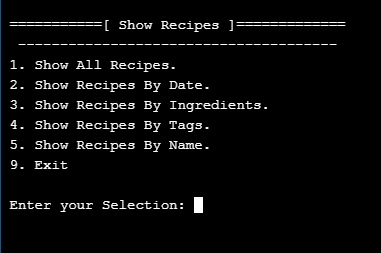
Second menu to write is “Show Recipes”, the user will use this menu to display and read the Recipes.
[ Show Recipes ]
1. Show All Recipes.
2. Show Recipes By Date.
3. Show Recipes By Ingredients.
4. Show Recipes By Tags.
5. Show Recipes By Name.
9. Exit.
 # Show Recipes Menu Code

def show_recipes () :
    while True:
        os.system("clear")
        print('\n ===========[ Show Recipes ]=============')
        print('  --------------------------------------')
        print(' 1. Show All Recipes.')
        print(' 2. Show Recipes By Date. ')
        print(' 3. Show Recipes By Ingredients.')
        print(' 4. Show Recipes By Tags.')
        print(' 5. Show Recipes By Name.')
        print(' 9. Exit')
        uinp= input('\n Enter your Selection: ')

        if uinp == '1':
            pass
        elif uinp == '2':
            pass
        elif uinp == '3':
            pass
        elif uinp == '4':
            pass
        elif uinp == '5':
            pass

        elif uinp =='9':
            return
        else:
            print('\n  Please select from the Menu.')

|
 |
Third menu we have in our application is “Ingredient Menu”, the user will it to manage the Ingredient list.
[ INGREDIENT MENU ]
1. Show all Ingredient.
2. Add Ingredient.
3. Delete Ingredient.
4. Edit Ingredient.
9. Exit.
 # Ingredient Menu Code

def ingredient_menu():
    while True:
        os.system("clear")
        print('\n ===========[ INGREDIENT MENU ]=============')
        print('  --------------------------------------')
        print(' 1. Show all Ingredient.')
        print(' 2. Add Ingredient.')
        print(' 3. Delete Ingredient. ')
        print(' 4. Edit Ingredient')
        print(' 9. Exit')
        uinp= input('\n Enter your Selection: ')

        if uinp == '1':
            pass
        elif uinp == '2':
            pass
        elif uinp == '3':
            pass
        elif uinp == '4':
            pass
        elif uinp =='9':
            return
        else:
            print('\n  Please select from the Menu.')

|
 |
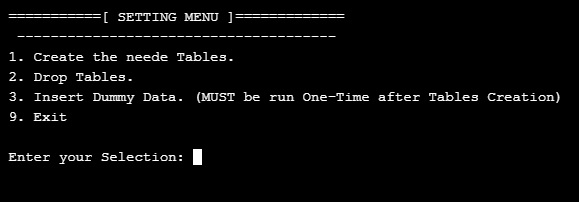
Last menu we have is “Setting Menu”, from here we can create the tables and Insert a Dummy-Data.
[ SETTING MENU ]
1. Create the needed Tables.
2. Drop Tables.
3. Insert Dummy Data. (MUST be run after Tables Creation)
9. Exit.
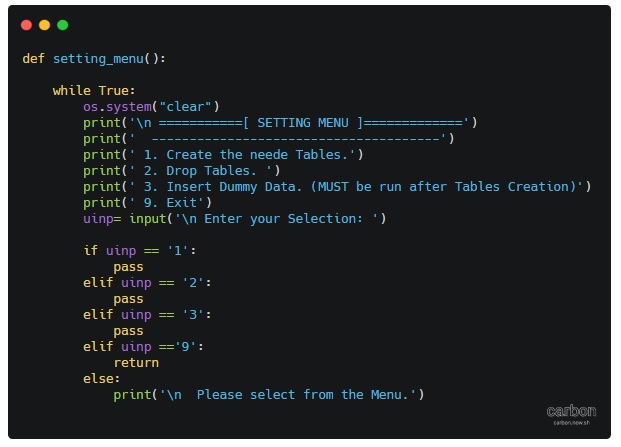
 # Setting Menu Code

def setting_menu():

    while True:
        os.system("clear")
        print('\n ===========[ SETTING MENU ]=============')
        print('  --------------------------------------')
        print(' 1. Create the needed Tables.')
        print(' 2. Drop Tables. ')
        print(' 3. Insert Dummy Data. (MUST be run One-Time after Tables Creation)')
        print(' 9. Exit')
        uinp= input('\n Enter your Selection: ')

        if uinp == '1':
            pass
        elif uinp == '2':
            pass
        elif uinp == '3':
            pass
        elif uinp =='9':
            return
        else:
            print('\n  Please select from the Menu.')
|
 |
Next Post: In next post we will write the codes for Setting menu so we can run it and from there we can create the Tables and Insert the Dummy Data.
To Download my Python code (.py) files Click-Here
By: Ali Radwani
Python: Cooking App P-1
Learning : Python, Data-Base, SQlite
Subject: Writing a Cooking Application
Over view: We will start new project to work on in coming weeks, and will call it ” Cooking App” I will use Python as a code language and Sqlite3 as a database in a full stack task.
Assumptions: I will assume that we have some basic information about Database such as Tables, fields, records and relationships between tables also Primary key and foreign keys. All this are important just to understand what’s going on, and we will write the code to generate all tables through Python code.
The Concept: The Cooking App will give the user the ability to write a food Recipe with it’s ingredients and how to cook it. (Along with it’s photo.. ) The application will have the ability to store a list for ingredient so the user can select from it instead of re-writing it every time, also to save the photo of your dish if you want.
Data-Base Design: In this application we will need four Tables, we will call them: Recipes, Photo, Rec_ingredients and ingredient_list. Each table will have a Primary Key (id).
Here are the Tables and the Fields
- r_id PRIMARY KEY AUTOINCREMENT
- r_name
- r_type (Breakfast, Lunch, Dinner)
- r_tags (NOT Sure to use static list or DB-Table)
- r_date
- r_details
Recipes
-
Photo
- p_id PRIMARY KEY AUTOINCREMENT
- r_id FOREIGN KEY
- p_name
-
Ingredients_List
- ing_id PRIMARY KEY AUTOINCREMENT
- i_name
-
rec_ingredient
- ing_id PRIMARY KEY AUTOINCREMENT
- i_l_id
- r_id
First thing we will write in the application is the Main-Menu and other sub menus we may have in the application. (After posting this article Menus may change)
[ MAIN MENU ]
1. Add New Meal.
2. Ingredients Manager [will have a sub menu]
3. ??.
4. Show Recipes.(Meals) [will have a sub menu]
5. Recipes Information.) [ number or Recipes by date, number on tags, number of Ingredients .. ]
6. Data-Base Information.
7. Setting. [will have a sub menu]
9. Exit.
[ Show Recipes ]
1. Show All Recipes.
2. Show Recipes By Date.
3. Show Recipes By Ingredients.
4. Show Recipes By Tags.
5. Show Recipes By Name.
9. Exit.
[ SETTING MENU ]
1. Create the needed Tables.
2. Drop Tables.
3. Insert Dummy Data. (MUST be run after Tables Creation)
9. Exit.
[ INGREDIENT MENU ]
1. Show all Ingredient.
2. Add Ingredient.
3. Delete Ingredient.
4. Edit Ingredient.
9. Exit.
We can say that this is a blue-print of the application that we want to work on, everything is subject to change while working, since this is a personal application we will be flexible in changing, but in real life project development cycle we need to take an approval (From the Business Owner) on the project plan and design before we start working also to be very clear that : “Any changes in the scope of work may cost money and time”.
Next Post: In next post we will write the codes for the menu also we will create the Tables.
To Download my Python code (.py) files Click-Here
By: Ali Radwani
Python: SQlite Project – P3
Learning : Python and Sqlite3
Subject: Sqlite3, Database functions ” Employee App” P3
In this post we will cover the SEARCH AND EDIT Functions, so let’s start with Edit.
To Edit or change something or a record in the database we need to target that line of record; and to do this we will select the record by it’s Primary-Key. In our employee table the primary-key is emp_id. Our scope is to list-down all the data to the user and he will enter the ID of the employee, then we will ask about each field if he want to change it, and we will assume that if he just press enter then NO CHANGE will be done to that field. So let’s see the Function in run also the code ..
| Once we select opt.4 in Main-Menu we will seea list of all records and the prompt |
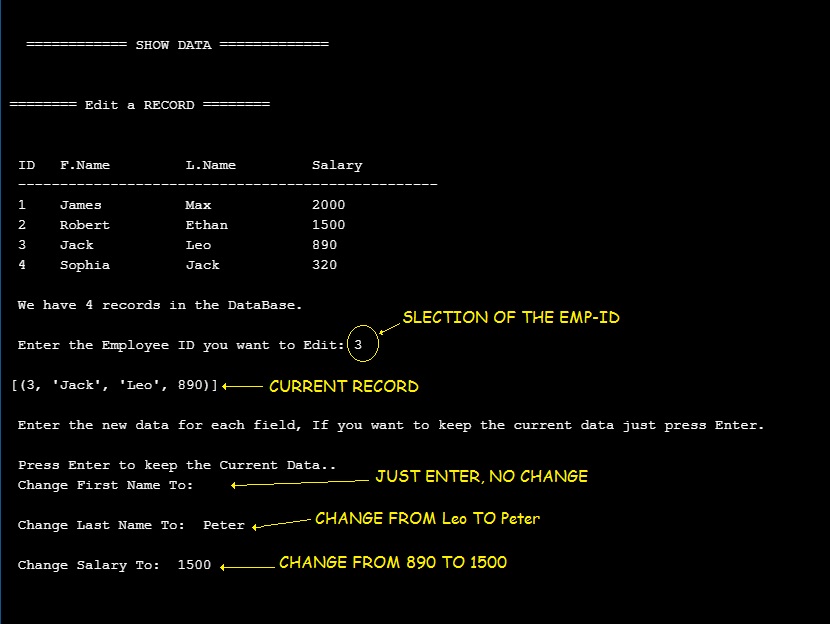 |
| Then the system will show the record after the change.. |
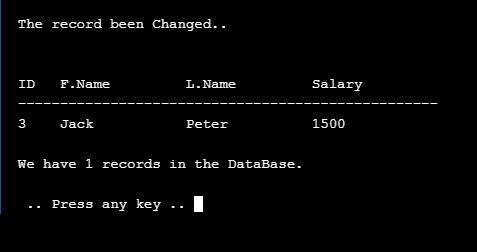 |
And here is the code ..

|
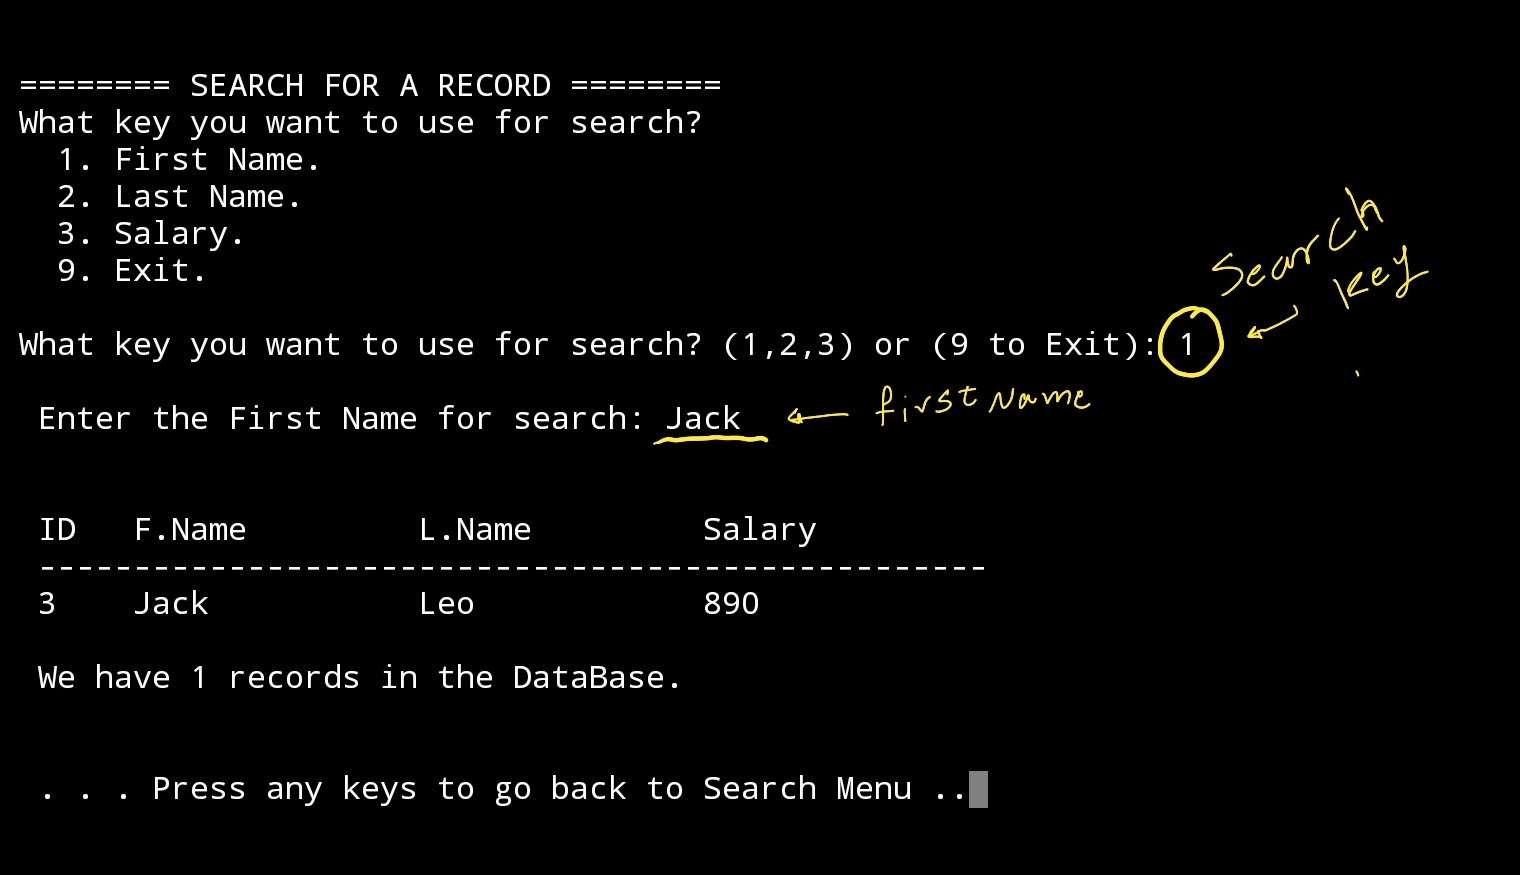
Now we will write a basic SEARCH function, usually searching (in a simple apps) will be for one of the fields in the DataBase, in our case we have employee First Name, Employee Last Name and the Salary. In the Search section we will ask the user to select a searching key (fname, lname or Salary) then to enter the value to be search for and running our SQL-Query based on that. Let’s see.
First here is the run screen, Once we select Search from Main-Menu we will jump into Search Page, with short list to select from, in this sample I select the 1. First Name (search key), then the prompt will wait for the user to Enter the Name and retrieve the record ..
|
Here I select to search with Last Name, and i got two records ..
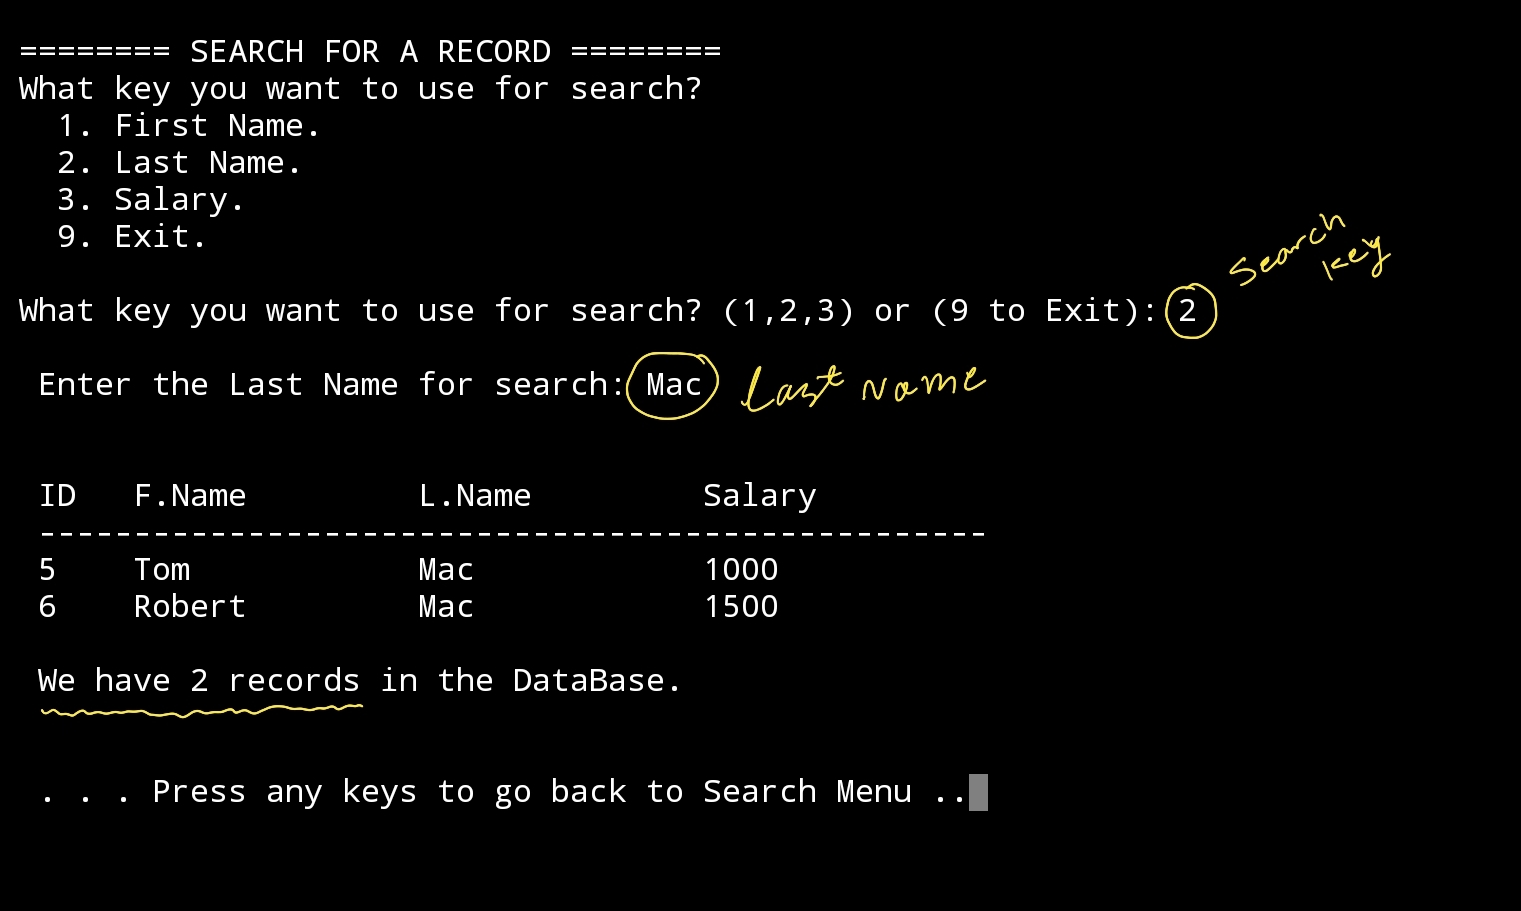
|
For the Salary we will have two options, even to fetch all the records with same salary amount the user will enter, or the user can enter a range for the salary (From and To). Let’s see the run-screen for it.
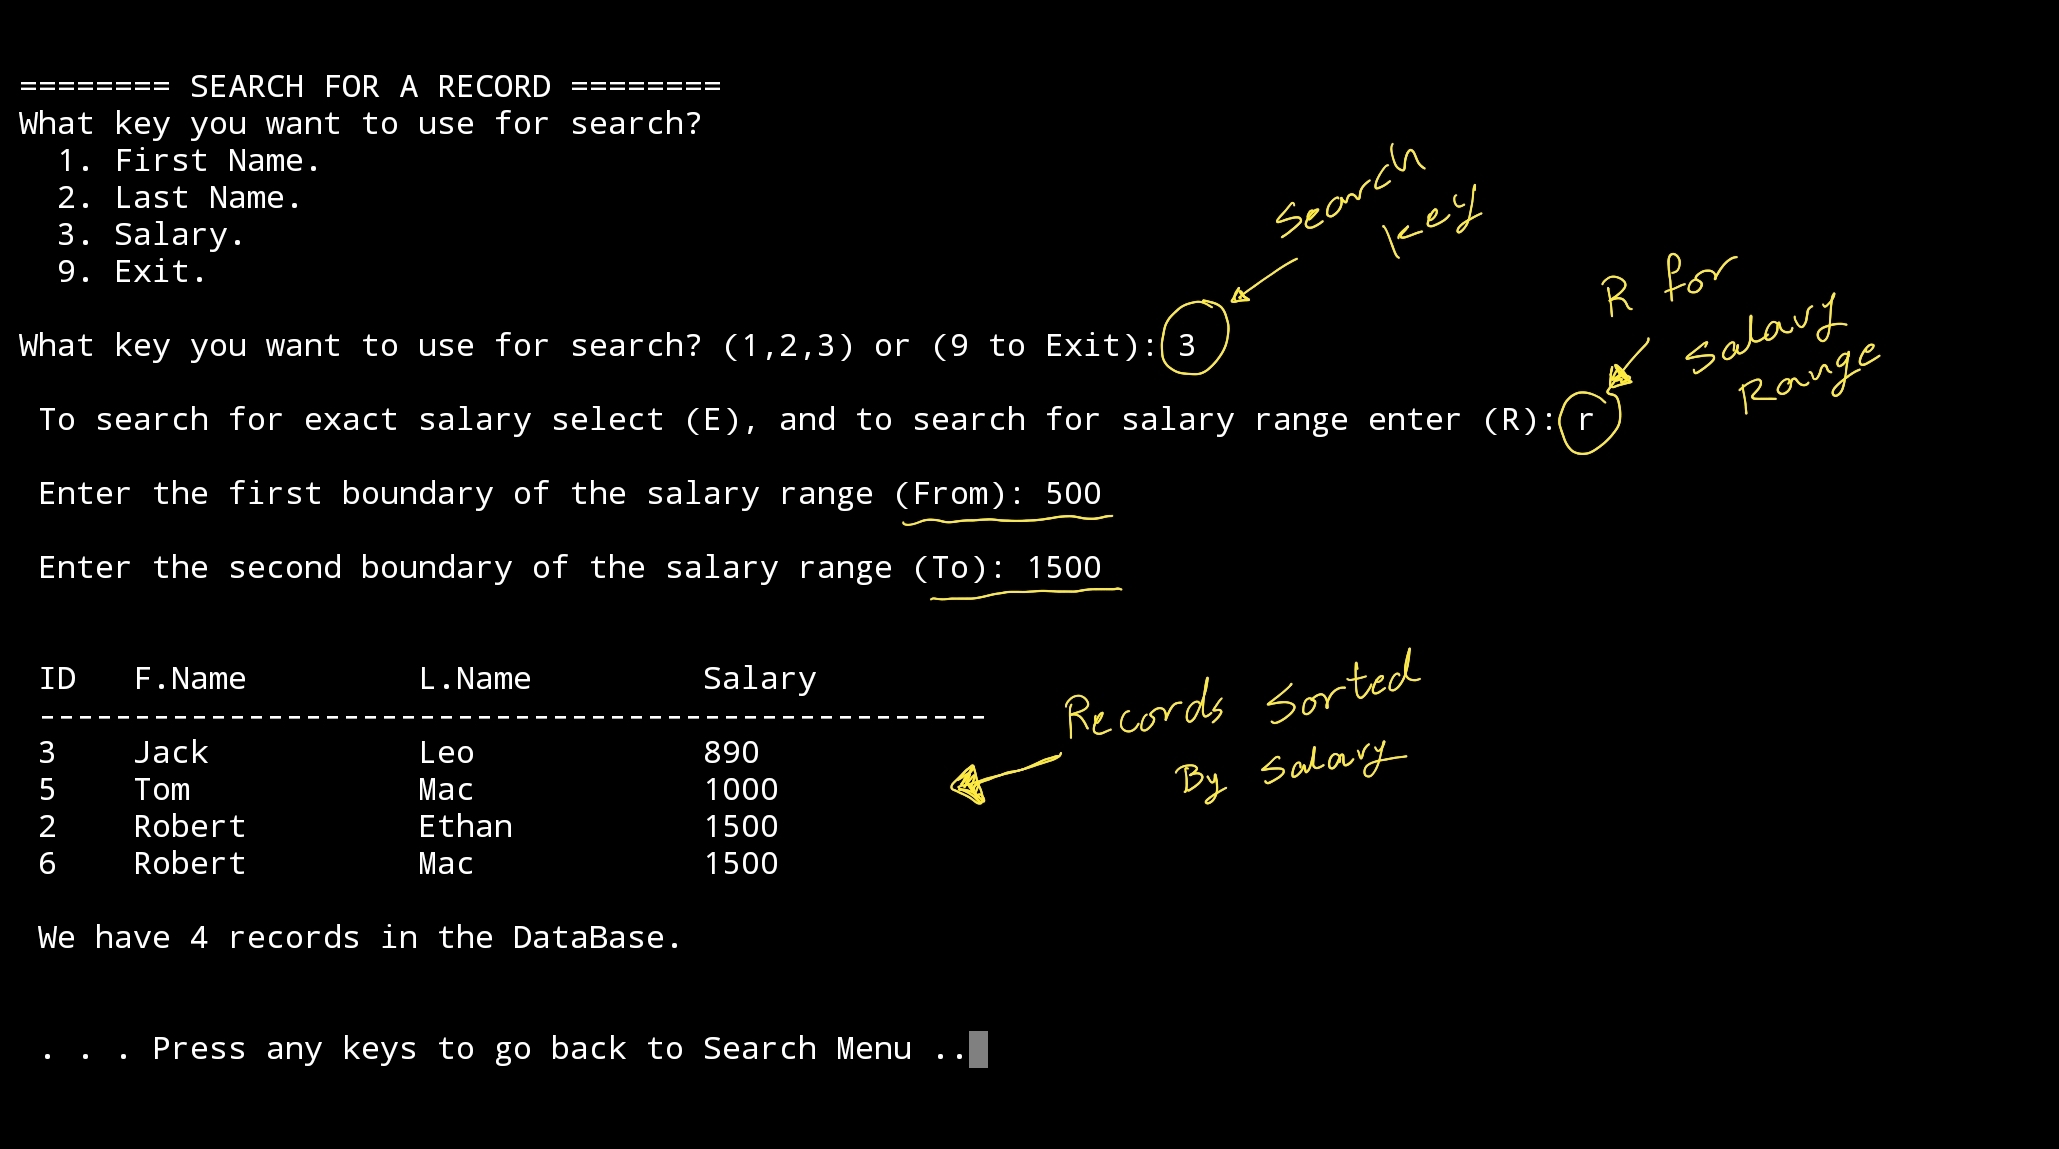
|
We can see that 4 records has the salary between (500 and 1500) also we sort the records by salary. |
Last thing here is a screen-shot of the code ..

|
By this paragraph we reach the end of this simple application, we work full-stack, we design the database, Table and create it, also we design the application Menus and Functions. If we run the application we may find some small issues that need to be enhanced or changed, but in general the Main Goal was to write a simple application working with DataBase and using SQlite.
To Download my Python code (.py) files Click-Here
By: Ali Radwani
Python: Applications Main Menu
Learning : Application Main Menu
Subject: Main Menu Template
In some of my applications often I start writing codes to create a Menu for some parts in the app. Now in this post we will write a simple general Main Menu Template, to keep the screen prompt waiting for the user we use while True, and to exit we just use return . Here is the code ..

|
'''
Date: 10.1.2020
By: Ali Radwani.  www.ahradwani.com

Main_Menu Function
'''
import os

def main_menu():

    """
    Template Function to help in creating a Menu for the application.

    You can change the names and functions must be defined.
    """
    while True:
        os.system("clear")
        print('\n ===========[ MENU NAME]=============')
        print('  --------------------------------------')
        print(' 1. Function-1 Name.')
        print(' 2. Function-2 Name. ')
        print(' 3. Function-3 Name')
        print(' 9. Exit')
        uinp= input('\n Enter your Selection: ')

        if uinp == '1':
            Function_1_Name()
        elif uinp == '2':
            Function_2_Name()
        elif uinp == '3':
            Function_3_Name()
        elif uinp =='9':
            return
        else:
            print('\n  Please select from the Menu.'
To Download my Python code (.py) files Click-Here
By: Ali Radwani
Python: SQlite Project – P2
Learning : Python and Sqlite3
Subject: Sqlite3, Database functions ” Employee App” P2
In Part1 of this project (Click to Read) we create the database and set the connection, also we create an Employee table with very basic fields and also we wrote a dummy_data() function to Insert some records into the table. And to make the application usable we wrote the Main-Men function and we test it with selecting to display the records that we have.
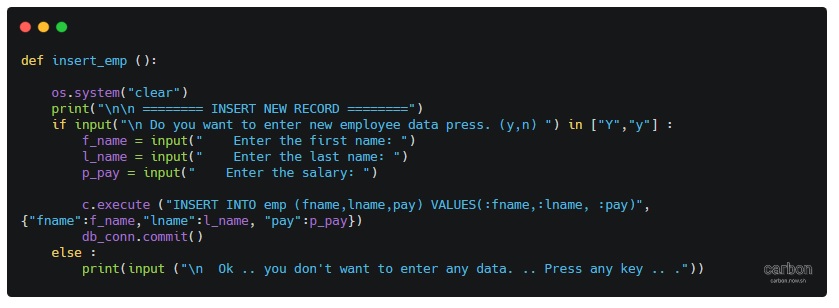
Today we will write other functions from our Menu. INSERT NEW EMPLOYEE: To Insert new employee we will ask the user to input or to fill the fields we have in our table such as First Name, Last Name and the Salary. .Let’s see the code ..
 # Insert Function

def insert_emp ():

    os.system("clear")
    print("\n\n ======== INSERT NEW RECORD ========")
    if input("\n Do you want to enter new employee data press. (y,n) ") in ["Y","y"] :
        f_name = input("    Enter the first name: ")
        l_name = input("    Enter the last name: ")
        p_pay = input("    Enter the salary: ")

        c.execute ("INSERT INTO emp (fname,lname,pay) VALUES(:fname,:lname, :pay)",{"fname":f_name,"lname":l_name, "pay":p_pay})
        db_conn.commit()
        print(input ("\n  One record has been Inserted. .. Press any key .. ."))
    else :
        print(input ("\n  Ok .. you don't want to enter any data. .. Press any key .. ."))

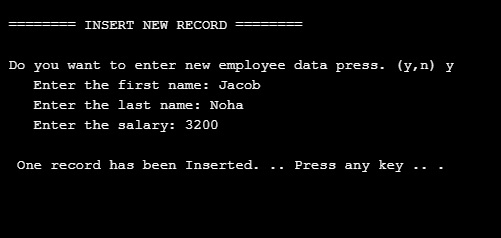
So, if we select to Insert a new Employee and we Enter First name as : Jacob Last Name as: Noha also we we set the salary to 3200 and press Enter, as in this page ..
|
Then if we select to show all data we have in the database, we can see the new record added..

|
DELETE AN EMPLOYEE: To Delete or remove an employee from the database, First we will print-out all the records on the screen and ask the user to enter the ID_ number of the employee he want to delete. As shown here ..
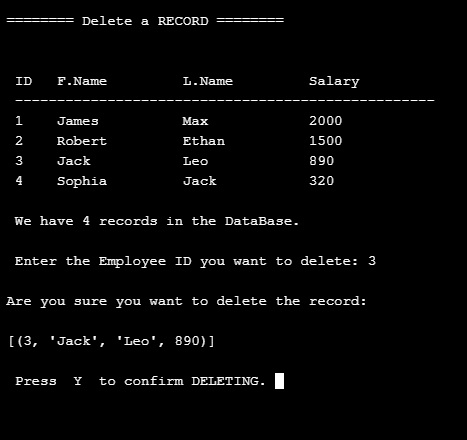
|
In the above example we select ID number 3 to be deleted and press enter, the system will show the record and ask to confirm the deletion and wait for ‘Y’ to be pressed, then the record will be deleted.
..Here is the code..

|
In this post we cover the INSERT AND DELETE of the records from the database, in the next post we will cover the SEARCH AND EDIT Functions also some search conditions like salary range and group-by command.
To Download my Python code (.py) files Click-Here
By: Ali Radwani
Python: My Fake Data Generator P-7
Learning : Python: Functions, Procedures and documentation
Subject: About fake data P-7: (Fake File Name)
In this post we will write a function to generate a file name. Each file name consist of two part, first one is the name which present (or should present) a meaning part, then there is a dot (.) then mostly three characters showing the file type or extension.
Scope of work: Our files names will have 4 syllables all to gather will be one file name. Each syllables will be loaded in a variable as shown ..
1. fext: for Files extensions such as: (doc, jpeg, pdf, bmp …. and so on)
2. name_p1: Is a noun such as (customers, visitors, players .. . and so on )
3. name_p2: will be an nouns, adjective or characteristics such as (name, index, table .. .. and so on)
4. Then we will add a random integer number between (1,30) to give the file a version, or a number.
All parts or syllables will be as one file name.
Let’s Work: First we need to load the File name syllables from the json file called : file_dict.json
 # Loading the json from a url

import json , requests, random

fname = "https://raw.githubusercontent.com/Ali-QT/Ideas-and-Plan/master/file_dict.json"

def call_json_url(fname):
    """
    Function to load the json file from URL.
    Argument: str :fname

    Return : dict: data
    """
    req = requests.get(fname)
    cont = req.content
    data = json.loads(cont)
    return data

fdict = call_json_url(fname)

# Save each syllables into variable.
f_ext = fdict["fext"]
f_p1_name = fdict["name_p1"]
f_p2_name = fdict["name_p2"]
Now we will write the function that will generate the file name:
 # Function to generate the file name

def generate_fname():
    """
    Function to generate a Fake files name.

    File Name consist of four syllables, Two names, a random number and an extension.
    First two syllables of the file name will be selected randomly from a dictuenary stored in a json       file.

    Return : str : f_file_name

    To read the information key in the json file use this code.
    ------ CODE TO READ DATA-SET INFORMATION --------------
     	for each in fdict["information"]:
          print(each,":",fdict["information"])

    ---END OF CODE ------------------------------------------
    """
    fp1 = (random.choice (f_p1_name)["n_p1"])
    fp2 = (random.choice (f_p2_name)["n_p2"])
    fp3 = (random.choice (f_ext)["ext"])

    f_file_name = (fp1 + "_" + fp2 + "_" + str(random.randint(1,30)) + "." + fp3)

    return f_file_name

|
Last thing we just will call the function for X numbers of files Name we want.
 # Generate 15 file Name.

for x in range (15):
    generate_fname()

[Output]:


kids_name_15.ico
speakers_list_1.asp
cars_photos_27.csv
students_database_26.xml
kids_details_27.html
animals_index_10.mov
speakers_parameters_17.csv
drivers_name_8.doc
males_attributes_16.mov
players_sketches_11.py
animals_sketches_3.wav
cars_details_12.css
animals_list_17.txt
flowers_parameters_4.doc
players_database_28.log
:: Fake Function List ::
| Function Name | Description |
| Color | To return a random color code in RGB or Hex. |
| Date | To return a random date. |
| Mobile | To return a mobile number. |
| Country | To return a random country name. |
| City | To return a random City name. |
| ID | To return X random dig as ID. |
| Time | To return random time. |
| Car’s Brand | |
| file_name | file name: list for fake file names. |
| Creatures | Random animal names of a certain type: Mammals, Birds, Insect, Reptiles |
| Foods | To return a random list of foods |
By: Ali Radwani
Python: My Fake Data Generator P-4
Learning : Python: Functions, Procedures and documentation
Subject: About fake data P-4: (Fake Dates)
The fourth function of our Fake Data Generator will be the date function, from it’s name this one will generate a FAKE Date in yyyy/mm/dd format. The function will have one argument (go_back) for range, the max-limit is current date (today) and mini-limit will be (1/1/1900), if the user did’t pass any thing for (go_back) then the range is (from current to 1/1/1900) and if the user pass (X) then the range will be ((current date) to current – X_YEARS). Also in dates we need to take care of Leap Years, In leap year, the month of February has 29 days instead of 28. To solve this in our function we can use two ways, first one (the easy way) we know that we are generating a random numbers for months and days; so we can say if the month is February, then days can’t be more than 28. But if we want this thing to be more realistic we need to add more conditions such as :
1. The year can be evenly divided by 4.
2. If the year can be evenly divided by 100, it is NOT a leap year, unless the year is also evenly divisible by 400. Then it is a leap year (February has 29 days).
'''
10/12/2019
By: Ali Radwani
To get Fake Date.

'''

import random, datetime

def fdate(go_back = 0):
    """
        ###   Fake Date Generator V.01  ###
        Date: 10.12.2019, By: Ali Radwani

        This function will generate and return a fake date in string format.
        The function accept one int argument go_pback.
        If go_past = X, and current year - X is less than 1900 then
        the range of FAKE time will be (current year to current year - X).

        If NO argument passed to the function, then default limit set to 1900.

        Default limits:  Date are from current (today) and back to 1900.

        Import: random, datetime

        Argument: int : go_back to set the upper limit of the date

        Return: str: dd/mm/yyyy

    """

    # Get current year.
    c_year = datetime.datetime.today().year

    # set the maximum year limit.
    if go_back > 0 :
        max_y_limit = c_year - go_back
    else :
        max_y_limit = 1900

    if max_y_limit < 1900 :
        max_y_limit = 1900

    yy = random.randint(max_y_limit, c_year)

    mm = random.randint(1,12)

    if mm in [1,3,5,7,8,10,12] :
        dd = random.randint(1,31)
    elif mm in [4,6,9,11]:
        dd = random.randint(4,30)

    else :
        # IF the month is February (2)
        if (yy % 4 == 0 ) or ((yy % 100 == 0)and (yy % 400 == 0)):
            # It is a leap year February has 29 days.
            dd = random.randint(1,29)

        else : # it is NOT a leap year February has 28 days.
            dd = random.randint(1,28)

    d = (str(dd) +'/'+ str(mm)+'/' + str(yy))

    return (str(dd) +'/'+ str(mm)+'/' + str(yy))


# To check the output.
for x in range (30):
    print(fdate())
<
Here is a screenshot of the code, also available on the Download Page . . .

|
:: Fake Function List ::
| Function Name | Description |
| Color | To return a random color code in RGB or Hex. |
| Date | To return a random date. |
| Mobile | To return a mobile number. |
| Country | To return a random country name. |
| City | To return a random City name. |
| ID | To return X random dig as ID. |
| Time | To return random time. |
| Car’s Brand | |
| file_name | |
| Done |
By: Ali Radwani
Python: My Fake Data Generator P-3
Learning : Python: Functions, Procedures and documentation
Subject: About fake data P-3: (Fake Time)
The third function of our Fake Data Generator will be the Time function, Fake Time is very easy to implement, all we need is call random function two times, one for minutes (0,60) and another for hours (0,12 or 0,23) based on the argument s (style).
Let’s start: First we need to Import random, the function def ftime() will take one integer argument (s) represent the time style.
If the s = 12 then the time format will be regular start from 1 and end at 12, the number will be generated randomly using random.randint, also we will select random.choice([‘ AM’,’ PM’]) to be added to the time and return it back.
If the s = 24 or nothing been passed then the time format will start from 0 to 23 (Military Time Format). Another random integer (0,60) to be generated as minutes.
'''
  Fake Data Generator
  Function for:  Fake Time
  Ali Radwani
  11/12/2019
'''

import random

def ftime(s = 24):

    """
        ###   Fake Time Generator   ###
        Date: 11.12.2019, By: Ali Radwani

        This function will generate a fake time, the
        function accept one int argument s.

        If s = 12 function return Regular time format,
        If s = 24 function return military time format
        (the 24 format system).

        If No argument passes then default time system
        format will be 24 system (military time)

        Argument: int : s, if No argument then default is 24.

        Return: str : ftimes
    """

    m = str(random.randint(0,60))
    if (len(m)) == 1 :
            m = '0' + str (m)

    if s == 12 :
        h = str(random.randint(1,12))
        if (len(h)) == 1:
            h = '0' + h
    else :
        h = str(random.randint(0,23))
        if (len(h)) == 1:
            h = '0' + h

    ftimes = str(h) + ':' + str(m)
    if s == 12 :
        ftimes = ftimes + random.choice([' AM',' PM'])

    return ftimes

# Testing the function.
for x in range (10):
    print (ftime(12))
:: Fake Function List ::
| Function Name | Description |
| Color | To return a random color code in RGB or Hex. |
| Date | To return a random date. |
| Mobile | To return a mobile number. |
| Country | To return a random country name. |
| City | To return a random City name. |
| ID | To return X random dig as ID. |
| Time | To return random time. |
| Car’s Brand | |
| Foods | |
| Done |
By: Ali Radwani
Python: My Fake Data Generator P-2
Learning : Python: Functions, Procedures and documentation
Subject: About fake data P-2: (Fake ID)
Before we start i’d like to mention that with our last fcolor() function we write some comments in the first part of the function between three double quote(“””), and if we load the function and call help() as help(fcolor()) we will get that information on the python console as a help as in screen shot.

|
In this post we will write a function to generate a fake ID number, for ID’s there could be several styles, sometime we just want a random number without any meaning; just X number of random digits. Most of the time we need this number to be mean-full based on certain rules. For example, in Banks they may use some digits that indicate the branch. In sport club, they may include the date … and so-on.
Here we will write a function called key_generator(), the function will take two arguments (dig, s) dig is your key digits number, s is the style, if s = d then the first 6 digits of the key will be the date as ddmmyy + random digits, and if s = anything else or s not passed then the key will be as default (just x-digits). Let’s see the code.
First the summary or say information about the function:
def key_generator(dig, s = 'n'):
    """
       ### Date: 8/12/2019, By: Ali Radwani ###
       Summary:
            This function will generate x-digit key randomly.
            If the argument s = 'd' or 'D' then the key is two part, first (6) digits
            are date as ddmmyy then x-digit random numbers.

            If the argument s anything else than ['d','D'] or no argument passes, then the key
            is random numbers without any meaning.

            The numbers will randomly be selected in range of (10 to 99).

            import: random, datetime

            Argument: int: dig: The number of digits for the key.
                 str: s  : The key style (with date or just random numbers)

            return: int: the_key
    """
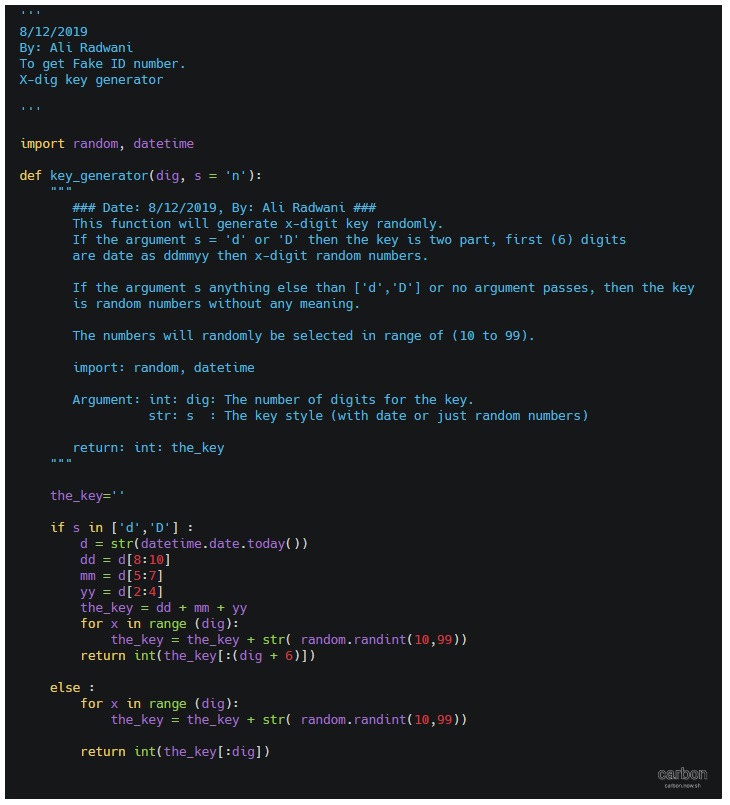
Now, if the user pass s=’d’ then part of the key will be the current date, to do this we will call the datetime function in python and split it into dd,mm,yy. Here is the key_generator() function.
def key_generator(dig, s = 'n'):
    """
       ### Date: 8/12/2019, By: Ali Radwani ###
       Summary:
            This function will generate x-digit key randomly.
            If the argument s = 'd' or 'D' then the key is two part, first (6) digits
            are date as ddmmyy then x-digit random numbers.

            If the argument s anything else than ['d','D'] or no argument passes, then the key
            is random numbers without any meaning.

            The numbers will randomly be selected in range of (10 to 99).

            import: random, datetime

            Argument: int: dig: The number of digits for the key.
                 str: s  : The key style (with date or just random numbers)

            return: int: the_key
    """
    the_key=''
    if s in ['d','D'] :
        d = str(datetime.date.today())
        dd = d[8:10]
        mm = d[5:7]
        yy = d[2:4]
        the_key = dd + mm + yy
        for x in range (dig):
            the_key = the_key + str( random.randint(10,99))
        return int(the_key[:(dig + 6)])

    else :
        for x in range (dig):
            the_key = the_key + str( random.randint(10,99))

        return int(the_key[:dig])
|
In next Fake Data function we will try to write one to generate the date. It will be published on next Sunday.
:: Fake Function List ::
| Function Name | Description |
| Color | To return a random color code in RGB or Hex. |
| Date | To return a random date. |
| Mobile | To return a mobile number. |
| Country | To return a random country name. |
| City | To return a random City name. |
| ID | To return X random dig as ID. |
| Time | To return random time. |
| Done |
By: Ali Radwani
Taking pictures is not my main daily practices, but when i start playing with my camera, i really enjoy my self.
Thanks for visiting my Space..


