Archive
Python: Testing the SQL joines Commands
Learning : SQL Commands, DataBase, Python
Subject: Testing the SQL Join Commands
Introduction In this post we will apply several SQL Join Commands to test them, here are them:
| Left Join: All the Data in the Category |  |
| Right Join: All the Data in the Products |  |
| Inner Join: All the Data that in Both Tables. |  |
| Left Join Only Data in Category Table and NOT in Product Table. |  |
| Right Join:Only data in Product Table and NOT in Category Table. |  |
| Full Outre:All the Records in both Tables |  |
| Full Outre:All the data from the Category Table that are NOT linked to any Product, AND all the data in Product Table that has NO Category. |  |
First: let’s talk about the Tables,we will create two Tables (Category and Products) each will be very simple, the Category will have two fields [c_id, and cat_name],
the Products will have [p_id, pro_name, cat_id]. (cat_id is the foreign key that connicting the two tables). Some test data will be inserted in both Tables so we can demonstrate the SQL Commands. I create a Dictionary storing information/summary about the project named about_the_project the user can read it in run time.
Coding: We will do the fowlloing:
1. Set a Database for the Project.
2. Writing the codes to Create the Tables.
3. Writing the codes to insert some test Data in the Tables.
4. Creating a Menu for the Project.
5. Writing the Functions to Apply the SQL Join commmands.
NOTE: All the code will be avilable in the DOWNLOAD page.
Let’s import some lybraries, we will need this code:
import sqlite3, os
And here is the code to set the data base and create the connection.
# Create the data-base and name it as Share_S_System.
db_conn = sqlite3.connect (“sql_join_test.db”)
# set the connection.
c = db_conn.cursor()
First function is to create the Tables:
 # Function to create the Tables.

def create_tables ():

    # CREATE TABLE:
    category_t = "CREATE TABLE if not exists category_t (c_id INTEGER PRIMARY KEY AUTOINCREMENT, cat_name text)"
    c.execute(category_t)
    db_conn.commit()

    product_t = "CREATE TABLE if not exists product_t (p_id INTEGER PRIMARY KEY AUTOINCREMENT, p_name text, cat_id integer)"
    c.execute(product_t)
    db_conn.commit()
Now we will insert some Test data.
 # Function to insert some Data into the Tables

def insert_sample_data():

    #First we will call the Function to Crete the Table.
    create_tables ()
    print('\n   Category Table has been Created. ')
    print('\n   Product Table has been Created. ')

    # Insert into Category Table
    c.execute ("INSERT INTO category_t (cat_name) VALUES(:cat_name )",{"cat_name":"Mobile Phone"})
    c.execute ("INSERT INTO category_t (cat_name) VALUES(:cat_name )",{"cat_name":"Labtop"})
    c.execute ("INSERT INTO category_t (cat_name) VALUES(:cat_name )",{"cat_name":"Ext. HD"})
    c.execute ("INSERT INTO category_t (cat_name) VALUES(:cat_name )",{"cat_name":"CCTV Camera"})
    db_conn.commit()

    # Insert into Product Table.
    c.execute ("INSERT INTO product_t (p_name, cat_id) VALUES(:p_name, :cat_id )",{"p_name":"Note 9","cat_id":"1"})
    c.execute ("INSERT INTO product_t (p_name, cat_id) VALUES(:p_name, :cat_id )",{"p_name":"iPhone 12 pro","cat_id":"1"})
    c.execute ("INSERT INTO product_t (p_name, cat_id) VALUES(:p_name, :cat_id )",{"p_name":"HP","cat_id":"2"})
    c.execute ("INSERT INTO product_t (p_name, cat_id) VALUES(:p_name, :cat_id )",{"p_name":"Toshiba 1T HD","cat_id":"3"})
    c.execute ("INSERT INTO product_t (p_name, cat_id) VALUES(:p_name, :cat_id )",{"p_name":"iMac","cat_id":None})
    db_conn.commit()

    print('\n   Sample Date Inserted in both tables.\n   Select 9 from the Main Menu to see the Data')

    input('\n      ... Press any key to continue.  > ')
Now, let’s write the function for the Main Menu, it will return the user_choice.. here is the code..
 # Main Menu Function.

def main_menu():
    os.system('clear')
    print("\n==========[ Main Menu ]==========")
    print(' 1. About this Project.')
    print(' 2. All Categories. (Left Join: All in Category Only).')
    print(' 3. All Products. (Right Join: All in Product Only).')
    print(' 4. Only Categories that linked to a Products. (Inner Join: Only if in Ta AND Tb).')
    print(' 5. All Catigories that are NOT linked to a Product. (Left Join: Only in Category AND NOT in Product .')
    print(' 6. All Products that has NO Category. (Right Join: Only in Product AND NOT in Category.')
    print(' 7. All Categories and Products. (Full Outer Join in Both Table)' )
    print(' 8. All Categories that are NOT linked to any Product, and All Products that has NO Categotry. (Full Outer Join NOT in Both Table)')
    print(' 9. Show the Data')
    print(' 11. Setting: Create the Tables and Insert Some Sample Data. Run Only One Time.')
    print(' 99. Exit.')

    user_choice = input("\n Select from the Menu: > ")
    return user_choice
 |
The coming part of the code is calling the functions and running the SQL commands based on the user choice. Here is the Main-code-body..
 # The Main section of the Application..

while True :
    user_select = main_menu()

    if user_select == '1' :
        show_data('cat')

    if user_select == '2' :
        show_data('prod')

    if user_select == '3' :
        os.system('clear')
        print('\n   First: All the Data in Category and Product ')
        show_data('both','inside')
        print("\n==========[ Show Date: INNER JOIN ]==========\n")
        print('   Inner Join: Only the Data that exist in Category AND Product).')
        print('\n   The SQL Statment:\n    select category_t.c_id, product_t.p_name from category_t inner join product_t on category_t.c_id == product_t.cat_id\n\n ')
        c.execute ("select category_t.c_id, category_t.cat_name, product_t.p_name from category_t inner join product_t on category_t.c_id == product_t.cat_id  ")
        innerJ_list = c.fetchall()

        print('   [OUTPUT]:\n       Categories Name      |',' '*2,'Products Name    ')
        for innerJ_data in (innerJ_list):
            print('       ',innerJ_data[1],'.'*(25 - len(str(innerJ_data[1]))),innerJ_data[2])

        print('\n   We can see that the INNER JOIN Command fetched the records of Products that has a Category.\n   iMac Not listed Because it has No Category Data.')
        input('\n\n      ...Press any key to continue.  > ')

   if user_select == '4' :
        os.system('clear')
        print('\n   List of All the Data in Category and Product ')
        show_data('both','inside')
        print("\n==========[ Show Date: LEFT JOIN, Only Data in Categoty Table ]==========\n")
        print('   The SQL Statment:\n     select category_t.c_id, category_t.cat_name, product_t.p_name from category_t\n     left join product_t on category_t.c_id == product_t.cat_id\n     where product_t.cat_id is null\n')
        c.execute ("select category_t.c_id, category_t.cat_name, product_t.p_name from category_t left join product_t on category_t.c_id == product_t.cat_id where product_t.cat_id is null")
        leftJ_list = c.fetchall()
        print('   [OUTPUT]:\n       Categories Name      |',' '*2,'Products Name    ')
        for leftJ_data in (leftJ_list):
            print('         ',leftJ_data[1],'.'*(25 - len(str(leftJ_data[1]))),leftJ_data[2])

        print('\n   We can see that the LEFT JOIN Command fetched all Categories that are not used/linked to/with any Product.\n   CCTV Camera is Not linked. So We can Say: We Do Not have any CCTV Camera Products.')
        input('\n\n      ...Press any key to continue.  > ')

    if user_select == '5' :
    ....
# Just to save the time, i will not post all the code here, you can see all the code and download
# the .py source code from the download page.
Here are some screen shot of the output ..
| The Main Menu
|
| Output Screen for Option 3: Only Categories that linked to a Products. (Inner Join: Only if Data in Category AND Product) 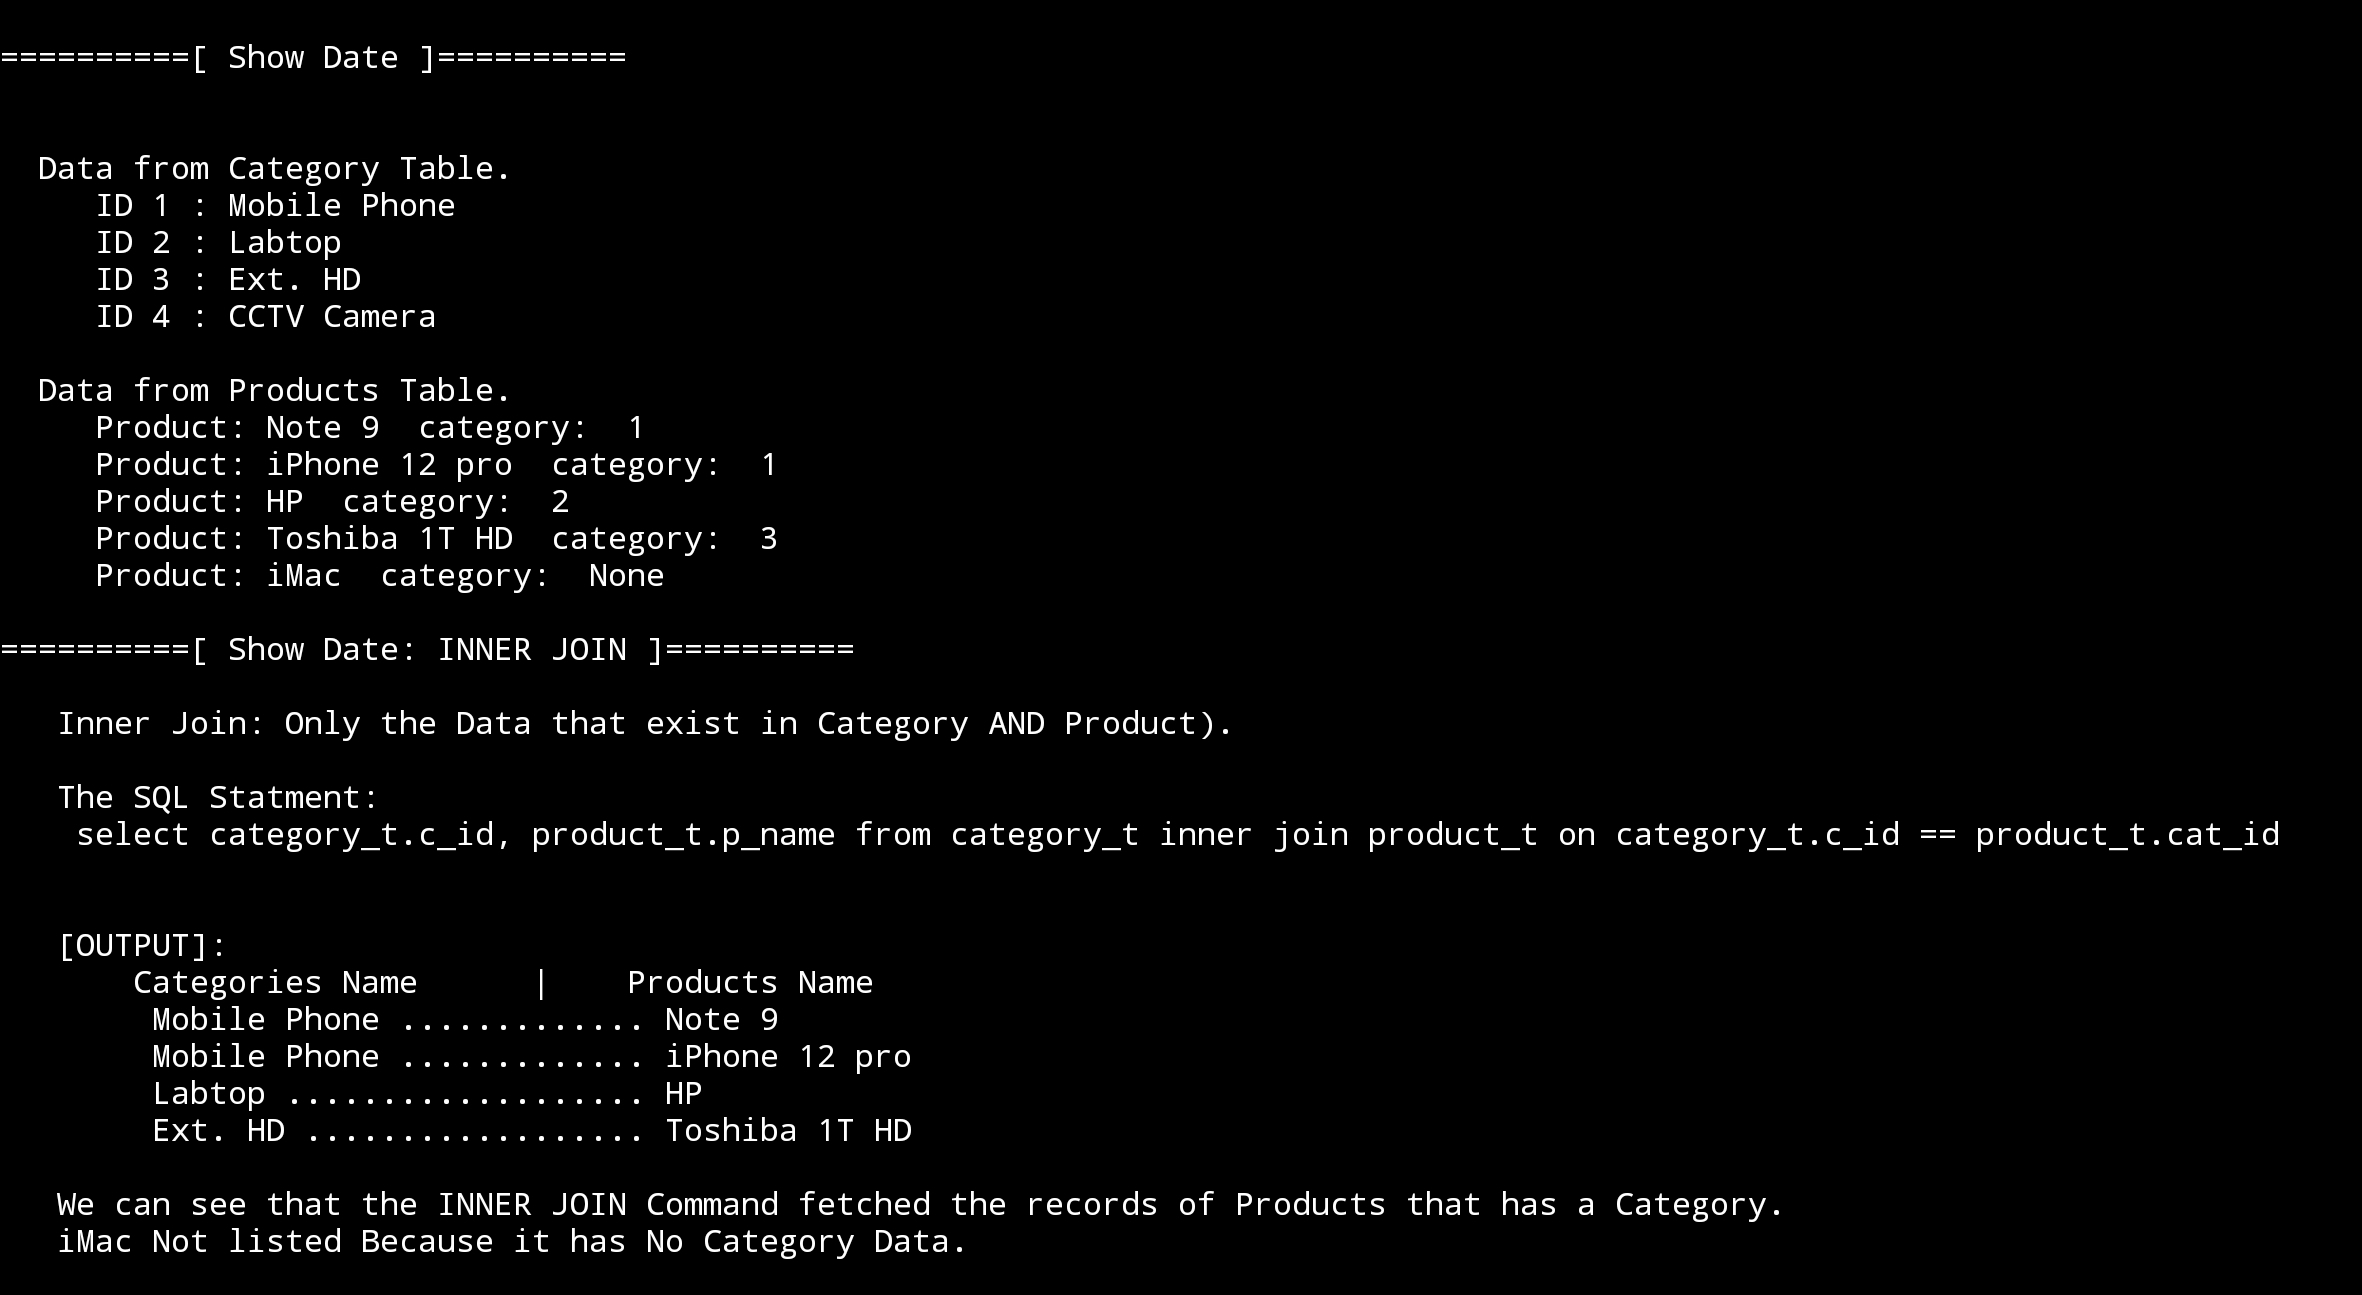 |

End of the Post, and all the code is available to download from the Download page.
To Download my Python code (.py) files Click-Here
By: Ali Radwani
Python Project: Disarium Number
Learning : Python to solve Mathematics Problems
Subject: Disarium Number
In Mathematics there are some formulas or let say rules that generate a sequence of given a certen result, and accordingly we gave that number or that sequence a name, such as even numbers, odd numbers, prime numbers and so on.
Here in this post we will talk about the Disarium Number and will write a code to check if a given number Disarium or Not.
Defenition: A Number is a Disarium if the Sum of its digits powered with their respective position is equal to the original number. Example: If we have 25 as a Number we will say: if (2^1 + 5^2) = 25 then 25 is Disarium.
So: 2^1 = 2, 5^2 = 25, 2+25 = 27; 25 NOT Equal to 27 then 25 is NOT Disarium.
Let’s take n = 175:
1^1 = 1
7^2 = 49
5^3 = 125
(1 + 49 + 125) = 175 thats EQUAL to n so 175 is a Disarium Number.
In the bellow code, we will write a function to take a number from the user the check if it is a Disarium Number or not. In this function we will print out the calculation on the screen. Let’s start by writing the function
# is_disarium function.
def is_disarium(num) :
    """
    Project Name: Disarium Number
    By: Ali Radwani
    Date: 2.4.2021
    """

    the_sum = []
    l = len(num)
    for x in range (0,l):
        print(num[x] , '^',x+1,'=', (int(num[x])**(x+1)))
        the_sum.append((int(num[x])**(x+1)))

    if int(num) == sum(the_sum) :
        print ("\n   The sum is {}, and the original Number is {} So {} is a Disarium Number.".format(sum(the_sum),num,num))
    else:
        print ('\n   The sum is {}, and the original Number is {} So it is NOT Disarium.'.format(sum(the_sum),num))


num = input('\n   Enter a Number to check if it is Disarium. > ')

# Call the function and pass the num.
is_disarium(num)
 |
To Download my Python code (.py) files Click-Here
 Follow me on Twitter..
By: Ali Radwani
Rhino Sketch
Using a pencil then black pen and a photo from the Net as a reference and after almost 25min I finished this Rhino.
Follow me on Twitter @h_ta3kees

Python Project: Drawing Cloud Number
Learning : Python, Drawing
Subject: Using Python to Draw Cloud Number
In this project we will write a code to draw a cloud of number, we will do this as layers each layer with different font size and different color density.
To do this we will write a function def draw_cloud(tcolor,max_r,sr,lr) : to fill the screen with max_r random numbers from sr to lr (small range, large ramge) using tcolor color. We will recall the function several time each time we will change the tcolor,max_r,sr,lr. Here is the code ..
The Code |
|
Example with Gray theme |
|
Another Example with Pink theme. |

By: Ali Radwani
Python: My Orders Tracker P-4
Learning : Pythn, sqlite, Database, SQL
Subject: Create a system to track the orders
In this last part we will write the code to Edit an Order, in editing an order function first we will show all orders and will ask the user to select the one to be EDIT, then we will display that order detail on the screen and ask the user to confirm the action by entering ‘Y’ [our code will handel both y and Y]. We will ask the user about each attribute in the Order details if it need to be change or [Just press Enter to Keep the Current Data], also if the user enter ‘e’ or ‘E’ we will exit from the Editing mode.
Here is the code ..
# Function to Edit an Order

def edit_order():
    os.system('clear')
    print("\n==========[ Edit Orders ]==========")

    show_order('yes')

    edit_order = input('   Select the Order ID to be Edited. [E to Exit] > ')

    if edit_order in ['e','E'] :
        return
    elif not edit_order.isnumeric() :
        input('\n   You need to enter an Order''s ID [Numeric]. .. Press any Key .. ')
        return

    try:

        c.execute ("select * from orders where o_id ={}".format(edit_order))
        order_list = c.fetchone()

        if order_list == [] :
            input('\n   ID {} Not Exsist. .. Press any key to continue.  '.format(edit_order))
            return

        os.system('clear')
        print("\n==========[ Edit Orders ]==========\n")
        print('\n   Details of the Order you select:\n ')

        print(" "*15,"ID: ",order_list[0])
        print(" "*13,"Date: ",order_list[1])
        print(" "*5,"Order Number: ",order_list[2])
        print(" "*12,"Price: ",order_list[4])
        print(" "*9,"Quantity: ",order_list[5])
        print(" "*3,"Shipment Price: ",order_list[6])
        print(" "*7,"Total Cost:  {:.2f}".format((order_list[4]*order_list[5]) + order_list[6]))
        print(" "*6,"Description: ",order_list[3])
        print(" "*12,"Image:",order_list[8])
        print(" "*13,"Link:",order_list[7])

        user_confirm = input("\n\n   You Select to EDIT the above Order, Enter Y to confirm, E to Exit. > ")
        if user_confirm in ['e','E'] :
            input('\n   You entered ''E'' to Exit. Nothing  will be change. Press any key. ')
            return

        if user_confirm in ['y','Y'] :
            #To Edit the order..

            print("#"*57)
            print("##"," "*51,"##")
            print("##   NOTE: Enter E any time to EXIT/Quit."," "*12,"##")
            print("##     OR  JUST Press Enter to keep the Current data."," ##")
            print("##"," "*51,"##")
            print("#"*57,)

            while True :

                new_date = input (f'\n   The current date is: {order_list[1]}, Enter the New date as[dd-mm-yyyy] > ')

                if e_to_exit(new_date) =='e' : return
                if new_date =="" : break   # Break the while loop if the user want to keep the current Date.

                if date_validation (new_date) == 'valid' :
                    break
                else :
                    print(date_validation (new_date))


            new_onum = input (f'\n   The current Order Number is: {order_list[2]}, Enter the New Order Number. [E to Exit]. > ')
            if e_to_exit(new_onum) =='e' : return

            new_qunt = input (f'\n   The current Quantity is: {order_list[5]}, Enter the New Quantity. [E to Exit]. > ')
            if e_to_exit(new_qunt) =='e' : return

            new_price = input (f'\n   The current Price is: {order_list[4]}, Enter the New Price. [E to Exit]. > ')
            if e_to_exit(new_price) =='e' : return

            new_ship_price = input (f'\n   The current shipment Price is: {order_list[6]}, Enter the New Quantity. [E to Exit]. > ')
            if e_to_exit(new_ship_price) =='e' : return

            new_link = input (f'\n   The current link is: {order_list[7]}, Enter the New Link. [E to Exit]. > ')
            if e_to_exit(new_link) =='e' : return

            new_image = input (f'\n   The current Image is: {order_list[8]}, Enter the New Image (path). [E to Exit]. > ')
            if e_to_exit(new_image) =='e' : return


            new_desc = input (f'\n   The current Description is:\n     {order_list[3]}.\n\n      Enter the New Description. [E to Exit]. > ')
            if e_to_exit(new_image) =='e' : return


            # Updating the record in the DataBase.
            if new_date > '' and new_date != "e" :
                c.execute("update orders set order_date = '{}' where o_id = {}".format(new_date,int(order_list[0])))
                db_conn.commit()

            if new_onum > '' and new_onum != "e" :
                c.execute("update orders set order_num = '{}' where o_id = {}".format(new_onum,int(order_list[0])))
                db_conn.commit()

            if new_qunt > '' and new_qunt != "e" :
                c.execute("update orders set order_quantity = '{}' where o_id = {}".format(new_qunt,int(order_list[0])))
                db_conn.commit()

            if new_price > '' and new_price != "e" :
                c.execute("update orders set order_price = '{}' where o_id = {}".format(new_price,int(order_list[0])))
                db_conn.commit()

            if new_ship_price > '' and new_ship_price != "e" :
                c.execute("update orders set order_price = '{}' where o_id = {}".format(new_ship_price,int(order_list[0])))
                db_conn.commit()

            if new_link > '' and new_link != "e" :
                c.execute("update orders set order_link = '{}' where o_id = {}".format(new_link,int(order_list[0])))
                db_conn.commit()

            if new_image > '' and new_image != "e" :
                c.execute("update orders set order_img = '{}' where o_id = {}".format(new_image,int(order_list[0])))
                db_conn.commit()

            if new_desc > '' and new_image != "e" :
                new_desc = " ".join([word.capitalize() for word in new_desc.split(" ")])

                c.execute("update orders set order_desc = '{}' where o_id = {}".format(new_desc,int(order_list[0])))
                db_conn.commit()

            input('\n   One record has been EDITED and Saved... \n      ... Press any key to Continue ...')

        else:
            input('\n      Wrong input ... Press any key to continue ..')

    except:
        pass
[All the System Codes available in Download Page.]
Finish: Now we have an application that will store and retrieve our simple order data.
Enhancement: We can do some enhancement in [link and image] data part to show and display them in better way.
| Part 1 | Part 2 | Part 3 | Part 4 |
To Download my Python code (.py) files Click-Here
By: Ali Radwani
Another sketch challenge: The House
This week sketch challenge @1hour1sketch is to Draw a Red House, so here is my sketch using pencil, black Pen and watercolour. More Sketches on my Sketch page .. also follow me on Twitter @h_ta3kees

Python: My Orders Tracker P-3
Learning : Pythn, sqlite, Database, SQL
Subject: Create a system to track the orders
In this part we will write the code to Delete an Order that we have from our system, also we will add some validations on the user input, like if the user enter something not from the menu, or to do so, first we will re-call the show_orders() function that we have and passing the ‘yes’ parameter which means we are calling the function from inside another function [we will not print the function header, and will not clear the screen]. Then we will ask the user to select/Enter the ID of the order to be Deleted, after that we will print tha order details again on the screen and ask the user to confirm Deleting command by entering ‘Y’ … thats it.. let’s write the code..
# Delete Order

def del_order():
    os.system('clear')
    print("\n==========[ Delete Orders ]==========\n")

    show_order('yes')

    del_order = input('   Select the Order ID to be Deleted. [E to Exit] > ')

    if not del_order.isnumeric() :
        input('\n   You need to enter an Orders ID [Numeric]. .. Press any Key .. ')
        return

    elif del_order in ['e','E'] :
        return

    try:
        c.execute ("select * from orders where o_id ={}".format(del_order))
        order_list = c.fetchone()

        if order_list == [] :
            input('\n   ID {} not exsist.'.format(del_order))
            return

        os.system('clear')
        print("\n==========[ Delete Orders ]==========\n")
        print('\n   Details of the Order you select:\n ')

        print("   ID: ",order_list[0])
        print("   Date: ",order_list[1])
        print("   Order Number: ",order_list[2])
        print("   Price: ",order_list[4])
        print("   Quantity: ",order_list[5])
        print("   Shipment Price: ",order_list[6])
        print("   Total Cost: {:.2f}".format((order_list[4]*order_list[5]) + order_list[6]))
        print("\n   Description:",order_list[3])
        print("   Image:",order_list[8])
        print("   Link:",order_list[7])

        user_confirm = input("\n\n   You Select to DELETE the above Order, Enter Y to confirm, E to Exit. > ")
        if user_confirm in ['y','Y'] :
            #To Delete the order..
            c.execute ("delete from orders where o_id ={}".format(int(del_order)))
            db_conn.commit()

            input('\n   One record has been DELETED ... \n      ... Press any key to Continue ...')

        elif user_confirm in ['n','N']:
            input("\n    You select not to DELETE any thing.   Press any key to Continue .. ")

        elif user_confirm in ['e','E']:
            input("\n    You select stop the process and EXIT.    ... Press any key to Continue .. ")
            return

        else:
            input('\n      Wrong input ... Press any key to continue ..')

    except:
        pass
The user select #3 from the menu to Delete an Order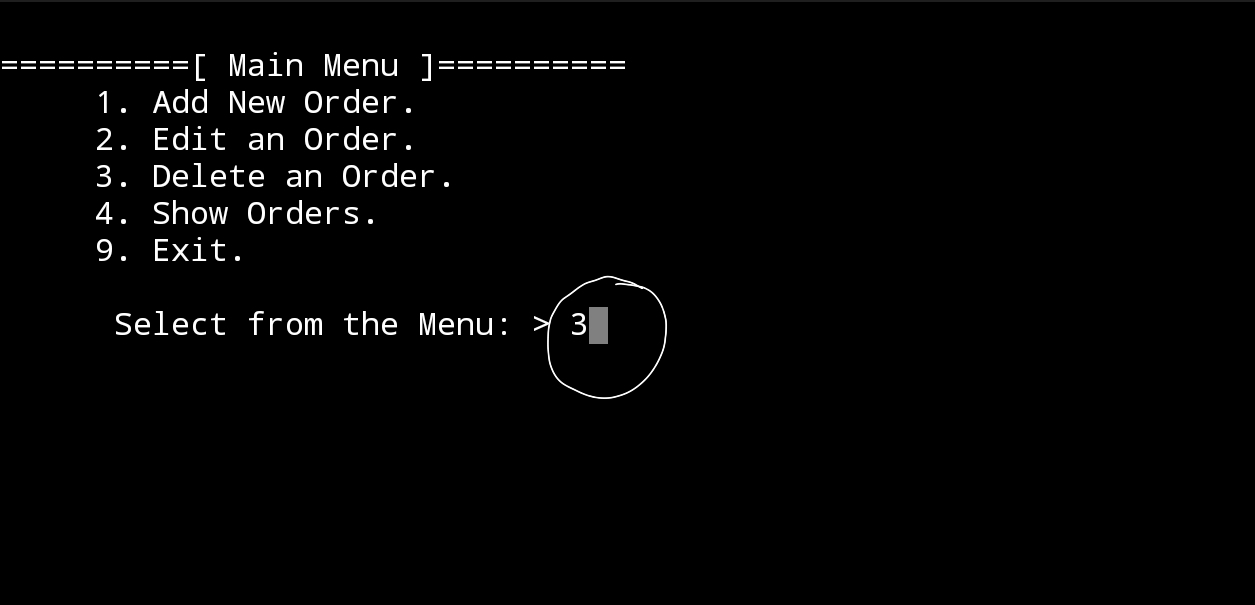 |
The screen display the list of orders we have in the system, and the user select Order ID Number 3 to delete it. |
The screen display the details of the order ID 3 and ask the user to confirm the deleting by entering ‘Y’ |
In Next Post: In the coming post P4 , we will write the codes to Edit an order information.
| Part 1 | Part 2 | Part 3 | Part 4 |
To Download my Python code (.py) files Click-Here
By: Ali Radwani
Python: Data Visualization Part-2
Learning : python, pygal, Data Visualization,Line Chart
Subject: Data visualization using pygal library
In this post we will talk about Line-chart using pygal library in python, Line-chart has three sub-type as: Basic, Stacked ,Time. We will use the data-set for Average age of Males and Females at first Marage during 6 yeaars (2000 and 2006), the code line to set the data data will be as :
line_chart.add(‘Females’,[22,25,18,35,33,18])
line_chart.add(‘Males’, [30,20,23,31,39,44])
Line-chart: Basic
This is very normal and basic chart we use in all reports, we are feeding the data for Males and Females average age in first marage.. here is the code and the output ..
import pygal

line_chart = pygal.Line()

line_chart.add('Females',[22,25,18,35,33,18])
line_chart.add('Males', [30,20,23,31,39,44])

line_chart.x_labels=map(str,range(2000,2006))

line_chart.title = "Males and Females first Marage Age (average)"

line_chart.render()
 |
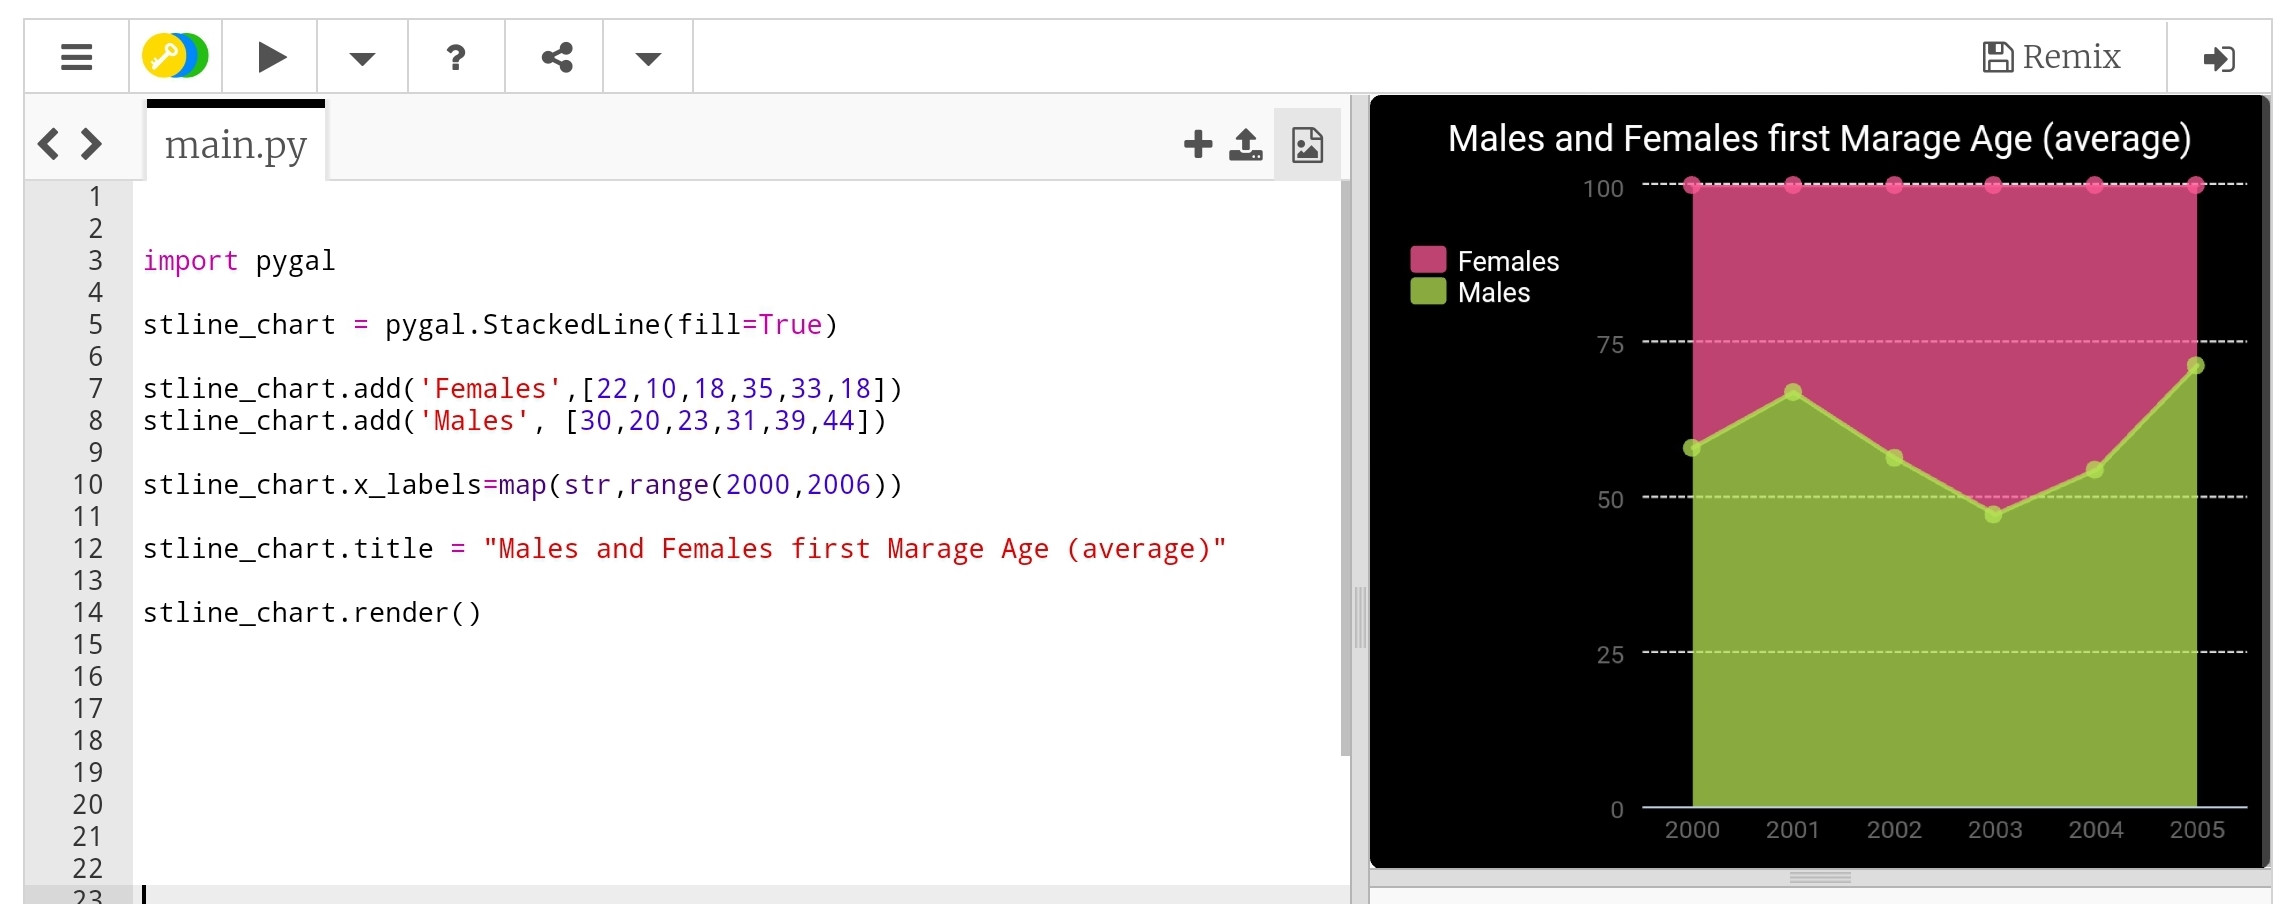
Line-chart: Stacked Line Stacked chart (fill) will put all the data in top of each other. Here is the code.
 |
Line-chart: Time Line Last type just to add or format the x_lables of the chart, we can use lambda function to do this (we can use lambda function with any other chart types), here we will do two example, one is using full time/date and another just write the month-year as string and will use the lambda function to calculate second data-set of Tax’s based on the salary amount..
import pygal
from datetime import datetime, timedelta

d_chart = pygal.Line()

d_chart.add('Females',[22,25,18,35,33,18])
d_chart.add('Males', [30,20,23,31,39,44])

d_chart.x_labels = map(lambda d: d.strftime('%Y-%m-%d'), [
 datetime(2000, 1, 2),
 datetime(2001, 1, 12),
 datetime(2002, 3, 2),
 datetime(2003, 7, 25),
 datetime(2004, 1, 11),
 datetime(2005, 9, 5)])

d_chart.title = "Males and Females first Marage Age (average)"

d_chart.render()
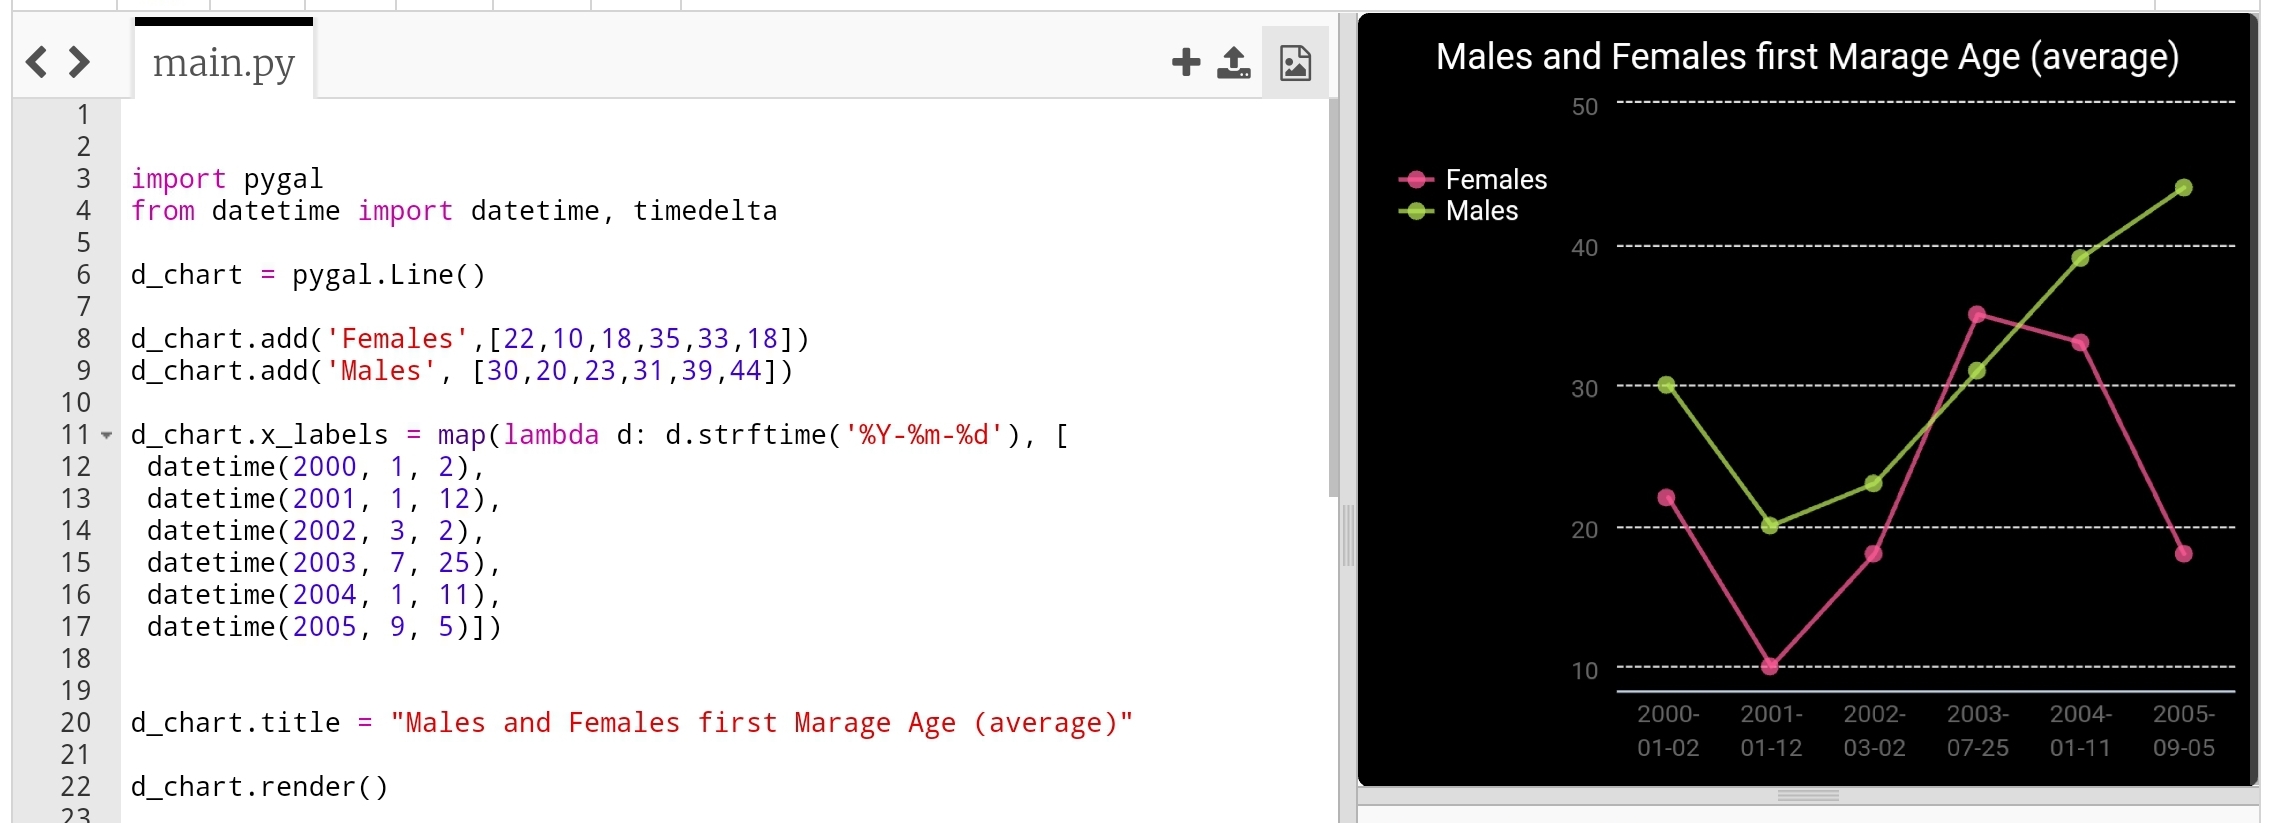 |
To give better example of using lambda function, we will say: we have a salaries for 6 years (May-2000 to May-2006) and a Tax of 0.25, we will let the lambda function to calculate the Tax amount for each salary. Here is the code ..
 # Using lambda to calculate Tax amount

import pygal

d_chart = pygal.Line()

d_chart.add('Salary', [550,980,1200,1800,2200,3500])

d_chart.add('Tax',map(lambda t: t*0.25, [550,980,1200,1800,2200,3500]))
d_chart.x_labels = map(str,(
  'May-2001','May-2002',
  'May-2003','May-2004',
  'May-2005','May-2006'))

d_chart.title = "Salary and Tax (0.25) payment in 6 years"

d_chart.render()
 |
Next we will talk about Histogram chart.
:: Data Visualization using pygal ::
| Part-1Bar-Chart | Part-2 Line Chart | Part-3 | Part-4 |
By: Ali Radwani
Python: Data Visualization Part-1
Learning : python, pygal, Data Visualization, Bar Chart
Subject: Data visualization using pygal library
pygal is a Data Visualization library in python to help us showing our Data as a graph. In coming several posts we will discover and learn how to use the pygal library in simple and easy configuration and style.
First we need to install pygal packeg, to do so write this:
pip install pygal
Now we need some Data to show, in this leson I am using aGalaxy Tab S4, so all the codes will be tested and applyed on trinket.io website [trinket.io alow us to use pygal package online so we don’t need to install it on our divice]
Type of Chart:
pygal has several types of charts that we can use, here we will list them all then in coming posts will use each one with simple data. So what we have:
Line, Bar, Histogram, XY, Pie, Radar, Box, Dot, Funnel, SolidGauge, Gauge, Pyramid, Treemap, Maps
Some of those charts has a sub-types such as in Bar char we have: Basic, Stacked and Horizontal. Also for each chart we can add a title and labels and we can use some styles.
So let’s start ..
First we will go for the Bar chart, and we have three sub-types as Basic, Stacked and Horizontal.
First chart: Bar chart:
In this part we will demonstrate the Bar Chart, it has three sub-types as Basic, Stacked and Horizontal.
We assume that our data is the Males and Female ages on first marage, the data will be as dictionary (later we will see how to customize each bar)
 # Basic Bar Chart using pygal

import pygal
bar_chart = pygal.Bar() # To create a bar graph object
bar_chart.add('Females', [22,25,18,35,33,18])
bar_chart.add('Males', [30,20,23,31,39,44])

bar_chart.title = "Males and Females First Marage Age"
bar_chart.x_labels=(range(1,6))

bar_chart.render()
Sample code for Basic bar chart |
Another sub-type in Bar chart is Horizontal-Bar, it is semelar to the Basic but as if fliped 90 degree. Here is the code ..
 # Horizontal Bar Chart using pygal

import pygal

# HorizontalBar()
HBar = pygal.HorizontalBar()
HBar.add('Females', [22,25,18,35,33,18])
HBar.add('Males', [30,20,23,31,39,44])

HBar.title = "Males and Females First Marage Age"

HBar.x_labels=(range(1,6))

HBar.render()
Sample code for Horizontal Bar chart |
Last sub-type in Bar chart is Stacked Bar were all data of each element will be in one bar. Here is the code and example..
 # Stacked Bar Chart using pygal

import pygal
# StackedBar()
stackedbar = pygal.StackedBar()
stackedbar.add('Females', [22,25,18,35,33,18])
stackedbar.add('Males', [30,20,23,31,39,44])
stackedbar.x_labels=(range(1,0))
stackedbar.title = "Males and Females First Marage Age"

stackedbar.render()
If we say we have another data-set as “age in First-Divorces” and we want to add this set to the Stacked Bar chart, then we first will create the data-set as:
stackedbar.add(‘Divorses’, [35,22,45,33,40,38])
and we will arrange the code line to be at top,middle or bottom of the bar. Here is the code..
Sample code for stacke Bar chart with Divorce data
|
Next we will talk about Line chart.
:: Data Visualization using pygal ::
| Part-1Bar-Chart | Part-2 | Part-3 | Part-4 |
By: Ali Radwani
Python: Password Generator
Learning : Python Project
Subject: Password Generator
In this function we will use the string library to select a random X numbers of letters as a Password length and print it on the screen.
First: We create a list of letters type l_type that hold the following: lowercase, uppercase, digits, punctuation and we will use the (random.choice) to select from the list.Then we will call the ‘password Generator’ pass_generator function torandomly select a letter based on the selected type, we will do so for a X time (X is the length of the password). In this project we will print the password on the screen, in real-life we can send the password via email or SMS. Here is the Code ..
# Password Generator Function

"""

Project: Python Password Generator
By: Ali Radwani
Date: Des-2020


    This function will use the string library to select a random X numbers of letters as a Password and print it on the screen.

    We create a list of letter type l_type that hold the following lowercase, uppercase, digits, punctuation and we will
    use the (random.choice) to select from the list, then we will call the 'password Generator' pass_generator function to
    randomly select a letter, we will do so for a X time (X is the length of the password). In this project we will print
    the password on the screen, in real-life we can send the password via email or SMS.

"""

import random, string

l_type = ["lowercase","uppercase","digits","punctuation"]

the_password =[]

def pass_generator(lt) :
    if lt =="lowercase":
        the_password.append(random.choice(string.ascii_lowercase))

    elif lt =="uppercase" :
        the_password.append(random.choice(string.ascii_uppercase))

    elif lt =="digits" :
        the_password.append(random.choice(string.digits))

    elif lt =="punctuation":
        the_password.append(random.choice(string.punctuation))

    return the_password


pass_length = int(input("\n   Enter the password Length: > "))


while len(the_password) < pass_length:
    pass_generator(random.choice(l_type))


print("\n   The New Generated Password is: ","".join(the_password))
To Download my Python code (.py) files Click-Here
By: Ali Radwani
Taking pictures is not my main daily practices, but when i start playing with my camera, i really enjoy my self.
Thanks for visiting my Space..


