Archive
From 8 years back

I just was revisiting some of my sketch books and sow this one, I just feel I want to publish it.
Back to 2016, I use pincel and then black ink, Sketchbook #12.
Indoor Photography _7

Two black chairs 💺, one meter away from each other, i used a black and white setting on the Sony RX100vii camera.
Camera setting, ISO 1600, F4, 65mm Focal-Point, and 1/60s shutter.
Python: Simple Ticket System _Part2
Subject: Writing a Simple Ticket System Application
Learning : Python, SQL, Logeic
In this part we will do the following:
- Write the code for [show_list] function.
- Write the code for [check_availabilty] function.
- Write the code for Priority function in Setting.
- Add New Priority.
- Edit a Priprity.
- Delete Priority.
- Write the code for Status function.
- Add New Status.
- Edit a Status.
- Delete Status.
Helping Function
Show List Function: Once the user to Edit or Delete a record from the dataBase, we will call this function to list-down whatever in the table, then the user will select the ID number of the entity to be Edited/Deleted.
Show List Function:
def show_list(dt,d_id):
“””
Function to Display the Data we have in the Lookup Tables based on the user selection function.Return: None
“””c.execute (f”select * from {dt} where {d_id} > 1 “)
dataset = c.fetchall()for d in range (0,(len(dataset)),3):
try:
print(‘ ‘*5,'{:<3}{:<20}'.format(dataset[d][0],dataset[d][1]),end="")
print(' '*5,'{:<3}{:<20}'.format(dataset[d+1][0],dataset[d+1][1]),end="")
print(' '*5,'{:<3}{:<20}'.format(dataset[d+2][0],dataset[d+2][1]))except:
pass
print('\n')
Check Availabilty Function:def check_availabilty(dt, d_id, check_id):
“””
Function to check if the passed ID available in the data-set or not.Arguments:
dt : Data-Table
d_id : Name of id column.
check_id : The id we want to search for.Return : True if ID is available, False if not.
“””c.execute (f”select * from {dt} where {d_id} = {check_id} “)
dataset = c.fetchone()return (dataset)
Priority Function:
In coming code section we will write three functions to Add, Edit and Delete a Priority [All the code is available in the file for downloading FREE].
Add New Priority:
def add_priority ():
os.system(‘clear’)
line2 =”Add New Priority Level”
header(line2,2,4)print(‘\n\t List of Priority Levels we have in the system:\n’)
show_list(‘priority_t’,’pr_id’)
new_pri = input(‘\n Enter the New Priority Level to be Added to the List. [E to Exit]. > ‘)# Check user input
if new_pri in [‘e’,’E’] or new_pri ==’ ‘ or new_pri == ”:
input(“\n\t You select to Exit from ‘Adding New Priority Level’.. Press any key to Exit. > “)
return
else:
# Code to add New priority level to the database
# Capitalize user input
new_pri = ” “.join([word.capitalize() for word in new_pri.split(” “)])
# Insert onto database
c.execute (“INSERT INTO priority_t (pri_level) VALUES(:pri_level )”,{“pri_level”:new_pri})
db_conn.commit()input(‘\n\t One Priority level been Added to the database. Press any key to Continue. > ‘)
Edit Priority:
 Click the image to enlarge Click the image to enlarge |
In this function, first we call show_list function to list down the priorities we have in the system and ask the user to select the ID of one to be Edit. Then we check if the user want to Exit from here!, If Not then we show him his selection and give the prompt so he can insert the corrected priority, and saving the changes. |
Delete Priority:
 Click the image to enlarge Click the image to enlarge |
In this function, first we call show_list function to list down the priorities we have in the system and ask the user to select the ID of one to be Deleted. Then we check if the user want to Exit from here!, If Not then we show him his selection and give the prompt so he can insert the corrected priority, and saving the changes. |
Show Priority:
 Click the image to enlarge Click the image to enlarge |
Last function is Show Priority, her we will list all the priorities we have in the table. |
Status Functions
For Status also we have three functions to Add, Edit and Delete a Status. In Status of a task we have “Not Started, In progress, Finished” and the user can add more to the list. [All the code is available in the file for downloading FREE].
Add New Startus
 [Click image to enlarge] [Click image to enlarge] |
First, we will display all the status we have in the system, and will ask the user to enter the new one to be added, we will perform a simple validation and then will save the New status into the table and show a confirmation of that on the screen. |
Edit Startus
 [Click image to enlarge] [Click image to enlarge] |
Her the user must select an ID of the status he want to edit, then entering the new one, confirming that, and we will save the change. |
Delets Startus
 [Click image to enlarge] [Click image to enlarge] |
Her the user must select an ID of the status he want to Delete,user must confirm that, and we will Delete and Save the change. |
Show Startus
def show_status():
os.system(‘clear’)
line2 =”Show Status List”
header(line2,2,4)
c.execute (“select * from status_t where st_id > 0 “)
stat_list = c.fetchall()
print(‘\n\n\t List of Status in the System…> ‘)
for stat in range (0,(len(stat_list)),4):
try:
print(‘ {:<3}{:<20}'.format(stat_list[stat][0],stat_list[stat][1]),end="")
print('{:<3}{:<20}'.format(stat_list[stat+1][0],stat_list[stat+1][1]),end="")
print('{:<3}{:<20}'.format(stat_list[stat+2][0],stat_list[stat+2][1]),end="")
print('{:<3}{:<20}'.format(stat_list[stat+3][0],stat_list[stat+3][1]),end="")
except:
pass
End of part two, we create all the sub functions in Priority and Status. In part 3, we will do all the sub functions in Department and category.
:: Ticket System ::
| Intorduction | Part 1 | Part 2 | Part 3 |
..:: Have Fun with Coding ::.. 🙂
To Download my Python code (.py) files Click-Here
By: Ali Radwani
Python: Simple Ticket System
Subject: Writing a Simple Ticket System Application
Learning : Python, SQL, Logeic
Introduction:
A Ticket System serves is a tool for managing and tracking customer support interactions or internal task requests efficiently. It offers a centralized platform where users can submit their issues, questions, or requests, known as Tickets, and designated personnel can address them promptly. This article outlines the structure and functionality of a Ticket System, emphasizing the importance of organization, efficiency, and accountability in handling various requests.
In coming weeks I will work to create Python “Simple Ticket System”, using DataBase to store the data,I will try to publish the code and documentation about this project. In this post I will draft-down a brain-storming session with myself of what may we need in this system, tables and functions. So points may not be consistent and organized and ordered in the right way.
Notes:
- Anything in this articale concidered as draft and may changed later.
- Functions and Tables in coming lines are not in order
- creation of the database will not be in one time, so we will use ALTER many times to add or change the tables.
- All the data will be as test and not real.
Functions:
Main Functions in the system to add and manage the data and interact with the Database and records.
- 1. Tickets:
- 2. Priority.
- 3. Department.
- 4. Status.
- 5. Category.
Add, Edit, Delete and Show Tickets in the system.
Add, Edit, Delete and Show Priorety in the system.
Add, Edit, Delete and Show Department in the system.
Add, Edit, Delete and Show Status in the system.
Add, Edit, Delete and Show Category in the system.
Helping Functions:
Functions that will help to perform some action within the system or other main function.
- 1. Show List:
- 2. Export to Excle:
- 3. Check Availability:
To list/show the data we have in a lookup table.
Exporting the data to an excel file.[Backup]
To check if the user input is exist in the lookup table or not.
Tables:
All the Tables Names and fields are subject of change during the implementation.
1. Staff Table (staff):
- s_id (Staff ID)
- name
- mobile
- position (manager, technical, etc.)
2. Ticket Table (ticket):
- t_id (Ticket ID)
- dep_id (Department ID)
- date (Creation Date)
- asignto (Assigned To: s_id)
- description
- priority_id (High, Medium, Low)
- status_id (Open, In Progress, Resolved, Closed)
- updated_date
- category
3. Category Table:
- c_id (Category ID)
- cat_name (Category Name)
4. Ticket Notes Table (t_notes):
5.Priority Table (priority):
- pr_id (Priority ID)
- pri_level (Priority Level: High, Medium, Low)
6.Status Table (status):
- stat_id (Status ID)
- stat (Status: Open, In Progress, Resolved, Closed)
7.Staff Job Table (staff_job):
- sj_id (Job ID)
- job_id
- received_date
- finished_date
- status_id
- note_id
8.Departments Table (departments):
Versions Policy:
In this system i will create version 1 and will be released with all esintial functions to perform and work, however there will be some ideas to enhance the data entry and reporting also some validations that will be done later in version 2.
Part 1:
in Part1 we will do the folloeing:
- Define the Tables and their fields initially.
- Write the code to create the database and selected tables.
- Writing the code to insert initial data in selected tables .
- Initial naming of functions.
- Create the Main Menu
- Create the Menu for the Lookups Table
:: Ticket System ::
| Intorduction | Part 1 | Part 2 | Part 3 |
..:: Have Fun with Coding ::.. 🙂
To Download my Python code (.py) files Click-Here
By: Ali Radwani
Qatar, DohaPort _8
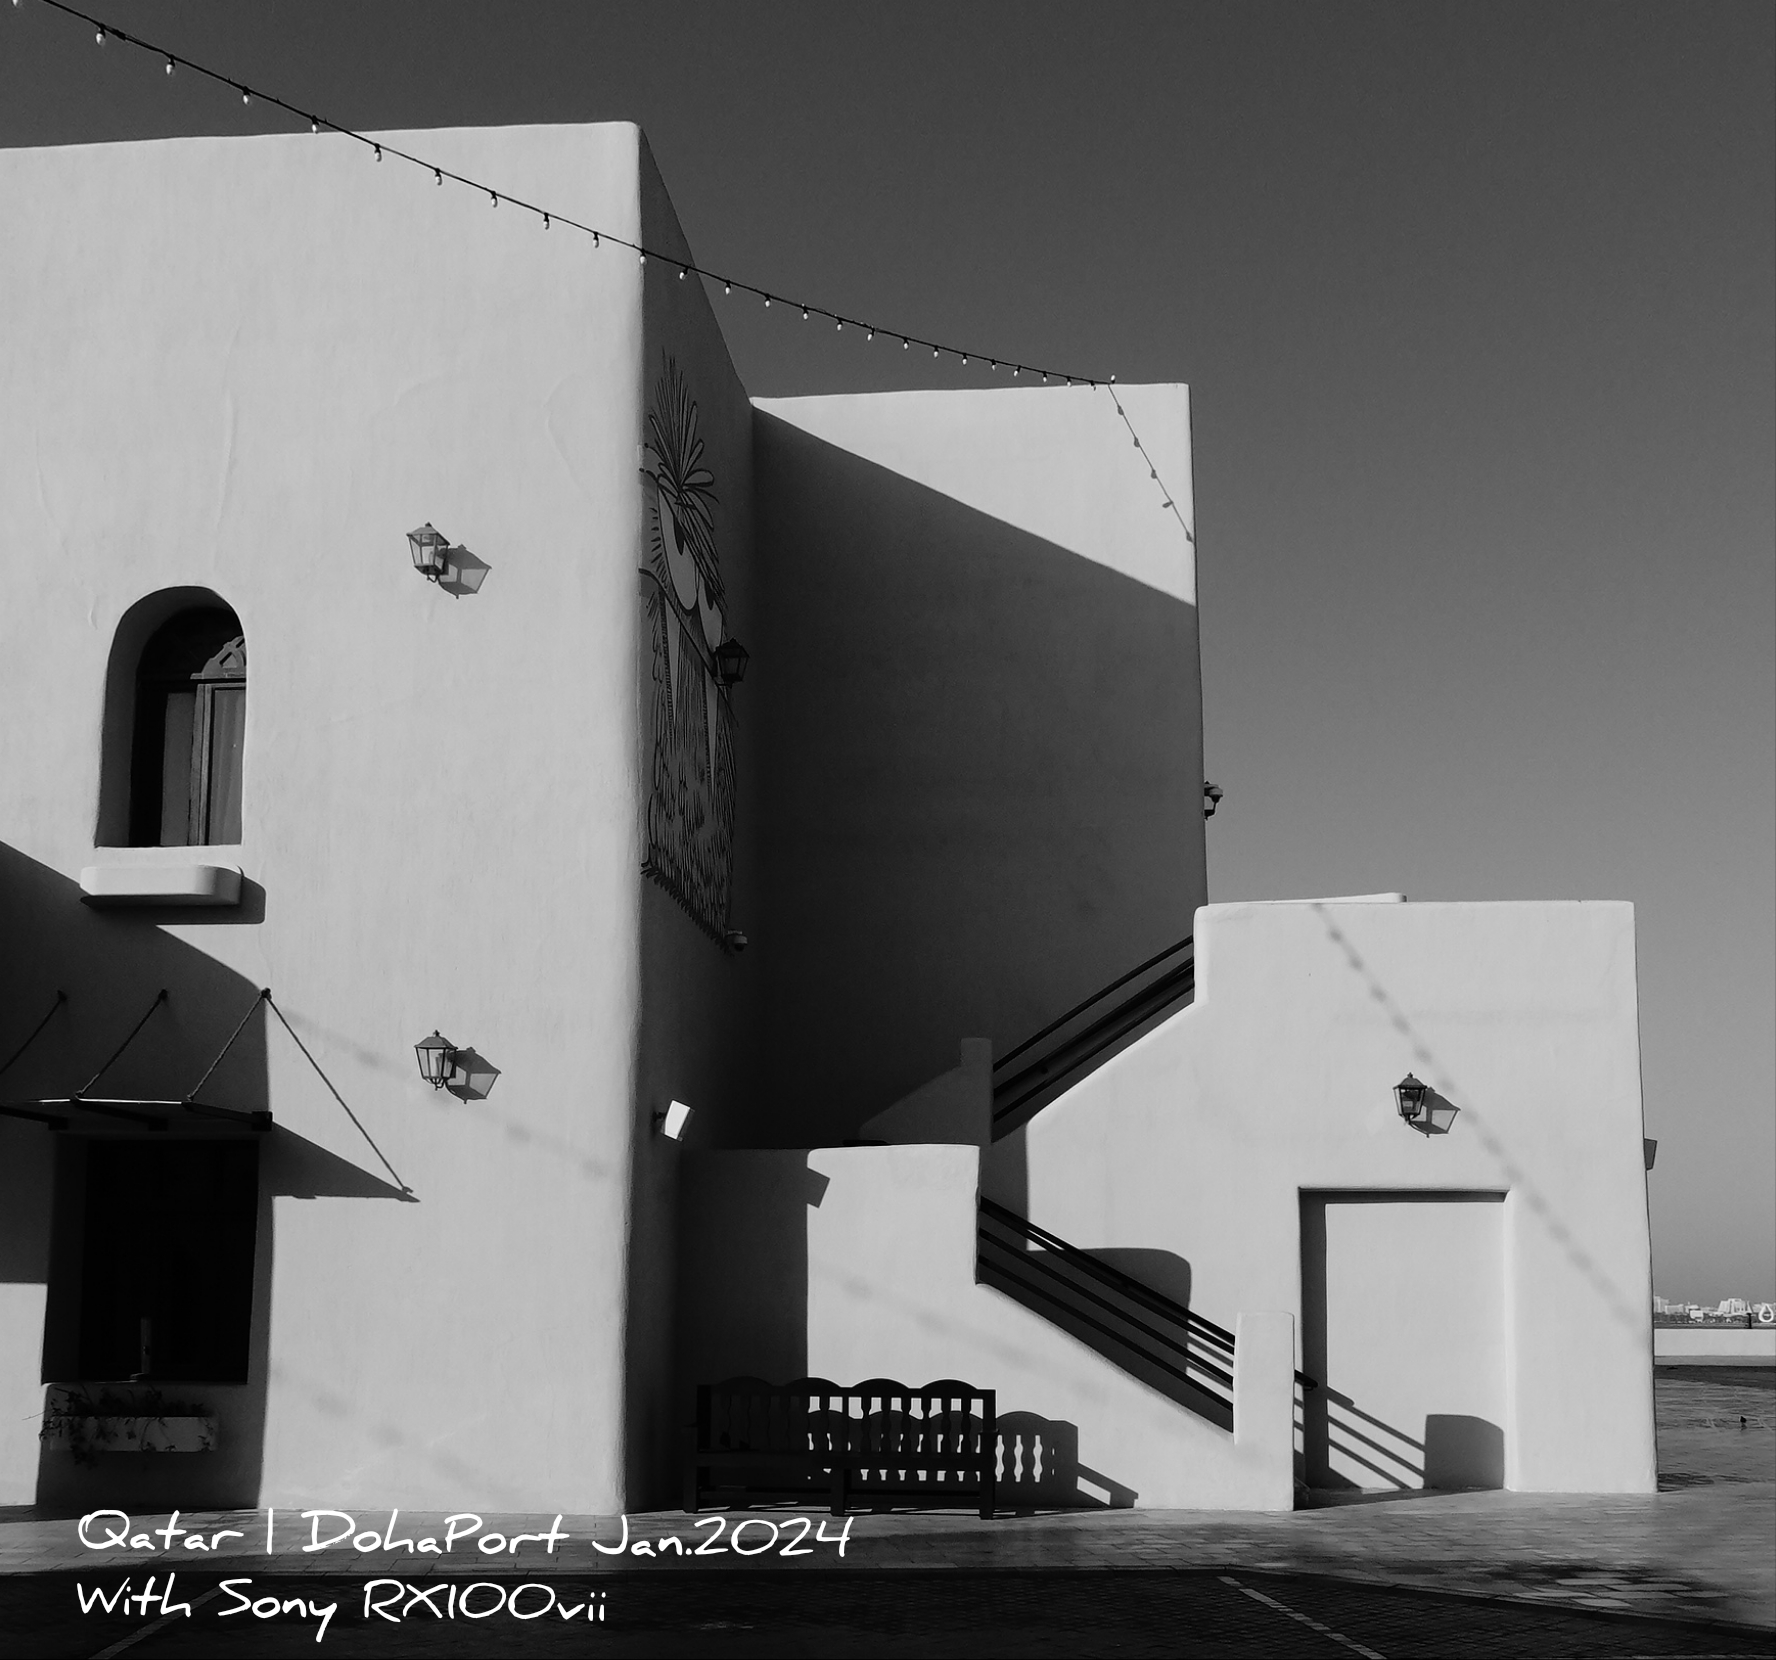
Title: Qatar | DohaPort
A Photo from DohaPort album, I take the shot using Sony RX100vii camera while walking in DohaPort. I take the shot using Black and white mode.
By: Ali Radwani
Photos from Qatar _31

The Dark Entrance
Street photography from Qatar, an apartments building with a wide dark entrance, I take the shot using Nikon S9900 camera.
By: Ali Radwani
Photos from Qatar _40
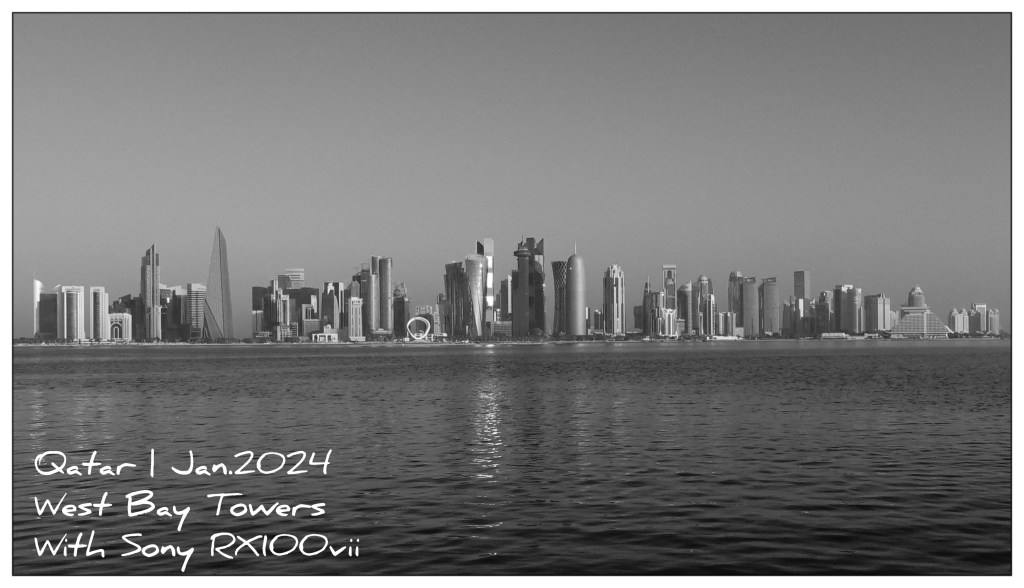
I take this shot of a wide angle west By Towers from Doha Port, I use the Sony RX100vii camera sets to Black and White mode and 500ISO and Shutter 1/1600s.
Image croped and framed no more changes, actually I rarely doing post-edit to my photos other than adding text an white frame.
Click to read my Sony picture profile page for setting and sample images.
By: Ali Radwani
Photos from Qatar _34

Title: Q.P. in West Bay
This is the entrance of Qatar Petroleum Square in West Bay. I take the shot using Nikon S9900 camera while driving my car, camera in hand.
Click Here to see all photos from Qatar.
By: Ali Radwani
London 2023, Post 29

Title: A day in Shepherd’s Bush Market
Another photo of from Shepherd Bush Market, camera on and in hand set to use the ilford simulation to give a black and white images.
Camera setting:Fujifilm XT30ii F 3.6, 18mm Focal-point, ISO 800 and Shutter 1/800s.
Ali Radwani,
Photos from Qatar _4
Title: A Mosque Under Restoration
In the way to my work, I seen this small mosque under restoration, all the needed materials stacked in the location, the workers were doing there jobs to finish the task, I stoped my car and take the shot using Nikon S9900 camera set’s to take Black and white Photos.
Click Here to see all photos with Nikon S9900.
By: Ali Radwani
Taking pictures is not my main daily practices, but when i start playing with my camera, i really enjoy my self.
Thanks for visiting my Space..


