Archive
Python: Simple Ticket System _Part2
Subject: Writing a Simple Ticket System Application
Learning : Python, SQL, Logeic
In this part we will do the following:
- Write the code for [show_list] function.
- Write the code for [check_availabilty] function.
- Write the code for Priority function in Setting.
- Add New Priority.
- Edit a Priprity.
- Delete Priority.
- Write the code for Status function.
- Add New Status.
- Edit a Status.
- Delete Status.
Helping Function
Show List Function: Once the user to Edit or Delete a record from the dataBase, we will call this function to list-down whatever in the table, then the user will select the ID number of the entity to be Edited/Deleted.
Show List Function:
def show_list(dt,d_id):
“””
Function to Display the Data we have in the Lookup Tables based on the user selection function.Return: None
“””c.execute (f”select * from {dt} where {d_id} > 1 “)
dataset = c.fetchall()for d in range (0,(len(dataset)),3):
try:
print(‘ ‘*5,'{:<3}{:<20}'.format(dataset[d][0],dataset[d][1]),end="")
print(' '*5,'{:<3}{:<20}'.format(dataset[d+1][0],dataset[d+1][1]),end="")
print(' '*5,'{:<3}{:<20}'.format(dataset[d+2][0],dataset[d+2][1]))except:
pass
print('\n')
Check Availabilty Function:def check_availabilty(dt, d_id, check_id):
“””
Function to check if the passed ID available in the data-set or not.Arguments:
dt : Data-Table
d_id : Name of id column.
check_id : The id we want to search for.Return : True if ID is available, False if not.
“””c.execute (f”select * from {dt} where {d_id} = {check_id} “)
dataset = c.fetchone()return (dataset)
Priority Function:
In coming code section we will write three functions to Add, Edit and Delete a Priority [All the code is available in the file for downloading FREE].
Add New Priority:
def add_priority ():
os.system(‘clear’)
line2 =”Add New Priority Level”
header(line2,2,4)print(‘\n\t List of Priority Levels we have in the system:\n’)
show_list(‘priority_t’,’pr_id’)
new_pri = input(‘\n Enter the New Priority Level to be Added to the List. [E to Exit]. > ‘)# Check user input
if new_pri in [‘e’,’E’] or new_pri ==’ ‘ or new_pri == ”:
input(“\n\t You select to Exit from ‘Adding New Priority Level’.. Press any key to Exit. > “)
return
else:
# Code to add New priority level to the database
# Capitalize user input
new_pri = ” “.join([word.capitalize() for word in new_pri.split(” “)])
# Insert onto database
c.execute (“INSERT INTO priority_t (pri_level) VALUES(:pri_level )”,{“pri_level”:new_pri})
db_conn.commit()input(‘\n\t One Priority level been Added to the database. Press any key to Continue. > ‘)
Edit Priority:
 Click the image to enlarge Click the image to enlarge |
In this function, first we call show_list function to list down the priorities we have in the system and ask the user to select the ID of one to be Edit. Then we check if the user want to Exit from here!, If Not then we show him his selection and give the prompt so he can insert the corrected priority, and saving the changes. |
Delete Priority:
 Click the image to enlarge Click the image to enlarge |
In this function, first we call show_list function to list down the priorities we have in the system and ask the user to select the ID of one to be Deleted. Then we check if the user want to Exit from here!, If Not then we show him his selection and give the prompt so he can insert the corrected priority, and saving the changes. |
Show Priority:
 Click the image to enlarge Click the image to enlarge |
Last function is Show Priority, her we will list all the priorities we have in the table. |
Status Functions
For Status also we have three functions to Add, Edit and Delete a Status. In Status of a task we have “Not Started, In progress, Finished” and the user can add more to the list. [All the code is available in the file for downloading FREE].
Add New Startus
 [Click image to enlarge] [Click image to enlarge] |
First, we will display all the status we have in the system, and will ask the user to enter the new one to be added, we will perform a simple validation and then will save the New status into the table and show a confirmation of that on the screen. |
Edit Startus
 [Click image to enlarge] [Click image to enlarge] |
Her the user must select an ID of the status he want to edit, then entering the new one, confirming that, and we will save the change. |
Delets Startus
 [Click image to enlarge] [Click image to enlarge] |
Her the user must select an ID of the status he want to Delete,user must confirm that, and we will Delete and Save the change. |
Show Startus
def show_status():
os.system(‘clear’)
line2 =”Show Status List”
header(line2,2,4)
c.execute (“select * from status_t where st_id > 0 “)
stat_list = c.fetchall()
print(‘\n\n\t List of Status in the System…> ‘)
for stat in range (0,(len(stat_list)),4):
try:
print(‘ {:<3}{:<20}'.format(stat_list[stat][0],stat_list[stat][1]),end="")
print('{:<3}{:<20}'.format(stat_list[stat+1][0],stat_list[stat+1][1]),end="")
print('{:<3}{:<20}'.format(stat_list[stat+2][0],stat_list[stat+2][1]),end="")
print('{:<3}{:<20}'.format(stat_list[stat+3][0],stat_list[stat+3][1]),end="")
except:
pass
End of part two, we create all the sub functions in Priority and Status. In part 3, we will do all the sub functions in Department and category.
:: Ticket System ::
| Intorduction | Part 1 | Part 2 | Part 3 |
..:: Have Fun with Coding ::.. 🙂
To Download my Python code (.py) files Click-Here
 Follow me on Twitter..
By: Ali Radwani
Python: Simple Ticket System
Subject: Writing a Simple Ticket System Application
Learning : Python, SQL, Logeic
Introduction:
A Ticket System serves is a tool for managing and tracking customer support interactions or internal task requests efficiently. It offers a centralized platform where users can submit their issues, questions, or requests, known as Tickets, and designated personnel can address them promptly. This article outlines the structure and functionality of a Ticket System, emphasizing the importance of organization, efficiency, and accountability in handling various requests.
In coming weeks I will work to create Python “Simple Ticket System”, using DataBase to store the data,I will try to publish the code and documentation about this project. In this post I will draft-down a brain-storming session with myself of what may we need in this system, tables and functions. So points may not be consistent and organized and ordered in the right way.
Notes:
- Anything in this articale concidered as draft and may changed later.
- Functions and Tables in coming lines are not in order
- creation of the database will not be in one time, so we will use ALTER many times to add or change the tables.
- All the data will be as test and not real.
Functions:
Main Functions in the system to add and manage the data and interact with the Database and records.
- 1. Tickets:
- 2. Priority.
- 3. Department.
- 4. Status.
- 5. Category.
Add, Edit, Delete and Show Tickets in the system.
Add, Edit, Delete and Show Priorety in the system.
Add, Edit, Delete and Show Department in the system.
Add, Edit, Delete and Show Status in the system.
Add, Edit, Delete and Show Category in the system.
Helping Functions:
Functions that will help to perform some action within the system or other main function.
- 1. Show List:
- 2. Export to Excle:
- 3. Check Availability:
To list/show the data we have in a lookup table.
Exporting the data to an excel file.[Backup]
To check if the user input is exist in the lookup table or not.
Tables:
All the Tables Names and fields are subject of change during the implementation.
1. Staff Table (staff):
- s_id (Staff ID)
- name
- mobile
- position (manager, technical, etc.)
2. Ticket Table (ticket):
- t_id (Ticket ID)
- dep_id (Department ID)
- date (Creation Date)
- asignto (Assigned To: s_id)
- description
- priority_id (High, Medium, Low)
- status_id (Open, In Progress, Resolved, Closed)
- updated_date
- category
3. Category Table:
- c_id (Category ID)
- cat_name (Category Name)
4. Ticket Notes Table (t_notes):
5.Priority Table (priority):
- pr_id (Priority ID)
- pri_level (Priority Level: High, Medium, Low)
6.Status Table (status):
- stat_id (Status ID)
- stat (Status: Open, In Progress, Resolved, Closed)
7.Staff Job Table (staff_job):
- sj_id (Job ID)
- job_id
- received_date
- finished_date
- status_id
- note_id
8.Departments Table (departments):
Versions Policy:
In this system i will create version 1 and will be released with all esintial functions to perform and work, however there will be some ideas to enhance the data entry and reporting also some validations that will be done later in version 2.
Part 1:
in Part1 we will do the folloeing:
- Define the Tables and their fields initially.
- Write the code to create the database and selected tables.
- Writing the code to insert initial data in selected tables .
- Initial naming of functions.
- Create the Main Menu
- Create the Menu for the Lookups Table
:: Ticket System ::
| Intorduction | Part 1 | Part 2 | Part 3 |
..:: Have Fun with Coding ::.. 🙂
To Download my Python code (.py) files Click-Here
By: Ali Radwani
Python Project: Properties Maintenance System P11
Subject: Writing a Full Application for Properties Maintenance System [Show Maintenance Request]
Learning : Python, Math, SQL, Logeic
[NOTE: To keep the code as simple as we can, We WILL NOT ADD any user input Varevecations. Assuming that our user will Enter the right inputs.]
In this part we will continue write the Functions in Maintenance Request Service. Here we will write the Function to Show Maintenance Request.
Show all Request In this Function we will display all the Properties we have in the system, then the user will Select the ID of the Property, after that we will display all Maintenance Jobs that we have in the system (Maintenance for); again the user need the Select the Job ID and if the required job is not in the list the user need to go-back and add it to the system first. After that the user will Select current Job-Status [also if not in the system we need to add it], then entering the Date of starting the Maintenance, finally the user can write any Notes or just press enter to save the request. With any question above the user can Exit the function by interning [E].
Here are some code sample..
Table header
print(‘ ‘*6,’ID’,’ ‘*3,’Property ID’,’ ‘*5,’Maintenance Date’,’ ‘,’Maintenance For’,’ ‘*7,’Job Status’,’ ‘*12,’Note’)
print(‘ ‘*4,’-‘*120)
Code to fetch-all data in the Maintenance Request Table.
c.execute (“select * from maint_request_t “)
dataset = c.fetchall()
To Get the Property Type, we call our get_lookup_values Function..
prop_type_id = get_lookup_values(‘properties_t’,’p_id’,dataset[each][1])
p_type_name = get_lookup_values(‘prop_type_t’,’pt_id’,prop_type_id[0][2])
To save the time, all the code is available in the Download Page.
:: PMS Parts ::
| Part 1 | Part 2 | Part 3 | Part 4 | Part 5 | Part 6 | Part 7 |
| Part 8 | Part 9 | Part 10 | Part 11 | Part 12 | Part 13 | Part 14 |
..:: Have Fun with Coding ::.. 🙂
To Download my Python code (.py) files Click-Here
By: Ali Radwani
Python Project: Properties Maintenance System P7
Subject: Writing a Full Application for Properties Maintenance System [Property: Showing the Records in Main property Table]
Learning : Python, Math, SQL, Logeic
[NOTE: To keep the code as simple as we can, We WILL NOT ADD any user input Varevecations. Assuming that our user will Enter the right inputs.]
After adding Records to the Main Property Table, we need to display the records on the screen. So now in this part (Part -7) we will write a function to display all the records. The Function name will be def show_property() the function is not taking any attribute and is Not returning any things. First we will print-out the Table-Header then we will run an [SQL: select * from table-name] command to fetch all the records, then will [for loop] and test-format to print all the records on the screen. Here is the Code ..
 |
After i display the records, I notes that the Address-Column needs more than one row (in some cases), and it miss the line formating, so I wrote a function and call it def warp_text(tex,warp_on,nl_space) the function takes three arguments, the test: it the text/string you want to print.warp_on: is a number of character before the new-line.nl_space: is the number of white-character in the new-line.
Here is the Code ..
 # Function to warp

def warp_text(tex,worp_on,nl_space) :
    c = 0

    for t in range (len(tex)) :
        print(tex[t],end="")
        c += 1
        if c == worp_on :
            print('\n', ' '*nl_space, end="")
            c = 0
Check all the codes in the Download Page..
End of Part 7
NOTE: If you Download this Part you MUST Run the Option 82 (82. Delete the Data-Base and Start Again.) from the Main Menu to do the following Updates:
- Update the properties_t Table (Adding the number of BathRooms)
- Update on create_tables Function.
- Update on insert_zero_records Function.
If you did this in last part (6) then you don’t need to do it again
In Part-8 In the Next Part, after adding and showing the records we will write the Function to Delete a record from the Table.
:: PMS Parts ::
| Part 1 | Part 2 | Part 3 | Part 4 |
| Part 5 | Part 6 | Part 7 | Part 8 |
..:: Have Fun with Coding ::.. 🙂
To Download my Python code (.py) files Click-Here
By: Ali Radwani
Python Project: Properties Maintenance System P2
Subject: Writing a Full Application for Properties Maintenance System
Learning : Python, Math, SQL, Logeic
[NOTE: To keep the code as simple as we can, We WILL NOT ADD any user input Varevecations. Assuming that our user will Enter the right inputs.]
In Part-2 we will start writing the Functions in our app, to start I select the Payment Methods, this is a Look-up Table that will help the user to select come values, by defualt when you install the application and select to create the database, [in Part-1] we Insert some data all lookup-tables, So here in payment Method we have [Cash, Card, Cheque]. Our Functions will be Add New Payment Method, Edit a Payment Method and Delete a Payment Method.
Once i start writing the Edit Function, i notes that we need another two Functions to Help-up theyare: get_lookup_values(tname,t_id,key_id) and check_availabilty(dt, d_id, check_id) both not printing any thing on the screen just returning a Value.
get_lookup_values(tname,t_id,key_id) Here we pass the Table-Name, the ID field and key_id we want to return it’s Value.
check_availabilty(dt, d_id, check_id) This function will return True if the ID we send in ‘check_id’ is in the Data-Table dt.
So, let’s start with Add New Payment Method, We will ask the user to write the New Payment Method the will run the SQL command to Insert it into the data-base.. Hear is the Code ..
 # Add Payment Method

def add_pay_method():
    os.system('clear')
    line2 = "Add Payment Method"
    header(line2, 9,14)

    print('\n\n     List of the Payment Methods in the System ..  \n')
    show_lookup_data('Yes' ,'pay_meth_t','pm_id')

    print('\n     Enter a New Payment Method to the System.')
    print("     [E, Space or just Pressing Enter will be as 'Exit'].\n")

    new_pm =  input('     Enter a New Payment Method > ')

    if new_pm in ["e","E", "", " "] :
        input ('\n     You Select to Exit .. Press any key > ')
        return
    else:
        c.execute ("INSERT INTO pay_meth_t (p_method) VALUES(:p_method)",{"p_method":new_pm.capitalize()})
        db_conn.commit()

        input('\n     Done .. One record Added to the Data-Base .. Press any Key .. > ')
        return
Now, we will go to Edit a Payment Method that we have in the DataBase, here we will list all the Data we have on the screen, and will ask the user to Select the one to be edit, we will check the availability of the ID using the def check_availabilty(dt, d_id, check_id) Function and then [if the ID is available] we will use the def get_lookup_values(tname,t_id,key_id): function to fetch the key-value of that ID, then asking the user to Enter the New/Edited one. Here is the code..
 |
Last Function in this part is to Delete a Payment Method from the Databsae, here also we will display all the contents of the table on the screen, and ask the user to select the one tobe deleted, we will check the availability of the ID and ask the user to confirm the Deleting action, then will call the SQL command to delete the entry. Here is the code..
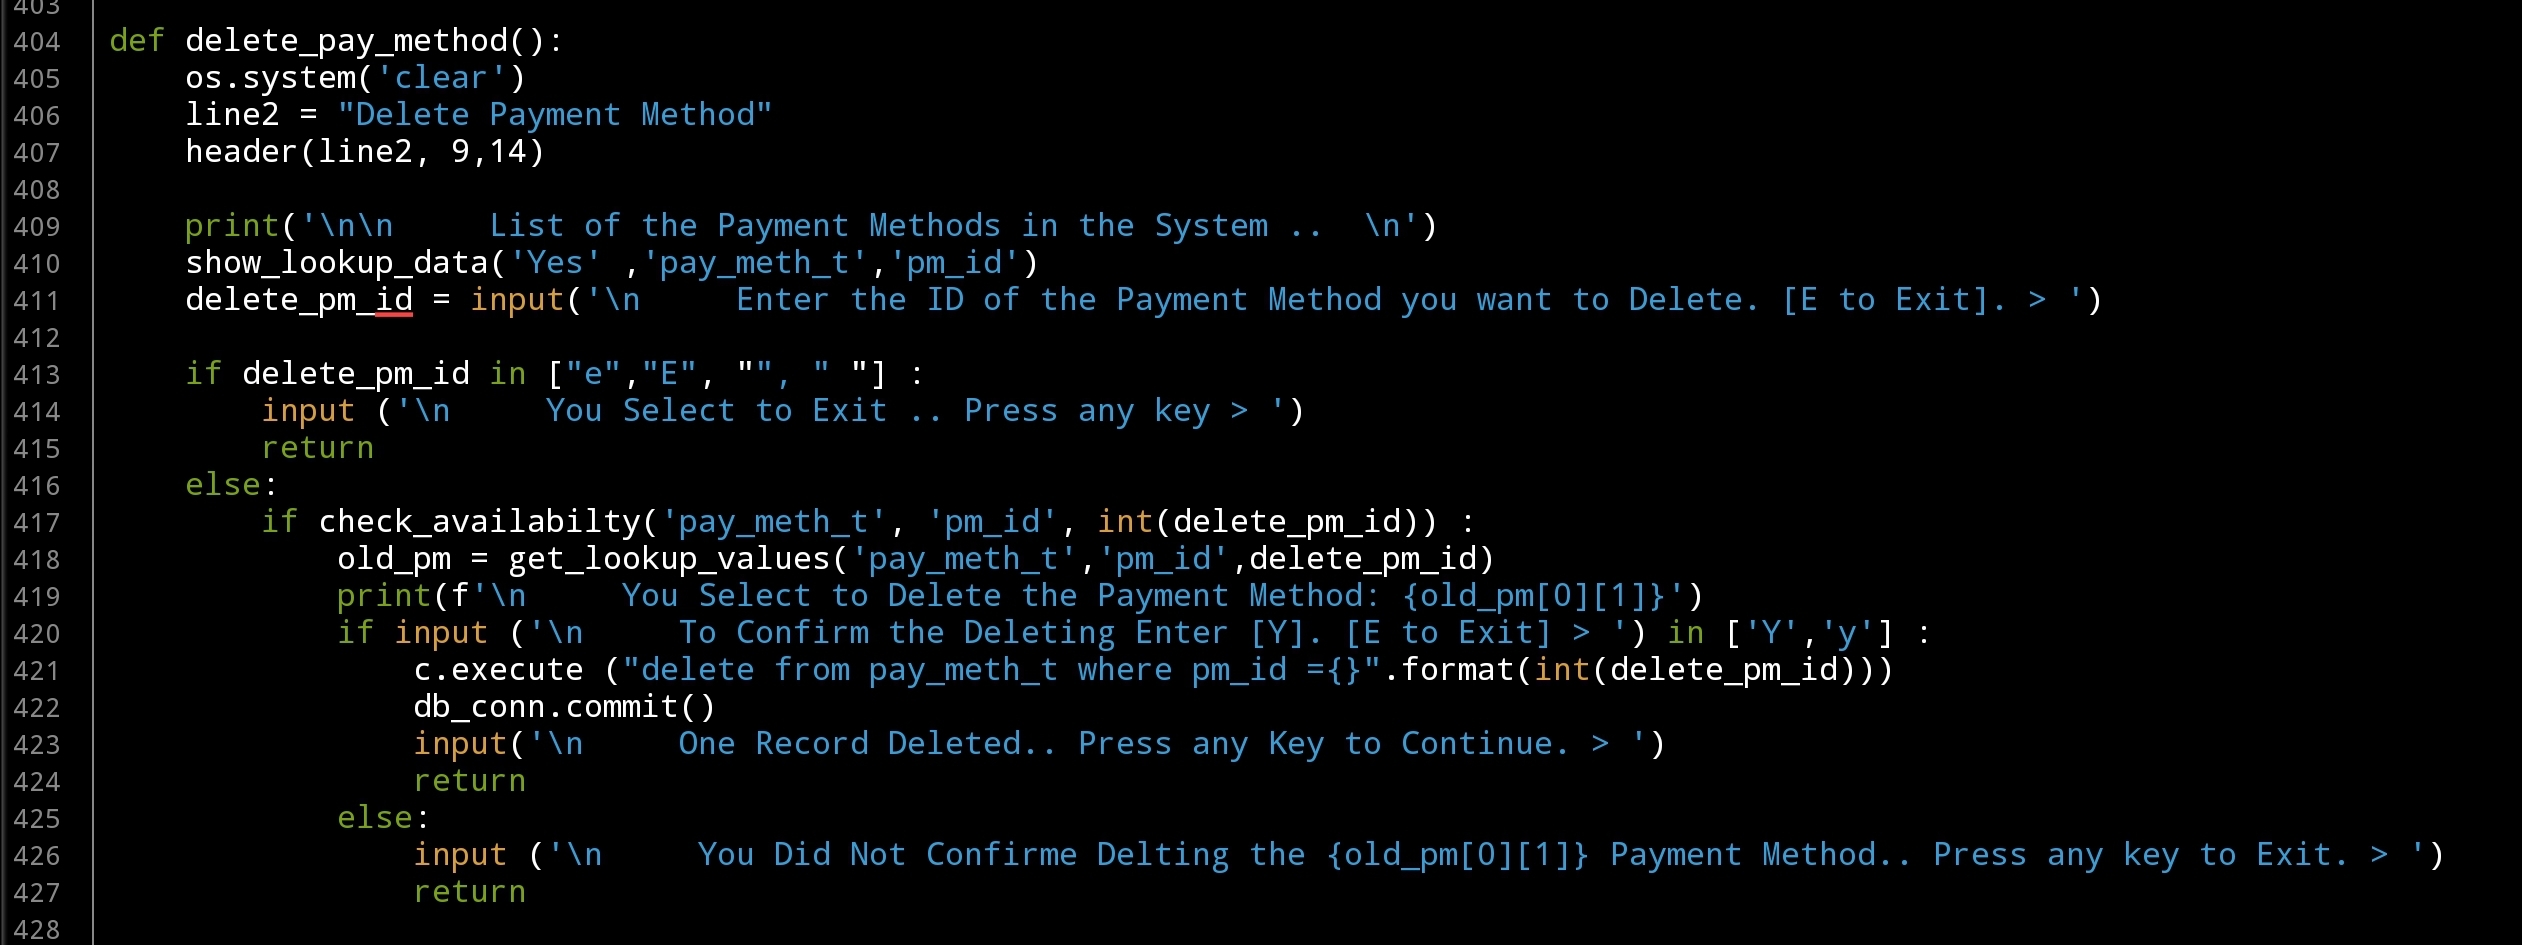 |
In Part-3 In coming post we will continue writing Lookup Table Functions to Add, Edit and Delete there data.
:: PMS Parts ::
| Part 1 | Part 2 | Part 3 | Part 4 |
..:: Have Fun with Coding ::.. 🙂
To Download my Python code (.py) files Click-Here
By: Ali Radwani
Drafting New System
Start to write down some notes and ideas for a new system/application using a self-brainstorming session.
I am always using the MindJet Maps app to draw the basic outlines of the application I want to work on.
Here is the first Draft of a Payroll System that I want to do in coming weeks. Not sure if I will use Python or MS-Excel to do this project.

Python: My Orders Tracker P-4
Learning : Pythn, sqlite, Database, SQL
Subject: Create a system to track the orders
In this last part we will write the code to Edit an Order, in editing an order function first we will show all orders and will ask the user to select the one to be EDIT, then we will display that order detail on the screen and ask the user to confirm the action by entering ‘Y’ [our code will handel both y and Y]. We will ask the user about each attribute in the Order details if it need to be change or [Just press Enter to Keep the Current Data], also if the user enter ‘e’ or ‘E’ we will exit from the Editing mode.
Here is the code ..
# Function to Edit an Order

def edit_order():
    os.system('clear')
    print("\n==========[ Edit Orders ]==========")

    show_order('yes')

    edit_order = input('   Select the Order ID to be Edited. [E to Exit] > ')

    if edit_order in ['e','E'] :
        return
    elif not edit_order.isnumeric() :
        input('\n   You need to enter an Order''s ID [Numeric]. .. Press any Key .. ')
        return

    try:

        c.execute ("select * from orders where o_id ={}".format(edit_order))
        order_list = c.fetchone()

        if order_list == [] :
            input('\n   ID {} Not Exsist. .. Press any key to continue.  '.format(edit_order))
            return

        os.system('clear')
        print("\n==========[ Edit Orders ]==========\n")
        print('\n   Details of the Order you select:\n ')

        print(" "*15,"ID: ",order_list[0])
        print(" "*13,"Date: ",order_list[1])
        print(" "*5,"Order Number: ",order_list[2])
        print(" "*12,"Price: ",order_list[4])
        print(" "*9,"Quantity: ",order_list[5])
        print(" "*3,"Shipment Price: ",order_list[6])
        print(" "*7,"Total Cost:  {:.2f}".format((order_list[4]*order_list[5]) + order_list[6]))
        print(" "*6,"Description: ",order_list[3])
        print(" "*12,"Image:",order_list[8])
        print(" "*13,"Link:",order_list[7])

        user_confirm = input("\n\n   You Select to EDIT the above Order, Enter Y to confirm, E to Exit. > ")
        if user_confirm in ['e','E'] :
            input('\n   You entered ''E'' to Exit. Nothing  will be change. Press any key. ')
            return

        if user_confirm in ['y','Y'] :
            #To Edit the order..

            print("#"*57)
            print("##"," "*51,"##")
            print("##   NOTE: Enter E any time to EXIT/Quit."," "*12,"##")
            print("##     OR  JUST Press Enter to keep the Current data."," ##")
            print("##"," "*51,"##")
            print("#"*57,)

            while True :

                new_date = input (f'\n   The current date is: {order_list[1]}, Enter the New date as[dd-mm-yyyy] > ')

                if e_to_exit(new_date) =='e' : return
                if new_date =="" : break   # Break the while loop if the user want to keep the current Date.

                if date_validation (new_date) == 'valid' :
                    break
                else :
                    print(date_validation (new_date))


            new_onum = input (f'\n   The current Order Number is: {order_list[2]}, Enter the New Order Number. [E to Exit]. > ')
            if e_to_exit(new_onum) =='e' : return

            new_qunt = input (f'\n   The current Quantity is: {order_list[5]}, Enter the New Quantity. [E to Exit]. > ')
            if e_to_exit(new_qunt) =='e' : return

            new_price = input (f'\n   The current Price is: {order_list[4]}, Enter the New Price. [E to Exit]. > ')
            if e_to_exit(new_price) =='e' : return

            new_ship_price = input (f'\n   The current shipment Price is: {order_list[6]}, Enter the New Quantity. [E to Exit]. > ')
            if e_to_exit(new_ship_price) =='e' : return

            new_link = input (f'\n   The current link is: {order_list[7]}, Enter the New Link. [E to Exit]. > ')
            if e_to_exit(new_link) =='e' : return

            new_image = input (f'\n   The current Image is: {order_list[8]}, Enter the New Image (path). [E to Exit]. > ')
            if e_to_exit(new_image) =='e' : return


            new_desc = input (f'\n   The current Description is:\n     {order_list[3]}.\n\n      Enter the New Description. [E to Exit]. > ')
            if e_to_exit(new_image) =='e' : return


            # Updating the record in the DataBase.
            if new_date > '' and new_date != "e" :
                c.execute("update orders set order_date = '{}' where o_id = {}".format(new_date,int(order_list[0])))
                db_conn.commit()

            if new_onum > '' and new_onum != "e" :
                c.execute("update orders set order_num = '{}' where o_id = {}".format(new_onum,int(order_list[0])))
                db_conn.commit()

            if new_qunt > '' and new_qunt != "e" :
                c.execute("update orders set order_quantity = '{}' where o_id = {}".format(new_qunt,int(order_list[0])))
                db_conn.commit()

            if new_price > '' and new_price != "e" :
                c.execute("update orders set order_price = '{}' where o_id = {}".format(new_price,int(order_list[0])))
                db_conn.commit()

            if new_ship_price > '' and new_ship_price != "e" :
                c.execute("update orders set order_price = '{}' where o_id = {}".format(new_ship_price,int(order_list[0])))
                db_conn.commit()

            if new_link > '' and new_link != "e" :
                c.execute("update orders set order_link = '{}' where o_id = {}".format(new_link,int(order_list[0])))
                db_conn.commit()

            if new_image > '' and new_image != "e" :
                c.execute("update orders set order_img = '{}' where o_id = {}".format(new_image,int(order_list[0])))
                db_conn.commit()

            if new_desc > '' and new_image != "e" :
                new_desc = " ".join([word.capitalize() for word in new_desc.split(" ")])

                c.execute("update orders set order_desc = '{}' where o_id = {}".format(new_desc,int(order_list[0])))
                db_conn.commit()

            input('\n   One record has been EDITED and Saved... \n      ... Press any key to Continue ...')

        else:
            input('\n      Wrong input ... Press any key to continue ..')

    except:
        pass
[All the System Codes available in Download Page.]
Finish: Now we have an application that will store and retrieve our simple order data.
Enhancement: We can do some enhancement in [link and image] data part to show and display them in better way.
| Part 1 | Part 2 | Part 3 | Part 4 |
To Download my Python code (.py) files Click-Here
By: Ali Radwani
Python: My Orders Tracker P-3
Learning : Pythn, sqlite, Database, SQL
Subject: Create a system to track the orders
In this part we will write the code to Delete an Order that we have from our system, also we will add some validations on the user input, like if the user enter something not from the menu, or to do so, first we will re-call the show_orders() function that we have and passing the ‘yes’ parameter which means we are calling the function from inside another function [we will not print the function header, and will not clear the screen]. Then we will ask the user to select/Enter the ID of the order to be Deleted, after that we will print tha order details again on the screen and ask the user to confirm Deleting command by entering ‘Y’ … thats it.. let’s write the code..
# Delete Order

def del_order():
    os.system('clear')
    print("\n==========[ Delete Orders ]==========\n")

    show_order('yes')

    del_order = input('   Select the Order ID to be Deleted. [E to Exit] > ')

    if not del_order.isnumeric() :
        input('\n   You need to enter an Orders ID [Numeric]. .. Press any Key .. ')
        return

    elif del_order in ['e','E'] :
        return

    try:
        c.execute ("select * from orders where o_id ={}".format(del_order))
        order_list = c.fetchone()

        if order_list == [] :
            input('\n   ID {} not exsist.'.format(del_order))
            return

        os.system('clear')
        print("\n==========[ Delete Orders ]==========\n")
        print('\n   Details of the Order you select:\n ')

        print("   ID: ",order_list[0])
        print("   Date: ",order_list[1])
        print("   Order Number: ",order_list[2])
        print("   Price: ",order_list[4])
        print("   Quantity: ",order_list[5])
        print("   Shipment Price: ",order_list[6])
        print("   Total Cost: {:.2f}".format((order_list[4]*order_list[5]) + order_list[6]))
        print("\n   Description:",order_list[3])
        print("   Image:",order_list[8])
        print("   Link:",order_list[7])

        user_confirm = input("\n\n   You Select to DELETE the above Order, Enter Y to confirm, E to Exit. > ")
        if user_confirm in ['y','Y'] :
            #To Delete the order..
            c.execute ("delete from orders where o_id ={}".format(int(del_order)))
            db_conn.commit()

            input('\n   One record has been DELETED ... \n      ... Press any key to Continue ...')

        elif user_confirm in ['n','N']:
            input("\n    You select not to DELETE any thing.   Press any key to Continue .. ")

        elif user_confirm in ['e','E']:
            input("\n    You select stop the process and EXIT.    ... Press any key to Continue .. ")
            return

        else:
            input('\n      Wrong input ... Press any key to continue ..')

    except:
        pass
The user select #3 from the menu to Delete an Order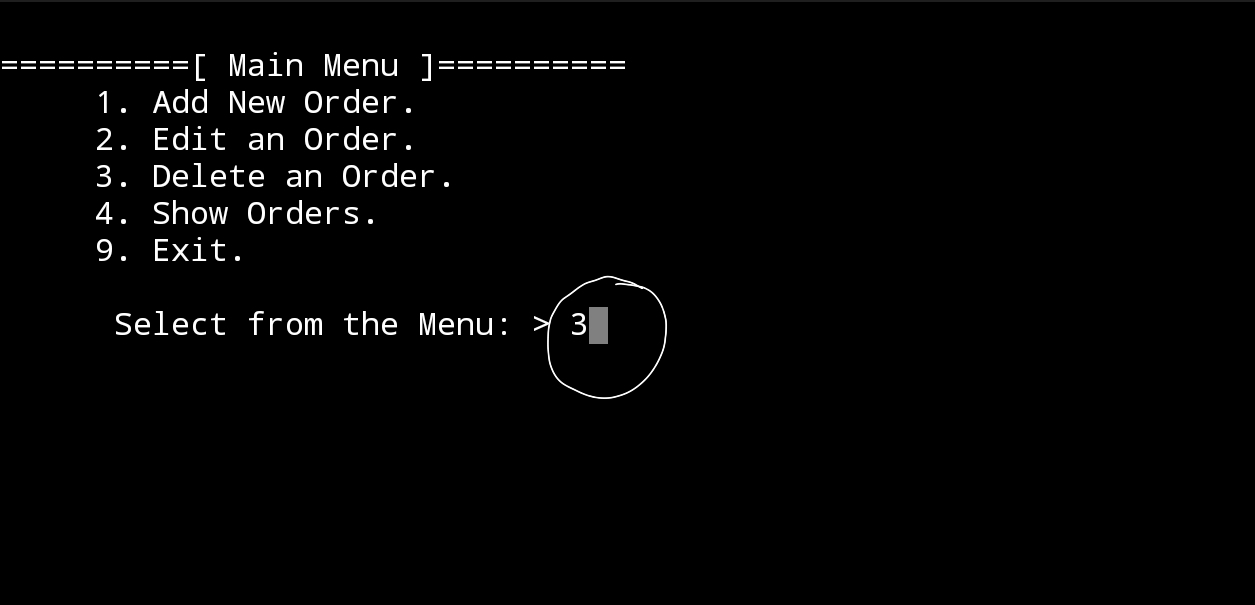 |
The screen display the list of orders we have in the system, and the user select Order ID Number 3 to delete it. |
The screen display the details of the order ID 3 and ask the user to confirm the deleting by entering ‘Y’ |
In Next Post: In the coming post P4 , we will write the codes to Edit an order information.
| Part 1 | Part 2 | Part 3 | Part 4 |
To Download my Python code (.py) files Click-Here
By: Ali Radwani
Library System with Excel -P1
Learning :Excel formulas and VBA Cods
Subject: To Develop a Library System with Excel
Someone asked if we can do the Library Management system using Excel, so in the coming several posts we will try to develop an Excel File to store our Books. So I will stop the CRM Project and will work on Library System, we will use MS-EXCEL and VBA code to create a simple spreadsheet looking after our Books.
To start, do the following:
1. We will create an empty Excel file and call it “my Library System” and save it as “Excel Macro-Enabled Workbook.xlsm”
2. Create 7 Tabs(Sheets), name them as:
Menu, Books, Authors, Classifications, Data, Setting, Summary
In this post (Part-1), we will work on the Menu sheet, I will not concern about the themes and colors or fonts all this is back to each user to do formating as needed. So let’s begin with creating four buttons using the insert – shapes Rectangle: Rounded Corners.
 |
We need to create four Rectangle: Rounded Corners, align them as you want and use any theme color, then give each a Captions as in the coming image..
 |
Now, select the Books Button and with Right-Mouse-button select “Assign Macro” and from the new Assign Macro pop-up screen click on New.
 |
This will launch the VBA Application with an open window to write our code, here is the code that if the user clicks on ‘SAY’: Books-Button the Books Sheet will be selected. In coming image, you will find the codes for all buttons we have in the Menu.
 |
Also, we create a code to take us back to the Menu sheets and we call the button MENU, we will add this Button to all sheets we have.
-
Recap this part:
- 1. We Create an Excel file.
- 2. We Create 7 Sheets and named them.
- 3. We Create Buttons for the Menu Sheet.
- 4. We Create the Home Button.
- 5. We wrote the VBA code so we /the user can navigate thrugh the system.
:: Library System with Excel ::
| Part 1 | Part 2 | Part 3 | Part 4 |
To Download EXCEL (.xlsm) files Click-Here
By: Ali Radwani
Taking pictures is not my main daily practices, but when i start playing with my camera, i really enjoy my self.
Thanks for visiting my Space..


