Archive
Python: Orders Manager P1
Orders Managment System
Subject: Outlines – P1
In last several posts we develop a Zoo Managment System [Click to Read]. We try to use our skills in python and pandas to work with DataFrame and developing easy app that reading and writeing a csv file. We will use the same principle and re-use most of it’s functions to write our new coming system.
The Story: I don’t think that there is any person using the web without using at least one of the online shopping sites, personally; I am using three sites. In coming posts we will work on Orders Managment System (OMS) to track our orders.
General Enhancement In the Zoo application we did not use any validation or try … Exceptions blocks, but this time we will use a range of validations over the user input starting from the menu until asking if the user want to save shange before he Quit. Using validations will make the code (or make it looks like) complicated, so I will use lots of comments to describe some codes.
Validation Example ..
In our Date entry, we will inform the user that we want the date as DD-MM-YYYY , then if the user enter any thing not logic (not a date) or say he enter “3/8-2019” our validation will convert that to “03-08-2019”.
OMS Outline: In this application our goal is to practices on data validation so we will develop a system to store our orders data and apply the validation on it, I will use aliexpress orders information to build the csv file. As far as i know, aliexpress site is not providing any tool to export a file that contain your orders detail so we will do this just to keep a history records of our orders.
File Structuer: The file will have 8 columns here is a short description of each column:
order_no: A serial number that will increment automatically, we will consider this to be a primary key of the table.
order_id: This is the order id generated by aliexpress site, we will enter it as it is.
order_date: To hold the orders date, the date will be in DD-MM-YYYY format.
order_detail: Short description of the order, even you write it in your words or copy paste it from your order page.
item_price: The price in US$
ship_price: Shipment amount in US$
quantity: The Quantity of the items.
item_url: The URL of the item page.
Coming Post We will start from next post to write the main menu, and the first function to create a csv file and insert the first row.
 Follow me on Twitter..
Python: Pandas Lesson 11
Learning : Pandas Lesson 11
Subject: Zoo Management System – P5
In this post we will cover another three functions, let’s start.
Missing Data: A commun problems we will face in any data file is Missing data, and if we are doing data analysis this may ledd us to a real problem. In this section we will cover only the missing data and will not go through any filling techniques.
Missing Data Report
def missing_data(df):
clear() # To clear the terminal.
print(‘\n\n *** Missing Data Report ***\n’)
print(‘ There are {} rows and {} columns.’.format(df.shape[0],df.shape[1]))
print(‘\n Number of missing data in each columns are:\n’)
total_miss = 0 # Counter
for each in df:
print(‘\n We have {} missing data in {} column.’.format(df[each].isnull().sum(),each))
total_miss = total_miss + df[each].isnull().sum()
print(‘\n Total missing data :’,total_miss)
print(‘\n The missing data represent {}% of the DataFrame.’.format((df.size*total_miss)/100))
input(‘\n\n\n\n ** Press any key to continue .. . . ‘)
|
|
This is a very simple missing data report, but doing the job for-now, we cover some part of missing data in lesson 5 read it Here.
Add New Record: I divide the editing function into three parts or three functions, Add new record, Edit a record and delete a record.
First we will work on Add New Record, from the name we know that this function will allow the user to add a record to the DataFrame, first we will get all columns in the dataframe, also we will get the maximum value in the ID column and increase it by one, then we will ask the user to enter the data for each column, and we are assuming that the user will (or MUST) enter a valid data since we agree that we will not have any validation test in this version of the application, also if the user just press ‘Enter’ thats mean NA data so we will add NaN to the field.
So let’s start..
Add New Record
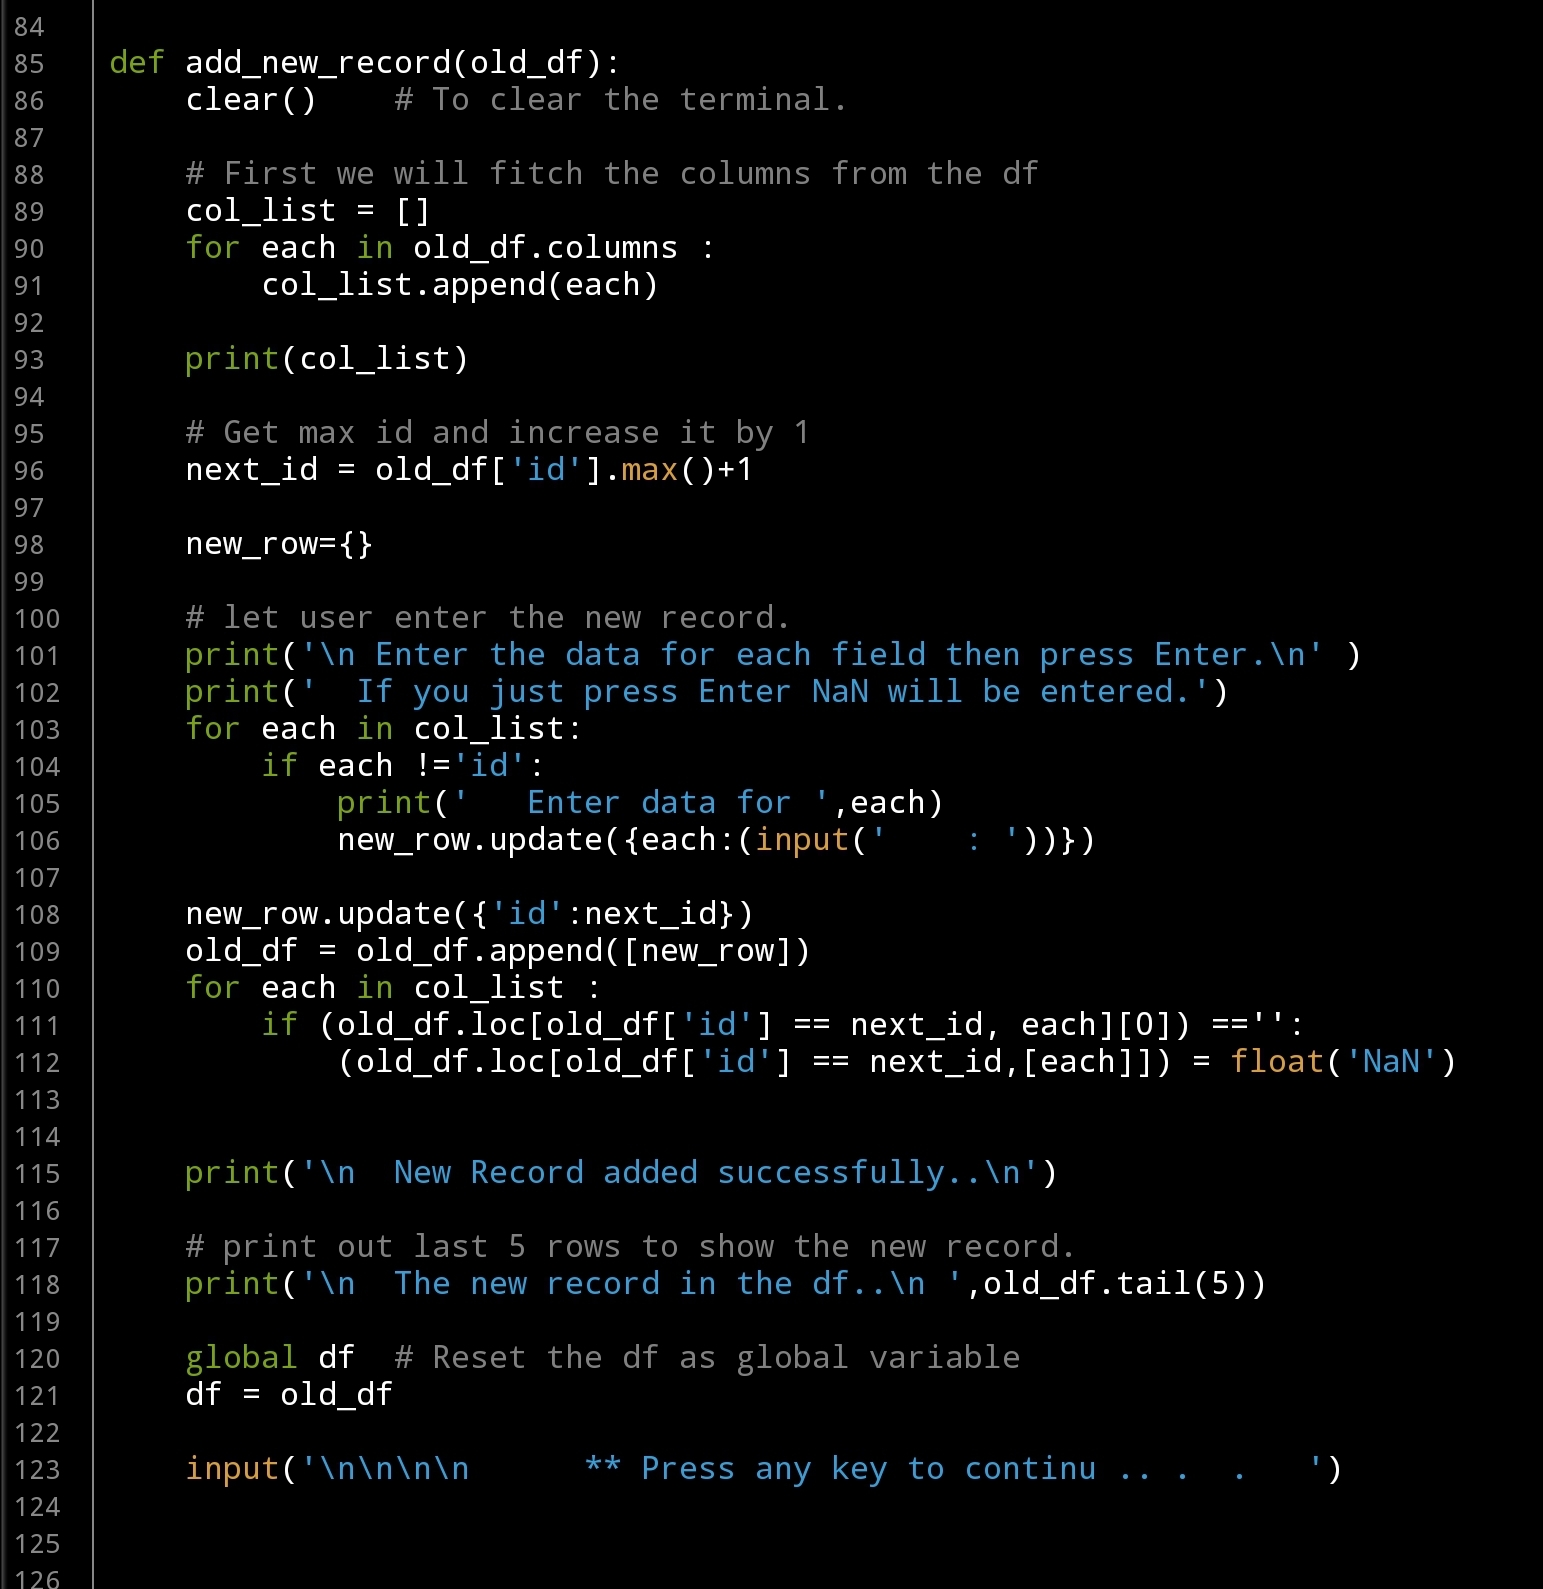
def add_new_record(old_df):
clear() # To clear the terminal.
# First we will fitch the columns from the df
col_list = []
for each in old_df.columns :
col_list.append(each)
print(col_list)
# Get max id and increase it by 1
next_id = old_df[‘id’].max()+1
new_row={}
# let user enter the new record.
print(‘\n Enter the data for each field then press Enter.\n’ )
print(‘ If you just press Enter NaN will be entered.’)
for each in col_list:
if each !=’id’:
print(‘ Enter data for ‘,each)
new_row.update({each:(input(‘ : ‘))})
new_row.update({‘id’:next_id})
old_df = old_df.append([new_row])
for each in col_list :
if (old_df.loc[old_df[‘id’] == next_id, each][0]) ==”:
(old_df.loc[old_df[‘id’] == next_id,[each]]) = float(‘NaN’)
print(‘\n New Record added successfully..\n’)
# print out last 5 rows to show the new record.
print(‘\n The new record in the df..\n ”,old_df.tail(5))
global df # Reset the df as global variable
df = old_df
input(‘\n\n\n\n ** Press any key to continu .. . . ‘)
|
Save : At this point we will jump to the last function, simply after adding data to our DataFrame we need to keep this change, we need to save the new record so we can retrieve it next time we run the application. So to do this we will re-write the csv file again.
Save the DataFrame
def save_the_df (df):
clear() # To clear the terminal.
file_name=’data_file_zoo.csv’
df.to_csv(file_name, encoding=’utf-8′, index=False)
print(‘\n File saved .. ‘)
input(‘\n\n\n\n ** Press any key to continue .. . . ‘)
|
|
Now, if we close the application then re-open it again we will have the new records that we add. We just save the file and will not have any option to rename it.
In Next Post.. in coming post we will cover deleting and editting functions, also I will upload the full code file to the portal so any one can download it as python file.
:: Pandas Lessons Post ::
| Lesson 1 | Lesson 2 | Lesson 3 | Lesson 4 |
| Lesson 5 | Lesson 6 | Lesson 7 | Lesson 8 |
| Lesson 9 | Lesson 10 | Lesson 11 |
Python: Pandas Lesson 10
Learning : Pandas Commands
Subject: Zoo Management System – P4
In the last lesson, we wrote the first two function (loading the file and showing some sample data), now we will show the columns in our data file, showing the data type of each column and sorting the data based on certain column.
Show Columns: In most or all cases, we need to take a look to what we have in our data file and columns name will give us a fast idea of what we should expect. To do this we will write this code..
Show Columns
def show_column(df):
clear() # To clear the terminal.
#first we will count the column.
print(‘\n\n There is {} column in the DataFrame. ‘.format(len(df.columns)))
print(‘\n The columns name: ‘,df.columns)
input(‘\n\n\n\n ** Press any key to continu .. . . ‘)
|
|
Enhancement: If we want to add more flexibility to this function, we may give the user the opportunity to change the columns name, but we want this application to be as simple as we can.
Data Type: Knowing the Data type of our fields is important, in case we want to apply the data validation on user entries we will use the data type, so here is the function to do this.
def data_type()
def data_type(df):
clear() # To clear the terminal.
print(‘\n\n The data type of each columns in the DataFrame is :\n’)
print(df.dtypes)
input(‘\n\n\n\n ** Press any key to continu .. . . ‘)
|
Run Time .. 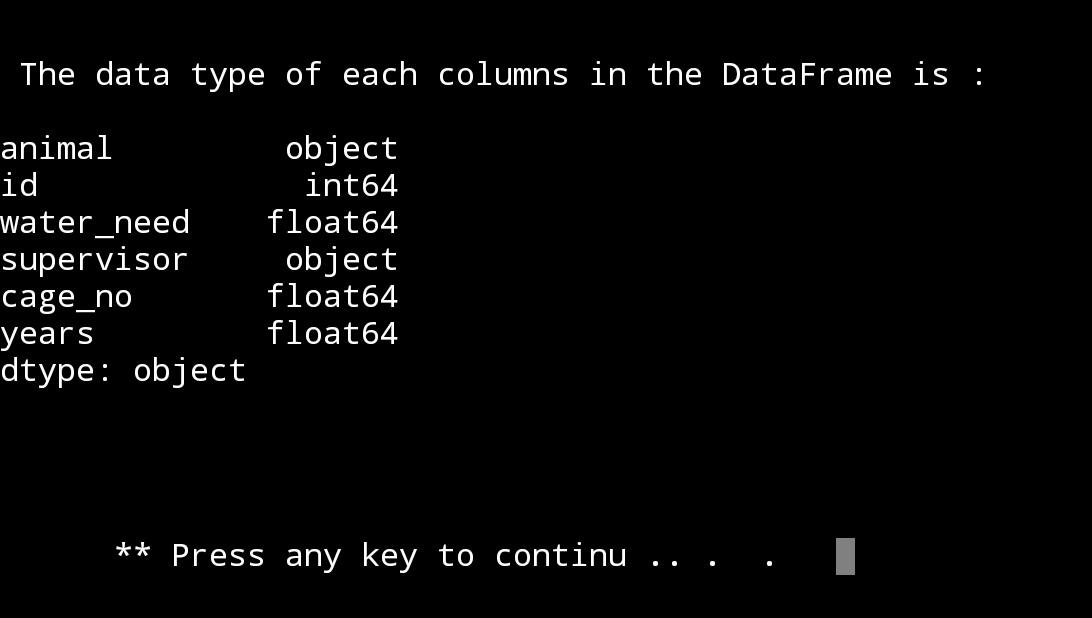
|
Third function we want to write is Sort, sorting the dataframe and in this function we will give the user the ability to select the column to sort the data based on it.
To do this, we first will list the clomns in the date frame then we will ask the use to select a column of sort.
Here is the code
Sorting based on user selection
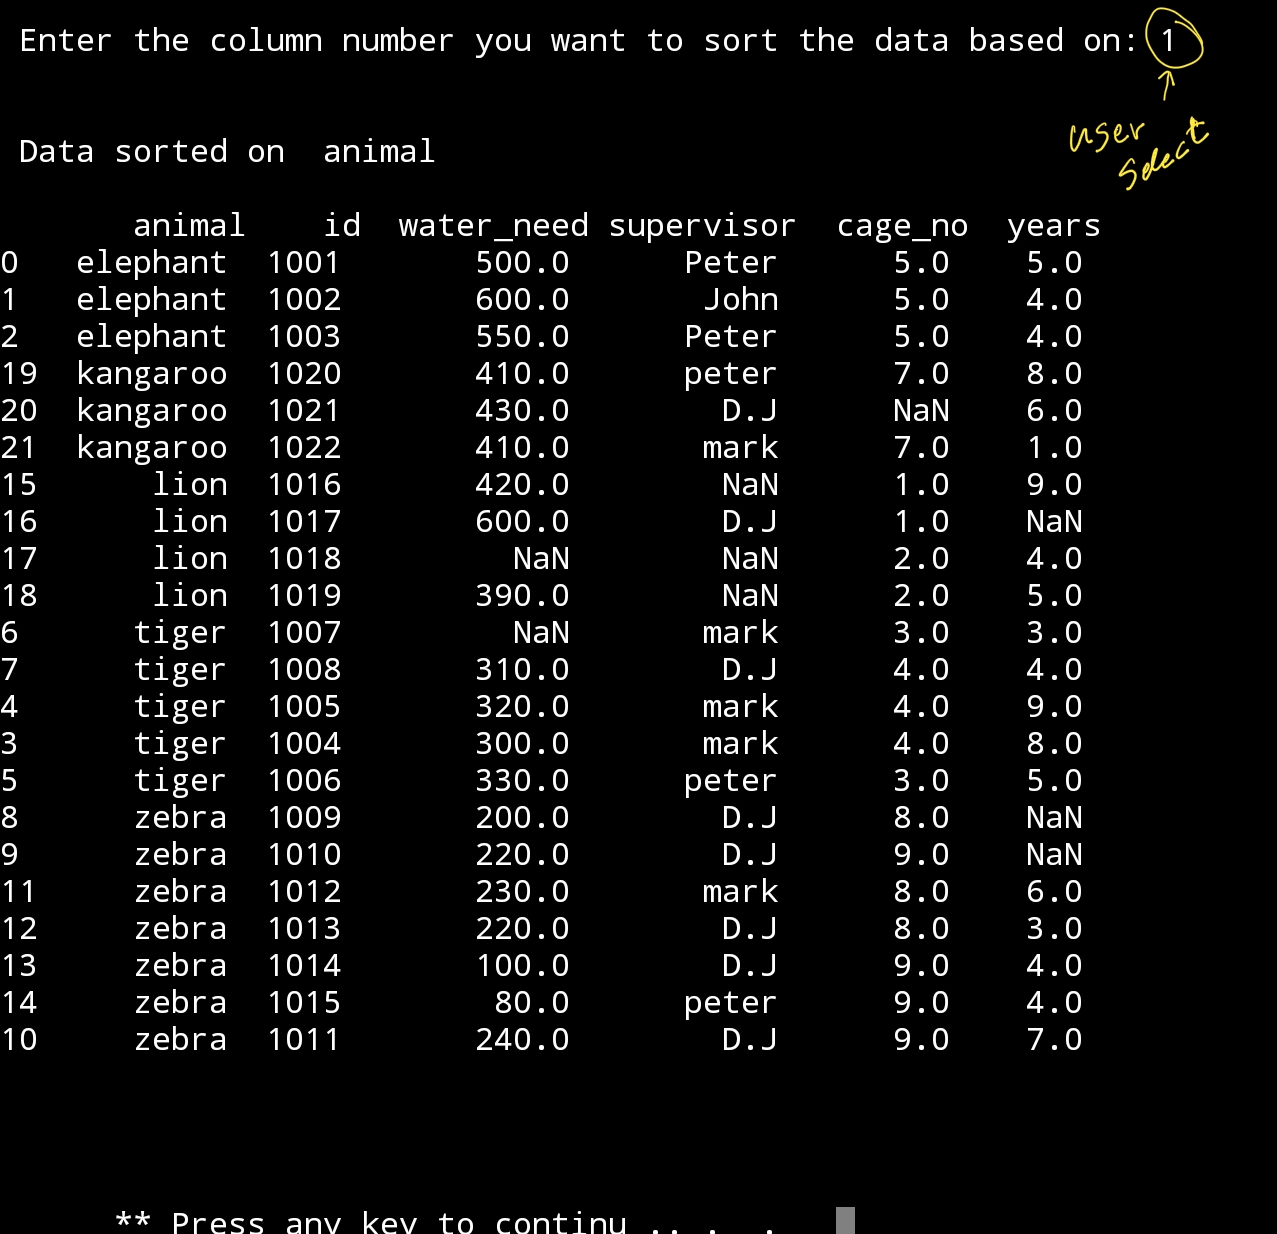
def sort_df(df):
clear() # To clear the terminal.
x = 1
print(‘\n\n The list of the columns in the DataFrame are:’)
for each in df.columns : # List the columns in DataFrame
print(‘ ‘,x,each)
x +=1
u_sele=input(‘\n Enter the column number you want to sort the data based on: ‘)
print(‘\n\n Data sorted on ‘,df.columns[int(u_sele)-1])
print(‘\n’,df.sort_values(df.columns[int(u_sele)-1]))
input(‘\n\n\n\n ** Press any key to continu .. . . ‘)
|
|
Screen shot of the code. |
| After selecting option No.5 (Sort) from the main menu, we will have a list of columns in the DataFrame to select from. | |
|
DataFrame sorted based on our selection. |
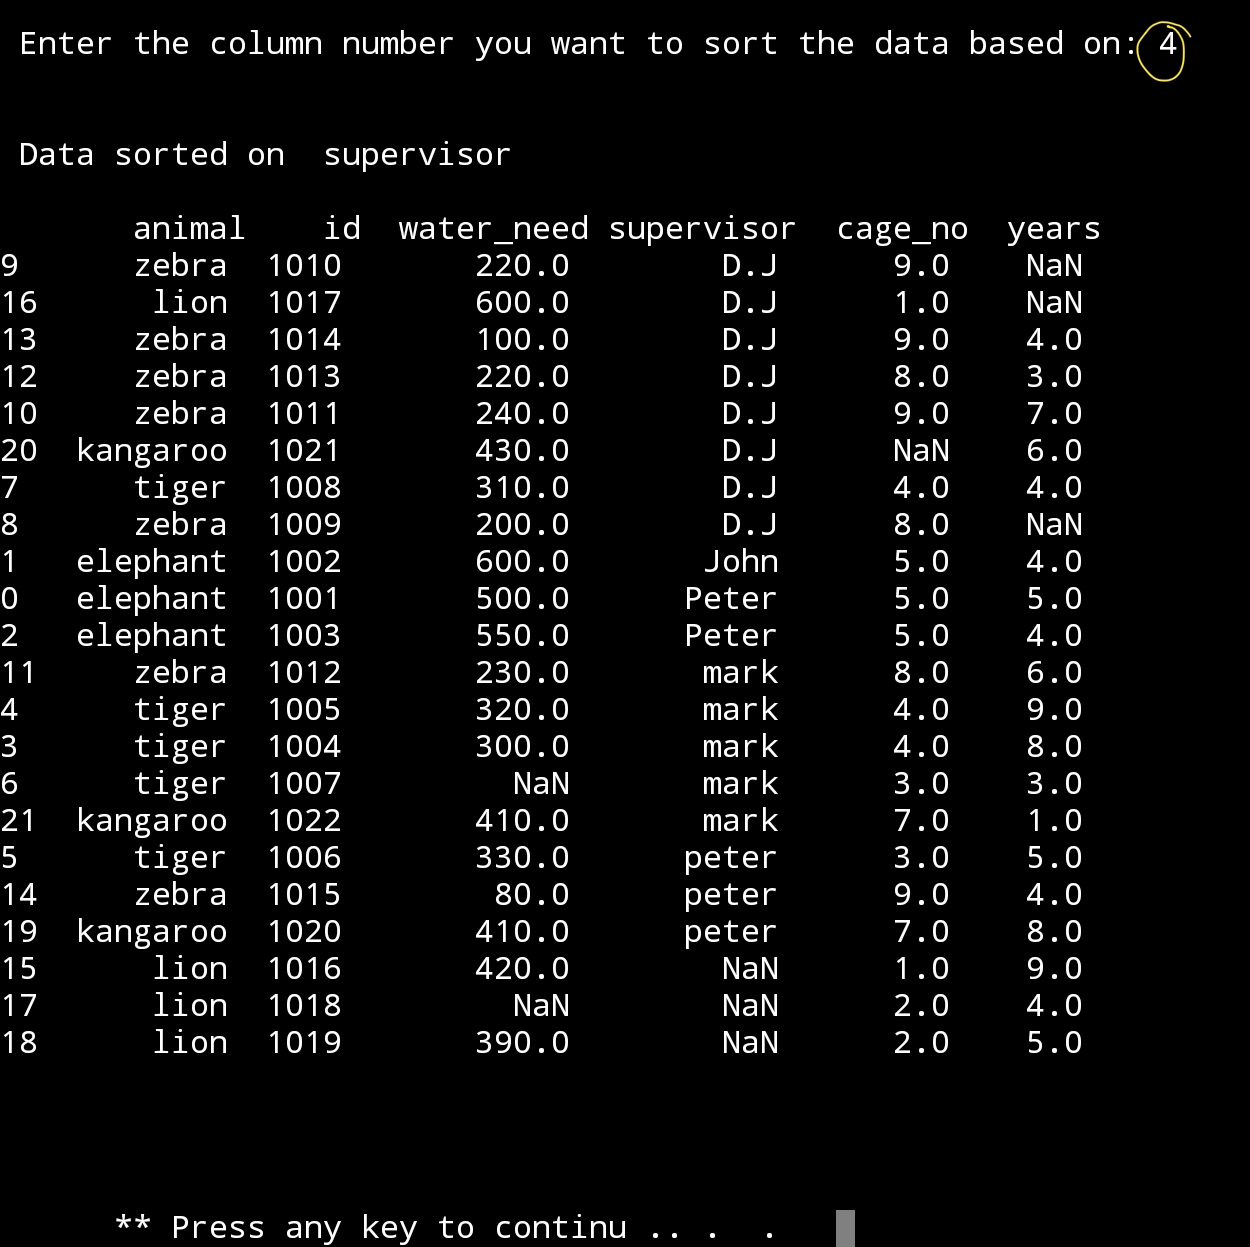 |
Another try of sorting. |
Enhancement: In sorting we can add to sort Descending or Ascending, but we will keep this for next version.
Wrapping Up: At this point we finised five functions of our system, I will upload the code file pandas_zoo_app.py at the end of this lesson section, the file will be on my Download Page.
:: Pandas Lessons Post ::
| Lesson 1 | Lesson 2 | Lesson 3 | Lesson 4 |
| Lesson 5 | Lesson 6 | Lesson 7 | Lesson 8 |
| Lesson 9 | Lesson 10 | Lesson 11 | Lesson 12 |
Python: Pandas Lesson 9
Learning : Pandas Commands
Subject: Zoo Management System – P3
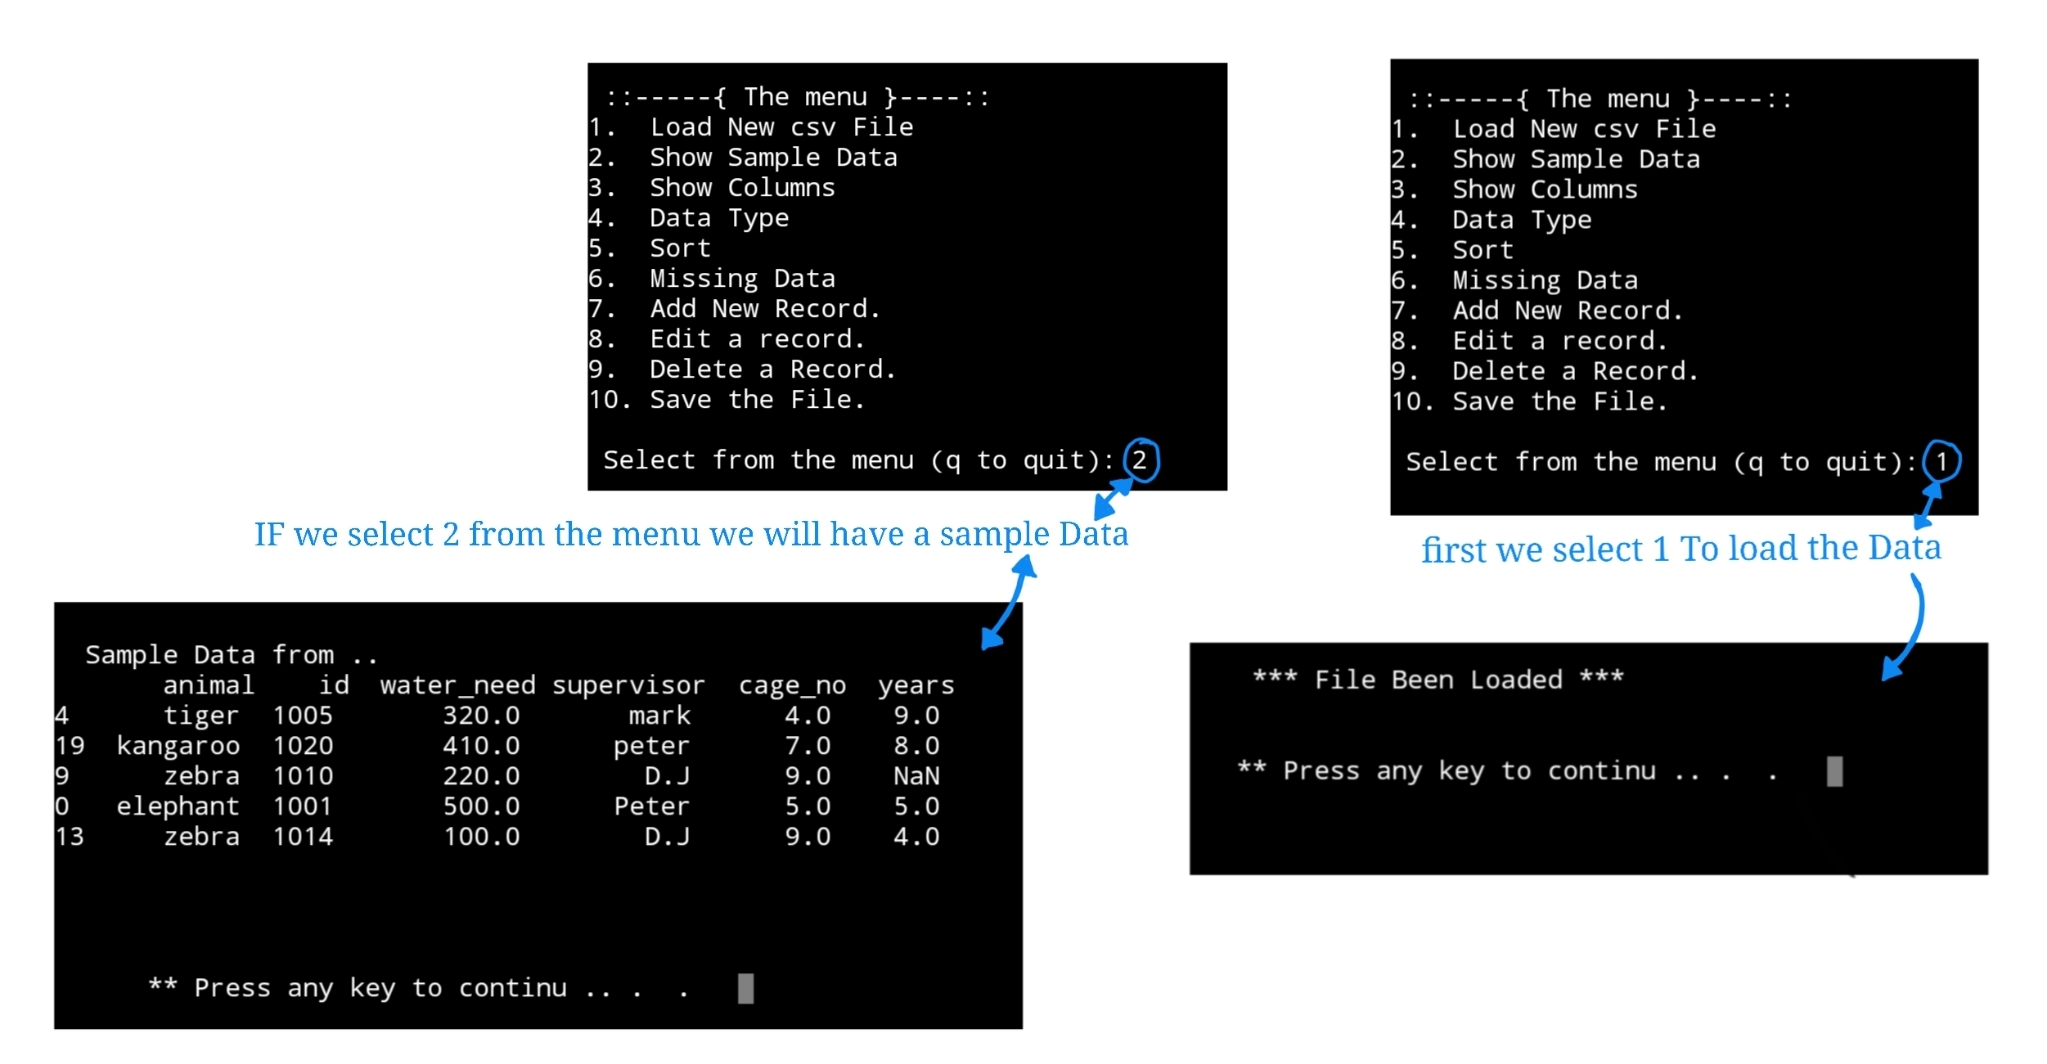
In this lesson we will write two functions in our Zoo Management System-ZMS, first one to load the data file (we assume we have our data file in the same directory of the .py file.) and the second one is to display a sample 5 rows from the data. We will write each function and test it then we will add it to our main app user_choice() section and will try it from there. At the end of this post you can find a screen shot of the user_choice() code with two function in place.
Also I would like to emphasize that I am not using any try .. exception block in this system, so I am expecting that the user will enter a valid data.
Load New File: As far we want to be simple in this lesson, we will assume that we have a file named ‘data_file_zoo.csv’ and that it stored in the same directory as our source file .py, so we will not cover the [find file code] to change or select other file in other directory.(maybe in version 2.0 of this app if we want to upgrade it. ).
Enhancement ides:
1. Giving the user the ability to change the path and the file.
2. User can start form new empty file and create the columns and data of his new data file.
def load_file()
def load_file() :
filename=’data_file_zoo.csv’
global df
df = pd.read_csv(filename)
print(‘\n\n *** File Been Loaded *** \n’)
input(‘\n ** Press any key to continu .. . . ‘)
|
|
Show sample data: After loading the data into a df, and we set the df as a global variable so we can use it any-where in our application. So to print-out a sample data we will use coming code.
get_sample_data(df2)
def get_sample_data(df2):
clear() # To clear the terminal.
print(‘\n\n Sample Data from .. \n’,df2.sample(5))
input(‘\n ** Press any key to continue .. . . ‘)
|
|
Here is the two function in the def user_coice(u_choice):

|
Summary: At this point we have the menu and two functions, each time we run the app we need to select first number 1 to load the data into a df, the idea behind this was to give the user the opportunity to select any data file from any path, but in this stage the data file will be static in the code. this feature will be in version 2.0 After loading the data we can select number 2 from the menu ( Show sample data ).
And here is a run screen shot..
|
In coming Next Post .. in coming post we will cover more functioins in our system. We will check the columns name, seeing the data type of each column and sorting the data in the data frame.
:: Pandas Lessons Post ::
| Lesson 1 | Lesson 2 | Lesson 3 | Lesson 4 |
| Lesson 5 | Lesson 6 | Lesson 7 | Lesson 8 |
| Lesson 9 |
Python: Pandas Lesson 7
Learning : Create simple zoo application P1
Subject: The Menu and functions names
Althought we mostly using pandas in reading datafile and analysing it, Here we are thinking as if we have an interface for an application, and we are offering some menu and function to the user so he can use the apps.
As we went throught learnning pandas and from all past lessons we saw alot’s of functions and commands that are enuph to start developing a small application to manage our zoo data. Starting from this post we will bulid parts of our application, so lets start.
The Menu The menu is the way or the tool that will help the user to perform deffernt action on the data. Here is the function of the the_menu and it will return the user selection.
Althought we mostly using pandas in reading datafile and analysing it, but Here we are think as if we have an interface of application, and the we are offering a menu to the user were he can select a function user will
The Menu
def the_menu ():
print(‘\n ::—–{ The menu }—-::’)
print(‘1. Load New csv File’)
print(‘2. Show Sample Data’)
print(‘3. Show Columns’)
print(‘4. Data Type’)
print(‘5. Sort.’)
print(‘6. Missing Data’)
print(‘7. Add New Record.’)
print(‘8. Edit a record.’)
print(‘9. Delete a Record.’)
print(’10. Save the File.’)
return (input(‘\n Enter your selection: ‘))
# calling the menu.the_menu()

|
def the_menu(): The code above will print our menu on the screen and asking the user to select the action and return a number of the menu. From there we will run other functions, we may change or add to the menu if we need to.
First I will define each menu-line to have an overall view of the functionality in the app:
1. Load New csv File: We will ask the user to write the file name he want to upload, and we will assume that the file is in the same directory and if the file not exist we will create one.
2. Show Sample Data: Print out sample data from the dataframe using df.sampl().
3. Show Columns: List all the columns in the dataframe.
4. Data Type: Show the data Type of each column.
5. Sort: The user will select the sorting column.
6. Missing Data: This command will give the user a report of how many data are available in the columns and if there is any missing data.
7. Add New Record: Adding new row to the data file.
8. Edit a record: Editing a row.
9. Delete a Record: Deleting a row from the data file.
10. Save the File To save the file, and we will save it under new name.
Whats in the next lesson:
:: Writing the menu selection loops.
:: Writing the first two functions in the application.
:: Pandas Lessons Post ::
| Lesson 1 | Lesson 2 | Lesson 3 | Lesson 4 |
| Lesson 5 | Lesson 6 | Lesson 7 | Lesson 8 |
| Lesson 9 | Lesson 10 | Lesson 11 | Lesson 12 |
Python: Pandas Lesson 4
Learning : Panda Lesson 4
Subject: DataFrame Columns: Hide, Drop, rename
We still workinng on dataframe and columns, we will go thrght some function and at the end I will just add a line to save the dataframe in a new CSV file. So let’s start.
We still working on our data_file_zoo.csv and here i am copying the column we have in the file or in our df.
print(‘\n\n Columns in thedataFrame..\n’,df.columns)
|
|
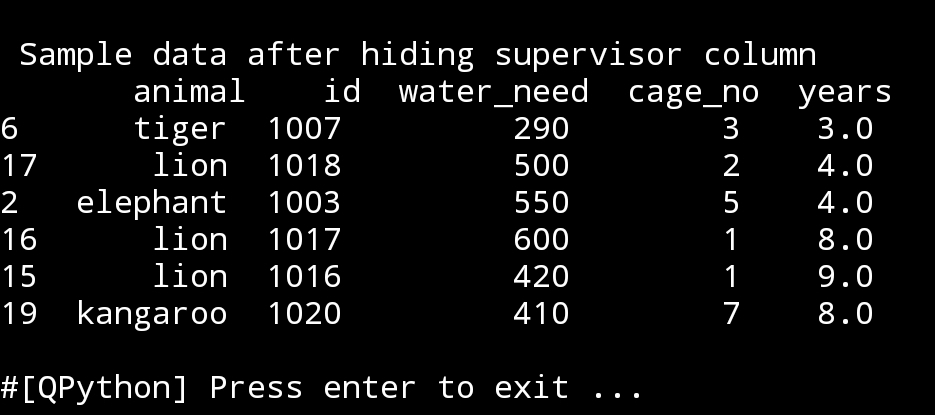
Now we have a list of columns in our DataFrame, some time we want to hide a column, here we will creat a variable and whenever we call this variable the column will not be shone on the screen.
Hide column ‘supervisor’
In this line we will set a variable to hide supervisor column, and just for sceen-shop we will present 6 random rows
hide_supervisor=df.drop([‘supervisor’], axis=1)
print(‘\n\n Sample data after hiding supervisor column\n’,hide_supervisors.sample(6))
|
In the upper case, we may have a password column or some key information column that we don’t want to be shown in the dataframe, then it’s good idea to create a DataFrame without this column an use it.
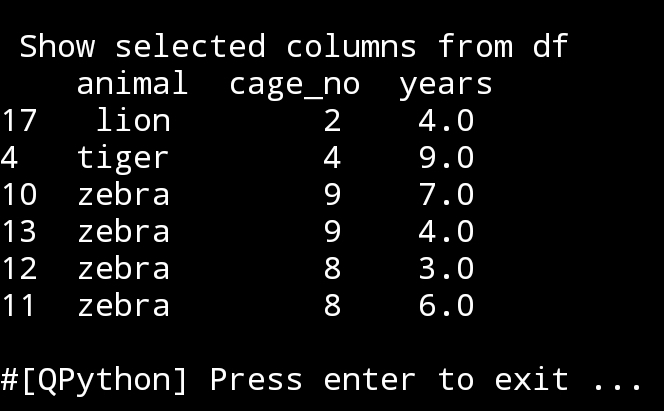
If we have a dataframe and we are examining some thing and don’t want to show all columns every time we print the df, so just show (say three) columns. To do this, first we will print the columns names so we know what we have in the df, then using coming code we will select whatever we want to show.
animal_cage_years=df[[‘animal’,’cage_no’,’years’]]
print(‘\n\n Show selected Columns from df\n’,animal_cage_years.sample(6))
|
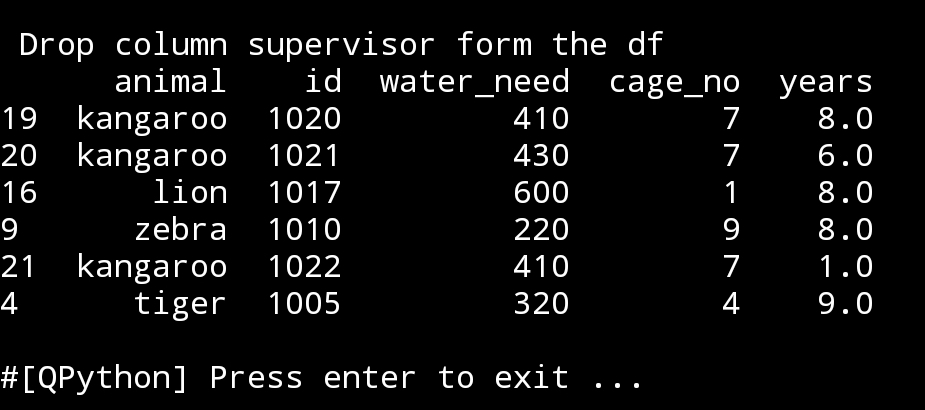
Now we will drop a column from the df, I will select ‘supervisor’, just like this:
print(‘\n\n Drop column ”supervisor” form the df’)
print(df.drop([‘supervisor’],axis=1))
|
To be Aware: In the above case, if we use the command on df and we add inplace=True then this will change the df, so any time we calling the df it will be without the ‘supervisor’ column. Here is the code..
df.drop([‘supervisor’], inplace=True, axis=1)
print(‘\n\n’,df)
If we want to hide more than one columns we just add them in the command like this:
hide_years_cages=df.drop([‘years’,’cage_no’], axis=1)
print(hide_years_cages.sample(6))

|
If we want to check wither or not a df contain column c_name if yes hide-it else print ‘Column not found’.
If column ‘cage_no’ in df hide it.
if ‘cage_no’ in df.columns:
hide_cage = df.drop([‘cage_no’], axis=1)
print(‘\n\n’,hide_cage.sample(6))
else:
print(‘Column not found’)
and we can in the else block just showing another dataframe.
|
:: Pandas Lessons Post ::
| Lesson 1 | Lesson 2 | Lesson 3 | Lesson 4 |
| Lesson 5 |
Python: Pandas Lesson 3
Learning : Pandas Lesson 3
Subject: dataframe (sort, where and filters)
In my Last post Pandaas Lesson 2, we show some commands that will output part of our dataframe (df) such as if we want to output the information we have about lions, or other animals in the Zoo file. Or to see what aminals fell under particular supervisor. Also I try to add a print statment over each output table to show/describe the table content.
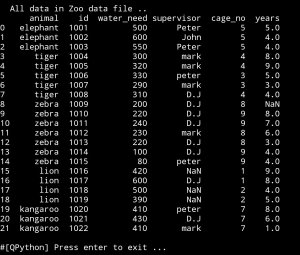
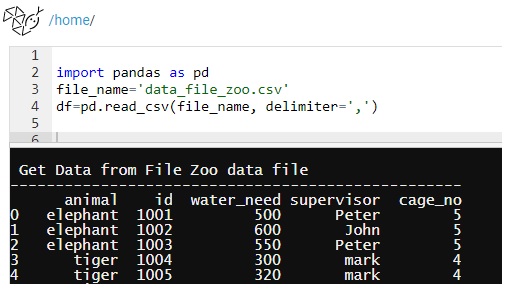
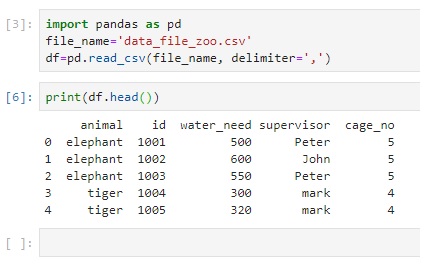
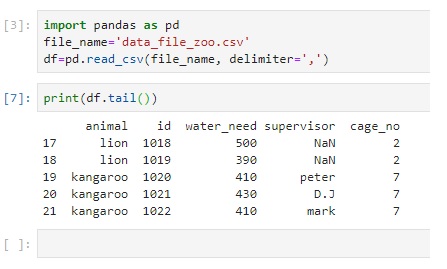
In theis Lesson, or let’s say in this post I will share another bunch of commands dealing with one table of data. We will keep using our Zoo data file. So first I wll call the dataframe df.
import pandas as pd
file_name=’data_file_zoo.csv’
df=pd.read_csv(file_name, delimiter=’,’)
print(‘\n Data from Zoo file..’,df)
So, if we want to sort the data based on supervisor name.
df.sort_values(‘supervisor’, inplace=True)
print(‘\n\n Sorted data with Supervisor Name\n’,df)
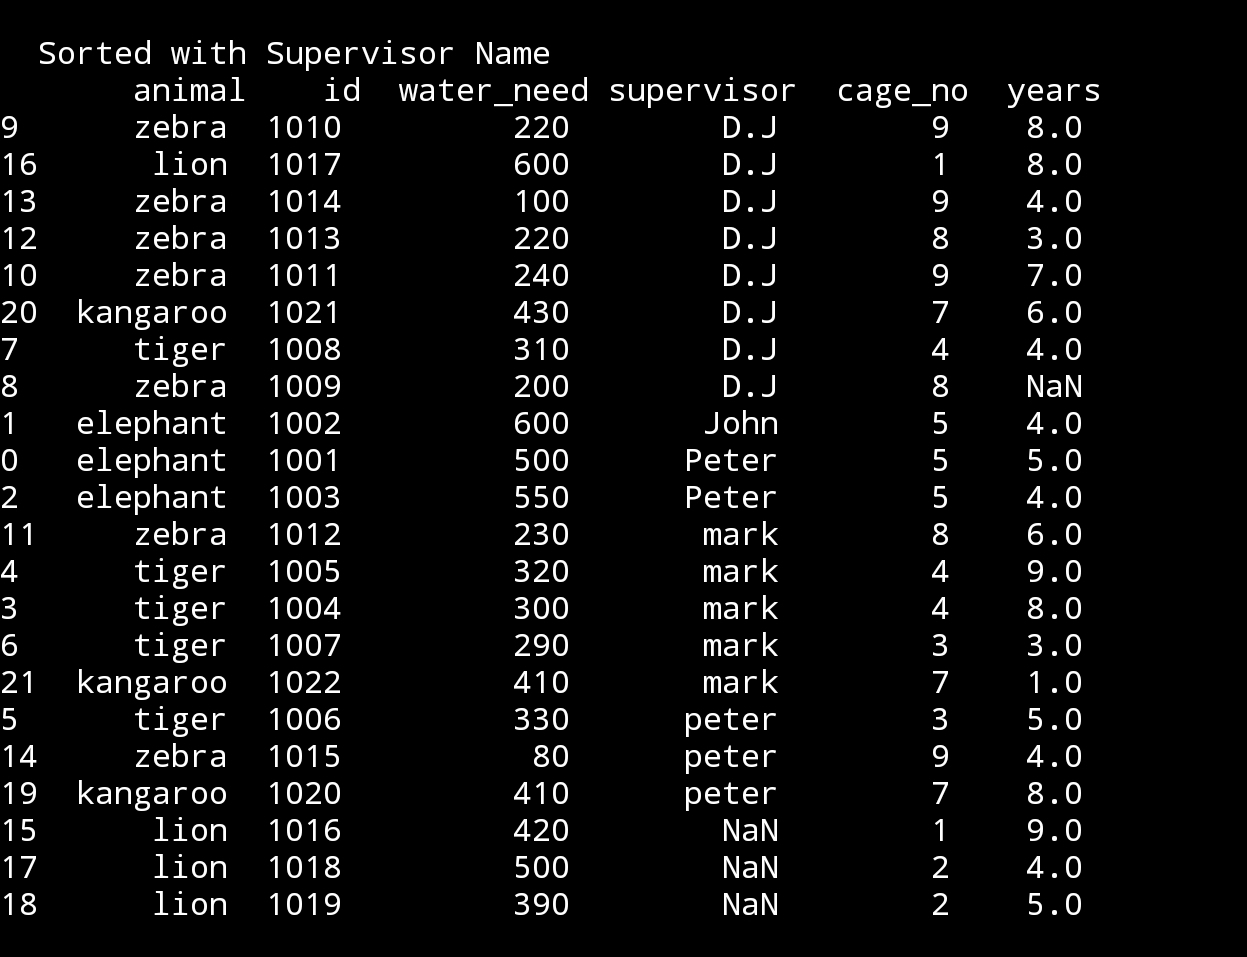
|
First thing to notes that we have two group of supervisors name ‘peter’ one with small ‘p’, another with Big ‘P’. Another thing to see that we have some ‘lions’ with NaN under supervisor, this meas there is no data in that feilds. I will not change this now, let’s do this in another lesson.
So, let’s sort the data now with anumal type.
df.sort_values(‘animal’,inplace=True)
print(‘\n\n Sort with animal type.\n’,df)
 |
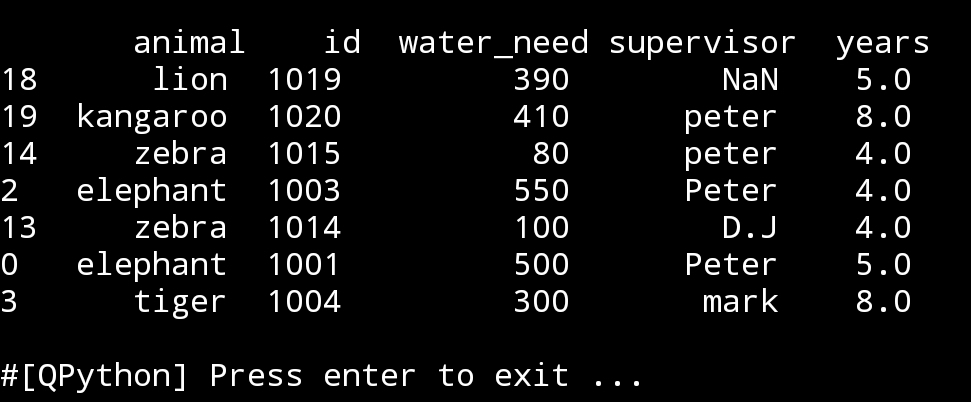
If we want to print all animal data under mark supervision, other data will be shown as NaN.
mark_supervision = df[‘supervisor’]==’mark’
df.where(mark_supervision, inplace = True)
print(‘\n\n Any rows else than Mark as supervisore will be as NaN\n’,df)
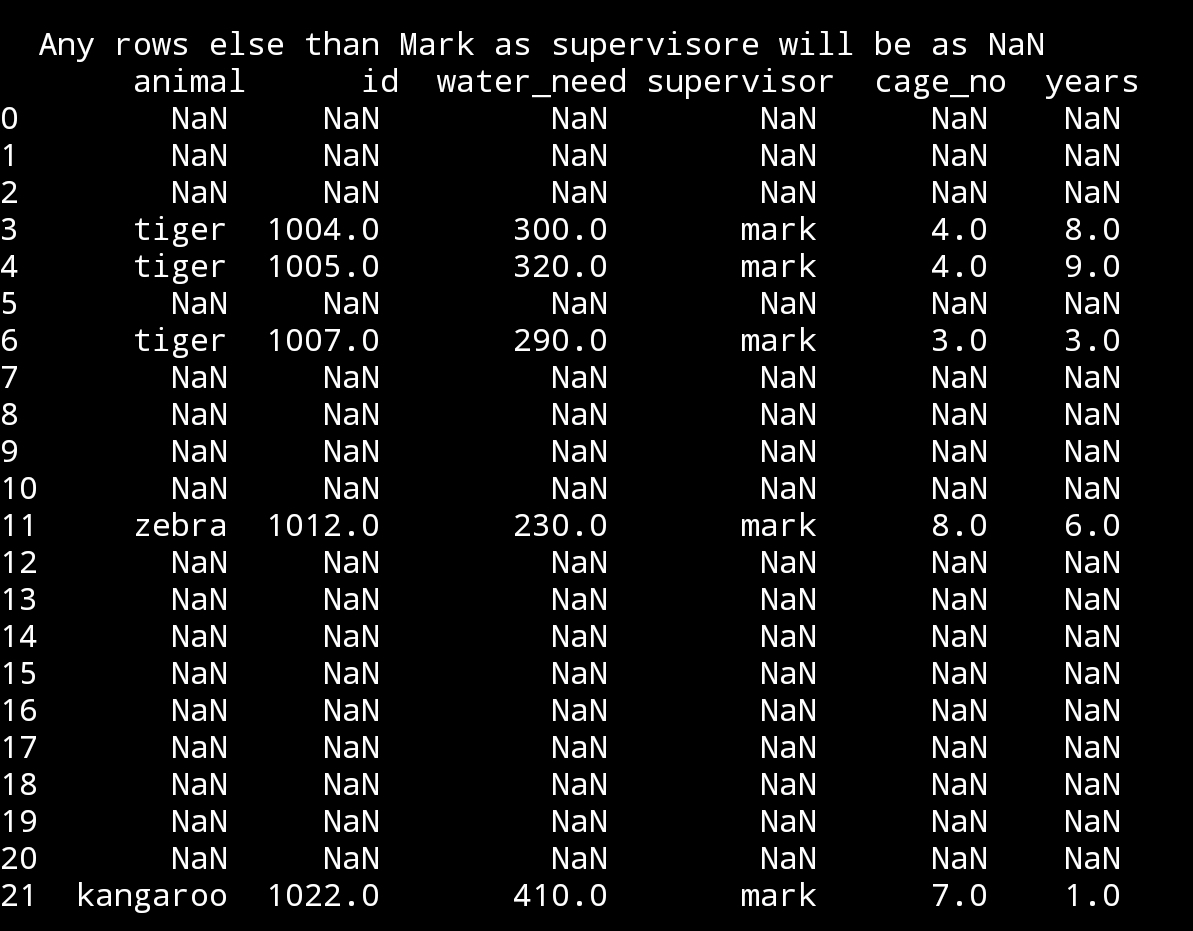
|
If we want to add another filter to the upper dataframe to show animals under mark supervision if the animal age is more than 7.
age_biger_7 = df[‘years’] >7
df.where(mark_suoervision & age_biger_7, inplace = True)
print(‘\n\n Only rows under mark supervision if animal age > 7 \n’,df)

|
:: Pandas Lessons Post ::
| Lesson 1 | Lesson 2 | Lesson 3 | Lesson 4 |
| Lesson 5 |
Python: Pandas Lesson
Learning : DataFrame and some commands
Subject: Pandas printing selected rows
First thing we will do today, we will add another coloumn to our CSV data_file_zoo.csv, we will add ‘years’ this will be hwo old each animal in the zoo is.
File_Name: data_file_zoo.csv
animal,id,water_need,supervisor,cage_no,years
elephant,1001,500,Peter,5,5
elephant,1002,600,John,5,4
elephant,1003,550,Peter,5,4
tiger,1004,300,mark,4,8
tiger,1005,320,mark,4,9
tiger,1006,330,peter,3,5
tiger,1007,290,mark,3,3
tiger,1008,310,D.J,4,4
zebra,1009,200,D.J,8,
zebra,1010,220,D.J,9,8
zebra,1011,240,D.J,9,7
zebra,1012,230,mark,8,6
zebra,1013,220,D.J,8,3
zebra,1014,100,D.J,9,4
zebra,1015,80,peter,9,4
lion,1016,420,,1,9
lion,1017,600,D.J,1,8
lion,1018,500,,2,4
lion,1019,390,,2,5
kangaroo,1020,410,peter,7,8
kangaroo,1021,430,D.J,7,6
kangaroo,1022,410,mark,7,1
As we just update out file, we need to load it to the memory by calling the df (dataframe), this will happen once we run our code.
Here is a screen shot of the new data using print(df)
Lets say we want to know how many animals are numder 6 years. Here we will use df.loc to locate what we are looking for.
age_less_6 = df.loc[(dfyears<6)]
# To print we may use this:
print(‘ we have {} animals less than 6 years’.format(len(age_less_6)))
Now, we want to print only lion rows:
lino_rows = df.loc[(df.animal==’lion’)]
 Here is only rows with animal name ‘elephants’:
elephant_rows=df.loc[(df.animal==’elephant’)]

Now let’s print only the rows with lion and elephants:lion_and_elephant = df.loc[(df.animal==’lion’) | (df.animal == ‘elephant’)]
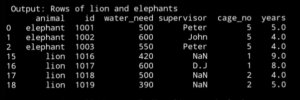
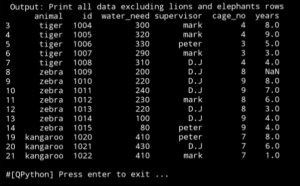
What if we want all the data but not the rows with lino or elephant.
all_exclude_lion_elephant=df.loc[(df.animal !=’lion’) & (df.animal !=’elephant’)]
:: Pandas Lessons Post ::
| Lesson 1 | Lesson 2 | Lesson 3 | Lesson 4 |
| Lesson 5 |
Python: Pandas Lessons
Learning : DataFrame and some commands
Subject:
This is my first hours in Pandas, until now thing are going smooth. I am using pythonanywhere on my PC, and jupyterlab on my galaxy tab S4.
In this post and coming once under name Pandas Lesson I will write some commands and what-ever I think I may need.
So, first thing we need a csv file with data to play with, so I search for some thing simple, i found one with zoo data!, I add two new column to it. so lets see it.
File_Name: data_file_zoo.csv
animal,id,water_need,supervisor,cage_no
elephant,1001,500,Peter,5
elephant,1002,600,John,5
elephant,1003,550,Peter,5
tiger,1004,300,mark,4
tiger,1005,320,mark,4
tiger,1006,330,peter,3
tiger,1007,290,mark,3
tiger,1008,310,D.J,4
zebra,1009,200,D.J,8
zebra,1010,220,D.J,9
zebra,1011,240,D.J,9
zebra,1012,230,mark,8
zebra,1013,220,D.J,8
zebra,1014,100,D.J,9
zebra,1015,80,peter,9
lion,1016,420,,1
lion,1017,600,D.J,1
lion,1018,500,,2
lion,1019,390,,2
kangaroo,1020,410,peter,7
kangaroo,1021,430,D.J,7
kangaroo,1022,410,mark,7
I add the ” supervisor and cage_no ” to the original file so we will have more room to manipulate.
First Command: first thing we need to call pandas library using import, and set the file name and dataframe.
import pandas as pd
file_name=’data_file_zoo.csv’
df=pd.read_csv(file_name, delimiter=’,’)
We will use this part for all our initialization part
|
Other Command: Here are other commands that works with dataframe df.
| print(df) | Will print out all the data from the file. |
| print (df.head()) | Will print first 5 rows |
| print (df.tail()) | Will print last 5 rows |
| print (df.sample(3)) | Will print random 3 rows from the dataframe. |
| print(df.columns) | Will print the columns in the file |
| print (df[[‘id’,’animal’,’cage_no’]]) | Print only the data from column you want |
| print (df[[‘id’,’animal’,’cage_no’]].sample(3)) | Print random 3 rows of only ‘id’,’animal’,’cage_no’ columns |
| print (df[df.animal==’lion’]) | Get all the rows with animal name = lion . case sensitive |
| print(df.head()[[‘animal’,’id’]]) | Print first five rows of only animal and id |
 |
 |
 |
 |
 |
Wrapped up: This is a step one, pandas has many to read about and to learn, I start this initiative just for my self, and i select the hard way to do this, this is not important to my current job, this is nothing that any body will ask me about, but i want to learn and I think i will go further in this self-taught learning sessions..
———————————
Update on: 29/7/2019
:: Pandas Lessons Post ::
| Lesson 1 | Lesson 2 | Lesson 3 | Lesson 4 |
| Lesson 5 |
Python Project: Expenditure App Part 1
Python Project:
Two months back I start to learn #Python “Python is a #computer #programming #language “, you can say it grabbed me very quickly. I start to read some #sample #code from the net, then downloading the requirement and after 10 working days I was writing #codes in python and doing what I love ‘Solving #mathematics puzzles with #python’.
So I decide to contribute in training or publishing python language by posting some codes block with explaining and comments, also by developing an application so we will learn on a real example.
I am publishing some codes on my Twitter (@h_ta3kees):
https://twitter.com/h_ta3kees?s=09
and I will do the same here on my blog.
The coming posts will be about the application that we will start develop I will call it ‘Expenditure App’.
Taking pictures is not my main daily practices, but when i start playing with my camera, i really enjoy my self.
Thanks for visiting my Space..


