Archive
Python: Circle Packing
Circle Packing Project
Subject: Draw, circles, Turtle
Definition: In geometry, circle packing is the study of the arrangement of circles on a given surface such that no overlapping occurs and so that all circles touch one another. Wikipedia
So, we have a canvas size (w,h) and we want to write a code to draw X number of circles in this area without any overlapping or intersecting between circles. We will write some functions to do this task, thous functions are:
1. c_draw (x1,y1,di): This function will take three arguments x1,y1 for circle position and di as circle diameter.
2. draw_fram(): This function will draw the frame on the screen, we set the frame_w and frame_h as variables in the setup area in the code.
3. c_generator (max_di): c_generator is the circles generating function, and takes one argument max_di presenting the maximum circles diameter. To generate a circle we will generate three random numbers for x position, y position and for circle diameter (max_di is the upper limit),also with each generating a while loop will make sure that the circle is inside the frame, if not regenerate another one.
4. can_we_draw_it (q1,di1): This is very important, to make sure that the circle is not overlapping with any other we need to use a function call (hypot) from math library hypot return the distance between two points, then if the distance between two circles is less than the total of there diameters then the two circles are not overlaps.

|
So, lets start coding …
First: the import and setup variables:
from turtle import *
import random
import math

# Create a turtle named t:
t =Turtle()
t.speed(0)
t.hideturtle()
t.setheading(0)
t.pensize(0.5)
t.penup()

# frame size
frame_w = 500
frame_h = 600

di_list = [] # To hold the circles x,y and diameters
 |
Now, Drawing the frame function:
def draw_fram () :t.penup()
t.setheading(0)
t.goto(-frame_w/2,frame_h/2)
t.pendown()
t.forward(frame_w)
t.right(90)
t.forward(frame_h)
t.right(90)
t.forward(frame_w)
t.right(90)
t.forward(frame_h)
t.penup()
t.goto(0,0)
Now, Draw circle function:
def c_draw (x1,y1,di):t.goto(x1,y1)
t.setheading(-90)
t.pendown()
t.circle(di)
t.penup()
This is Circles generator, we randomly select x,y and diameter then checks if it is in or out the canvas.
def c_generator (max_di):falls_out_frame = True
while falls_out_frame :
x1 = random.randint(-(frame_w/2),(frame_w/2))
y1 = random.randint(-(frame_h/2),(frame_h/2))
di = random.randint(3,max_di)
# if true circle is in canvas
if (x1-di > ((frame_w/2)*-1)) and (x1-di < ((frame_w/2)-(di*2))) :
if (y1 ((frame_h/2)-(di))*-1) :
falls_out_frame = False
di_list.append([x1-di,y1,di])

|
With each new circle we need to check the distances and the diameter between new circle and all circles we have in the list, if there is an overlap then we delete the new circle data (using di_list.pop()) and generate a new circle. So to get the distances and sum of diameters we use this code ..
 # get circles distance

    cs_dis = math.hypot(((last_cx + last_cdi) - (c_n_list_x + c_n_list_di)) , (last_cy - c_n_list_y))
    di_total = last_cdi + c_n_list_di
To speed up the generation of right size of circles I use a method of counting the trying times of wrong sizes, that’s mean if the circles is not fit, and we pop it’s details from the circles list we count pops, if we reach certain number then we reduce the upper limits of random diameter of the new circles we generate. Say we start with max_di = 200, then if we pop for a number that divide by 30 (pop%30) then we reduce the max_di with (-1) and if we reach max_di less then 10 then max_di = 60. and we keep doing this until we draw 700 circles.
# if di_list pops x time then we reduce the randomization upper limits
  if (total_pop % 30) == 0:
    max_di = max_di - 1
    if max_di < 10 :
      max_di = 60
Here are some output circles packing ..
 |
 |
With current output we reach the goal we are looking for, although there is some empty spaces, but if we increase the number of circles then there will be more time finding those area with random (x,y,di) generator, I am thinking in another version of this code that’s will cover:
1. Coloring the circles based on the diameter size.
2. A method to fill the spaces.
To Download my Python code (.py) files Click-Here
 Follow me on Twitter..
Python: Numpay – P2
Learning : Python Numpy – P2
Subject: Two Dimensional array and some basic commands
In real mathematics word we mostly using arrays with more than one dimensions, for example with two dimension array we can store a data as
So let’s start, if we want to create an array with 24 number in it starting from 0 to 23 we use the command np.range. as bellow :
 # We are using np.range to create an array of numbers between (0-23)

m_array = np.arange(24)
print(m_array)
[Output]:
[ 0  1  2  3  4  5  6  7  8  9 10 11 12 13 14 15 16 17 18 19 20 21 22 23]
And if we want the array to be in a range with certain incriminating amount we may use this command:
 # Create array between 2-3 with 0.1 interval

m_array = np.arange(2, 3, 0.1)
print(m_array)
[Output]:
[ 2. , 2.1, 2.2, 2.3, 2.4, 2.5, 2.6, 2.7, 2.8, 2.9]
Now if we want to create an array say 3×3 fill with random numbers from (0-10) we use random function in numpy as bellow:
 # create 3x3 Array with random numbers 0-10
m_array = np.random.randint(10, size=(3,3))
print(m_array)
[Output]:
[[6 0 7]
 [1 9 8]
 [5 8 9]]

|
And if we want the random number ranges to be between two numbers we use this command:
# Array 3x3 random values between (10-60)
m_array = np.random.randint(10,60, size=(3,3))
[Output]:
[[11 23 50]
 [36 44 18]
 [56 24 30]]
If we want to reshape the array; say from 4×5 (20 element in the array) we can reshape it but with any 20-element size. Here is the code:
# To crate a randome numbers in an array of 4x5 and numbers range 10-60.
m_array = np.random.randint(10,60, size=(4,5))
print(m_array)

# We will reshape the 4x5 to 2x10
new_shape = m_array.reshape(2,10)
print ('\n   Tne new 2x10 array:\n',new_shape)
[Output]:
[[37 11 56 18 42]
 [17 12 22 16 42]
 [47 29 17 47 35]
 [49 55 43 13 11]]

Tne new 2x10 array:
[[37 11 56 18 42 17 12 22 16 42]
 [47 29 17 47 35 49 55 43 13 11]]
Also we can convert a list to an array,
# Convert a list l=([2,4,6,8]) to a 1D array
# l is a list with [2,4,6,8] values.
l=([2,4,6,8])
print('  l= ',l)
# Convert it to a 1D array.
ar = np.array(l)
print('\n  Type of l:',type(l),', Type of ar:',type(ar))
print('  ar = ',ar)

[Output]:
l=  [2, 4, 6, 8]
Type of: class'list'  , Type of ar: class 'numpy.ndarray'
ar =  [2 4 6 8]
If we want to add a value to all elements in the array, we just write:
# Adding 9 to each element in the array


print('ar:',ar)
ar = ar + 9
print('ar after adding 9:',ar)

[Output]:
ar:  [2 4 6 8]
ar after adding 9: [11 13 15 17]
:: numpy Commands::
| Command | Comments and Outputs |
| my_array = np.array([1,2,3,4,5]) | Create an array with 1 to 5 integer |
| len(my_array) | Get the array length |
| np.sum(my_array) | get the sum of the elements in the array my_array = np.array([1,2,3,4,5]) print(np.sum(my_array)) [Output]: 15 |
| np.max(my_array) | # Get the maximum number in the array my_array = np.array([1, 2, 3,4,5]) max_num = np.max(my_array) [Output]: 5 |
| np.min(my_array) | # Get the minimum number in the array my_array = np.array([1, 2, 3,4,5]) min_num = np.min(my_array) [Output]: 1 |
|
my_array = np.ones(5) Output: [ 1., 1., 1., 1., 1.] |
create array of 1s (of length 5) np.ones(5) Output: [ 1., 1., 1., 1., 1.] |
| m_array = np.arange(24) print(m_array) |
# To create an array with 23 number. [ 0 1 2 3 4 5 6 7 8 9 10 11 12 13 14 15 16 17 18 19 20 21 22 23] |
| m_array = np.arange(2, 3, 0.1) print(m_array) |
# Create an array from 2 to 3 with 0.1 interval value increments. [ 2. , 2.1, 2.2, 2.3, 2.4, 2.5, 2.6, 2.7, 2.8, 2.9] |
| m_array = np.random.randint(10, size=(3,3)) print(m_array) |
# Create a 3×3 array with random numbers between (0,10) [[6 0 7] [1 9 8] [5 8 9]] |
| m_array = np.random.randint(10,60, size=(3,3)) | # Create a 3×3 array with random numbers between (10,60) [[11 23 50] [36 44 18] [56 24 30]] |
| # Create a 4×5 array with random numbers. m_array = np.random.randint(10,60, size=(4,5)) # Reshape m_array from 4×5 to 2×10 |
# m_array 4×5 [[37 11 56 18 42] [17 12 22 16 42] [47 29 17 47 35] [49 55 43 13 11]] # Tne new 2×10 array: |
| # convert a list to array: l=[2,4,6,8] ar = np.array(l) # check data type for l and ar: print(‘\n Type of l:’,type(l),’, Type of ar:’,type(ar)) |
[Output]: l = [2, 4, 6, 8] ar = [2, 4, 6, 8] Type of l: class ‘list,’, Type of ar: class ‘numpy.ndarray’ |
| # Adding 9 to each element in the array ar = ar + 9 |
[11 13 15 17] |
:: numpy Sessions ::
| Sessions 1 | Sessions 2 | Sessions 3 | Sessions 4 |
:: Some Code output ::
Create array with 24 numbers (0-23).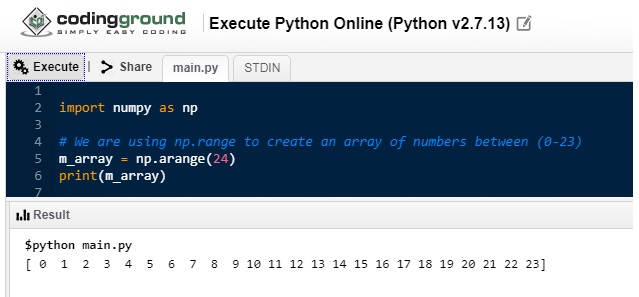
|
Reshape array to 4×6. |
| Create random array of numbers (0-10), size 3×3. |
Reshape 4×5 array to 2×10. |
Convert list to array.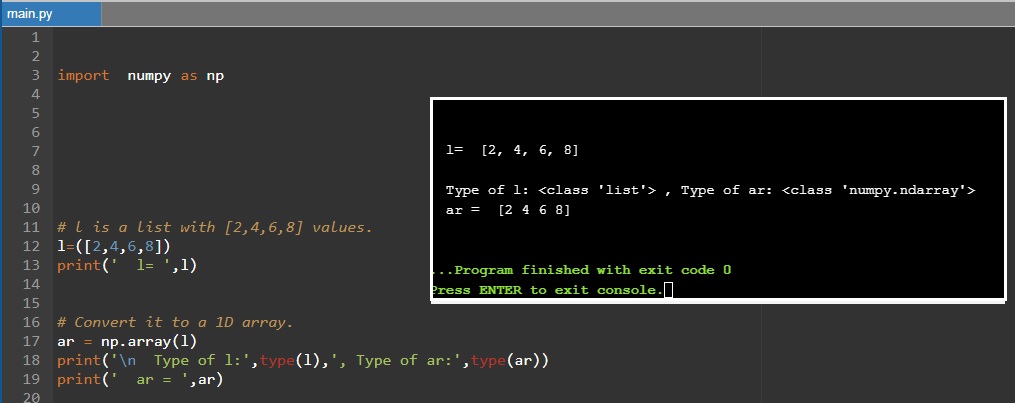 |
To Download my Python code (.py) files Click-Here
Python: Numpay – P1
Learning : Python Numpy – P1
Subject: Numpay and some basic commands
In coming several posts I will talk about the numpay library and how to use some of its functions. So first what is numpy? Definition: NumPy is a library for the Python programming language, adding support for large, multi-dimensional arrays and matrices, along with a large collection of high-level mathematical functions to operate on these arrays. Also known as powerful package for scientific computing and data manipulation in python. As any library or package in python we need to install it on our device (we will not go through this process)
Basic commands in numpy: First of all we need to import it in our code. so we will use
import numpy as np
To create a 1 dimensional array we can use verey easy way as:
  # create an array using numpy array function.
my_array = np.array([1, 2, 3,4,5])
Later we will create a random array of numbers in a range.
Now, to get the length of the array we can use len command as
len(my_array)
Output: 5
To get the sum of all elements in the array we use..
np.sum(my_array)
And to get the maximum and minimum numbers in the array we use ..
 # Get the maximum and minimum numbers in the array
my_array = np.array([1, 2, 3,4,5])
np.max(my_array)
[Output]: 5

np.min(my_array)
[Output]: 1
Some time we may need to create an array with certain Number of elements only one’s, to do this we can use this commands:
#create array of 1s (of length 5)
np.ones(5)
Output: [ 1.,  1.,  1.,  1.,  1.]
The default data type will be float, if we want to change it we need to pass the the ‘dtype’ to the command like this :
#create array of 1s (of length 5) as integer:
np.ones(5, dtype = np.int)
Output: [ 1,  1,  1,  1,  1]
Code output:

|
So far we work on a one dimensional array, in the next post we will cover some commands that will help us in the arrays with multiple dimensions.
:: numpy Commands::
| Command | comment |
| my_array = np.array([1,2,3,4,5]) | Create an array with 1 to 5 integer |
| len(my_array) | Get the array length |
| np.sum(my_array) | get the sum of the elements in the array my_array = np.array([1,2,3,4,5]) print(np.sum(my_array)) [Output]: 15 |
| np.max(my_array) | # Get the maximum number in the array my_array = np.array([1, 2, 3,4,5]) max_num = np.max(my_array) [Output]: 5 |
| np.min(my_array) | # Get the minimum number in the array my_array = np.array([1, 2, 3,4,5]) min_num = np.min(my_array) [Output]: 1 |
|
my_array = np.ones(5) Output: [ 1., 1., 1., 1., 1.] |
create array of 1s (of length 5) np.ones(5) Output: [ 1., 1., 1., 1., 1.] |
:: numpy Sessions ::
| Sessions 1 | Sessions 2 | Sessions 3 | Sessions 4 |
To Download my Python code (.py) files Click-Here
Python and Lindenmayer System – P2
Learning : Lindenmayer System P2
Subject: Drawing with python using L-System
In the first part of Lindenmayer System L-System post (Click to Read) we had wrote two functions: one to generate the pattern based on the variables and roles, and one to draw lines and rotate based on the pattern we have.
In this part I will post images of what Art we can generate from L-System
the codes will be the L-system that generate the patterns, so the code will include: the Rules, Angle (Right, Left) Iteration and Starting Variable.
 |
L-System: Koch Curve  |
L-System: Minkowski Sausage |
L-System: … but here the Iteration is: 3 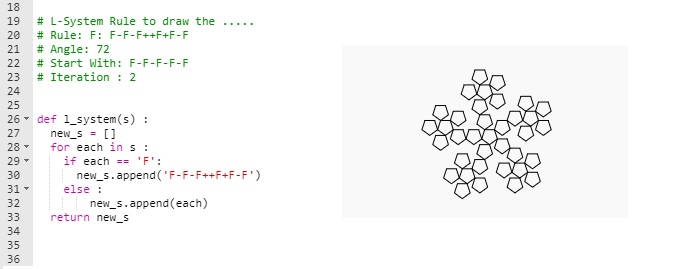 |
L-System: Again … but here the Iteration is: 3  |
L-System: Square Sierpinski  |
L-System: Sierpinski Arrowhead.  |
L-system: Dragon Curve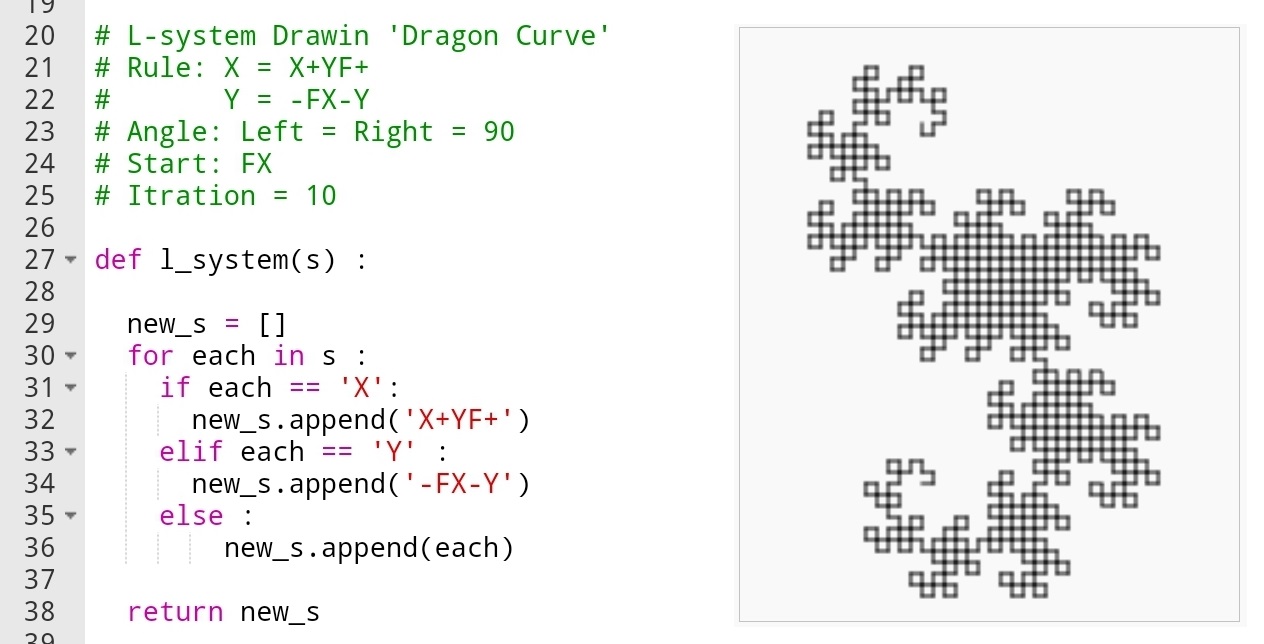 |
L-System: Koch Snowflake 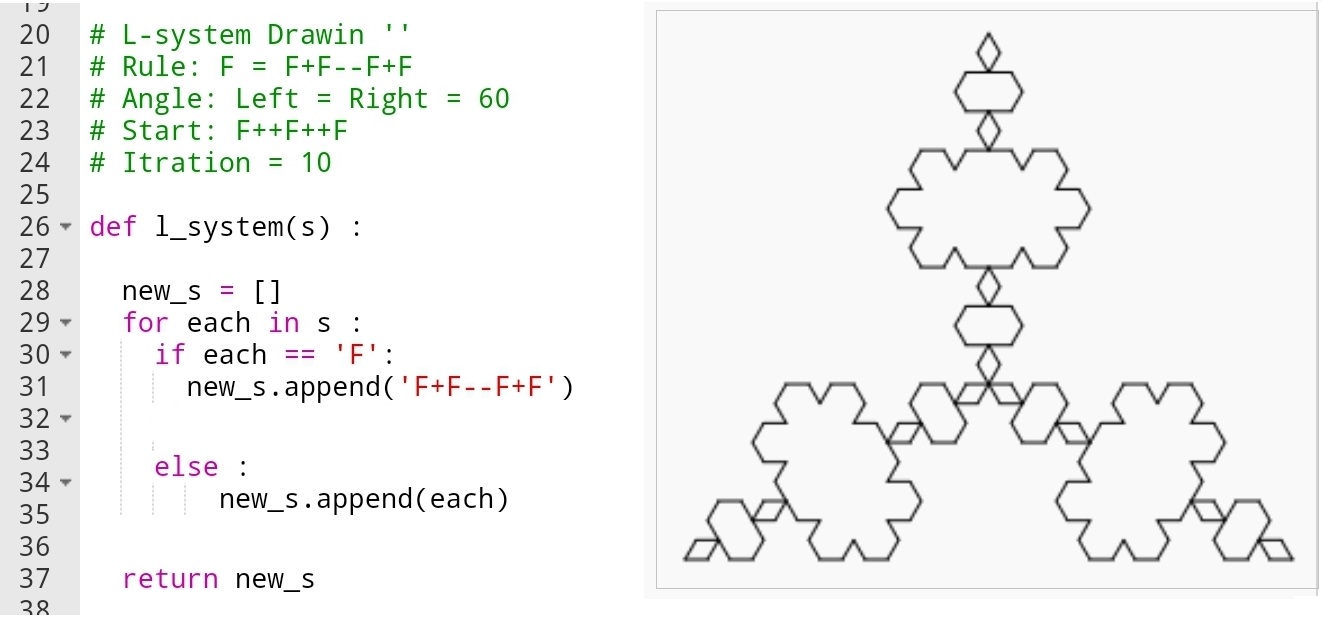 |
L-System: 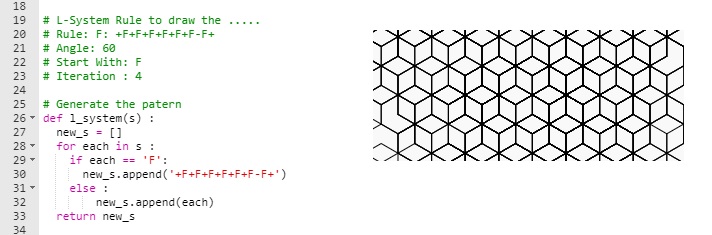 |
L-System:  |
The possibilities to generate the putters and therefore drawing the output is endless, any slightly changes in the iterations or rotation (+ -) angles will take all output to a new levels. In the coming post, I will use the L-system to generate fractal tree and see what we can get from there.
To Download my Python code (.py) files Click-Here
Python and Lindenmayer System – P1
Learning : Lindenmayer System P1
Subject: Drawing with python using L-System
First What is Lindenmayer System or L-System? L-System is a system consists of an alphabet of symbols (A, B, C ..) that can be used to make strings, and a collection of rules that expand each symbol into larger string of symbols.
L-system structure: We can put it as Variables, Constants, Axiom, Rules
Variables (V): A, B, C …
constants : We define a symbols that present some movements, such as ‘+’ mean rotate right x degree, ‘F’ mean move forward and so on ..
Axiom : Axiom or Initiator is a string of symbols from Variable (V ) defining the initial state of the system.
Rules : Defining the way variables can be replaced with combinations of constants and other variables.
Sample:
Variables : A, B {we have two variables A and B}
Constants : none
Axiom : A {Start from A}
Rules : (A → AB), (B → A) {convert A to AB, and convert B to A}
So if we start running the Nx is the number the time we run the rules (Iteration).
N0 : A
N1 : AB
N2 : AB A
N3 : AB A AB
N4 : AB A AB AB A
N5 : AB A AB A AB A AB .. an so-on
So in this example after 5 Iteration we will have this pattern (AB A AB A AB A AB)
In this post we will write two functions, one to generate the pattern based on the Variables and Rules we have. Another function to draw the pattern using Python Turtle and based on the Constants we have within the patterns.
The constants that we may use and they are often used as standard are:
F means “Move forward and draw line”.
f means “Move forward Don’t draw line”.
+ means “turn left by ang_L°”.
− means “turn right ang_R°”.
[ means “save position and angle”.
] means “pop position and angle”.
X means “Do nothing”
and sometime you may add your own symbols and and rules.
First Function: Generate the Pattern will take the Axiom (Start symbol) and apply the rules that we have (as our AB sample above). The tricky point here is that the function is changing with each example, so nothing fixed here. In the coming code i am using only one variable F mean (move forward) and + – to left and right rotations. Other patterns may include more variables. once we finished the function will return the new string list.
Generate the Pattern
|
# Generate the patern def l_system(s) : new_s = [] for each in s : if each == ‘F’: new_s.append(‘F+F+FF-F’) else : new_s.append(each) return new_s |

|
The second function: Draw the Pattern will take the string we have and draw it based on the commands and rules we have such as if it read ‘F’ then it will move forward and draw line, and if it reads ‘-‘ then it “turn right ang_R°”.
here is the code ..
Draw the Pattern
def draw_l_system(x,y,s,b,ang_L,ang_R):
cp = [] # Current position
t.goto(x,y)
t.setheading(90)
t.pendown()
for each in s:
if each == ‘F’ :
t.forward(b)
if each == ‘f’ :
t.penup()
t.forward(b)
t.pendown()
elif each == ‘+’:
t.left(ang_L)
elif each == ‘-‘:
t.right(ang_R)
elif each == ‘[‘:
cp.append((t.heading(),t.pos()))
elif each == ‘]’:
heading, position = cp.pop()
t.penup()
t.goto(position)
t.setheading(heading)
t.pendown()
t.penup()
Now we will just see a one example of what we may get out from all this, and in the next post P2, we will do more sample of drawing using L-System.
In the image bellow, left side showing the Rules, angles and iterations and on the right side the output after drawing the patters.
|
|
To Download my Python code (.py) files Click-Here
Python: Random Squares
Random Squares Art
Subject: Python, Graphics and simulation
In This project say we have a Square (10 x 10 cm) the square has four corners labeled as (a, b, c, d) as in figure i.

|
then we select a random corner (c or d) [assume it is c] then we select an angle (ang) of rotation between (10, 45), and we draw another square positioning (a) on the (c) and rotating it with (ang) anticlockwise as figure ii.

|
Now if we repeat this two steps .. S1. Selecting a random corner (c or d). S2. Selecting a random rotation angle between (10, 45). and draw the square. let’s see what we may have as a random art generator.
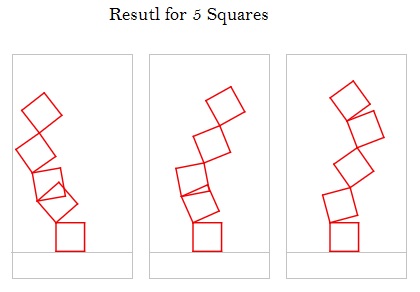 |

|
 |
Python Code for Random Squares Art
Codes to select corner (c or d)
def select_c_or_d():
if random.randrange(0,2) == 0 :
x = cdpos[0][0]
y = cdpos[0][1]
else:
x = cdpos[1][0]
y = cdpos[1][1]
t.setheading(0)
t.right(random.randrange(rotmin,rotmax)*f)
Codes to draw the Square (c or d)
def d_square(w,x1,y1):
t.goto(x1,y1)
t.pendown()
t.forward(w)
t.right(-90)
t.forward(w)
# save corner c position
cdpos.append([t.xcor(),t.ycor()])
t.right(-90)
t.forward(w)
# save corner d position
cdpos.append([t.xcor(),t.ycor()])
t.right(-90)
t.forward(w)
t.penup()
I notes that if we increase the number of Squares, we start to have some interesting results.
.. Have Fun ..
To Download my Python code (.py) files Click-Here
My Fitbit Data
Solving My Fitbit data Problem
Subject: VBA code to combine Fitbit excel files into one
I purchase a Fitbit Alta HR in 2017, and since then I wear it and never take it off unless for charging. Fitbit Alta HR is a very nice slim device, but unfortunately there was no way to upload my previous data from my old device to my Fitbit, this was not the only issue with Fitbit data, now; after three years still we can’t download Fitbit data in one file, if you want to do this (each time) you need to send a request to Fitbit team and they will prepare the file for you!! Instead, Fitbit site allow you to download your data as month by month, in my case I will have almost 32 files.
Solving the Problem: After downloading the excel files and look at them, I decide to write a code to help me combine all the current 32 files and any coming once into one data file. First I start thinking to use Python to do this task, but after second thought I will use the Excel file and VBA macro coding to do it.
Here in coming paragraph I will post about the general idea and some codes that i use.
General Idea: I will use same structure of Fitbit file and name it as “fitbit_All_data_ali”, in this file we will create new tab and name it Main. In the Main tab we will create several buttons using excel developer tools and will write the macro VBA code for each task we need to operate.
Tabs in our file: Main: Contain buttons and summary about my data.
Body, Food, Sleep, Activities and Food Log. Food Log tab will store the data such as calories, fibers, fat and so-on., all those tabs will be filled with a copied data from each Fitbit data file.
Here are some VBA codes that I use and what it’s purpose .
| Code: ‘ Get current path. the_path = Application.ActiveWorkbook.Path |
The path on the current excel file. |
| Code: the_All_Data_file = ThisWorkbook.Name |
Get current excel file name |
| Code: Workbooks.Open Filename:=thepath + my_source_Filename |
Open a file |
| Code: Windows(my_source_Filename).Activate Sheets(“Foods”).Select Range(“A2:B31”).Select Selection.Copy |
Goto fitbit file, goto food sheet, select the data copy it. |
| Code: Application.CutCopyMode = False Workbooks(my_source_Filename).Close SaveChanges:=False |
Close an open excel file. |
| Code: Range(“A3”).Select Selection.EntireRow.Insert , CopyOrigin:=xlFormatFromLeftOrAbove |
To insert a black Row |
| Code: sname = ActiveSheet.Name |
Get current sheet name |
| Code: Function go_next_sheet() As String ‘ This code will go to next sheet if there is one, if not will return ‘last’ On Error Resume Next If sht.Next.Visible xlSheetVisible Then Set sht = sht.Next sht.Next.Activate End Function |
if there is no more tabs or sheets, function will return “last” |
Final Results: After i run the code, I have an Excel file contain all my Fitbit data in one place. Mission Accomplished
To Download my Python code (.py) files Click-Here
Python Project: Ant Escaping Path
Python simulation project
Python, Graphics and simulation
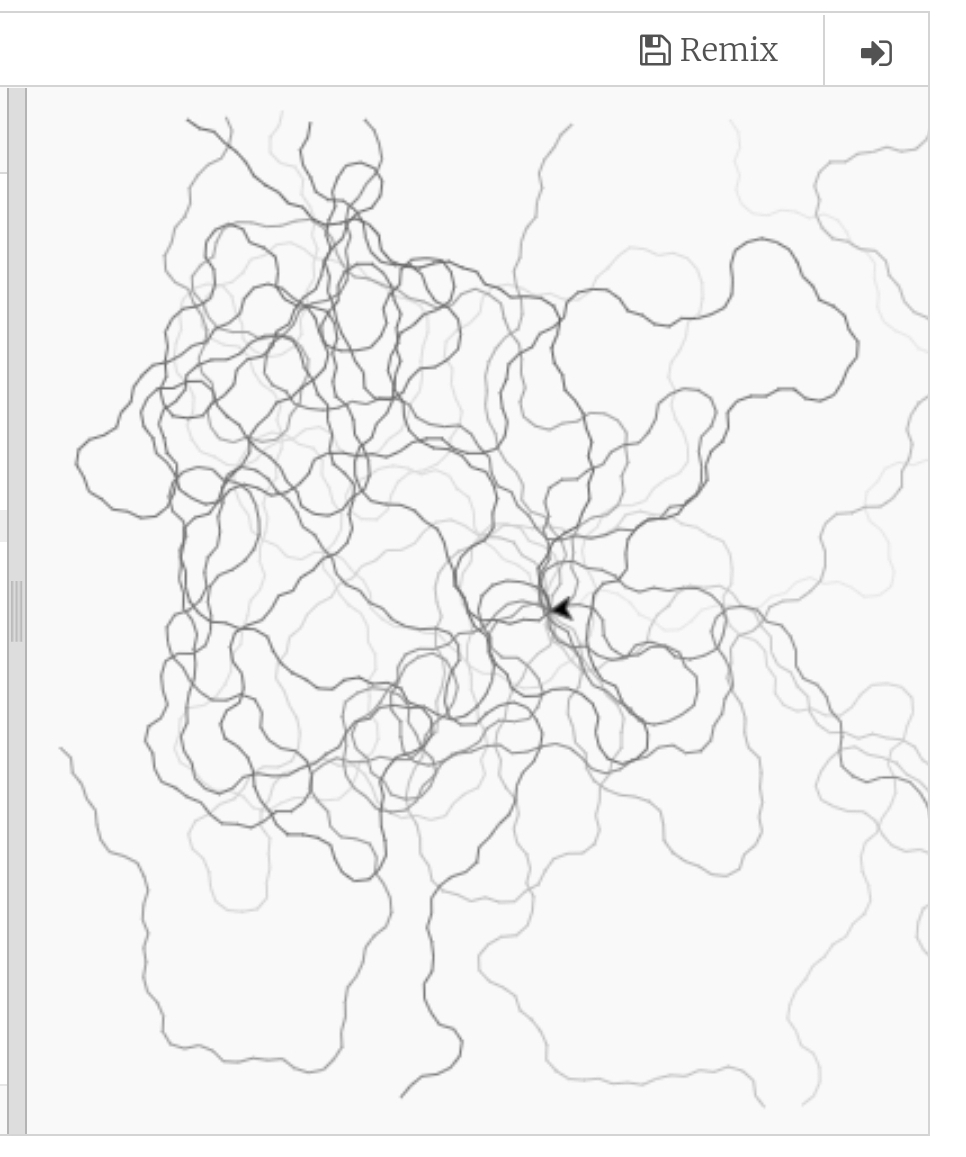
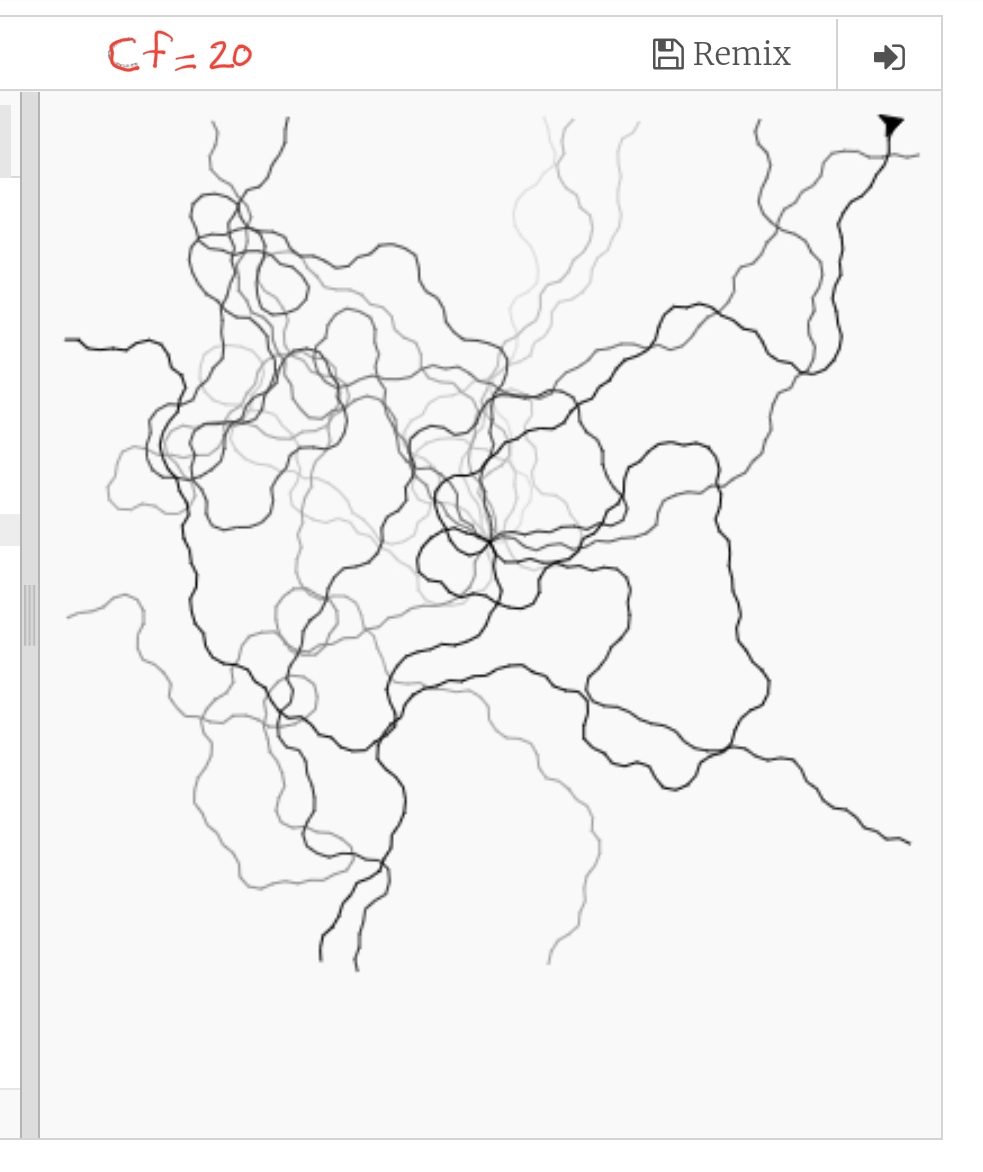
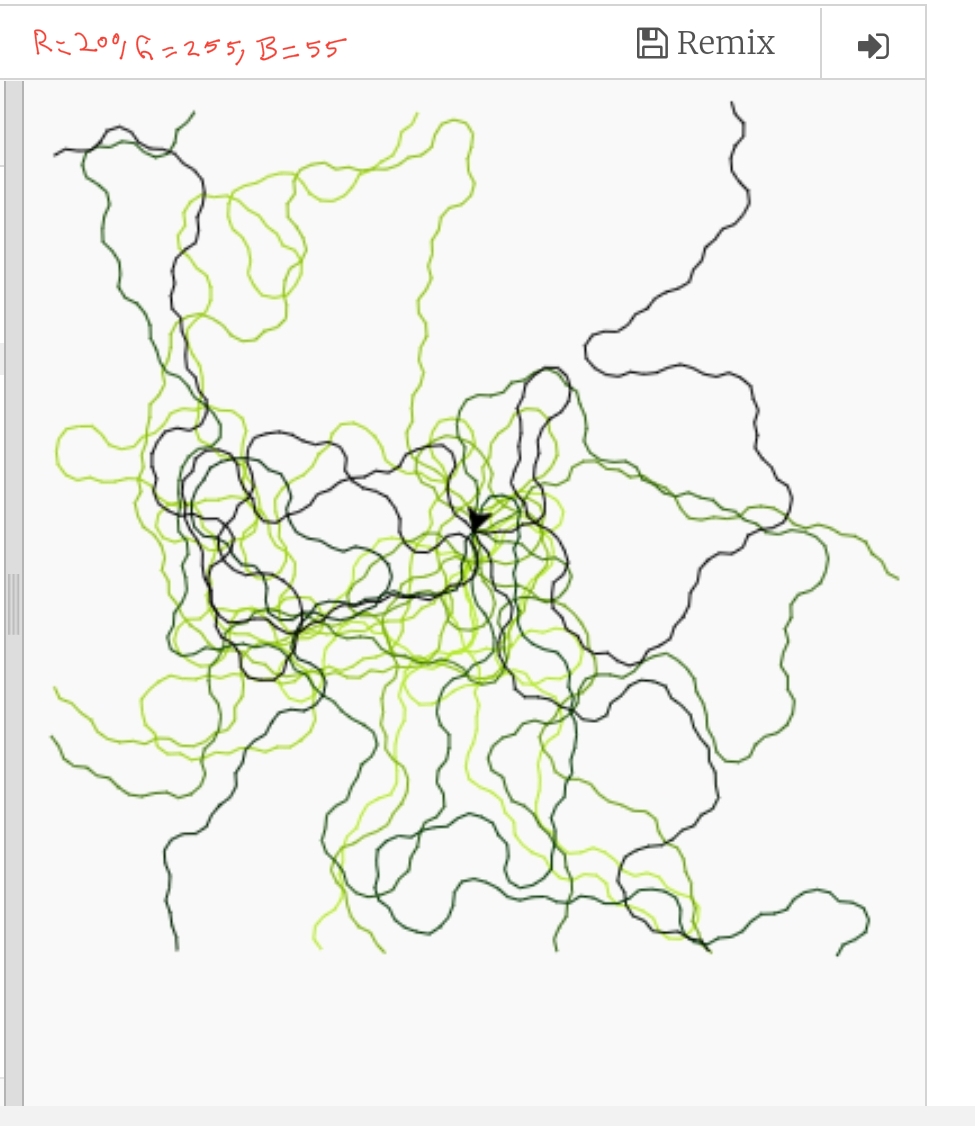
In this project we assume that we have a square pad and we put an ant in the center of this pad, we let the ant to walk, once it reach any eadgs of the square we move it with our hand to the middle again, say we doing this for x times and each time we colored the ant foots with gray level (light to dark) color. Our project is to write a code to simulate this task (ant movement).
Enhancement: Here are some enhancement ideas:
1. We can use the Pi or Golden Ratio for the variables.
2. Also we can set a memory facto so with each time we move the Ant to the center the memory will increase so it may use the same path.
3. For the memory, we can set a position (x,y) as a food, and each time it reach the food it’s memory will increase.
The Code
# Create in 27/8/2019 .
import turtle
import random
screen = turtle.Screen()
screen.setworldcoordinates(-700,-700,700,700)
screen.tracer(5)
t1=turtle.Turtle()
t1.speed(0)
t1.penup()
# colors varibles
# r=240, g=240, b=240 is a light gray color
r=240
g=240
b=240
t1.pencolor(r,g,b)
cf = 3 # color increasing factor
ff = 0 # ant forward moving factor
#screen.bgcolor(“black”)
def rand_walk(x,the_t):
the_t.pendown()
# The color will be darker each time
the_t.pencolor(r-(x*cf),g-(x*cf),b-(x*cf))
the_t.forward(20+(ff*x))
def ant_walk ():
x = 1
while x < 7 : # Moving the Ant to the center 7 times
rand_walk(x,t1)
if random.randrange(1,100) %2:
t_ang = random.randrange(10,45)
t1.right(t_ang)
else:
t_ang = random.randrange(10,45)
t1.left (t_ang)
# if the ant reach the square boards then we move it to the center.
if (t1.xcor() > 650 ) or (t1.xcor() 650 ) or (t1.ycor() < -650 ):
t1.penup()
t1.goto(0,0)
x = x + 1
# Calling the Function
ant_walk()
Here is an GIF file
|
|

|
|
|
To Download my Python code (.py) files Click-Here
Python: Orders Manager P4
Learning : Orders Management System using Python and Pandas
Subject: File Exists and Adding new Record
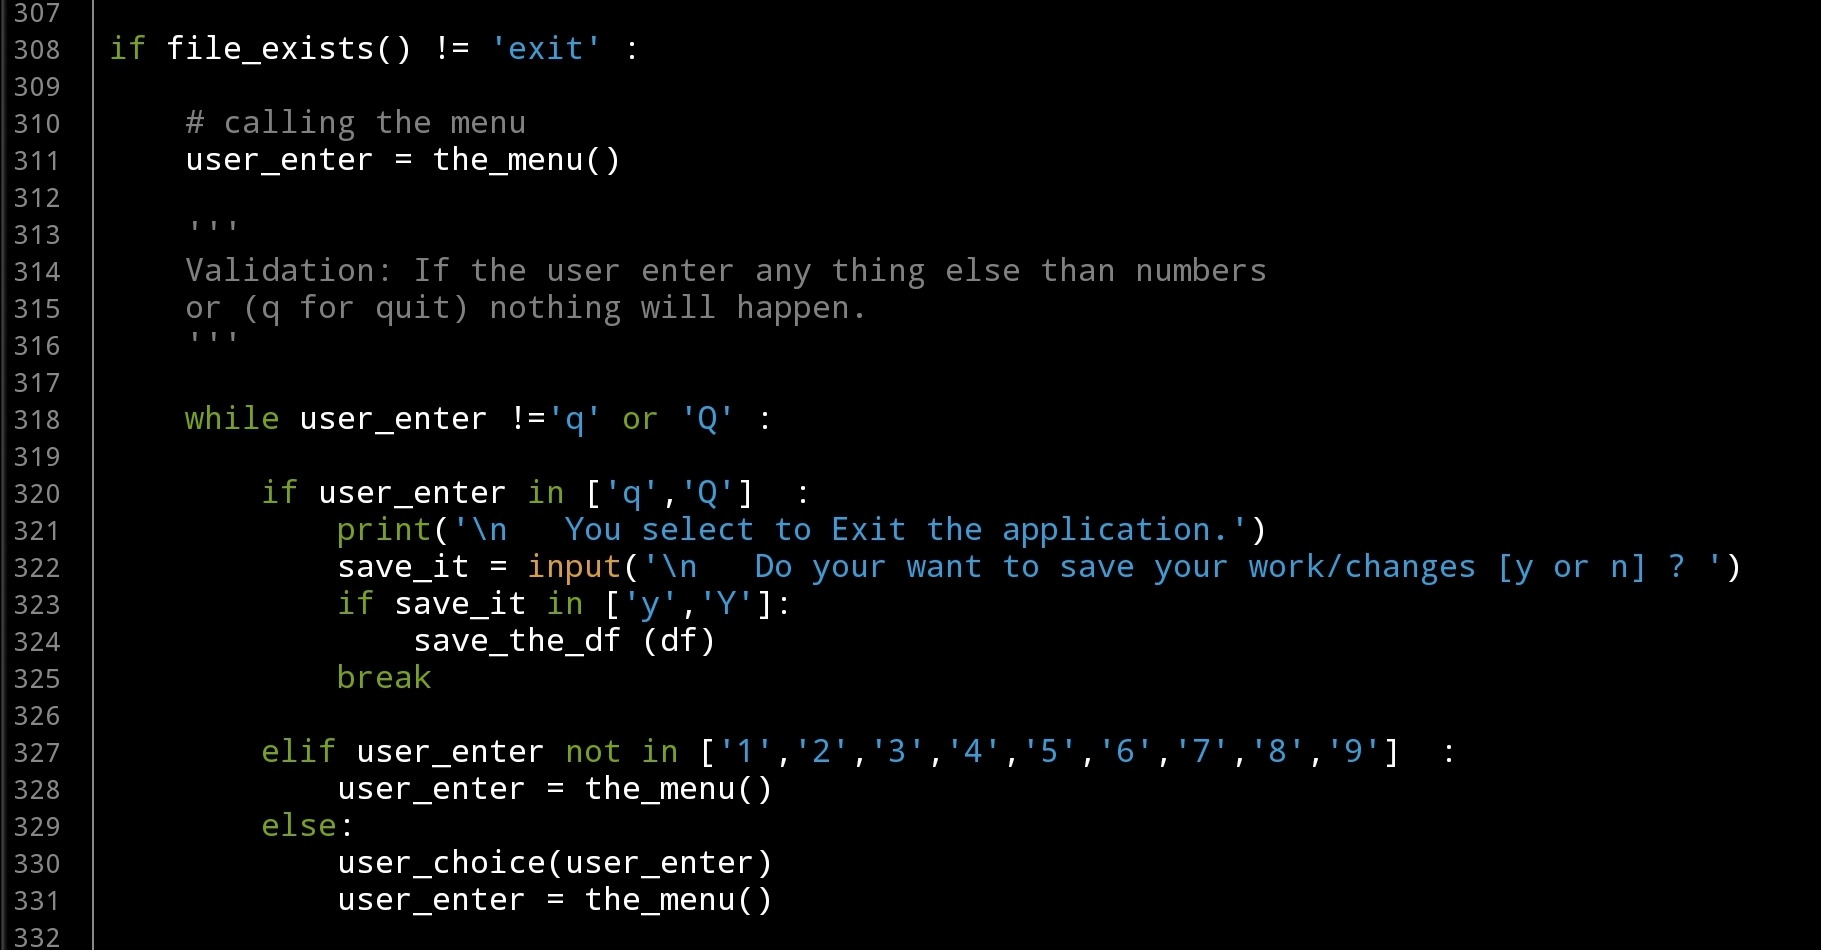
In the last post of our system, we develop the file_exists function, the function is checking if the file not exists then will create ond and enter a dummy data. Now we need to add a code to the application body that call this function and if the file exists the application will run without applying the or creating any file. Here is the code in the application body:
Header here
if file_exists() != ‘exit’ :
# calling the menu
user_enter = the_menu()
”’
Validation: If the user enter any thing else than numbers
or (q for quit) nothing will happen.
”’
while user_enter !=’q’ or ‘Q’ :
if user_enter in [‘q’,’Q’] :
print(‘\n You select to Exit the application.’)
save_it = input(‘\n Do your want to save your work/changes [y or n] ? ‘)
if save_it in [‘y’,’Y’]:
save_the_df (df)
break
elif user_enter not in [‘1′,’2′,’3′,’4′,’5′,’6′,’7′,’8′,’9’] :
user_enter = the_menu()
else:
user_choice(user_enter)
user_enter = the_menu()
|
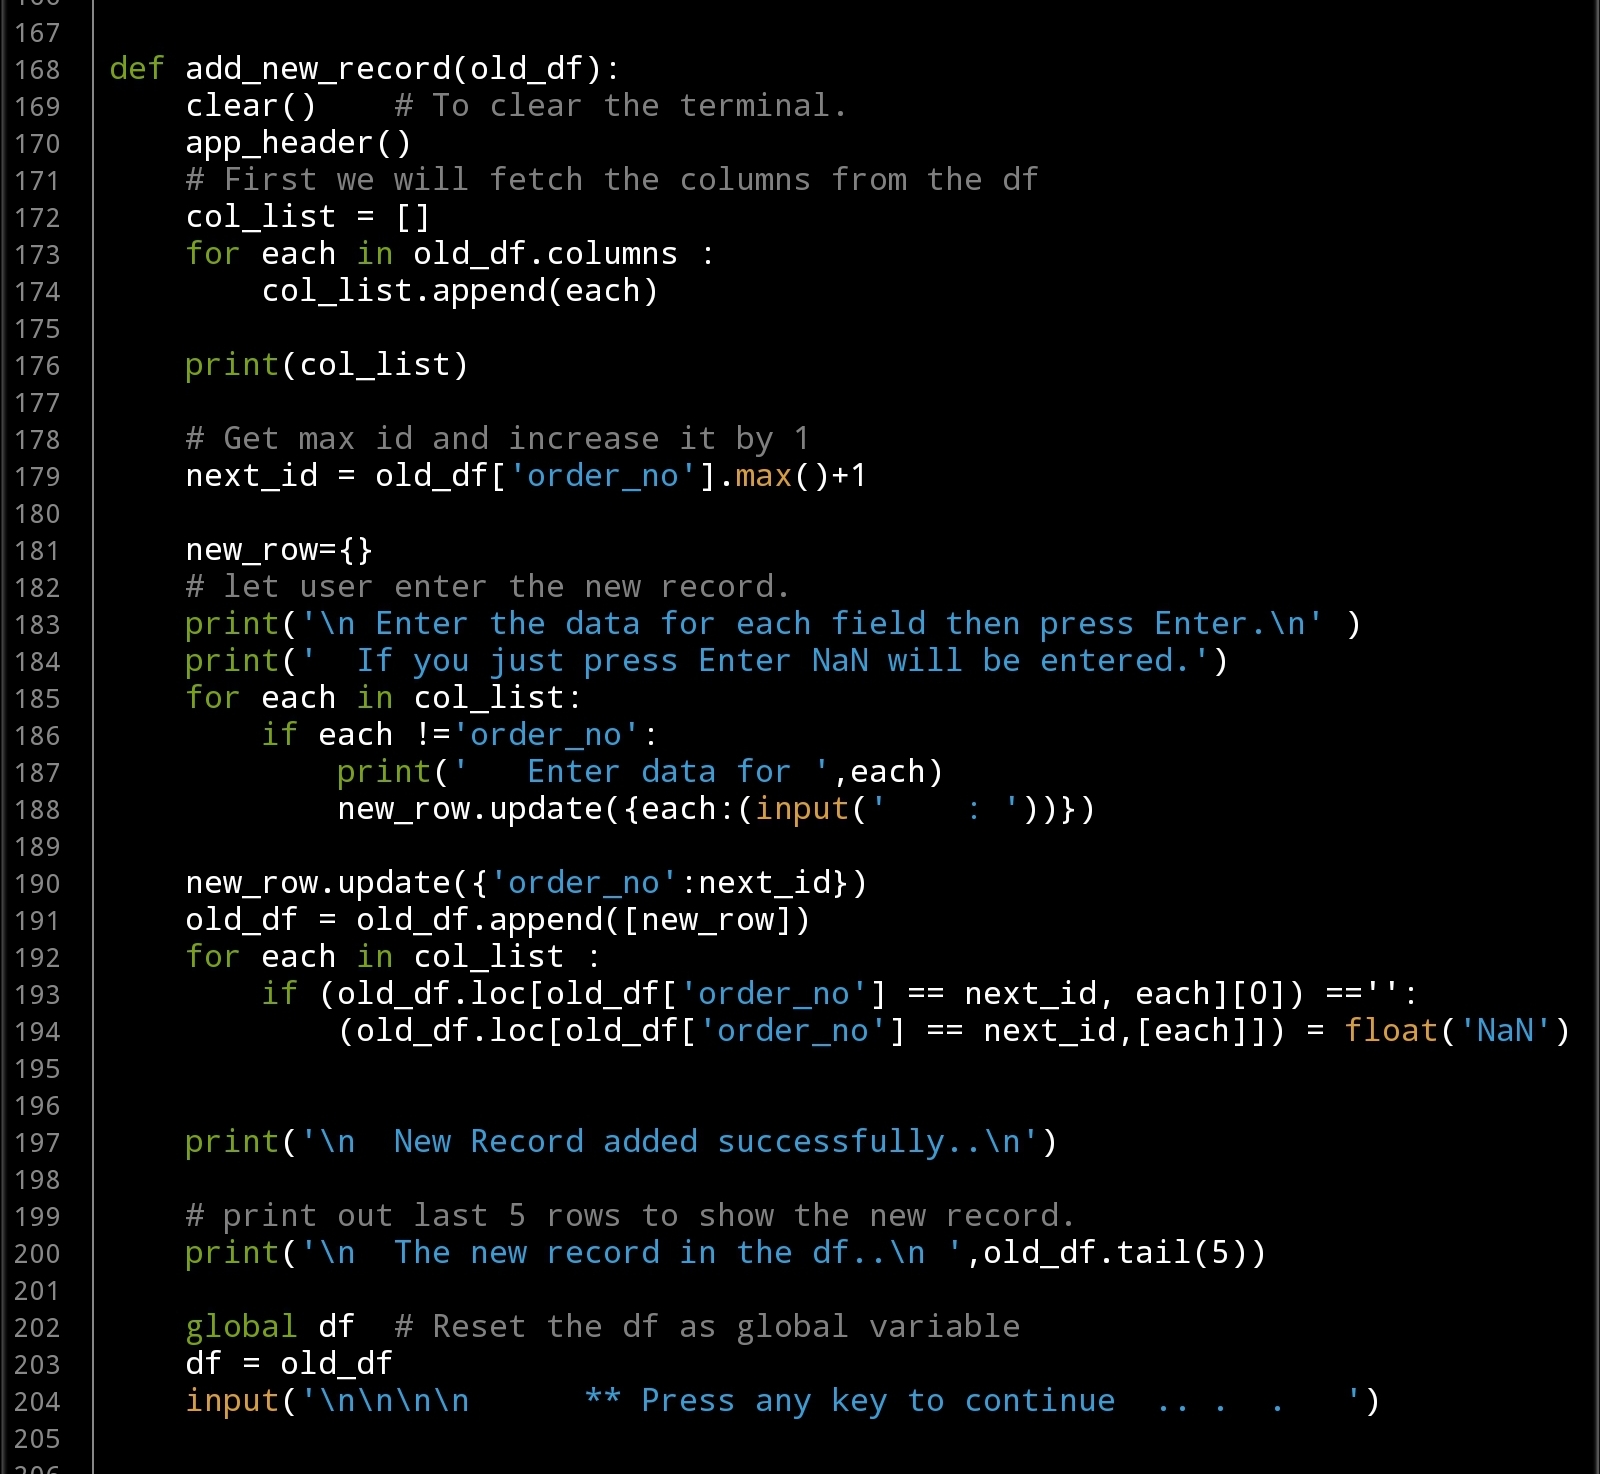
In this post we will talk about the Adding new record function, since we may start from new file we need to enter some records in our data file. Here is the def add_new_record() that will help us to enter our data.
Add New Record Function
def add_new_record(old_df):
clear() # To clear the terminal.
app_header()
# First we will fetch the columns from the df
col_list = []
for each in old_df.columns :
col_list.append(each)
print(col_list)
# Get max id and increase it by 1
next_id = old_df[‘order_no’].max()+1
new_row={}
# let user enter the new record.
print(‘\n Enter the data for each field then press Enter.\n’ )
print(‘ If you just press Enter NaN will be entered.’)
for each in col_list:
if each !=’order_no’:
print(‘ Enter data for ‘,each)
new_row.update({each:(input(‘ : ‘))})
new_row.update({‘order_no’:next_id})
old_df = old_df.append([new_row])
for each in col_list :
if (old_df.loc[old_df[‘order_no’] == next_id, each][0]) ==”:
(old_df.loc[old_df[‘order_no’] == next_id,[each]]) = float(‘NaN’)
print(‘\n New Record added successfully..\n’)
# print out last 5 rows to show the new record.
print(‘\n The new record in the df..\n ‘,old_df.tail(5))
global df # Reset the df as global variable
df = old_df
input(‘\n\n\n\n ** Press any key to continue .. . . ‘)
|
In the coming post, we will work on the date validation function also the user choice loop so we can run the application and test it.
Python: Orders Manager P3
Learning : Orders Management System using Python and Pandas
Subject: Data File and Adding new Record
In This system and once the user run the application we will check if the Data file exists or not. If the file exists then the system will run, otherwise the application will guide the user to some questions to create the new file. Then we will talk about adding new records to our file.
First time run: Each time we run the application the system will chick for the file, at this version we will have only one data file we will call it “orders_dataframe.csv” if the file exists the application will continue and the file will be loaded automaticly, if not, then the first choice of our menu will be called. Function called “create_file()” will run, we will inform the user that the file is not there and if he want to create a new file. If the user select Yes, the file will be created and a dummy row (id = 0) will be added. If the user select No, we will show a message then if any key pressed the system will quite. .. Let’s see the code ..
File Exists check point
def file_exists():
# Check if the data file not exists create one
if not (os.path.exists(‘orders_dataframe.csv’)):
no_file =’o’
while no_file not in [‘y’,’Y’,’n’,’N’]: # Validation for user input
clear() # To clear the terminal.
app_header()
no_file = input(‘\n The file ”orders_dataframe.csv” is not exists, Do you want to create new one: [ y , n ] ‘)
if no_file in [‘y’,’Y’]: # Validation for user input
create_file() # Call the function create_file
return
elif no_file in [‘n’,’N’]: # Validation for user input
print(‘\n You select not to create a data file, so the system will Exit. ‘)
input(‘\n\n Press any key …’)
return ‘exit’
|
|
Validation:
To keep asking the user for his input until he enters one of [ y,Y,n,N]
while no_file not in [‘y’,’Y’,’n’,’N’]:
no_file = input(‘\n The file ”orders_dataframe.csv” is not exists, Do you want to create new one: [y,n] ‘)
Last, I am thinking to add a header for our app, so this header will be at the top of all out screens. Here it is ..
Application Header
def app_header():
print(‘\n ********************************’)
print(‘ ** Orders Managment System **’)
print(‘ ** App V.08-19 **’)
print(‘ **********************************\n’)
In the next post we will look at the Validation on the File Exists check and create file function, also first row added to our dataframe.
Taking pictures is not my main daily practices, but when i start playing with my camera, i really enjoy my self.
Thanks for visiting my Space..


