Archive
Rhino Sketch
Using a pencil then black pen and a photo from the Net as a reference and after almost 25min I finished this Rhino.
Follow me on Twitter @h_ta3kees

Flowers in my lens.. 4
Here is another photo sample taken with #galaxy #Note9 phone for some flowers in my garden..
For mor follow me on Twitter @h_ta3kees

Flowers in my lens … 3
Here is a mcro photo sample taken with #galaxy #Note9 phone for some flowers in my garden..
For mor follow me on Twitter @h_ta3kees

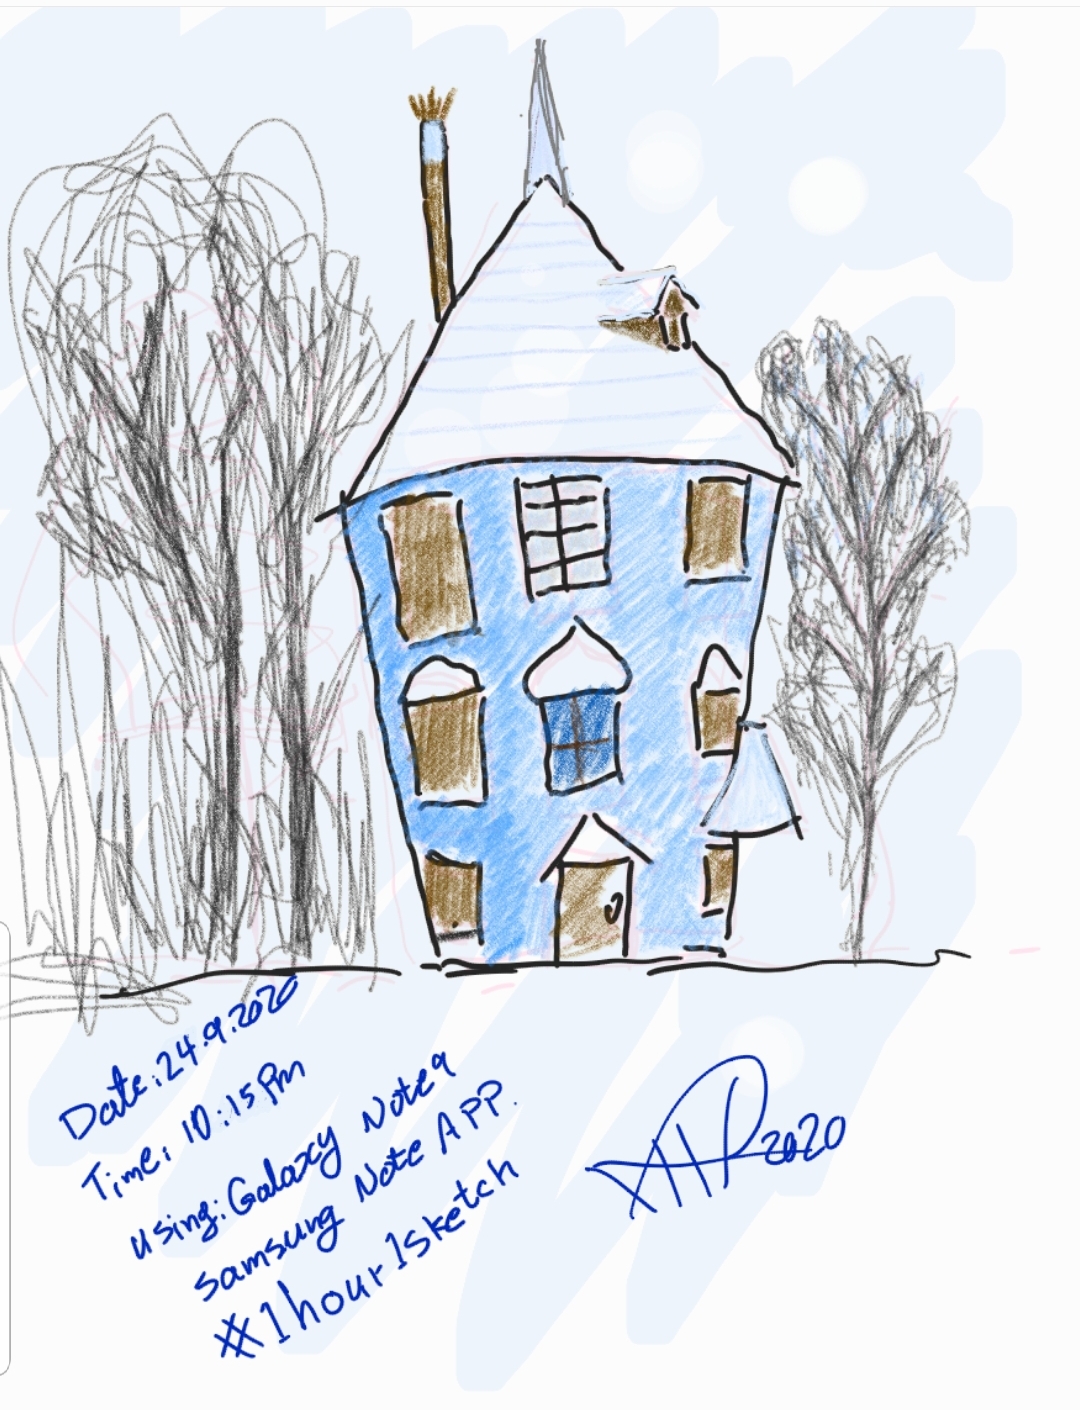
Another sketch challenge: The House
This week sketch challenge @1hour1sketch is to Draw a Red House, so here is my sketch using pencil, black Pen and watercolour. More Sketches on my Sketch page .. also follow me on Twitter @h_ta3kees

A Sketch from Five years back
Looking back in my sketchbooks this is a sketch from 2016 on same day 8.3.2016, in this one I didn’t use pencil, and I was fast in sketching against the time. Later I did some tuning and retouching. ..

Library System with Excel -P1
Learning :Excel formulas and VBA Cods
Subject: To Develop a Library System with Excel
Someone asked if we can do the Library Management system using Excel, so in the coming several posts we will try to develop an Excel File to store our Books. So I will stop the CRM Project and will work on Library System, we will use MS-EXCEL and VBA code to create a simple spreadsheet looking after our Books.
To start, do the following:
1. We will create an empty Excel file and call it “my Library System” and save it as “Excel Macro-Enabled Workbook.xlsm”
2. Create 7 Tabs(Sheets), name them as:
Menu, Books, Authors, Classifications, Data, Setting, Summary
In this post (Part-1), we will work on the Menu sheet, I will not concern about the themes and colors or fonts all this is back to each user to do formating as needed. So let’s begin with creating four buttons using the insert – shapes Rectangle: Rounded Corners.
 |
We need to create four Rectangle: Rounded Corners, align them as you want and use any theme color, then give each a Captions as in the coming image..
 |
Now, select the Books Button and with Right-Mouse-button select “Assign Macro” and from the new Assign Macro pop-up screen click on New.
 |
This will launch the VBA Application with an open window to write our code, here is the code that if the user clicks on ‘SAY’: Books-Button the Books Sheet will be selected. In coming image, you will find the codes for all buttons we have in the Menu.
 |
Also, we create a code to take us back to the Menu sheets and we call the button MENU, we will add this Button to all sheets we have.
-
Recap this part:
- 1. We Create an Excel file.
- 2. We Create 7 Sheets and named them.
- 3. We Create Buttons for the Menu Sheet.
- 4. We Create the Home Button.
- 5. We wrote the VBA code so we /the user can navigate thrugh the system.
:: Library System with Excel ::
| Part 1 | Part 2 | Part 3 | Part 4 |
To Download EXCEL (.xlsm) files Click-Here
By: Ali Radwani
Excel Simple CRM System P1
Learning : Excel Simple CRM System
Subject: Create Excel Form, Dynamic Name Range and VBA Code to build a simple CRM system.
In this short project we will learn how to create a simple CRM system and and will build forms to collect needed data and store it in tables.
Case Study:
We want to create a simple CRM system to collect data about our employees such as [Name, Department, Salary], we will keep the system (Forms and codes as simple as we can). In this part, we will work on fomrs and code to collect the Employee data.
First, we will open an Excel file, and will create Three Tabs (Sheets), and will name them [Form, Data, Table]. As in figure 1
As in figure 1  |
Now try to create the formes for Employee and another for Departments (Download the Excel file here).
Then in the Data Sheet starting from A1 create a table as A1: Name, B1: Department, C1: Salary, and in the F1 we will create a table named Department List. As in figure 2
figure 2  |
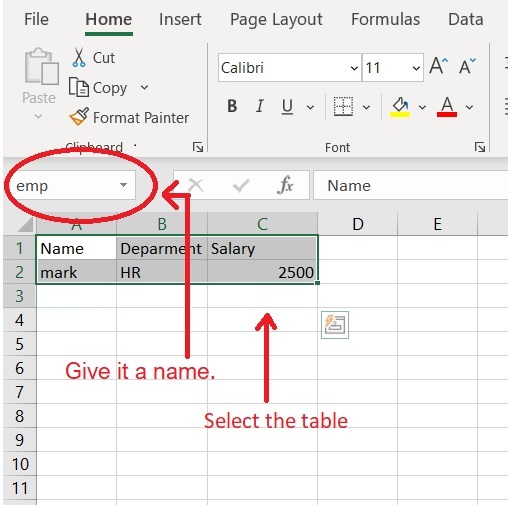
and enter one row of data as in figure 2. Then we also need to create a Dynamic Name Range, for both employee name and Department List, to do so we:
1. Go to Data Sheet.
2. Select the Employee table that we create.
3. in the “NameBox” just give the table a name as “emp”.
Do the same to the Department List table dep_list, we will use these names later.
 |
Coding: Now we will write the VBA code to make a list of Departments we have. To do so we will select the button of SAVE under the Department Form, Click the Right mouse button, and select Assign Macro, then select New and OK, after that the VBA application will start. We will write this code:
Sub save_new_dep()
‘ Get the next empty row
next_row = Sheets(“Data”).Range(“F” & Rows.Count).End(xlUp).Offset(1).Row
Sheets(“data”).Range(“F” & next_row).Value = Sheets(“form”).Range(“J7”)
Sheets(“form”).Range(“J7”).ClearContents
End Sub
figuer 4 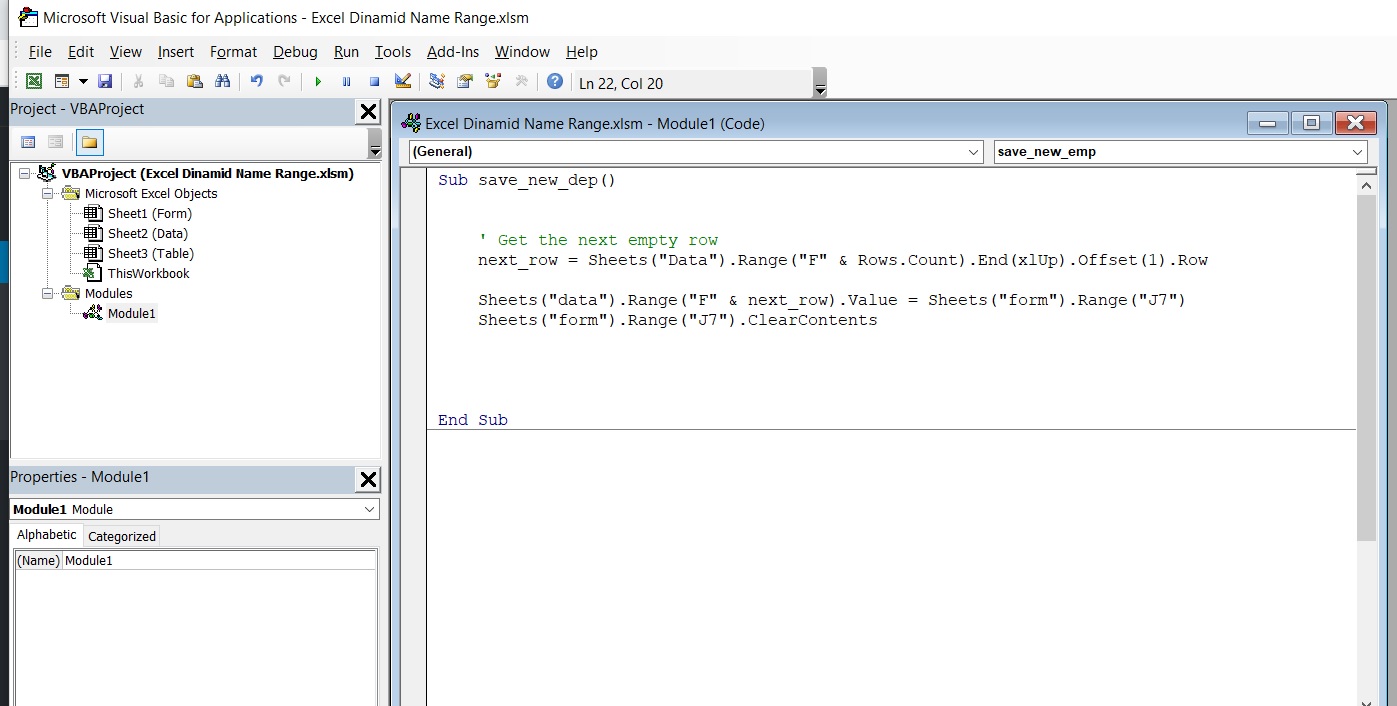 |
In this line
next_row = Sheets(“Data”).Range(“F” & Rows.Count).End(xlUp).Offset(1).Row we will get the next empty row in the department list.
in this line Sheets(“data”).Range(“F” & next_row).Value = Sheets(“form”).Range(“J7”) we will copy the date we just enter as a New Department to the Data Sheet Depatrtment List. Then with Sheets(“form”).Range(“J7”).ClearContents we will clear the content.
So now we can enter some department names: IT, Fin, Economy
We will do the same thing for the Employee Form, so with an open VBA application write the following code. as in figure 5
Sub save_new_emp()
‘ Get the next empty row
next_row = Sheets(“Data”).Range(“A” & Rows.Count).End(xlUp).Offset(1).Row
‘ Copy the Data
Sheets(“data”).Range(“A” & next_row).Value = Sheets(“form”).Range(“D7”)
Sheets(“data”).Range(“B” & next_row).Value = Sheets(“form”).Range(“D8”)
Sheets(“data”).Range(“C” & next_row).Value = Sheets(“form”).Range(“D9”)
‘ Clear the Form
Sheets(“form”).Range(“D7”).ClearContents
Sheets(“form”).Range(“D8”).ClearContents
Sheets(“form”).Range(“D9”).ClearContents
End Sub
figure 5 |
The first line of the code is to get the next empty line in the Employee table, then we will use it to copy the data from the form to the data table. In my form, the Name is in D7, the Department in D8, and the Salary in D9. here is the code line for the name: Sheets(“data”).Range(“A” & next_row).Value = Sheets(“form”).Range(“D7”), then we clear the form as we did with the Department form. In the Employee form (Range”D9″) we need to make it as a DropDown list of all Departments we have so we can select from the list, to do that follow the coming steps ..
1. Select Cell D9.
2. From the Menu Select Data then Data Validation, a popup box will apear as in figure 6, do as shown, here we will use the Dynamic Name range we create “dep_list” as a source. figure 6
figure 6  |
At this point we have two Forms, one for the Department List and one for the Employee (Name, Department, Salary), both forms has SAVE buttons, the Data will be saved in the Data Sheet
To Download Excel files Click-Here
By: Ali Radwani
Another SketcheBook
After my 6th Sketchebooks I start creating sketchebooks for my self, cutting the A4 papers, punch or glue them together then creating the cover and Sketch over it, other sketchbooks are purchased online then again I draw/sketch on it’s cover. Sample of what I made here ..
Sketch Books 12, 13 Here
Sketch Books 22, 23 Here
This one here is my 42nd Sketchebook Cover, I purchased this from AliExpress site, verey nice and small but the papers are very thin and the colors appear on the other side of the page, over all, they are doing the job.

|
More sketches are available in My Sketchbooks Page..
1Hour1Sketch challenge
While searching the Twitter I found a challenge called “1hour1sketch” posting a theme or a photo and asking however want to participate and doing/sketching around the idea, so I thought I can try it and get a subject to draw. Here is my sketch for this week..
I am using galaxy Note9 and Samsung Now app.
|
By: Ali Radwani
Sketch from One Year Back
This is an Elephant sketch from One #year ago i use a pencile then black ink pen.

|
Taking pictures is not my main daily practices, but when i start playing with my camera, i really enjoy my self.
Thanks for visiting my Space..


