Archive
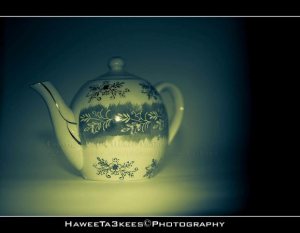
The Mosque in KATARA after Adobe LightRoom effect..

This photo is for the Mosque in KATARA after adding some Adobe LightRoom effects. [Click the image to enlarge]
To see it before the LightRoom effects Click Here..
Before & After Adobe LightRoom
Adobe LightRoom is a great tool to add some light/shadow effects and to the image, you may add colored lights or take the capture to the B/W channel.

Here is a shot of a wooden flower vase in my lightBox.The first one is before the LightRoom effect, the light source is from the Nikon SB900 speed light. [Click the image to enlarge]

In this shot (same subject) I add four lights with colors in LightRoom, and some shadows.[Click the image to enlarge]
Preparing the Scene for a good capture.
It is not that easy, yes you may use the Point and Shot cameras for daily quick capturing. If you want to have a good shot you may want to set-up the scene and arrange the objects in the positions that suit you.
 Here is a studio set-up for a shot, I used the natural lights from the windows and the room light, Nikon D90 with Nikon 35mm lens with f/1.8 to get the DOF effect, subjects are Watermelon, Orange [made of candle]and The Chinese’s Porcelainin in different distance from each other.
[Click the image to enlarge]
 Here is another view with more details on the set-up and distances. [Click the image to enlarge]

A shot with focus on the rear object (Chinese’s Porcelain).[Click the image to enlarge]
 And now I just moved the focus to the watermelon and take the camera closer. [Click the image to enlarge]
Before & After B/W Filter
Coming are two captures of a traditional Arabic Boat Model first one is a normal take with Nikon D90 and Nikon 35mm lens, the second one in B/W..[Click the images to enlarge]


Convert the Negative to JPG Files..
We all have lots of old file camera Negatives lots of them are for impotent occasions, we may want to digitalize them for more secure saving or using them in ‘Digital Photo Frame’.
I will list down three ways to Digitalize your Negatives:
1. Take your old Negatives to photo store and they will do the job. 🙂 simple/straight/fast and quality.
2. Buy a new scanner with Negatives adapter.
3. Do it @ home without scanner. How to?? read this article..
To Convert the old film Negative to JPG Files you need..
- Digital camera with macro lens.
- Home-made Negatives holder.
- Speed light, or any other light source.’Florescent/White‘
- Photoshop application, or any pro. Photo Editor Software.
My Studio and what been used..
- Nikon D90.
- Nikon 105mm VR Macro lens.
- Nikon SB900 speedlight.
- My old Negatives. 🙂
- Home-Made Negatives Holder.
[o] First photo to describe How to create the Negatives Holder..
You Need:
- White paper size (A):12.5cm x 10.5cm (H*W)
- Another white/transparent paper size (B): 12cm x 8cm (H*W)
- Adhesive Tape.
- Scissors and/or Razor blade.


Here is the studio set-up:


Now you are ready, slide the Negatives between the tow papers (A & B) adjust the focus and take the shot. [You Must NOT Change the position of the camera, Negative holder or the flash during the session] Here is the results..
The Negative..

Photoshop Time:
Open the Photoshop or any photo editor software (this demo for photoshop)
Menu–> Image –> Adjustment –> Invert (Or Ctrl + I)
Do some more Adjustment for:
[o] Color Balance as shown:
Menu–> Image –> Adjustment –> Color Balance
Tone Balance: Shadows
Color Levels: +100, 0, 0
Tone Balance: Midtones
Color Levels: +100, -1, 0
Tone Balance: Highlight
Color Levels: +56, +15, -21
[o] Brightness/Contrast
Menu–> Image –> Adjustment –> Brightness/Contrast
Brightness : -10
I fond that the above setting and the numbers will vary if we move any part of the studio, so the settings are suite for me 🙂 you have to do some changes to come up with your levels of colors/Brightness/Contrast.
Write down the setting then create an Action (in Photoshop) to apply the setting to a photo, put all the Negatives in a folder (copy of them) then (from photoshop): File –> Automate –> batch and select the folder and the action you just create, click OK. DONE!
All the Negatives in the folder are now a Positive photos, you need to tone up some of them manually as you wish.
Some samples from my Trip to Austria in 1998.


Have Fun …
Ali,
Macro on Fruit
Macro on Fruit: In this project I set-up my studio to be able to capture/shot the fruit from top, I use my Nikon D90 with tow lenses the Nikon 35mm and Nikon 105mm Macro. Note that the Focal Length of 105mm lens is equivalent to 157mm in 35mm Film.
[Click on the images to see them larger..]
The Studio set-up…
o. Camera Nikon D90. [Nikon 35mm + Nikon 105mm macro]
o. Square Glass. [Size as your studio need]
o. Glass Pyrex dish.
o. Light source.
o. Different type of fruit. [cut to slices or as you want/plan]
o. ML-L3 Wireless Remote Control.

Here are some shots:

Slice of Orange, I add the reflection and increase the brightness. In this shot I used 35mm lens, listed the other camera setting:
Exposure Time = 1/200″
Focal Length = 35mm [Nikon 35mm f/1.8]
F Number = F1.8
ISO Speed Ratings = 200
Exposure Bias Value = +5EV
Flash = Off
 Same Orange with Macro lens,
Exposure Time = 1/320″
F Number = F4
Focal Length = 105mm
ISO = 200
Exposure Bias Value = ±0EV
Light Source = out source
Flash = Off
 What is this? Yes, Kiwi Fruit, macro lens with extra brightness; the frame (upper & lower) are a black rectangular with 45% opacity.
Camera Setting:
Exposure Time = 1/80″
F Number = F4
Focal Length = 105mm
ISO Speed = 200
Exposure Bias Value = +5EV

Here is another shot for the Kiwi with 35mm lens.

This is a Lemon, tow images been joined in photoshop to get this..
 Camera setting for the shot on the left..
Exposure Time = 1/80″
F Number = F4
ISO Speed = 200
Exposure Bias Value = +5EV
Focal Length = 105mm

The Pomegranate is a wonderful fruit
More photos are on my Flickr : Hawee – Ta3kees
Ali,
Adobe LightRoom
Adobe LightRoom:
[Last Update: 27-03-2010]

for this photo, you can see the studio and the HomeMade LightBox… Click Here

For more photos visit my Flickr .. Hawee-Ta3kees
Ali,
Water Splash
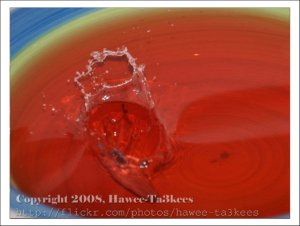
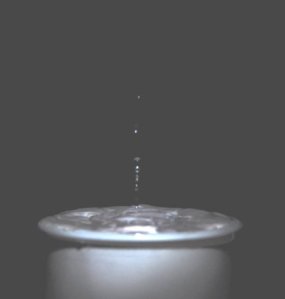
More in my Flickr site Hawee – Ta3kees
Taking pictures is not my main daily practices, but when i start playing with my camera, i really enjoy my self.
Thanks for visiting my Space..


