Archive
Python: Sorting Algorithm (3. Merge Sort)
Learning : Python coding, Math, Algorithm,
Subject: Writing Merge Sorting Algorithm in Python
[NOTE: To keep the code as simple as we can, We WILL NOT ADD any user input Varevecations. Assuming that our user will Enter the right inputs.]
Sorting Algorithm is a way to sort a given list/Array of numbers, there are several sorting Algorithm as follow:
Type of Sorting Algorithm
1. Quick Sort. [Click Here]
2. Bubble Sort. [Click Here]
3. Merge Sort. [Click Here]
4. Insertion Sort. [Click Here]
5. Selection Sort. [Click Here]
6. Heap Sort. [Click Here]
7. Radix Sort. [Click Here]
8. Bucket Sort. [Click Here]
Here in this post we will write a function to take a given list and sort it then pass it back. We assume the user will enter a serial of numbers, that he want to sort, our function will sort it and print out the original numbers and the sorted one.
Merge Sort: Steps of Merge Sorting Algorithm are:
1. If the Array has 1 Element then return it.
2. If the givin Array has more than 1 Element then we Divide it into 2 Parts.
Left = from Element 0 T0 Element len(arr)//2 and Right = from Element len(arr)//2 To Element len(arr). And we keep repeating step 2 for each part.
3. Once we have All parts divided we tart merge them in a sorted order.
Coding: In this Post we will write the Function for Main-Mnu, another one to collect the Array [Not Sorted] Elements from the user, then we will write the Main Function, here we will have One to Divide the Array into parts and One to Merge the Element together again. And as we done with Quick & Bubble Sort projects we will have one Fast-Run Function and another one with Details Step-By-Step run to show the Algorithm.
NOTE: All the Code will be Available in the Download Page.
Let’s start with the Main-menu to list down three option were the user will select one among them, the menu options are: 1. Merge Sort Algorithm – Fast Run. & 2. Merge Sort Algorithm – Step By Step and the last one is 3. Exit. Here is the code.

|
I will Not post the code for collecting the Array Element from the user [Find it in the .py file for this project]. Here is the code for merge_sort_divider Function, it takes two arguments the Array and the user_selection, so if the user selection is 2 (2. Merge Sort Algorithm – Step By Step) We will print-out the Dividing Steps and some other Text. [We are using If Statement to print-out Text lines]. Here is the Code ..

|
Now for merging function, for merging function we will have two copies, one as Fast-Run and another for Details to print-out the running Steps, this will make the Fast-Run Function short and easy to follow-up. So, here is the Fast-Run Function code for merge the two part of array returned from the merge_sort_divider. Here is the Code ..

|
Run time screen ..
|
End of Merge Sorting Algorithm.
To Download my Python code (.py) files Click-Here
 Follow me on Twitter..
By: Ali Radwani
Python: Sorting Algoritm – Bubble Sort
Learning : Python, Math, Algorithm
Subject: Sorting Algoritm – Bubble Sort
[NOTE: To keep the code as simple as we can, We WILL NOT ADD any user input Varevecations. Assuming that our user will Enter the right inputs.]
Sorting Algorithm is a way to sort a given list of numbers, there are several sorting Algorithm as follow:
Type of Sorting Algorithm
Quick Sort. [Click to Read]
Bubble Sort.
Merge Sort. [Commeing Soon]
Insertion Sort. [Commeing Soon]
Selection Sort. [Commeing Soon]
Heap Sort. [Commeing Soon]
Radix Sort. [Commeing Soon]
Bucket Sort. [Commeing Soon]
Here in this post we will write a function to take a given list and sort it then pass it back. We assume the user will enter a serial of numbers, that he want to sort, our function will sort it and print out the original numbers and the sorted one.
Bubble Sort: Steps of Bubble Sorting Algorithm are:
1. We will select the First Number (Current number) in the list and Compare it with the next number in the list. (Compare list[0] and list[1])
2. If the Next Number in the list IS SMALLER than Current Number SWAP the Two, then compare the Current with the third number and so on.
2.2 If the Next Number in the list IS NOT SMALLER than Current Number, Then we LEFT the Current Number in it’s Position and will Set the Next number as the Current. And will start Comparing Again as Step 2 until the last number in the list.
3. When we reach the end of the list and we perform a SWAP, then we start again with First Element as STEP 1.
4. If we reach the end of the list Without any SWAP being made, then the list is ordered and the algorithm can stop.
Coding Starting with the Main Menu Function and a Function to ask the
User to enter the numbers in the list, here are those two Functions.

|
And here is the Main code that will call the Menu and trigger the Functions based on the User selecting.

|
Also we have the Function that will ask the user to Enter the Numbers for the List or Array to be sort.All the code will be Available as a .py file in the Download Page [Click Here]
Now let’s see the code for Bubble Sorting Algorithm, we will have two version of the code, one for Fast-Run that takes the list and return it back as Sorted, and another one will be to show the Details Step By Step of applying the Algorithm. Both Functions are the same but the details one will have several print statements to show the steps, here I am posting the Fast-Run version.

|
Run Screen..
|
End of Bubble Sort Algorithm, hope you enjoy it.
.. Have Fun With Coding ..
To Download my Python code (.py) files Click-Here
By: Ali Radwani
Another sketch challenge: The House
This week sketch challenge @1hour1sketch on Twitter is to Draw a House so here is my sketch using pencil then black Pen, it takes around 25min. More Sketches on my Sketch page ..
you may Follow me on Twitter @h_ta3kees
Here is my sketch..

Another sketch challenge: Eagle Face
This week sketch challenge @1hour1sketch on Twitter is to Draw an Eagle Face, so here is my sketch using pencil then black Pen, it takes around 15min. More Sketches on my Sketch page ..
you may Follow me on Twitter @h_ta3kees
Here is my sketch..

Python: Testing the SQL joines Commands
Learning : SQL Commands, DataBase, Python
Subject: Testing the SQL Join Commands
Introduction In this post we will apply several SQL Join Commands to test them, here are them:
| Left Join: All the Data in the Category |  |
| Right Join: All the Data in the Products |  |
| Inner Join: All the Data that in Both Tables. |  |
| Left Join Only Data in Category Table and NOT in Product Table. |  |
| Right Join:Only data in Product Table and NOT in Category Table. |  |
| Full Outre:All the Records in both Tables |  |
| Full Outre:All the data from the Category Table that are NOT linked to any Product, AND all the data in Product Table that has NO Category. |  |
First: let’s talk about the Tables,we will create two Tables (Category and Products) each will be very simple, the Category will have two fields [c_id, and cat_name],
the Products will have [p_id, pro_name, cat_id]. (cat_id is the foreign key that connicting the two tables). Some test data will be inserted in both Tables so we can demonstrate the SQL Commands. I create a Dictionary storing information/summary about the project named about_the_project the user can read it in run time.
Coding: We will do the fowlloing:
1. Set a Database for the Project.
2. Writing the codes to Create the Tables.
3. Writing the codes to insert some test Data in the Tables.
4. Creating a Menu for the Project.
5. Writing the Functions to Apply the SQL Join commmands.
NOTE: All the code will be avilable in the DOWNLOAD page.
Let’s import some lybraries, we will need this code:
import sqlite3, os
And here is the code to set the data base and create the connection.
# Create the data-base and name it as Share_S_System.
db_conn = sqlite3.connect (“sql_join_test.db”)
# set the connection.
c = db_conn.cursor()
First function is to create the Tables:
 # Function to create the Tables.

def create_tables ():

    # CREATE TABLE:
    category_t = "CREATE TABLE if not exists category_t (c_id INTEGER PRIMARY KEY AUTOINCREMENT, cat_name text)"
    c.execute(category_t)
    db_conn.commit()

    product_t = "CREATE TABLE if not exists product_t (p_id INTEGER PRIMARY KEY AUTOINCREMENT, p_name text, cat_id integer)"
    c.execute(product_t)
    db_conn.commit()
Now we will insert some Test data.
 # Function to insert some Data into the Tables

def insert_sample_data():

    #First we will call the Function to Crete the Table.
    create_tables ()
    print('\n   Category Table has been Created. ')
    print('\n   Product Table has been Created. ')

    # Insert into Category Table
    c.execute ("INSERT INTO category_t (cat_name) VALUES(:cat_name )",{"cat_name":"Mobile Phone"})
    c.execute ("INSERT INTO category_t (cat_name) VALUES(:cat_name )",{"cat_name":"Labtop"})
    c.execute ("INSERT INTO category_t (cat_name) VALUES(:cat_name )",{"cat_name":"Ext. HD"})
    c.execute ("INSERT INTO category_t (cat_name) VALUES(:cat_name )",{"cat_name":"CCTV Camera"})
    db_conn.commit()

    # Insert into Product Table.
    c.execute ("INSERT INTO product_t (p_name, cat_id) VALUES(:p_name, :cat_id )",{"p_name":"Note 9","cat_id":"1"})
    c.execute ("INSERT INTO product_t (p_name, cat_id) VALUES(:p_name, :cat_id )",{"p_name":"iPhone 12 pro","cat_id":"1"})
    c.execute ("INSERT INTO product_t (p_name, cat_id) VALUES(:p_name, :cat_id )",{"p_name":"HP","cat_id":"2"})
    c.execute ("INSERT INTO product_t (p_name, cat_id) VALUES(:p_name, :cat_id )",{"p_name":"Toshiba 1T HD","cat_id":"3"})
    c.execute ("INSERT INTO product_t (p_name, cat_id) VALUES(:p_name, :cat_id )",{"p_name":"iMac","cat_id":None})
    db_conn.commit()

    print('\n   Sample Date Inserted in both tables.\n   Select 9 from the Main Menu to see the Data')

    input('\n      ... Press any key to continue.  > ')
Now, let’s write the function for the Main Menu, it will return the user_choice.. here is the code..
 # Main Menu Function.

def main_menu():
    os.system('clear')
    print("\n==========[ Main Menu ]==========")
    print(' 1. About this Project.')
    print(' 2. All Categories. (Left Join: All in Category Only).')
    print(' 3. All Products. (Right Join: All in Product Only).')
    print(' 4. Only Categories that linked to a Products. (Inner Join: Only if in Ta AND Tb).')
    print(' 5. All Catigories that are NOT linked to a Product. (Left Join: Only in Category AND NOT in Product .')
    print(' 6. All Products that has NO Category. (Right Join: Only in Product AND NOT in Category.')
    print(' 7. All Categories and Products. (Full Outer Join in Both Table)' )
    print(' 8. All Categories that are NOT linked to any Product, and All Products that has NO Categotry. (Full Outer Join NOT in Both Table)')
    print(' 9. Show the Data')
    print(' 11. Setting: Create the Tables and Insert Some Sample Data. Run Only One Time.')
    print(' 99. Exit.')

    user_choice = input("\n Select from the Menu: > ")
    return user_choice
 |
The coming part of the code is calling the functions and running the SQL commands based on the user choice. Here is the Main-code-body..
 # The Main section of the Application..

while True :
    user_select = main_menu()

    if user_select == '1' :
        show_data('cat')

    if user_select == '2' :
        show_data('prod')

    if user_select == '3' :
        os.system('clear')
        print('\n   First: All the Data in Category and Product ')
        show_data('both','inside')
        print("\n==========[ Show Date: INNER JOIN ]==========\n")
        print('   Inner Join: Only the Data that exist in Category AND Product).')
        print('\n   The SQL Statment:\n    select category_t.c_id, product_t.p_name from category_t inner join product_t on category_t.c_id == product_t.cat_id\n\n ')
        c.execute ("select category_t.c_id, category_t.cat_name, product_t.p_name from category_t inner join product_t on category_t.c_id == product_t.cat_id  ")
        innerJ_list = c.fetchall()

        print('   [OUTPUT]:\n       Categories Name      |',' '*2,'Products Name    ')
        for innerJ_data in (innerJ_list):
            print('       ',innerJ_data[1],'.'*(25 - len(str(innerJ_data[1]))),innerJ_data[2])

        print('\n   We can see that the INNER JOIN Command fetched the records of Products that has a Category.\n   iMac Not listed Because it has No Category Data.')
        input('\n\n      ...Press any key to continue.  > ')

   if user_select == '4' :
        os.system('clear')
        print('\n   List of All the Data in Category and Product ')
        show_data('both','inside')
        print("\n==========[ Show Date: LEFT JOIN, Only Data in Categoty Table ]==========\n")
        print('   The SQL Statment:\n     select category_t.c_id, category_t.cat_name, product_t.p_name from category_t\n     left join product_t on category_t.c_id == product_t.cat_id\n     where product_t.cat_id is null\n')
        c.execute ("select category_t.c_id, category_t.cat_name, product_t.p_name from category_t left join product_t on category_t.c_id == product_t.cat_id where product_t.cat_id is null")
        leftJ_list = c.fetchall()
        print('   [OUTPUT]:\n       Categories Name      |',' '*2,'Products Name    ')
        for leftJ_data in (leftJ_list):
            print('         ',leftJ_data[1],'.'*(25 - len(str(leftJ_data[1]))),leftJ_data[2])

        print('\n   We can see that the LEFT JOIN Command fetched all Categories that are not used/linked to/with any Product.\n   CCTV Camera is Not linked. So We can Say: We Do Not have any CCTV Camera Products.')
        input('\n\n      ...Press any key to continue.  > ')

    if user_select == '5' :
    ....
# Just to save the time, i will not post all the code here, you can see all the code and download
# the .py source code from the download page.
Here are some screen shot of the output ..
| The Main Menu
|
| Output Screen for Option 3: Only Categories that linked to a Products. (Inner Join: Only if Data in Category AND Product) 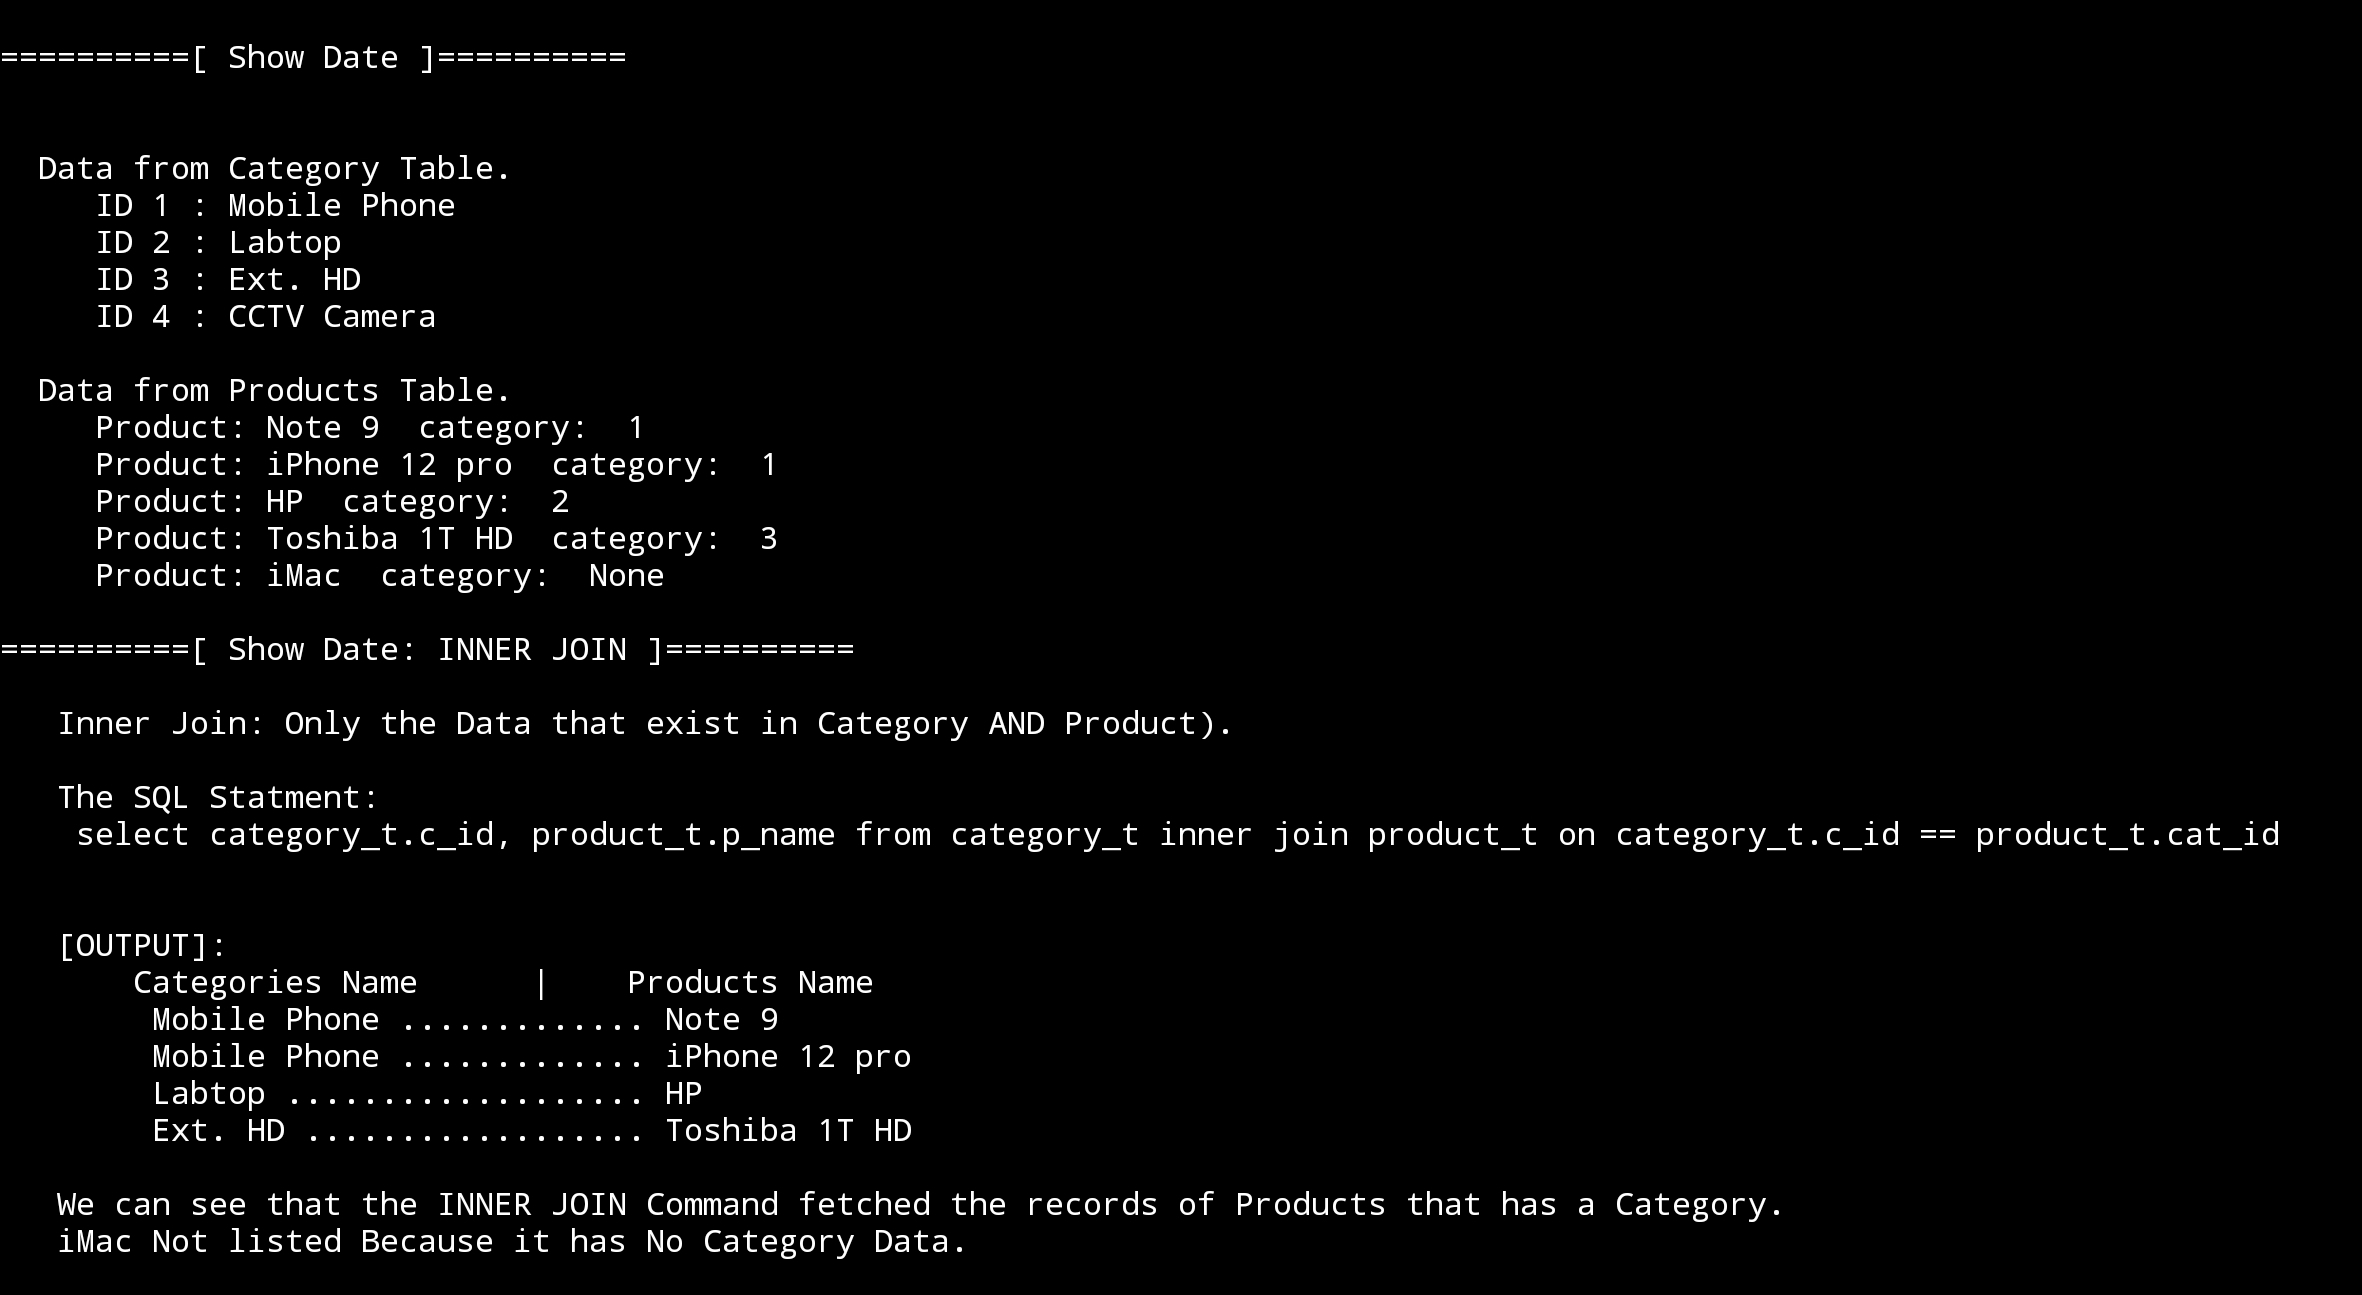 |

End of the Post, and all the code is available to download from the Download page.
To Download my Python code (.py) files Click-Here
By: Ali Radwani
Sketch of a Swan
Using a pencil then black pen and a photo from the Net as a reference, here is a sketch of a Swan in a Lake.
Follow me on Twitter @h_ta3kees

Flowers in my lens… 9
Some time the Fake is there as well as the real…. Here are some small FAKE pink flowers in a bouquet of flowers. I use a galaxy Note 9 phone to take this photo.
Click here and follow me on Twitter @h_ta3kees

Coffee and Boat
Some time you need a coffee, and some time you need a strong one .. here is a small shot of Turkish Coffee in a small beautiful cup from Holland . Photo taken by galaxy Note 9 .
Click and follow me on Twitter @h_ta3kees

A Sketch of Hoopoe
Using a pencil then black pen and a photo from the Net as a reference, here is a sketch of a Hoopoe with an insect in it mouth.
Follow me on Twitter @h_ta3kees

Flowers in my lens … 8
Here is another photo taken with a #galaxy #Note9 phone for some flowers from my garden..
For mor follow me on Twitter @h_ta3kees

Taking pictures is not my main daily practices, but when i start playing with my camera, i really enjoy my self.
Thanks for visiting my Space..


