Archive
Python Project: Drawing with Python – Flower 2
Python: Draw Flower
Drawing with Python
In a previous post, we use the t.forward(size) & t.left(x) to draw something looks-like flower petal. That post (See it Here) is drawing (8) petals facing left side to complete a flower shape… So can we improve it? Can we make it looks better?..
OK, I work on it and divide the code into two functions, one will draw a petal facing left side and another to draw a petal facing right side, each petals will be close to each other and touching or almost touching each’s head. Bellow I am posting the codes, and an image for the result.
You can play with the code and change the numbers, size and rotation degree and let’s see what we will have.
#To draw a flower using turtel and circle function
import turtle
# Here is some setting for the turtel
t = turtle.Turtle()
t.color(‘black’)
t.hideturtle()
t.speed(9)
t.left(0)
t.penup
size=10
#Draw petal facing left side
def petal_l():
t.pendown()
for x in range (40):
t.forward(size)
t.left(x)
t.penup()
#Draw petal facing right side
def petal_r():
t.pendown()
for x in range (40):
t.forward(size)
t.right(x)
t.penup()
left_d=-15
# To draw 5 petals
for pet in range (5):
petal_l ()
t.goto(0,0)
t.left(50)
petal_r ()
t.goto(0,0)
t.left(22)
t.penup
The Code: |
The Result |
Python Drawing flower
Python: Draw Flower
Drawing with Python
In this post I am using some codes to draw mathematical shapes that looks like flower.
To do this we need to import turtle library, then using circle function to complete our work. You may play around with the numbers and figure out what will happen.
#python #code
import turtle
t = turtle.Turtle()
t.hideturtle()
t.pendown()
for x in range (30):
t.circle(60,70)
if x % 2 == 0:
t.circle(10,70)

Python : Expenditure App
Expenditure Application
Add new Entry
Today we will work on the “Add New Entry” function, this is first function on our menu. (Read Expenditure App Menu here)
We will call the function def add_entry(): and will give the user the prompt to enter “Date” and “Amount” then we will write them to our json file.
Just to be as less codes as we can, I am not adding any validations here also not coding the try .. except. So I am assuming the entered data will be in correct way.
def add_entry():
my_date = input(‘Enter the date as dd/mm/yyyy: ‘)
my_amount = input(‘Enter the Amount: ‘)
new_data = {“date”: my_date, “amount”: int(my_amount)}
# Here we adding the new data to the file
ff = open(“expen_dat.json”, “a”)
ff.seek(0, 2) # goto the end of the file.
ff.truncate(ff.tell() – 3) # from end of the file erase last 3 char.
ff.write(‘,\n’)
ff.write(json.dumps(new_data))
ff.write(‘\n]}’)
ff.close()
If you add the “User input choice” in your code this function will be on choice “1” as here.
if choice == ‘1’:add_entry()
choice = the_menu()
if choice == ‘2’:
….
 Follow me on Twitter..
Table of posts regarding the Expenditure App..
| Title | Description | Post Link |
| The Case | Talking about the case study of the application | Click to Read |
| leveling the Ground | Talking about: Requirement, folder structure, data file json, sample data and .py file and other assumptions | Click to Read |
| The Menu | Talking about: The application menu function | Click to Read |
| User input ‘choice’: | Talking about: The user input and the if statement to run the desired function | Click to Read |
| Loading and testing the Data | Talking about: Loading the data from json file and print it on the screen. | Click to Read |
| Add New Entry | Talking about: The “Add New Entry” function | |
Here is the code shot..
|
Here is the output screen..
|
Python Project: Drawing with Python – Flower 1
Python: Draw Flower
Drawing with Python
One of my favorite areas is drawing, and when its come to programming languages, one of the first thing i look after is the commands that let me draw lines and shapes.
In python, we have to import a library to help us in this task, here in this short code block I am using codes to draw a flower shape. We can improve the idea later but i want the first version to be as simple as i can. So lets see the code.
# We have to import this library
import turtle
# Here are some setting
t = turtle.Turtle()
t.shape(“point”)
t.color(‘black’)
t.speed(9)
t.left(0)
t.penup
size=10
#This function to draw one petal
def petal():
t.pendown()
for x in range (40):
t.forward(size)
t.left(x)
t.penup()
left_d=-15
for pet in range (8):
petal()
t.goto(0,0)
t.left(-15)
———————————————–

Python : Expenditure App
Expenditure Application
Loading and testing the Data:
In this post we will load the data from json file and print it to the screen, also will use one of our functions called “get_year_total” to get the sum amount in a given year.
First we assume the our file.json is there in the same directory of the Expenditure.py file (read previous post here) so our code will upload the data in a variable named “data” and we will print the file to our screen, this line of code (print to screen) is there in our coding process and should be removed from the last version of our application.
# This function will load the json file data into var data and return it back so we can use it
def get_all():
with open(‘expen_data.json’) as f:
data = json.load(f)
return data
# This function will take a year from the user input and return the total of amount we expend in that year.
def get_year_total(my_year):
tot=0
for my_date in data[‘expenditure’]:
if my_year in my_date[‘date’]:
tot=tot+int(my_date[‘amount’])
return tot
data = get_all() # Load the file in to data
print(data)
# Ask the user to Enter a year.
my_year=input(‘Enter a year as yyyy: ‘)
# pass the year to the get_year_total function
total=get_year_total(my_year)
# print the total
print(total)
If every thing goes fine, you should see the data on your screen and a prompt will ask you to enter a year, at this point we are not doing any try … except block to our code so we assume that we are entering a good/right inputs. I am attaching images for the code and output screens.
Table of posts regarding the Expenditure App..
| Title | Description | Post Link |
| The Case | Talking about the case study of the application | Click to Read |
| leveling the Ground | Talking about: Requirement, folder structure, data file json, sample data and .py file and other assumptions | Click to Read |
| The Menu | Talking about: The application menu function | Click to Read |
| User input ‘choice’: | Talking about: The user input and the if statement to run the desired function | Click to Read |
Here is the code shot..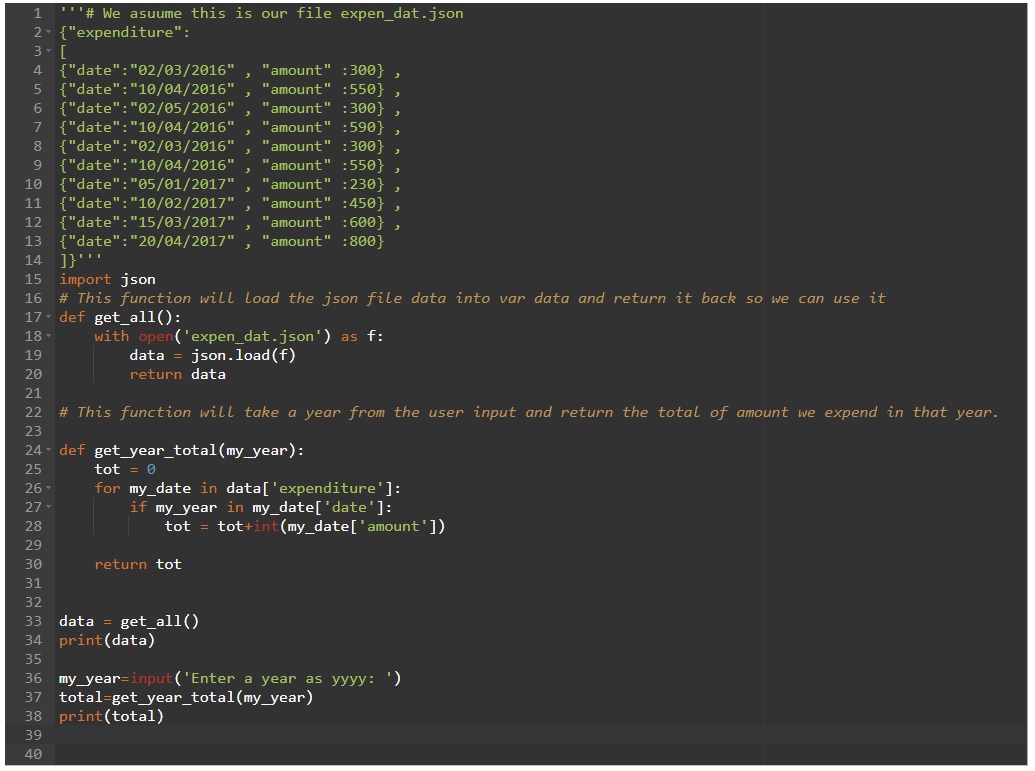
|
Here is the output screen..
|
Python code: Date Validation
Python: Date Validation
As in any application there is lots of functions and procedures helping the application, some of these functions are directly related to the menu bar other are there just to work on back ground to perform a task and return something that another function need to complete an action.
Here is a python code to ask the user to input a date and check if the date is in the format we want to be.
I am new in python so maybe there is a code or a function to perform this, so if any one can help in this.
#python code: Date Validation
def valid_date():
my_date=input(‘Enter the date as dd/mm/yyyy :’)
try:
d,m,y=(my_date.split(‘/’))
if len(d)==1: d=’0’+d
if len(m)==1: m=’0’+m
if len(y)==2: y=’20’+y
if int(d)>31: print(‘Day must be less then 31’), brake
if int(m)>12: print(‘Mounth must be less then 12’), brake
my_date=d+’/’+m+’/’+y
return my_date
except:
print(‘Enter a valid date.’)
return ‘false’
vd=valid_date()
if vd == ‘false’ : valid_date()
else:
print(‘OK’, vd)

Python : Expenditure App
Expenditure Application
User input ‘choice’:
In today post we will add the user input to our menu and based on the user input the app some function will run. As we said in the previous post ‘The Menu‘ we will use (9) to Exit from the application.
To read the user input we will use ‘input(‘something’)’ statement and The Menu def will return the choice back so our if statement will take us to another function, or EXIT if choice = 9, so let’s start.
As we can see in the last two lines of the_menu def, we have
choice = input(‘What you want to do? ‘) and return choice
Then in the main application body we will have while statement holding if statement as here:
choice = the_menu() # Here we are calling the menu and putting the return in the choice.
while choice != ‘9’ :
if choice == ‘1’:
# Calling “Add New Entry” function
choice = the_menu()
if choice == ‘2’:
# Calling “Delete an Entry” function
choice = the_menu()
if choice == ‘3’:
# Calling “Change an Entry” function
choice = the_menu()
if choice == ‘4’:
# Calling “Show Total Expenditure in a Year.” function
choice = the_menu()
if choice == ‘5’:
# Calling “Show Expenditure Details in a year.” function
choice = the_menu()
if choice == ‘9’:
choice = the_menu()
brack
Your code should be something like what we have in the image.

Python : Expenditure App
Expenditure Application
The Menu:
Continuing parts of the Expenditure Application, here is the basic menu that we will use in our app. We will select (9) as Exit from the system.
So now, we have a json file with sample data and stored in a directory, also we have a file called “expen.py” and we will write the menu def in it and save it.
def the_menu(): # This is a menu
print(‘1. Add New Entry.’)
print(‘2. Delete an Entry.’)
print(‘3. Change an Entry.’)
print(‘4. Show Total Expenditure in a Year.’)
print(‘5. Show Expenditure Details in a year.’)
print(‘9. Exit.’)
# This line will ask the user to enter the operation he want to do.
choice = input(‘What you want to do? ‘)
return choice
In this app we will have 5 functions as our menu and maybe one or two functions to facilitate some calculations in background.
Python : Expenditure App
Expenditure Application
leveling the Ground:
In this post we will assume that we have a folder for our application, and we will create two files one is for our python code and we will name it “expen.py”, the other is for our data and we will name it “expen_dat.json” this file extension is ‘json’. Also I assume that we have json pack is installed in the PC so if you don’t have json this is the time to install it.
json file:After you create expen_dat.json file just open it with any text editor and copy a test data of our expenditure as shown.
{“expenditure”:
[
{“date”:”02/03/2016″,”amount”:300},
{“date”:”10/04/2016″,”amount”:550},
{“date”:”02/05/2016″,”amount”:300},
{“date”:”10/04/2016″,”amount”:550},
{“date”:”02/03/2016″,”amount”:300},
{“date”:”10/04/2016″,”amount”:550},
{“date”:”05/01/2017″,”amount”:400},
{“date”:”10/02/2017″,”amount”:400},
{“date”:”15/03/2017″,”amount”:400},
{“date”:”20/04/2017″,”amount”:400}
}]
In next post we will start with coding and testing our Expenditure Application.
I will use the @pycharm to write the code and test it, but any other code editors can be used. Also, I assume we have Python and json installed in your PC.
Python: Expenditure App
Expenditure Application
In this post, we will go through the case study of our application.
‘ The Case’
We want to build an application to store and retrieve some data regard our expenditure, we will go as simple as two keys (date and amount), and we will save the data in a json file. So to view the data we need some functions to do some operations on the data such as Add, Delete, retrieve and change.
I will use the @pycharm to write the code and test it, but any other code editors can be used. Also, I assume we have Python and json installed in your PC.
Taking pictures is not my main daily practices, but when i start playing with my camera, i really enjoy my self.
Thanks for visiting my Space..


