Archive
Python: Pandas Lesson 4
Learning : Panda Lesson 4
Subject: DataFrame Columns: Hide, Drop, rename
We still workinng on dataframe and columns, we will go thrght some function and at the end I will just add a line to save the dataframe in a new CSV file. So let’s start.
We still working on our data_file_zoo.csv and here i am copying the column we have in the file or in our df.
print(‘\n\n Columns in thedataFrame..\n’,df.columns)
|
|
Now we have a list of columns in our DataFrame, some time we want to hide a column, here we will creat a variable and whenever we call this variable the column will not be shone on the screen.
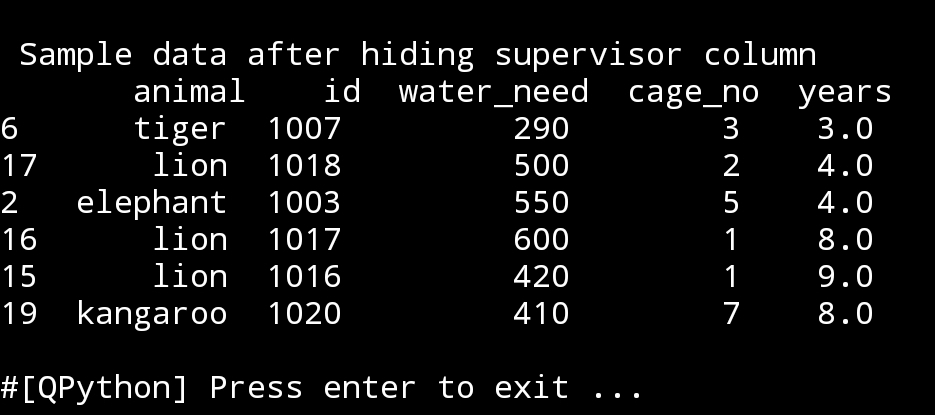
Hide column ‘supervisor’
In this line we will set a variable to hide supervisor column, and just for sceen-shop we will present 6 random rows
hide_supervisor=df.drop([‘supervisor’], axis=1)
print(‘\n\n Sample data after hiding supervisor column\n’,hide_supervisors.sample(6))
|
In the upper case, we may have a password column or some key information column that we don’t want to be shown in the dataframe, then it’s good idea to create a DataFrame without this column an use it.
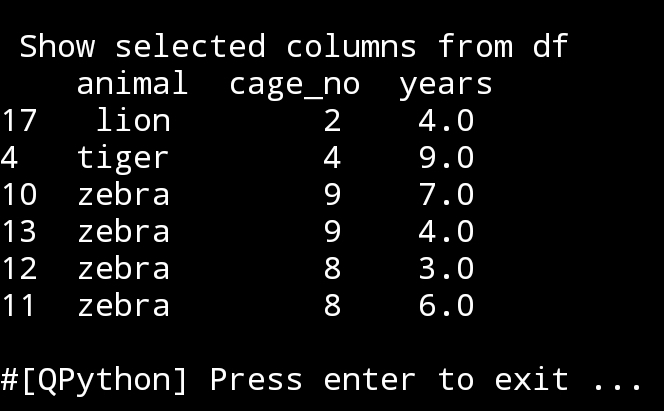
If we have a dataframe and we are examining some thing and don’t want to show all columns every time we print the df, so just show (say three) columns. To do this, first we will print the columns names so we know what we have in the df, then using coming code we will select whatever we want to show.
animal_cage_years=df[[‘animal’,’cage_no’,’years’]]
print(‘\n\n Show selected Columns from df\n’,animal_cage_years.sample(6))
|
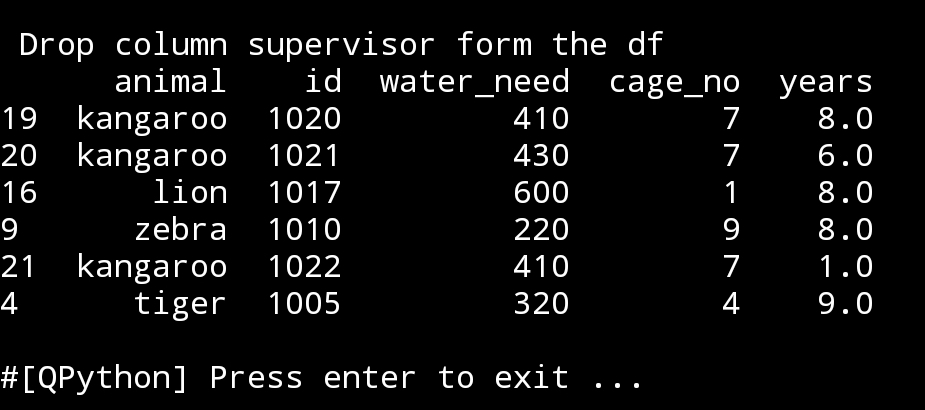
Now we will drop a column from the df, I will select ‘supervisor’, just like this:
print(‘\n\n Drop column ”supervisor” form the df’)
print(df.drop([‘supervisor’],axis=1))
|
To be Aware: In the above case, if we use the command on df and we add inplace=True then this will change the df, so any time we calling the df it will be without the ‘supervisor’ column. Here is the code..
df.drop([‘supervisor’], inplace=True, axis=1)
print(‘\n\n’,df)
If we want to hide more than one columns we just add them in the command like this:
hide_years_cages=df.drop([‘years’,’cage_no’], axis=1)
print(hide_years_cages.sample(6))

|
If we want to check wither or not a df contain column c_name if yes hide-it else print ‘Column not found’.
If column ‘cage_no’ in df hide it.
if ‘cage_no’ in df.columns:
hide_cage = df.drop([‘cage_no’], axis=1)
print(‘\n\n’,hide_cage.sample(6))
else:
print(‘Column not found’)
and we can in the else block just showing another dataframe.
|
:: Pandas Lessons Post ::
| Lesson 1 | Lesson 2 | Lesson 3 | Lesson 4 |
| Lesson 5 |
 Follow me on Twitter..
Python: Pandas Lesson 3
Learning : Pandas Lesson 3
Subject: dataframe (sort, where and filters)
In my Last post Pandaas Lesson 2, we show some commands that will output part of our dataframe (df) such as if we want to output the information we have about lions, or other animals in the Zoo file. Or to see what aminals fell under particular supervisor. Also I try to add a print statment over each output table to show/describe the table content.
In theis Lesson, or let’s say in this post I will share another bunch of commands dealing with one table of data. We will keep using our Zoo data file. So first I wll call the dataframe df.
import pandas as pd
file_name=’data_file_zoo.csv’
df=pd.read_csv(file_name, delimiter=’,’)
print(‘\n Data from Zoo file..’,df)
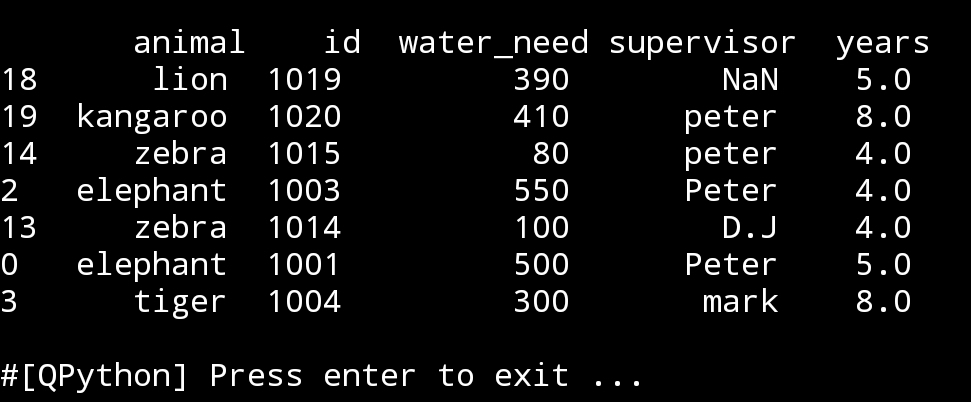
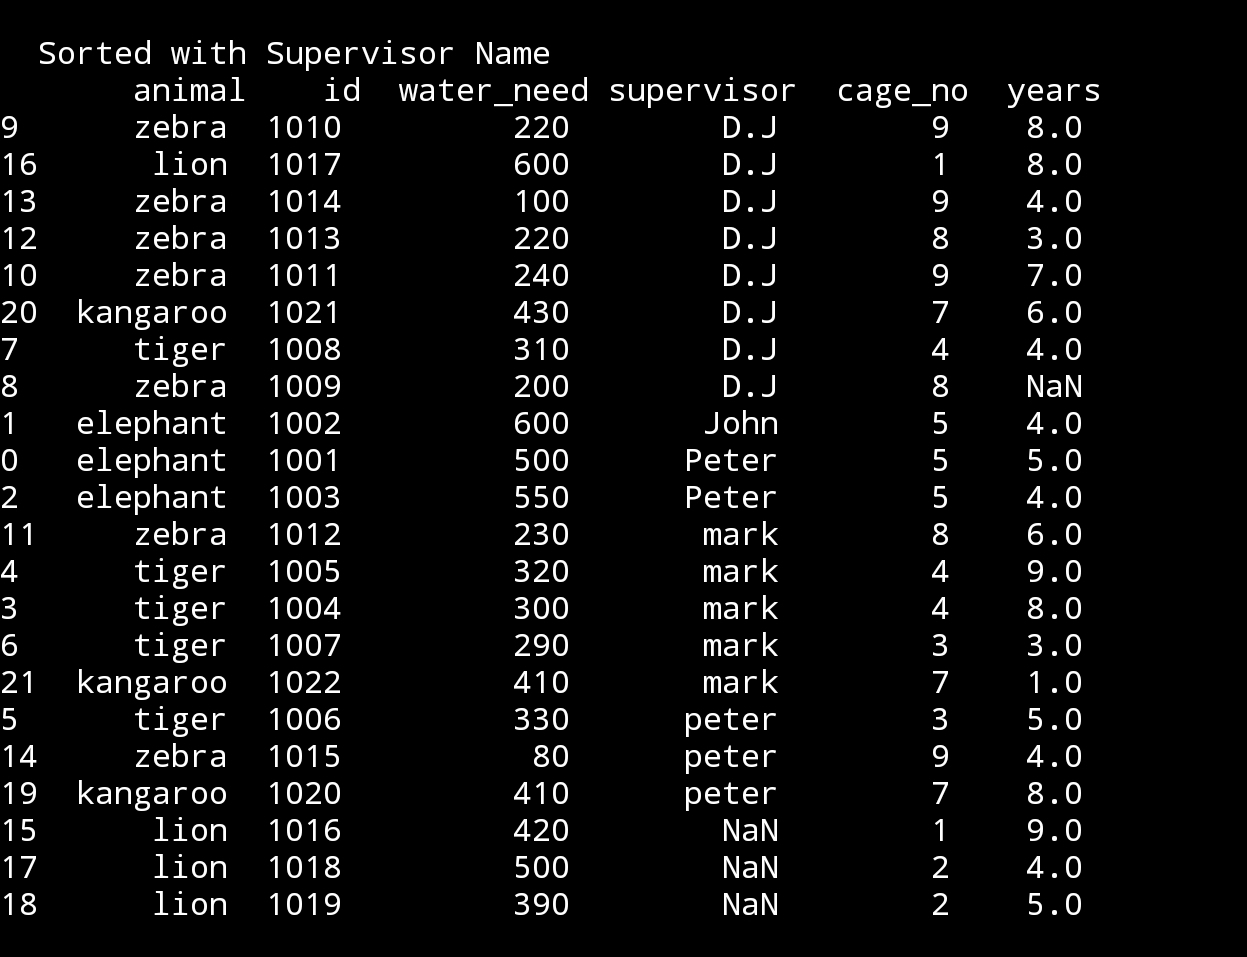
So, if we want to sort the data based on supervisor name.
df.sort_values(‘supervisor’, inplace=True)
print(‘\n\n Sorted data with Supervisor Name\n’,df)
|
First thing to notes that we have two group of supervisors name ‘peter’ one with small ‘p’, another with Big ‘P’. Another thing to see that we have some ‘lions’ with NaN under supervisor, this meas there is no data in that feilds. I will not change this now, let’s do this in another lesson.
So, let’s sort the data now with anumal type.
df.sort_values(‘animal’,inplace=True)
print(‘\n\n Sort with animal type.\n’,df)
 |
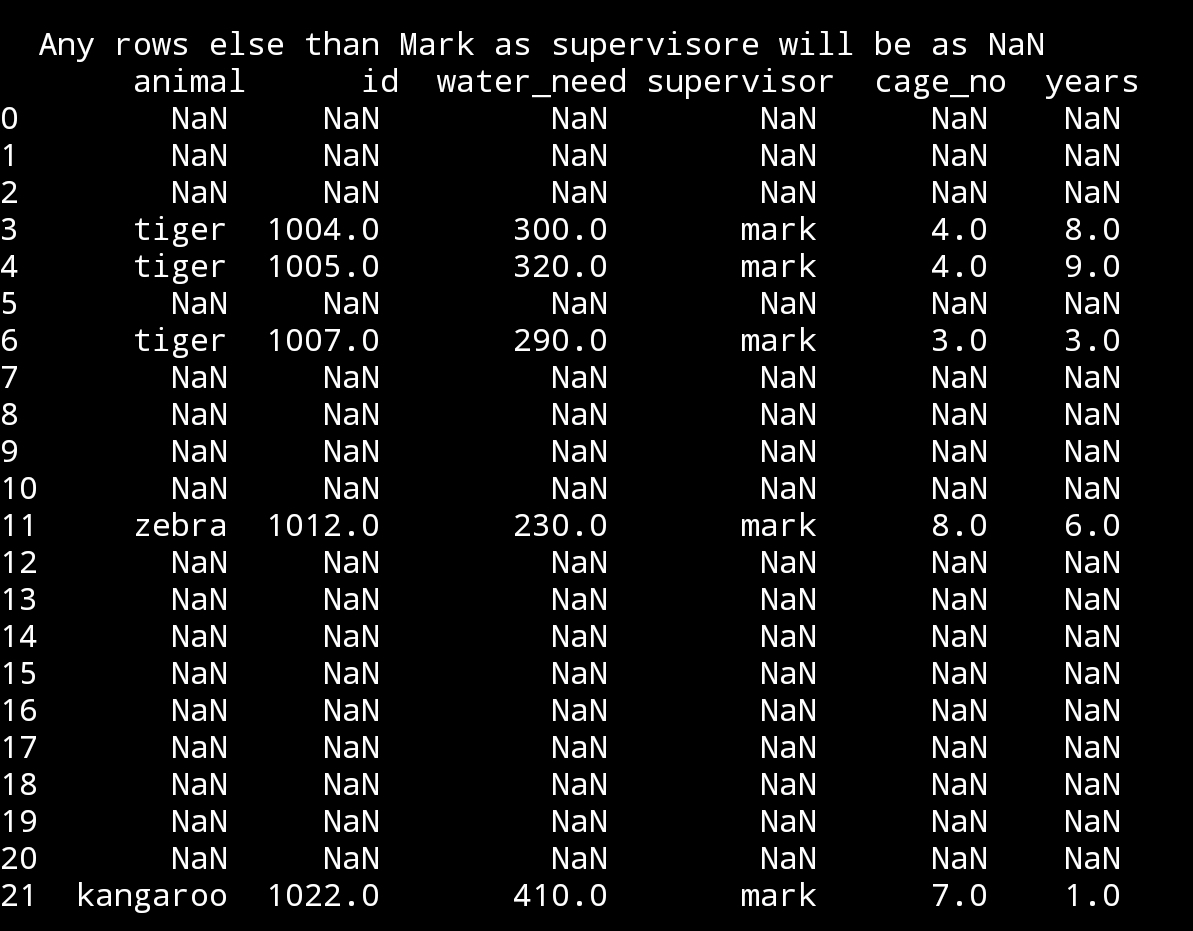
If we want to print all animal data under mark supervision, other data will be shown as NaN.
mark_supervision = df[‘supervisor’]==’mark’
df.where(mark_supervision, inplace = True)
print(‘\n\n Any rows else than Mark as supervisore will be as NaN\n’,df)
|
If we want to add another filter to the upper dataframe to show animals under mark supervision if the animal age is more than 7.
age_biger_7 = df[‘years’] >7
df.where(mark_suoervision & age_biger_7, inplace = True)
print(‘\n\n Only rows under mark supervision if animal age > 7 \n’,df)

|
:: Pandas Lessons Post ::
| Lesson 1 | Lesson 2 | Lesson 3 | Lesson 4 |
| Lesson 5 |
Python: Pandas Lesson
Learning : DataFrame and some commands
Subject: Pandas printing selected rows
First thing we will do today, we will add another coloumn to our CSV data_file_zoo.csv, we will add ‘years’ this will be hwo old each animal in the zoo is.
File_Name: data_file_zoo.csv
animal,id,water_need,supervisor,cage_no,years
elephant,1001,500,Peter,5,5
elephant,1002,600,John,5,4
elephant,1003,550,Peter,5,4
tiger,1004,300,mark,4,8
tiger,1005,320,mark,4,9
tiger,1006,330,peter,3,5
tiger,1007,290,mark,3,3
tiger,1008,310,D.J,4,4
zebra,1009,200,D.J,8,
zebra,1010,220,D.J,9,8
zebra,1011,240,D.J,9,7
zebra,1012,230,mark,8,6
zebra,1013,220,D.J,8,3
zebra,1014,100,D.J,9,4
zebra,1015,80,peter,9,4
lion,1016,420,,1,9
lion,1017,600,D.J,1,8
lion,1018,500,,2,4
lion,1019,390,,2,5
kangaroo,1020,410,peter,7,8
kangaroo,1021,430,D.J,7,6
kangaroo,1022,410,mark,7,1
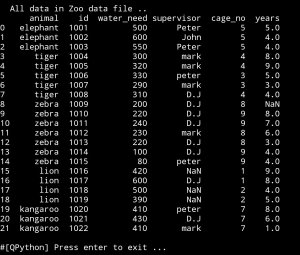
As we just update out file, we need to load it to the memory by calling the df (dataframe), this will happen once we run our code.
Here is a screen shot of the new data using print(df)
Lets say we want to know how many animals are numder 6 years. Here we will use df.loc to locate what we are looking for.
age_less_6 = df.loc[(dfyears<6)]
# To print we may use this:
print(‘ we have {} animals less than 6 years’.format(len(age_less_6)))
Now, we want to print only lion rows:
lino_rows = df.loc[(df.animal==’lion’)]
 Here is only rows with animal name ‘elephants’:
elephant_rows=df.loc[(df.animal==’elephant’)]

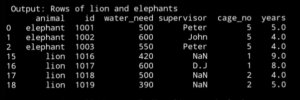
Now let’s print only the rows with lion and elephants:lion_and_elephant = df.loc[(df.animal==’lion’) | (df.animal == ‘elephant’)]
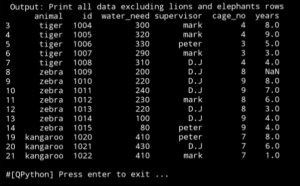
What if we want all the data but not the rows with lino or elephant.
all_exclude_lion_elephant=df.loc[(df.animal !=’lion’) & (df.animal !=’elephant’)]
:: Pandas Lessons Post ::
| Lesson 1 | Lesson 2 | Lesson 3 | Lesson 4 |
| Lesson 5 |
Python: Pandas Lessons
Learning : DataFrame and some commands
Subject:
This is my first hours in Pandas, until now thing are going smooth. I am using pythonanywhere on my PC, and jupyterlab on my galaxy tab S4.
In this post and coming once under name Pandas Lesson I will write some commands and what-ever I think I may need.
So, first thing we need a csv file with data to play with, so I search for some thing simple, i found one with zoo data!, I add two new column to it. so lets see it.
File_Name: data_file_zoo.csv
animal,id,water_need,supervisor,cage_no
elephant,1001,500,Peter,5
elephant,1002,600,John,5
elephant,1003,550,Peter,5
tiger,1004,300,mark,4
tiger,1005,320,mark,4
tiger,1006,330,peter,3
tiger,1007,290,mark,3
tiger,1008,310,D.J,4
zebra,1009,200,D.J,8
zebra,1010,220,D.J,9
zebra,1011,240,D.J,9
zebra,1012,230,mark,8
zebra,1013,220,D.J,8
zebra,1014,100,D.J,9
zebra,1015,80,peter,9
lion,1016,420,,1
lion,1017,600,D.J,1
lion,1018,500,,2
lion,1019,390,,2
kangaroo,1020,410,peter,7
kangaroo,1021,430,D.J,7
kangaroo,1022,410,mark,7
I add the ” supervisor and cage_no ” to the original file so we will have more room to manipulate.
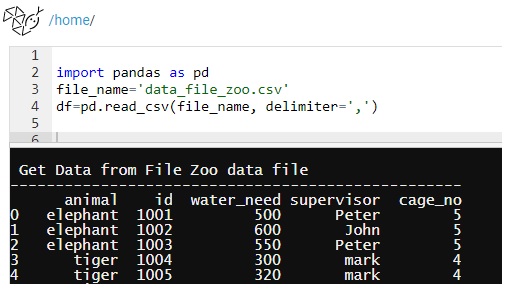
First Command: first thing we need to call pandas library using import, and set the file name and dataframe.
import pandas as pd
file_name=’data_file_zoo.csv’
df=pd.read_csv(file_name, delimiter=’,’)
We will use this part for all our initialization part
|
Other Command: Here are other commands that works with dataframe df.
| print(df) | Will print out all the data from the file. |
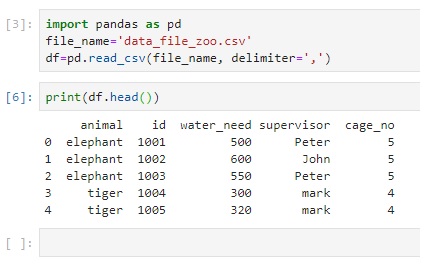
| print (df.head()) | Will print first 5 rows |
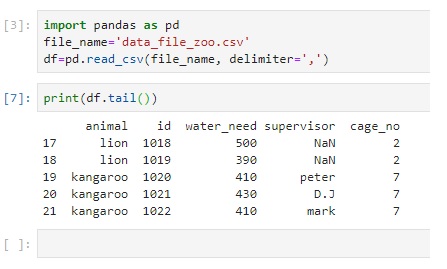
| print (df.tail()) | Will print last 5 rows |
| print (df.sample(3)) | Will print random 3 rows from the dataframe. |
| print(df.columns) | Will print the columns in the file |
| print (df[[‘id’,’animal’,’cage_no’]]) | Print only the data from column you want |
| print (df[[‘id’,’animal’,’cage_no’]].sample(3)) | Print random 3 rows of only ‘id’,’animal’,’cage_no’ columns |
| print (df[df.animal==’lion’]) | Get all the rows with animal name = lion . case sensitive |
| print(df.head()[[‘animal’,’id’]]) | Print first five rows of only animal and id |
 |
 |
 |
 |
 |
Wrapped up: This is a step one, pandas has many to read about and to learn, I start this initiative just for my self, and i select the hard way to do this, this is not important to my current job, this is nothing that any body will ask me about, but i want to learn and I think i will go further in this self-taught learning sessions..
———————————
Update on: 29/7/2019
:: Pandas Lessons Post ::
| Lesson 1 | Lesson 2 | Lesson 3 | Lesson 4 |
| Lesson 5 |
Python : Expenditure App
Expenditure Application
User input ‘choice’:
In today post we will add the user input to our menu and based on the user input the app some function will run. As we said in the previous post ‘The Menu‘ we will use (9) to Exit from the application.
To read the user input we will use ‘input(‘something’)’ statement and The Menu def will return the choice back so our if statement will take us to another function, or EXIT if choice = 9, so let’s start.
As we can see in the last two lines of the_menu def, we have
choice = input(‘What you want to do? ‘) and return choice
Then in the main application body we will have while statement holding if statement as here:
choice = the_menu() # Here we are calling the menu and putting the return in the choice.
while choice != ‘9’ :
if choice == ‘1’:
# Calling “Add New Entry” function
choice = the_menu()
if choice == ‘2’:
# Calling “Delete an Entry” function
choice = the_menu()
if choice == ‘3’:
# Calling “Change an Entry” function
choice = the_menu()
if choice == ‘4’:
# Calling “Show Total Expenditure in a Year.” function
choice = the_menu()
if choice == ‘5’:
# Calling “Show Expenditure Details in a year.” function
choice = the_menu()
if choice == ‘9’:
choice = the_menu()
brack
Your code should be something like what we have in the image.

Python : Expenditure App
Expenditure Application
The Menu:
Continuing parts of the Expenditure Application, here is the basic menu that we will use in our app. We will select (9) as Exit from the system.
So now, we have a json file with sample data and stored in a directory, also we have a file called “expen.py” and we will write the menu def in it and save it.
def the_menu(): # This is a menu
print(‘1. Add New Entry.’)
print(‘2. Delete an Entry.’)
print(‘3. Change an Entry.’)
print(‘4. Show Total Expenditure in a Year.’)
print(‘5. Show Expenditure Details in a year.’)
print(‘9. Exit.’)
# This line will ask the user to enter the operation he want to do.
choice = input(‘What you want to do? ‘)
return choice
In this app we will have 5 functions as our menu and maybe one or two functions to facilitate some calculations in background.
Python : Expenditure App
Expenditure Application
leveling the Ground:
In this post we will assume that we have a folder for our application, and we will create two files one is for our python code and we will name it “expen.py”, the other is for our data and we will name it “expen_dat.json” this file extension is ‘json’. Also I assume that we have json pack is installed in the PC so if you don’t have json this is the time to install it.
json file:After you create expen_dat.json file just open it with any text editor and copy a test data of our expenditure as shown.
{“expenditure”:
[
{“date”:”02/03/2016″,”amount”:300},
{“date”:”10/04/2016″,”amount”:550},
{“date”:”02/05/2016″,”amount”:300},
{“date”:”10/04/2016″,”amount”:550},
{“date”:”02/03/2016″,”amount”:300},
{“date”:”10/04/2016″,”amount”:550},
{“date”:”05/01/2017″,”amount”:400},
{“date”:”10/02/2017″,”amount”:400},
{“date”:”15/03/2017″,”amount”:400},
{“date”:”20/04/2017″,”amount”:400}
}]
In next post we will start with coding and testing our Expenditure Application.
I will use the @pycharm to write the code and test it, but any other code editors can be used. Also, I assume we have Python and json installed in your PC.
Taking pictures is not my main daily practices, but when i start playing with my camera, i really enjoy my self.
Thanks for visiting my Space..


