Archive
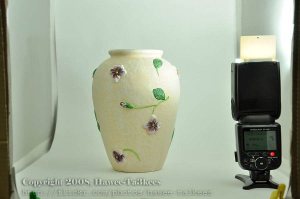
Still Life

Small wood vase with fake woody flowers in my LightBox. Your perspective may give you good capture, change the light position, try different camera setting,, for sure you will take good shot.
[Click the image to enlarge]
More information on How To Create a ‘LightBox’ Click here..
Macro on Fruit
Macro on Fruit: In this project I set-up my studio to be able to capture/shot the fruit from top, I use my Nikon D90 with tow lenses the Nikon 35mm and Nikon 105mm Macro. Note that the Focal Length of 105mm lens is equivalent to 157mm in 35mm Film.
[Click on the images to see them larger..]
The Studio set-up…
o. Camera Nikon D90. [Nikon 35mm + Nikon 105mm macro]
o. Square Glass. [Size as your studio need]
o. Glass Pyrex dish.
o. Light source.
o. Different type of fruit. [cut to slices or as you want/plan]
o. ML-L3 Wireless Remote Control.

Here are some shots:

Slice of Orange, I add the reflection and increase the brightness. In this shot I used 35mm lens, listed the other camera setting:
Exposure Time = 1/200″
Focal Length = 35mm [Nikon 35mm f/1.8]
F Number = F1.8
ISO Speed Ratings = 200
Exposure Bias Value = +5EV
Flash = Off
 Same Orange with Macro lens,
Exposure Time = 1/320″
F Number = F4
Focal Length = 105mm
ISO = 200
Exposure Bias Value = ±0EV
Light Source = out source
Flash = Off
 What is this? Yes, Kiwi Fruit, macro lens with extra brightness; the frame (upper & lower) are a black rectangular with 45% opacity.
Camera Setting:
Exposure Time = 1/80″
F Number = F4
Focal Length = 105mm
ISO Speed = 200
Exposure Bias Value = +5EV

Here is another shot for the Kiwi with 35mm lens.

This is a Lemon, tow images been joined in photoshop to get this..
 Camera setting for the shot on the left..
Exposure Time = 1/80″
F Number = F4
ISO Speed = 200
Exposure Bias Value = +5EV
Focal Length = 105mm

The Pomegranate is a wonderful fruit
More photos are on my Flickr : Hawee – Ta3kees
Ali,
The Sound Trigger system..
Sound Trigger System
Usually you need to press a button (Shutter release) to take a photo, but there are other ways to take photos such as timeing mode and the way we will talk about “Sound Trigger System” so What is it?
Sound Trigger System: In a simple words, some thing let you camera fire or releass it’s shutter when it detict any sounds.
In this artical i will show you how i create my Sound Trigger system.
Requirement:
[0] Shutter Release Cord. ($8 from Amazon.com).
[0] Any sound detection toy. ($3.5 from local toy’s shop)
[0] Some electrical tools..
1. Soldering Flux.
2. Soldering iron.
3. Rosin Core Solder.
4. Plastic terminal blocks. (Wire Connectors)
[0] Some knowledge in electricity. (Basic information)
The Shutter Release Cord.

A bird toy that start singing when it detect a sound.

Electrical tools

Start with:
[0] Unscrews the toy and find it’s parts and the functionalty of each.
1. The sound detector.
2. The speaker.

[0] Unscrews the Shutter Release Cord and find it’s parts and the functionalty of each.
i could’t open mine so i break it.

[0] Here i just did some electical Weld job.
The problem was that you need to press the shutter release on the remote half way down to set focus, then press all-way down to release the shutter, so i just turnover the the focus function.

[0] Packing-up the remote.

[0] The final shape, i add the On/Off switch (1) for more control.

The resault:
Here are some resaults and the studio set-up.
The Studio set-up

Sample images


For more photos, please visit my Flickr: Hawee-Ta3kees
Ali,
🙂 Feel free to visit my Flickr: Hawee Ta3kees
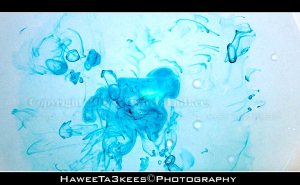
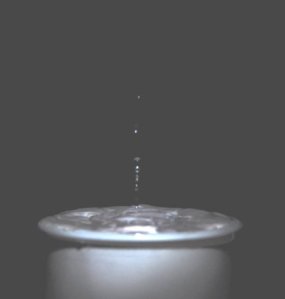
Ink in Water
The Equipments
o Water + Water container or Glass.
o Food color or normal ink.
o Use Camera Flash or light source.
o Camera on Stand.
o Manual Focus.
o High Speed shutter.
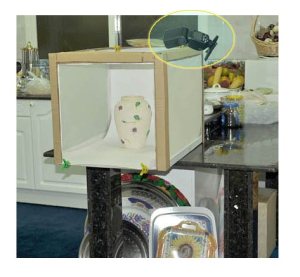
here is the studio set-up that i use
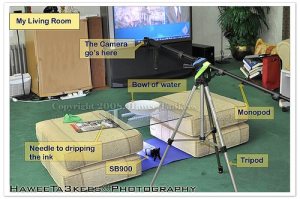
List of things in this Studio:
[o] Bowl of water. [semi-transparent bowl]
[o] Needle for dripping the ink.
[o] Food ink, or any normal ink.
[o] I used a Tripod and Monopod [as shown] to get the camera Top to bottom.
[o] Nikon SB900 as speed-light.
[o] Camera Nikon D90 + 35mm lens.
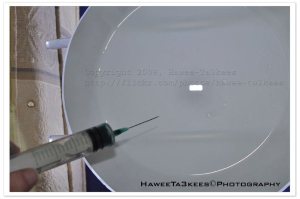
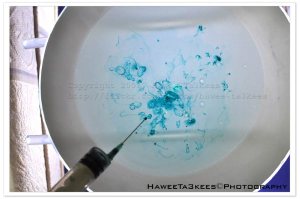
some original shots without any photoshop edits: [No crop, No colors.. Just resize to W800]

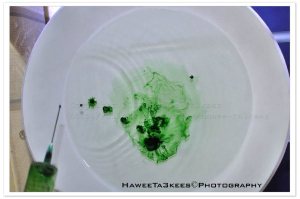

Sample shots after Photoshop edits


From more photos and sample shots, visit my Flickr ,, Hawee – Ta3kees
Ali,
Ali,
🙂 Feel free to visit my Flickr: Hawee Ta3kees
Adobe LightRoom
Adobe LightRoom:
[Last Update: 27-03-2010]

for this photo, you can see the studio and the HomeMade LightBox… Click Here


For more photos visit my Flickr .. Hawee-Ta3kees
Ali,
Strobist Techniques
Strobist Techniques: Part 2, [ Click here to read Part1 ]
The light is the key element in the photography, you may use the day-light, or the camera built-in flash but to play with lights and shadows you will need one or more external lights with remote fire capability. (I have the Nikon SB-900)
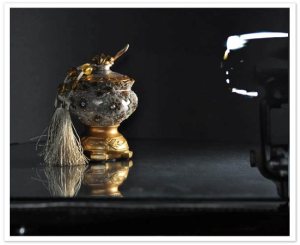
In this article (Part 2) i will use the same LightBox with black background and Glass as a reflection of the object, again SB-900 Nikon SpeedLight will be used in remote sync with my Nikon D90, also i will use a flashlight as another light source.
This is the LightBox with black background, and sb900 position.

The position of the of the FlashLight.

The result after Crop, you can see the reflection on the Glass.

The SB-900 placed inside the LightBox with 50% light power, [no flashlight]
Same after crop the SB-900.

The result, after croped.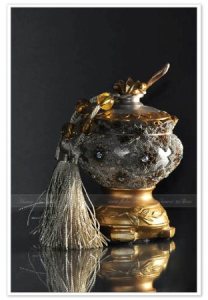
other photos for different objects will be post.
More on my Flickr: Hawee-Ta3kees
Regard,
Ali ,
Strobist Techniques
- The Studio is my Kitchen.
- Home Made LightBox.
- Stand for the camera.
- SB-900 SpeedLigth.
- I will use the normal room light -ceiling light-.


Light in position 3, left, flash on the lightbox, 50% light power.


Water Drops Project


Lemon ‘N’ Splash Action
ISO Speed: 800
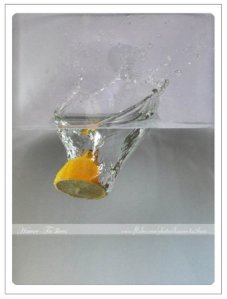
For more photos, please go to my flickr Hawee-Ta3kees
Water Splash
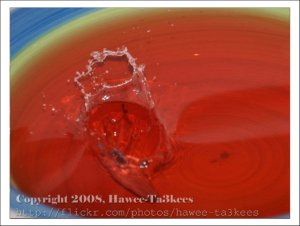
More in my Flickr site Hawee – Ta3kees
Taking pictures is not my main daily practices, but when i start playing with my camera, i really enjoy my self.
Thanks for visiting my Space..


