Archive
Python: Coffee Consumption P10
Learning : Python, SQlite3, Dataset, Pandas,
Subject: Create Coffee Consumption Application.
[NOTE: To keep the code as simple as we can, We WILL NOT ADD any user input Varevecations. Assuming that our user will Enter the right inputs.]
[ IF THE IS FIRST TIME DOWNLOADING THE CODE FILE, SELECT OPTION 7 FROM MAIN-MENU TO CREATE THE DATABASE]
In this Last part (Part-10) of Coffee Consumption App, we will write a Function to Export the Data to an Excel Fiel, So this will be the Last part of this application and any other Enhancement will be added as new version of the application.
Exporting The Data: To Export the data to or say “writing into” Excel file we need to import New library Named: xlsxwriter [if you don’t have the library then you need to install it first, using this command: pip install xlsxwriter]. After installing we will call it into our python file using this command: import xlsxwriter. The Excel file [in this case] will have four Sheets, named as follow:
coffee_con, coffee_name, coffee_type, coffee_size
each sheet will contains the table header and the date.
File Name: The file name will be as: coffee_consumption_[Current Date & Time].xlsx, the date and time will be formated as: yyyymmdd_HM, the python code to generate this is:
now = datetime.now()
date_t = now.strftime(“%Y%m%d_%H%M”)
Also we need to know that the file will be saved in the same directory of the application or (python .py file)
New Function: from our back_up function we will call another Function called: write_data(data_set,col_list,the_sheet): this Function will write the data-set into Excel file sheet, so we need to pass the data_set, column list and the Sheet Name as arguments to the function and it will use the command: write(row,col,data) to write the row to the sheet. Here is the code
# Writing the data into the sheet

def write_data(data_set,col_list,the_sheet):
    """
    Function to write the data-set into Excel file sheet.

    Argument:
        data_set:
        col_list: List of the columns in the data_set.
        the_sheet: the Sheet Name.

    """
    # write the Table Header
    for x in range (0,len(col_list)):
        the_sheet.write(0,x,col_list[x])

    rows = len(data_set)
    for row in range (1,rows) :
        for col in range (0,len(col_list)) :
            the_sheet.write(row,col,data_set[row][col])
In our main back-up function, we prepare the data-set and column list, then we call the new Function write_data passing the variable. Here is two parts of the code, first one is generating the file name, and calling the datetime function, second part is dealing with the data tables in the database, fetching the data, listing the columns and passing this to write_data function.. Here is the code
 |
 |
… Done. We finish the Coffee Consumption Application using Python and Sqlite. Next Week we will start New Application ..
..:: Have Fun with Coding ::.. 🙂
| Part 1 | Part 2 | Part 3 | Part 4 | Part 5 |
| Part 6 | Part 7 | Part 8 | Part 9 | Part 10 |
To Download my Python code (.py) files Click-Here
 Follow me on Twitter..
By: Ali Radwani
Python: Property Mainenance System
Project Name: Property Mainenance System
By: Ali Radwani
First-Draf: 5.10.2021 [Brin Storming]
I start writing the outline for a New Project about Renting System, one of the Functions in the system was Property Maintenance Service, then I notes that this Function can be a Stand-Alone System because of it’s Size and Requerment, so i decide to transfer the Property Maintenance Service into an Application.
Here are some Brain-Storming ideas [Not sorted, Not checked, Need to been Reviewed]
- Submit Maintenance Request (by Tenant) : (For What?: [Bathroom, kitchen, WaterSystem[Colling, Heating], Windoews and Doors, Paints, TV & Aoudio,Insects and Bugs, Roof, Others (If other please write.. )]
- Request Date,time
- Property address.
- Maintenance Suggested Date (by Tenant) [Need Maintenance team appoval]
- Cost Evaluation. [Tenant Approval Requear]
- IF Approved. Do Payment,[Cash, cheque, card] Set the Date and Time for the Maintenance.
- Start the job after payment.()
- After Maintenance Finsh Close the case.
- Print Report if requered.
- —> Tables:
- Properties: ID, Address[Zone, Street, Building],Type[Villa, Appartment], Bedroom(numbers), Bathroom(numbers), Kitchen(numbers),Car_garage(numbers), Intercome, TV_Cable, Internet, contract_period
- Maintenance_request: property ID, maintenance for, date_time status[pending, inprogress, complete],
- Payments: Total Cost, Date, Payed_by, Payment Method[cash,cheuq], Property ID, receipt id.
- completed: data, property ID, maintenance for, cost,
- —> look-up tables:
- job status: [pending, inprogress, complete, ]
- payment methods: [Cash, Card, cheque,]
- Maintenance List: [Bathroom, kitchen, WaterSystem[Colling, Heating], Windoews and Doors, Paints, TV & Aoudio, Insects and Bugs, Roof, Others (If other please write.. )]
- Functions:
- Main Menu.
- Add, Edit, Delete [For each Section/Function in the tables/Application]
- Show Data/Records.
- Reports
- submin_request.
… More to be added .. Needs:[Tables Name, ] .. Tables or functions may Merged or Deleted.
Souq-Waqif: Nikon S9900 Shot # 12
Subject: A Photo from Souq-Waqif with Nikon S9900
This Shot: I was walking in Souq-Waqif one the most famous ‘Bazaar’ in Qatar I fond this Restaurant, and I take the shot using my Nikon S9900, camera In-Hand.
…Click Image to Enlarge… Camera in Hand, F:4 , ISO:125 , Shutter:1/640s Focal-Point:6mm Camera in Hand, F:4 , ISO:125 , Shutter:1/640s Focal-Point:6mm
|
::.. To see all my Nikon S9900 Photos Click-Here
::.. To see all my Nikon D7100 Photos Click-Here
::.. To see all my Nikon D90 Photos Click-Here
::.. Other Photos From Qatar Click-Here
By: Ali Radwani
Python: Coffee Consumption P8
Learning : Python, SQlite3, Dataset, Pandas,
Subject: Create Coffee Consumption Application.
[NOTE: To keep the code as simple as we can, We WILL NOT ADD any user input Varevecations. Assuming that our user will Enter the right inputs.]
[ IF THE IS FIRST TIME DOWNLOADING THE CODE FILE, SELECT OPTION 7 FROM MAIN-MENU TO CREATE THE DATABASE]
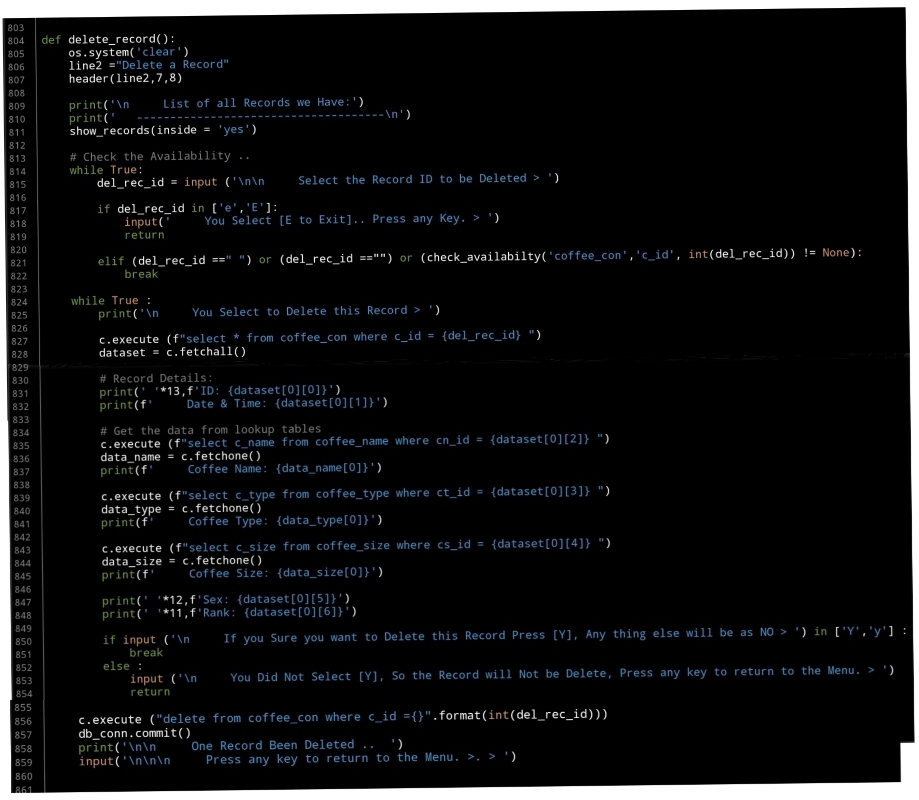
In this part (Part-8) of Coffee Consumption App, we will write a Function to Delete a Record from the Main Table of the Coffee Consumption System.
Deleting a record is an easy SQL command having the Table Name and the Record ID that we want to Delete. In our Function First we wil display all the Records on the screen and asking the user to Select the ID of the Record, then we will display that record (again) on the screen and ask to Confirm the action by Entering [Y].
If the user Enter [Y] the Record will be Deleted, any thing else it wil be as No and the user will returned to the Main-Menu.
Coding: We will start the Function by displaying the header, then we will call the Function that will display all the Records in the data-base.. Here is the code..
show_records(inside = ‘yes’)
and asking the user to Select the ID.
NEXT: We will check the Availability of the ID, so if the user Enter an ID that not in the Data-Base or Empty space or just press Enter we will ask to re-enter the ID again. … Here is the code ..
while True:
del_rec_id = input (‘\n\n Select the Record ID to be Deleted > ‘)
if del_rec_id in [‘e’,’E’]:
input(‘ You Select [E to Exit].. Press any Key. > ‘)
return
elif (del_rec_id ==” “) or (del_rec_id ==””) or (check_availabilty(‘coffee_con’,’c_id’, int(del_rec_id)) != None):
break
If the ID is available, then we will display the Record and will ask the user to Confirm the Delete Command. This is the code for all the Delete Function ..
 |
What’s Coming: In Part-9 we will Writing the Function to Edit a Coffee Record.
..:: Have Fun with Coding ::.. 🙂
| Part 1 | Part 2 | Part 3 | Part 4 | Part 5 |
| Part 6 | Part 7 | Part 8 | Part – | Part – |
To Download my Python code (.py) files Click-Here
By: Ali Radwani
Old Drawer: Nikon S9900 # 11
Title: Nikon S9900 # 11
Subject: Drawer Side with Nikon S9900
This Shot: In one of my indoor photo-session i take this shot of an old drawer in my living room, using Black and White option, lights coming from the window & Camera in hand
…Click Image to Enlarge… Camera in Hand, F:4 , ISO:400 , Shutter:1/10s Focal-Point:6mm Camera in Hand, F:4 , ISO:400 , Shutter:1/10s Focal-Point:6mm
|
::.. To see all my Nikon S9900 Photos Click-Here
::.. To see all my Nikon D7100 Photos Click-Here
::.. To see all my Nikon D90 Photos Click-Here
By: Ali Radwani
Python: Tower of Hanoi
Learning : Python
Subject: Write a Function to Solve Tower of Hanoi Problem
Intoduction: Tower Of Hanoi is Puzzle Game that has three Vertical Sticks/Pegs Named A, B, C (3 Towers) and we have n number of disks different in diameter soted on top of each other (Large to Small) in Tower A. The Gall is to move all the disks from (A) to (C).
 # Tower of Hanoi Puzzel

"""
    Project Name: Tower of Hanoi

    By: Ali Radwani
    Date: 13.6.2021

     d  : Number of Desk
     fs : From Stick
     ts : To Stick
     bs : Buffer Stick
"""


import os

def hanoi_t(d, fs, bs, ts):
    if d ==1 :
        print("\n   Move Desk 1 From {} To {}".format(fs,ts))
        return

    else:
        hanoi_t(d-1,fs,ts,bs)
        print("   Move Desk {} From {} To {}".format(d,fs,ts))

        hanoi_t(d-1,bs,fs,ts)
        print("   Move Desk {} From {} To {}".format(d,fs,ts))

os.system('clear')
print('\n\n   This is Tower Of Hanoi Project')
print('   We are Solving a Three Desk Tower Named 1, 2 and 3, with Three Sticks Named A, B and C ')
print('\n   Start Solving ...')
hanoi_t(3,'A','B','C')

|
..:: Have Fun with Coding ::.. 🙂
To Download my Python code (.py) files Click-Here
By: Ali Radwani
Python: Coffee Consumption – P7
Learning : Python, SQlite3, Dataset, Pandas,
Subject: Create Coffee Consumption Application.
[NOTE: To keep the code as simple as we can, We WILL NOT ADD any user input Varevecations. Assuming that our user will Enter the right inputs.]
[ IF THE IS FIRST TIME DOWNLOADING THE CODE FILE, SELECT OPTION 7 FROM MAIN-MENU TO CREATE THE DATABASE]
In this part (Part-7) of Coffee Consumption App, we will write a Function to display all Records in the data-base in a table on the screen.
Beginning with formating the table header, we will have the following columns: record Id, Date_time, Coffee_name, Coffee_type, coffee_size, customer_Gender and Rank. Here is the code..
print(‘ ‘*6,’ID’,’ ‘*5,’ Date & Time’,’ ‘*3,’ Coffee Name’,’ ‘*4,’Type’,’ ‘*9,’Size’,’ ‘*4,’ Gender’,’ ‘*4,’ Rank’)
print(‘ ‘*4,’-‘*90)
Next we will execute an SQLITE command to fetch all the records. Here is the commands..
c.execute (f”select * from coffee_con where c_id > 1 “)
dataset = c.fetchall()
Also we will using the lookup tables to get the names using the id keys in the coffee_name, coffee_type, coffee_size columns.
Now, Using the for loop to access all the records and print them on the screen. Here is apart of the code ..
print(‘ ‘*6,'{}’.format(data_id),end=””)
print(‘ ‘*(10 – 5),'{}’.format(data_date),end=””)
print(‘ ‘*(21 – 16),'{}’.format(data_name[0]),end=””)
print(‘ ‘*(14 – len(data_name[0])),'{}’.format(data_type[0]),end=””)
print(‘ ‘*(13 – len(data_type[0])),'{}’.format(data_size[0]),end=””)
print(‘ ‘*(13 – len(data_size[0])),'{}’.format(data_sex),end=””)
print(‘ ‘*(12 – 1),'{}’.format(data_rank))
Here is a screen shot of the code..
 |
OutPut Screen 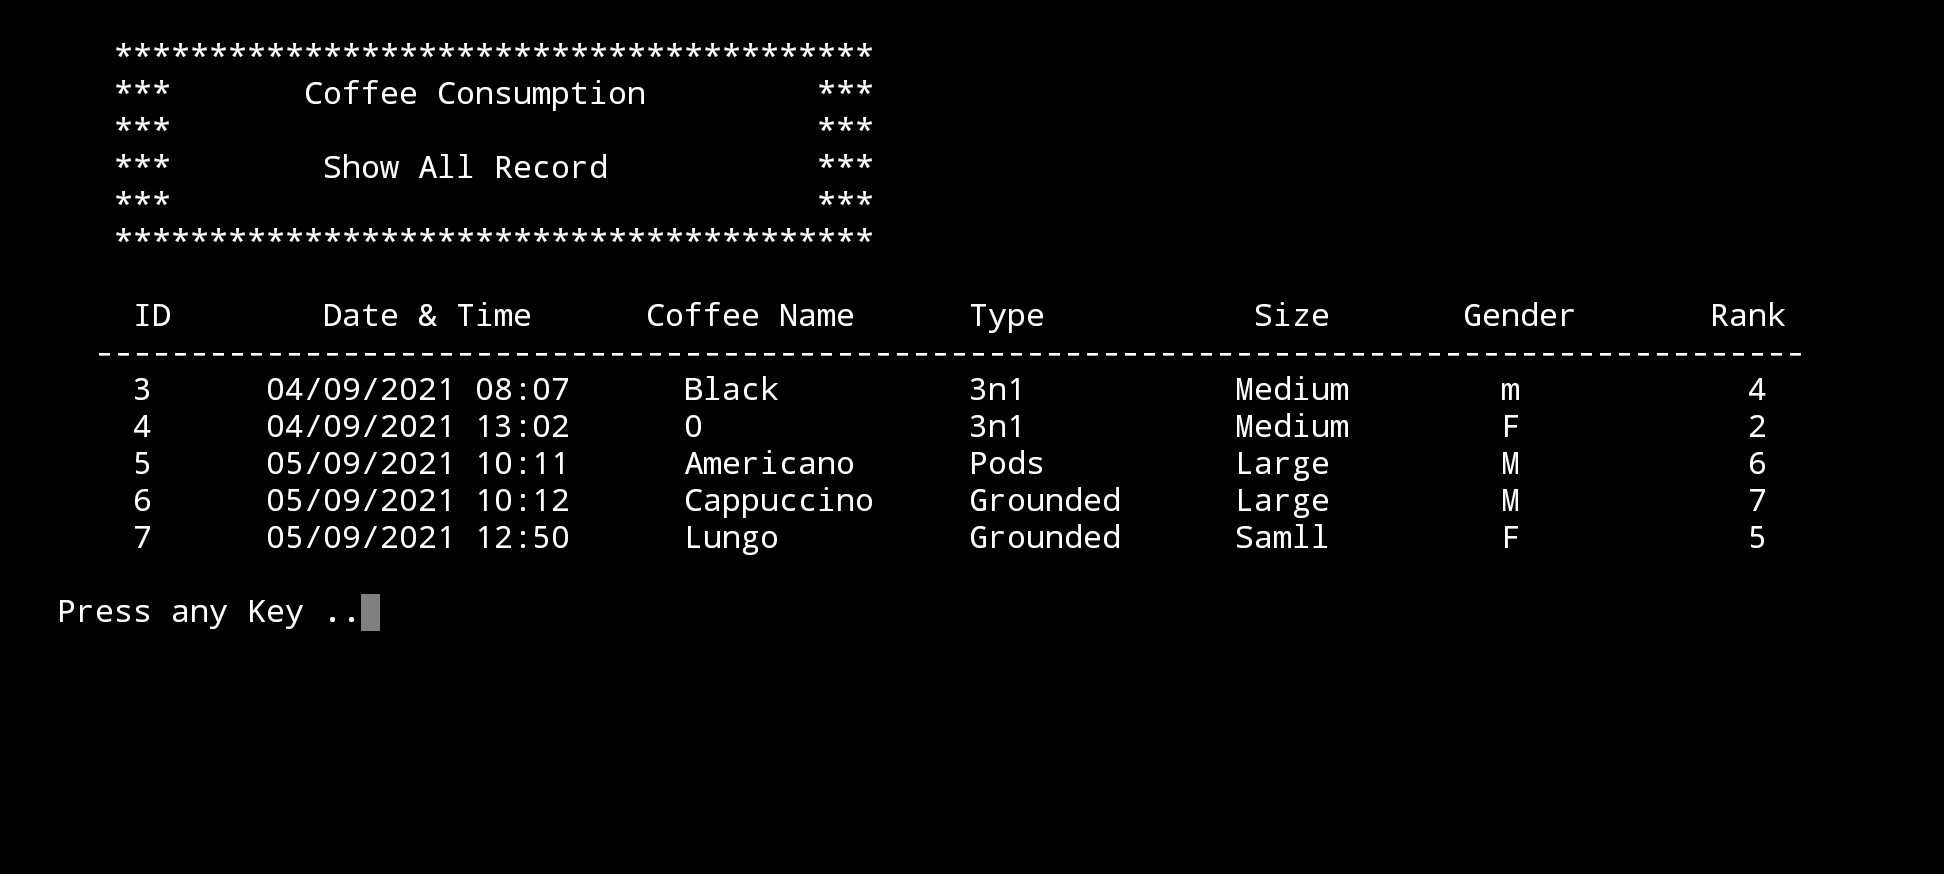 |
What’s Coming: In Part-8 we will write the Function to Edit the records on the Main Data-Base.
..:: Have Fun with Coding ::.. 🙂
| Part 1 | Part 2 | Part 3 | Part 4 | Part 5 |
| Part 6 | Part 7 | Part – | Part – | Part – |
To Download my Python code (.py) files Click-Here
By: Ali Radwani
Python: Coffee Consumption – P6
Learning : Python, SQlite3, Dataset, Pandas,
Subject: Create Coffee Consumption Application.
[NOTE: To keep the code as simple as we can, We WILL NOT ADD any user input Varevecations. Assuming that our user will Enter the right inputs.]
[ IF THE IS FIRST TIME DOWNLOADING THE CODE FILE, SELECT OPTION 7 FROM MAIN-MENU TO CREATE THE DATABASE]
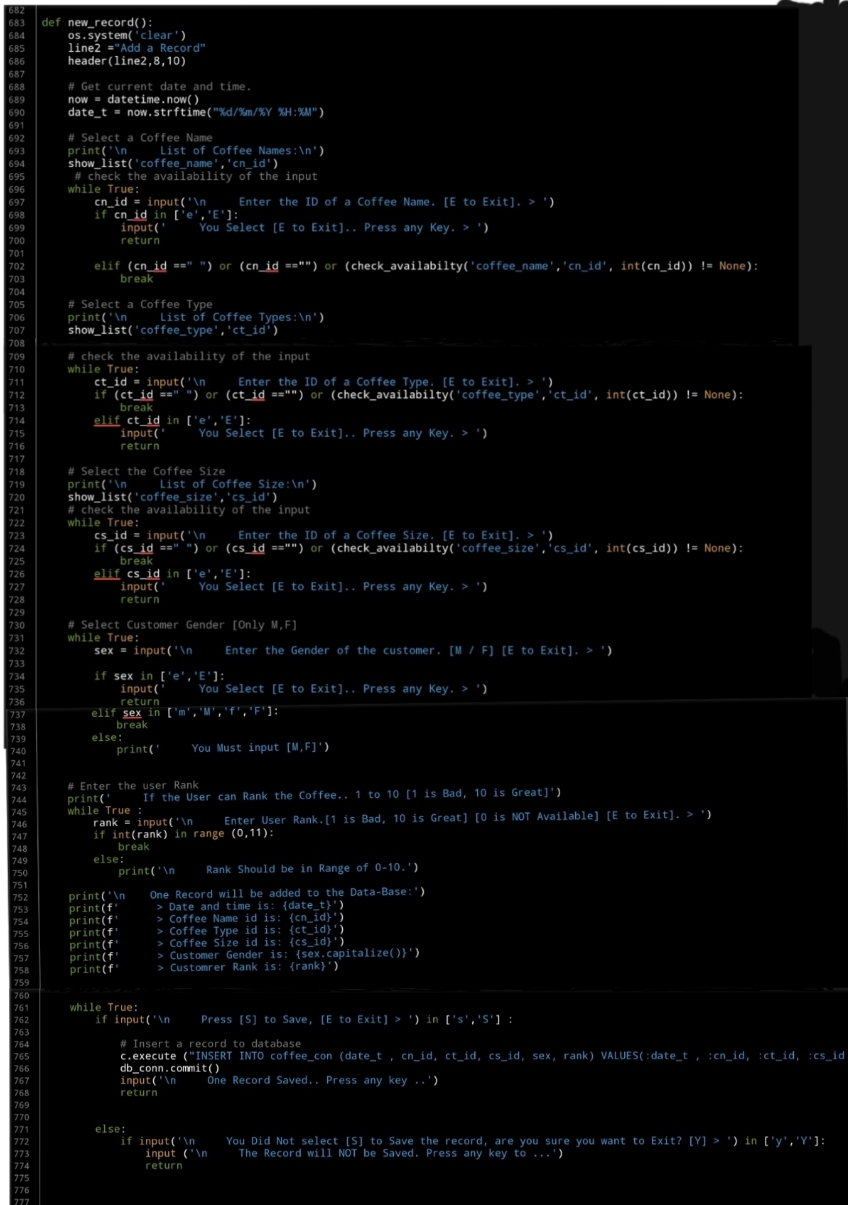
In this part (Part-6) of Coffee Consumption App, we will write First Function of the Main Application to ADD New Record. In this Function we will do the following:
- Get the Current Date and Time.
- The user will Select the Coffee Name, Type and Size from the list in lookup tables.
- Selecting the Gender of the user.
- Entring the Rank for the order [If the customer rank it].
Beginning with adding New Record in the Coffee Consumption System. We will use the datatime.now() function get the current data and time here is the code..
now = datetime.now()
date_t = now.strftime(“%d/%m/%Y %H:%M”)
Then we will show each of the lookup table we have and the user will select the ID of the Coffee Name,Type and Size, the, we will use a simple Validation process to control the user inut. Here is the code for Entering the Coffee Name
   # Select a Coffee Name
    print('\n     List of Coffee Names:\n')
    show_list('coffee_name','cn_id')
     # check the availability of the input
    while True:
        cn_id = input('\n     Enter the ID of a Coffee Name. [E to Exit]. > ')
        if cn_id in ['e','E']:
            input('     You Select [E to Exit].. Press any Key. > ')
            return

        elif (cn_id ==" ") or (cn_id =="") or (check_availabilty('coffee_name','cn_id', int(cn_id)) != None):
            break
The same code will be apply for the Coffee Type and Coffee Size.
[NOTE] All the codes will be in the file to be Download.
Next part of the code will be to select the customer Gender [M,F] here also we will use a simple Validation that will accept M or F Not anything else. Here is the code..
# Select Customer Gender [Only M,F]
    while True:
        sex = input('\n     Enter the Gender of the customer. [M / F] [E to Exit]. > ')

        if sex in ['e','E']:
            input('     You Select [E to Exit].. Press any Key. > ')
            return
        elif sex in ['m','M','f','F']:
            break
        else:
            print('     You Must input [M,F]')
Last variable we will collect will be the Rank, the Customer will ask the user to Rank this Order, the range will be from 1 to 10, 0 will be for Not Available.. Here is the code…
# Enter the user Rank
    print('     If the User can Rank the Coffee.. 1 to 10 [1 is Bad, 10 is Great]')
    while True :
        rank = input('\n     Enter User Rank.[1 is Bad, 10 is Great] [0 is NOT Available] [E to Exit]. > ')
        if int(rank) in range (0,11):
            break
        else:
            print('\n     Rank Should be in Range of 0-10.'
After that we will display all the Entries on the screen and ask the customer to press [S] to save the Record, and then we will use IINSERT SQL command to Insert the record. Here is the code for all the function….
 |
What’s Coming: In Part-7 we will do the Follwing:
Writing three Function to Show / Display the Records in the main Table of the Coffee Consumption Application.
..:: Have Fun with Coding ::.. 🙂
| Part 1 | Part 2 | Part 3 | Part 4 | Part 5 |
| Part 6 | Part – | Part – | Part – | Part – |
To Download my Python code (.py) files Click-Here
By: Ali Radwani
Python: Coffee Consumption – P4
Learning : Python, SQlite3, Dataset, Pandas,
Subject: Create Coffee Consumption Application.
[NOTE: To keep the code as simple as we can, We WILL NOT ADD any user input Varevecations. Assuming that our user will Enter the right inputs.]
[ IF THE IS FIRST TIME DOWNLOADING THE CODE FILE, SELECT OPTION 7 FROM MAIN-MENU TO CREATE THE DATABASE]
In this part (Part-4) of Coffee Consumption App, we will write all three Function to manage the Coffee types.
- Create Function: Add New Coffee Type.
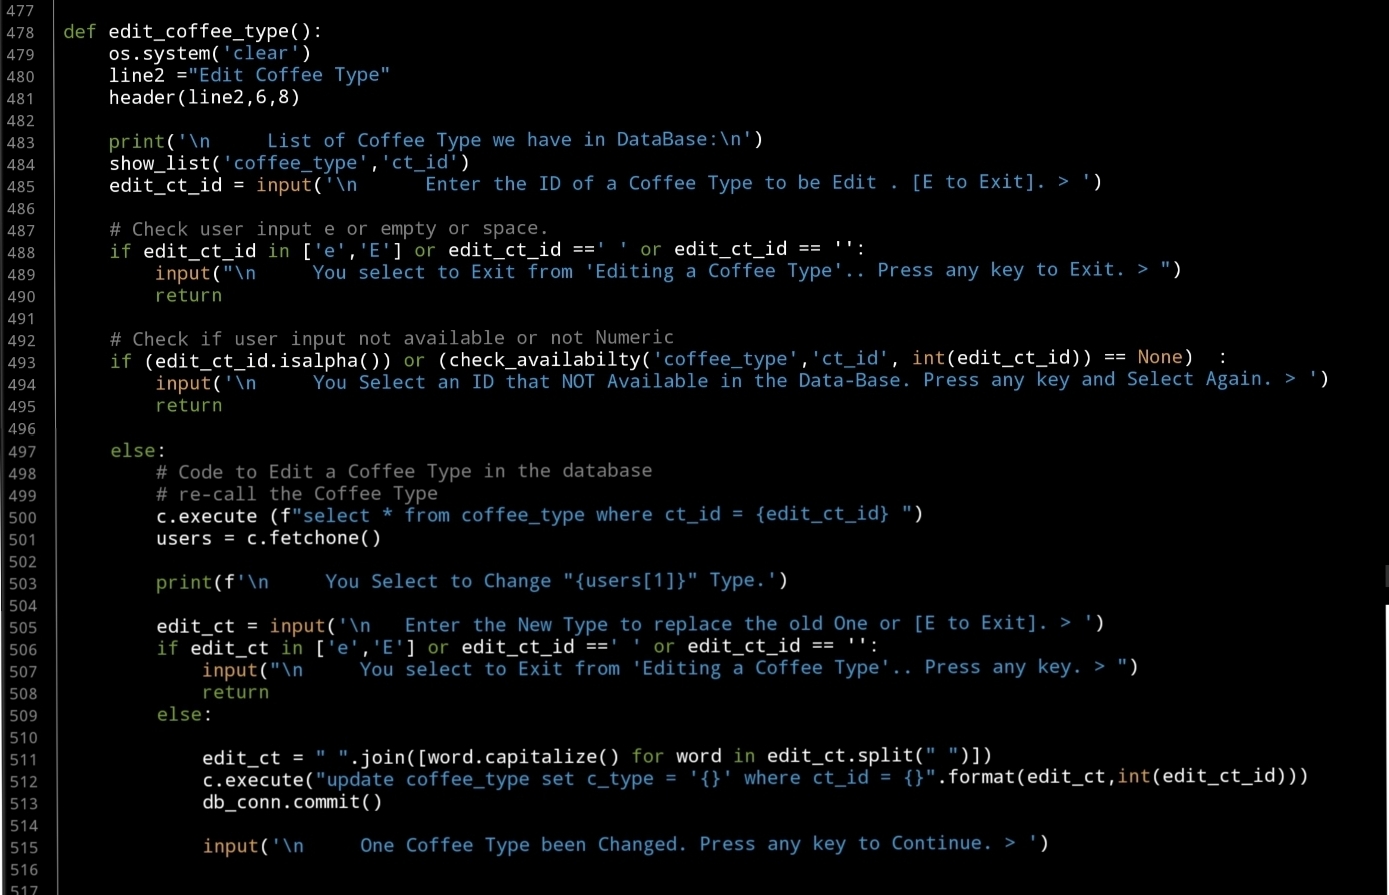
- Create Function: Edit a Coffee Type.
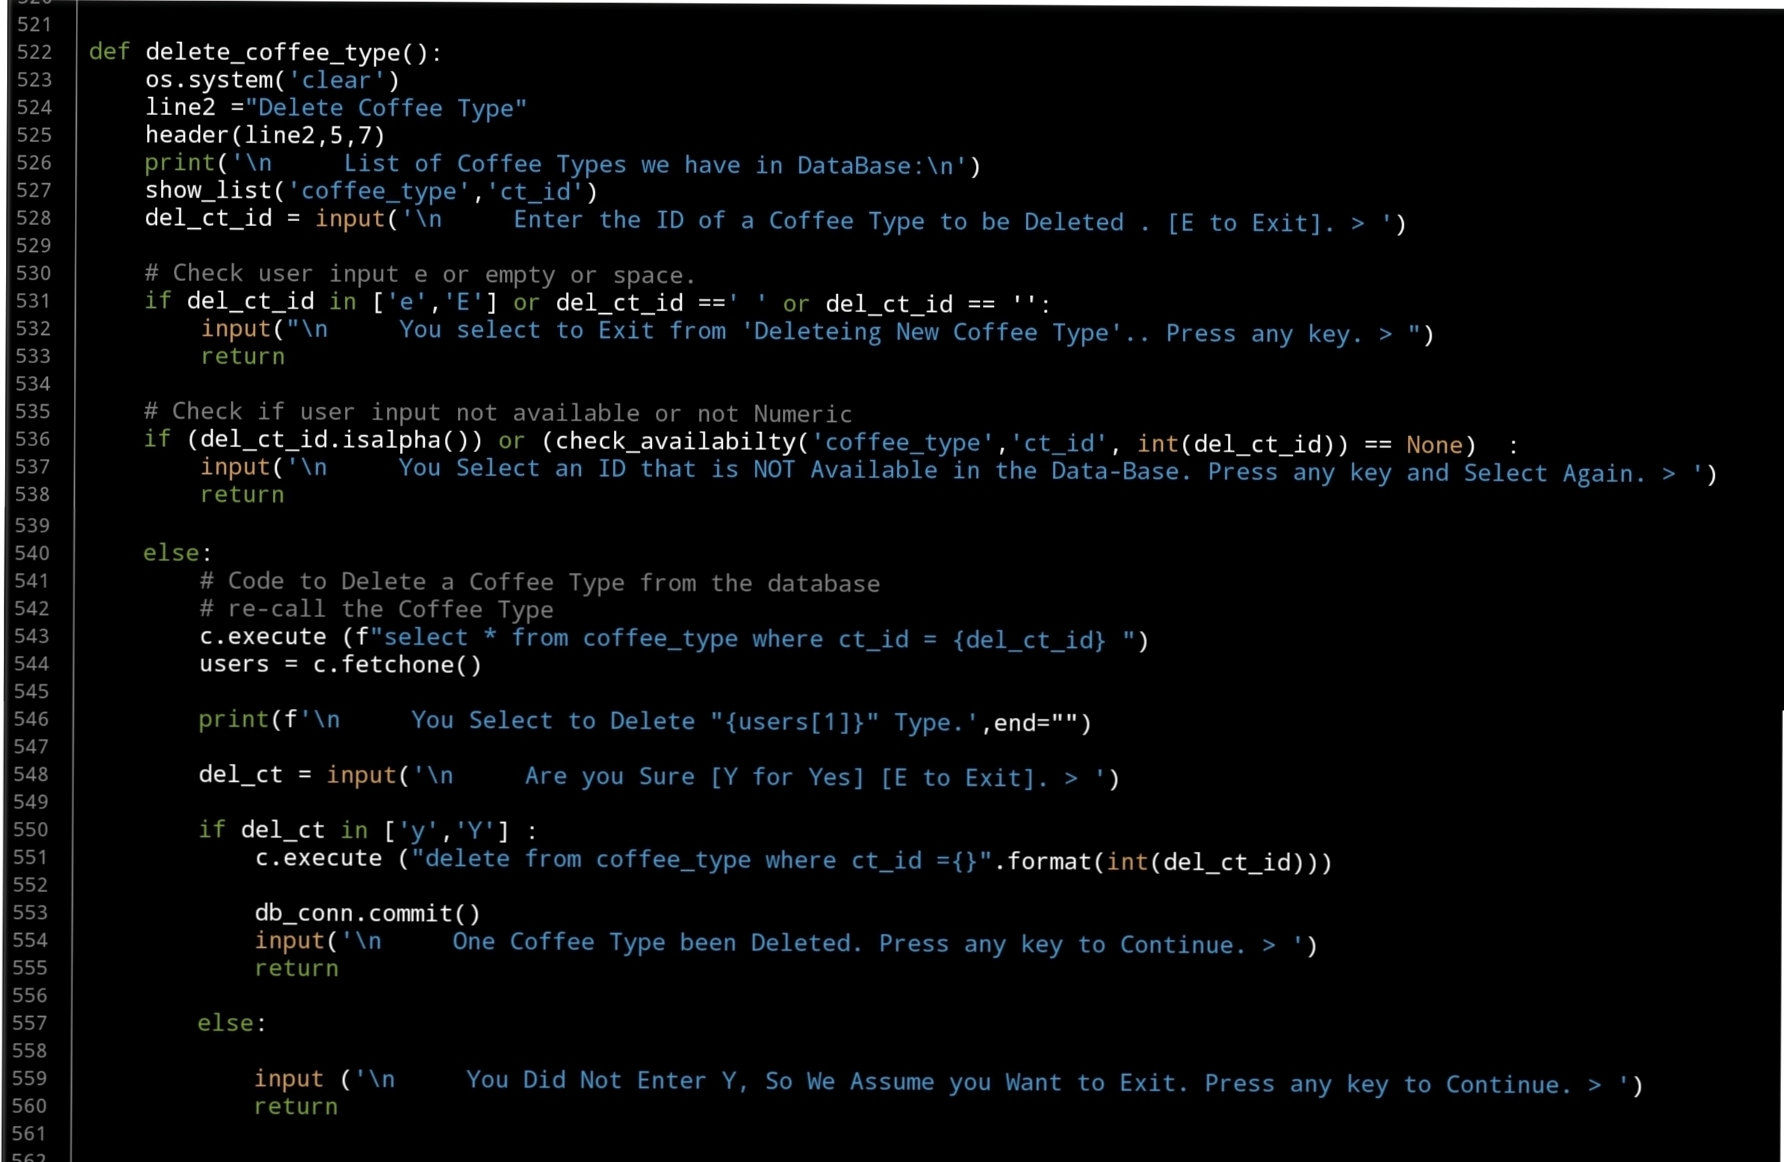
- Create Function: Delete a Coffee Type.
Beginning with adding new Coffee Type, we will ask the user to enter a new Coffee Type, then we simply added to the databasde. … Here is the Code ..
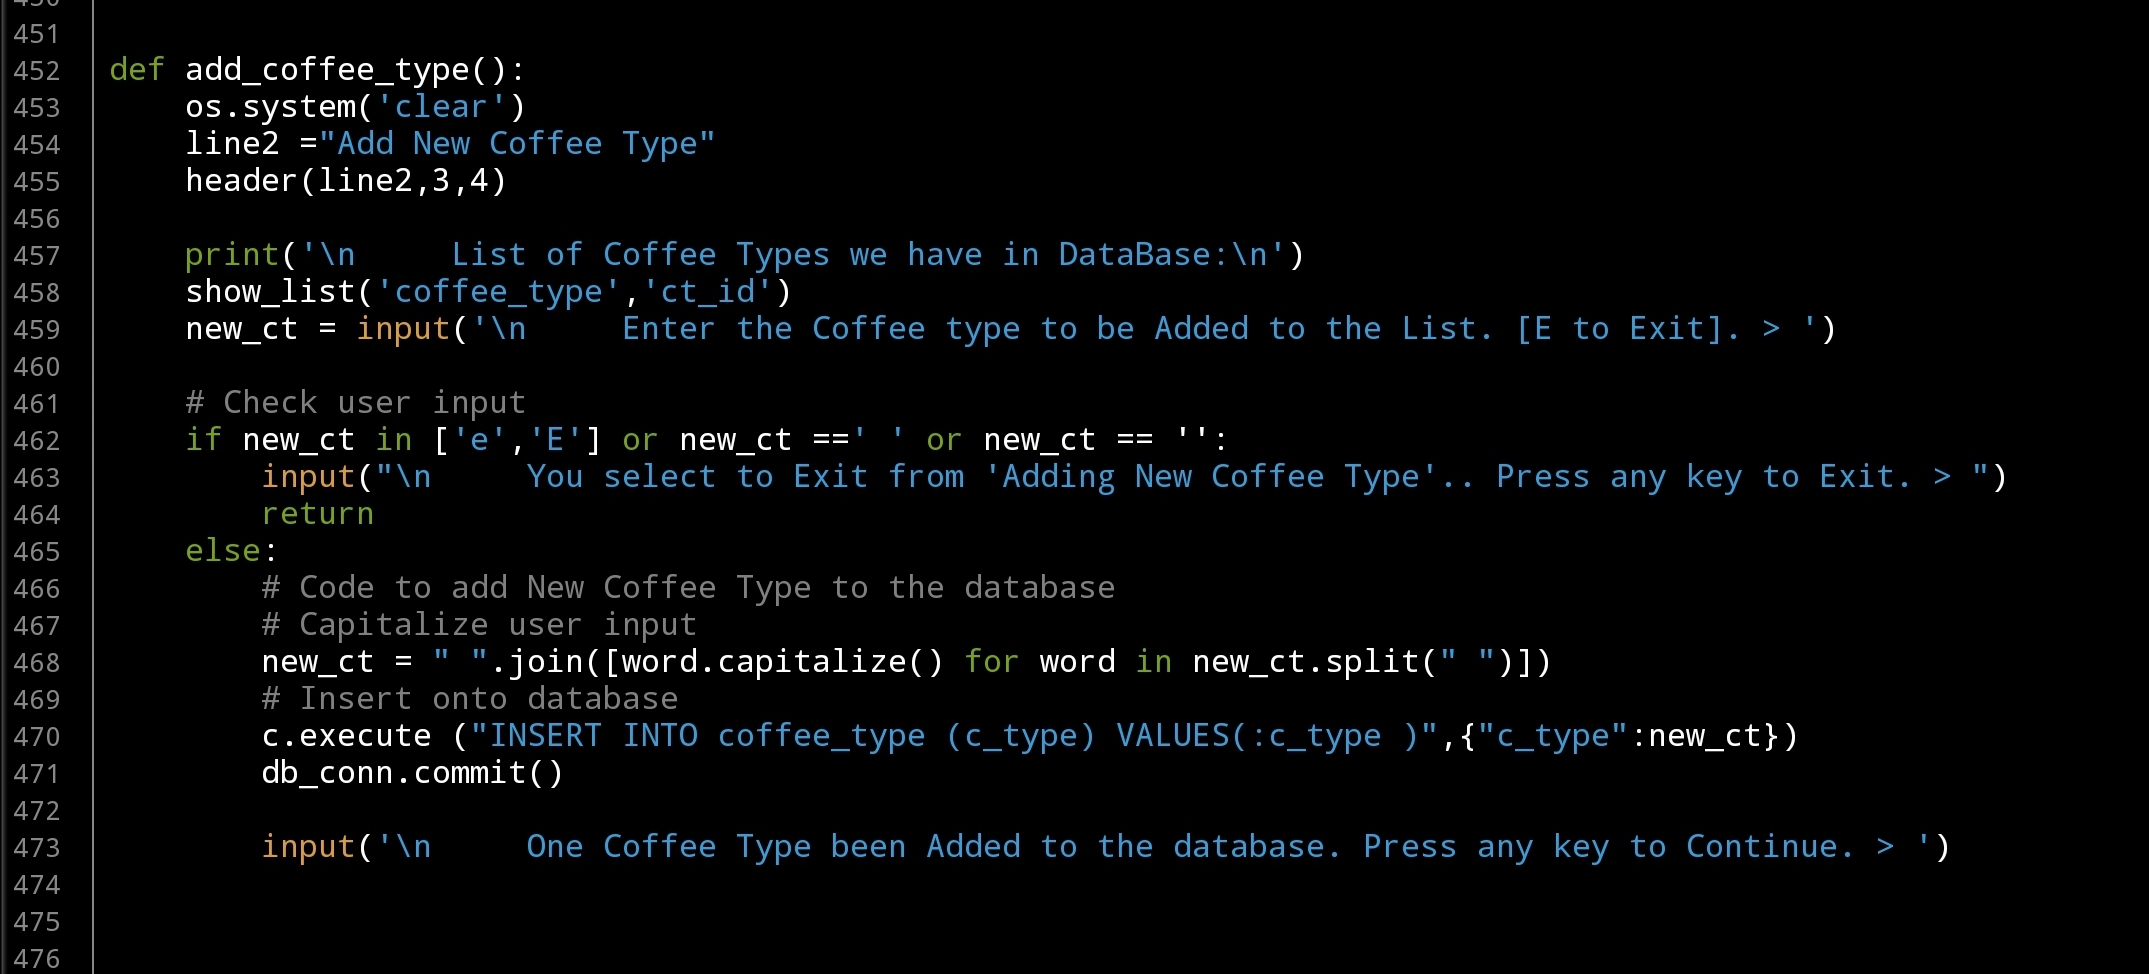 |
Tip: To Capitalize user input we are using one line code
# Capitalize user input
user_input = ” “.join([word.capitalize() for word in user_input.split(” “)])
The second Function in this part is to Edit a selected Coffee Type, so we will list-down all Types we have in the database, the user will select one (ID) then we will ask to enter the new one and update the database. Here is the code..
 |
Last Function in this part will be to Delete a selected Coffee Type, so again we will list all Coffee Types we have and will ask the user to select the one to be Deleted, then we execute the SQL command to Delete the record from the database… Here is the code..
 |
What’s Coming: In Part-5 we will do the Follwing:
Writing three Function to Manage the Coffee Size, Functions are: Add New Coffee Size, Edit Coffee Size and Delete a Coffee Size.
..:: Have Fun with Coding ::.. 🙂
::.Coffee Consumption Parts.::
| Part 1 | Part 2 | Part 3 | Part 4 | Part 5 |
| Part 6 | Part – | Part – | Part – | Part – |
To Download my Python code (.py) files Click-Here
By: Ali Radwani
Nikon S9900 shot – 8
Subject: Photo From Qatar using Nikon S9900
This Shot: A Photo from Qatar is a Tag i use for all photos i take for a Place or a Landmark of my country QATAR, in this photo; I was just finish shopping in a Grocery were i see this Mosque from the car parking, I use Nikon S9900 to take the shot then add the Black and white filter in my Tablet.
…Click Image to Enlarge… Camera in Hand, F: 4.5, ISO: 125, Shutter: 1/1600s Focal-Point: 11mm Camera in Hand, F: 4.5, ISO: 125, Shutter: 1/1600s Focal-Point: 11mm
|
::.. To see all my Nikon S9900 Photos Click-Here
::.. To see all my Nikon D7100 Photos Click-Here
::.. To see all my Nikon D90 Photos Click-Here
By: Ali Radwani
Taking pictures is not my main daily practices, but when i start playing with my camera, i really enjoy my self.
Thanks for visiting my Space..


